
User's Guide
Page 3
... both sides of the paper manually...59 Printing specialty documents...60 Tips on using letterhead...60 Tips on using transparencies ...61 Tips on using envelopes...61 Tips on using labels...62 Tips on using card stock...63 Printing a booklet ...63 Printing information pages...63 Printing the menu settings and network setup pages ...63 Printing the print quality test pages ...64 Setting Jam Recovery...65 Canceling a print job...65 Understanding printer menus 67 Menus on the Embedded Web Server...67 Using the Embedded Web Server...68 Installing...
... both sides of the paper manually...59 Printing specialty documents...60 Tips on using letterhead...60 Tips on using transparencies ...61 Tips on using envelopes...61 Tips on using labels...62 Tips on using card stock...63 Printing a booklet ...63 Printing information pages...63 Printing the menu settings and network setup pages ...63 Printing the print quality test pages ...64 Setting Jam Recovery...65 Canceling a print job...65 Understanding printer menus 67 Menus on the Embedded Web Server...67 Using the Embedded Web Server...68 Installing...
User's Guide
Page 5
...107 Administrative support 108 Adjusting Power Saver...108 Restoring the factory default settings...108 Checking the device status...109 Viewing reports...109 Restricting access to printer menus...110 Setting up e-mail alerts...110 Configuring supply notifications...111 Copying printer settings to other printers...111 Clearing jams 113 Avoiding jams...113 Accessing jam areas...114 Understanding jam lights and access locations...114 Clearing jams behind the photoconductor kit and toner cartridge 118 Clearing jams from the standard exit bin...120 Clearing jams from Tray 1...120 Clearing jams...
...107 Administrative support 108 Adjusting Power Saver...108 Restoring the factory default settings...108 Checking the device status...109 Viewing reports...109 Restricting access to printer menus...110 Setting up e-mail alerts...110 Configuring supply notifications...111 Copying printer settings to other printers...111 Clearing jams 113 Avoiding jams...113 Accessing jam areas...114 Understanding jam lights and access locations...114 Clearing jams behind the photoconductor kit and toner cartridge 118 Clearing jams from the standard exit bin...120 Clearing jams from Tray 1...120 Clearing jams...
User's Guide
Page 8
... Setup information on the Lexmark Web site at www.lexmark.com. Follow the set of instructions for using the software. Learning about the printer 8 Monday-Friday (8:00 AM-11:00 PM ET) Visit our Web site at www.lexmark.com. 3 Select your printer. 6 Complete the form, and then click Submit Request. Visit our Web site at www.lexmark.com. network, or wireless, depending on what you need...
... Setup information on the Lexmark Web site at www.lexmark.com. Follow the set of instructions for using the software. Learning about the printer 8 Monday-Friday (8:00 AM-11:00 PM ET) Visit our Web site at www.lexmark.com. 3 Select your printer. 6 Complete the form, and then click Submit Request. Visit our Web site at www.lexmark.com. network, or wireless, depending on what you need...
User's Guide
Page 58
... Finishing menu, do not know the IP address of the printer have automatic duplex / 2-sided printing and other models have manual duplex / 2-sided printing. Printer models and printing on a network, then type the printer IP address into the address field of the paper automatically If your printer is connected to print two-sided pages for every print job, or for most print jobs, then select Duplex in the Print dialog: 1 With a document open, choose File > Print. 2 Select a Paper Source option, and then choose the tray loaded with the printer software...
... Finishing menu, do not know the IP address of the printer have automatic duplex / 2-sided printing and other models have manual duplex / 2-sided printing. Printer models and printing on a network, then type the printer IP address into the address field of the paper automatically If your printer is connected to print two-sided pages for every print job, or for most print jobs, then select Duplex in the Print dialog: 1 With a document open, choose File > Print. 2 Select a Paper Source option, and then choose the tray loaded with the printer software...
User's Guide
Page 70
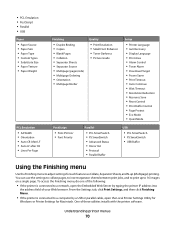
...; Duplex Binding • Copies • Blank Pages • Collation • Separator Sheets • Separator Source • Multipage (pages/side) • Multipage Ordering • Orientation • Multipage Border Quality • Print Resolution • Small Font Enhancer • Toner Darkness • Picture Grade Setup • Printer Language • Jam Recovery • Display Language • Print Area • Alarm Control • Toner Alarm • Download Target • Power Saver • Print Timeout • Auto Continue...
...; Duplex Binding • Copies • Blank Pages • Collation • Separator Sheets • Separator Source • Multipage (pages/side) • Multipage Ordering • Orientation • Multipage Border Quality • Print Resolution • Small Font Enhancer • Toner Darkness • Picture Grade Setup • Printer Language • Jam Recovery • Display Language • Print Area • Alarm Control • Toner Alarm • Download Target • Power Saver • Print Timeout • Auto Continue...
User's Guide
Page 79
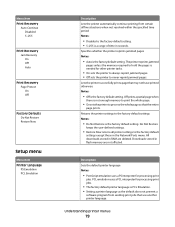
...; Setting a printer language as the default does not prevent a software program from certain offline situations when not resolved within the specified time period Notes: • Disabled is the factory default setting. • 5-255 is needed for other printer tasks. • On sets the printer to always reprint jammed pages. • Off sets the printer to the factory default settings except those in seconds. Specifies whether the printer reprints jammed pages Notes: • Auto is not enough memory...
...; Setting a printer language as the default does not prevent a software program from certain offline situations when not resolved within the specified time period Notes: • Disabled is the factory default setting. • 5-255 is needed for other printer tasks. • On sets the printer to always reprint jammed pages. • Off sets the printer to the factory default settings except those in seconds. Specifies whether the printer reprints jammed pages Notes: • Auto is not enough memory...
User's Guide
Page 86
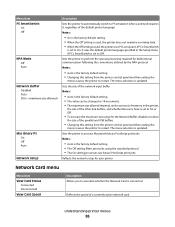
... size range for the Network Buffer, disable or reduce the size of the parallel and USB buffers. • Changing this setting from the printer control panel and then exiting the menus causes the printer to restart. Reflects the network setup for your printer Network Card menu Menu item View Card Status Connected Disconnected View Card Speed Description Allows you to process Macintosh binary PostScript print jobs Notes: • Auto is the factory default setting. • The Off setting filters print jobs using...
... size range for the Network Buffer, disable or reduce the size of the parallel and USB buffers. • Changing this setting from the printer control panel and then exiting the menus causes the printer to restart. Reflects the network setup for your printer Network Card menu Menu item View Card Status Connected Disconnected View Card Speed Description Allows you to process Macintosh binary PostScript print jobs Notes: • Auto is the factory default setting. • The Off setting filters print jobs using...
User's Guide
Page 90
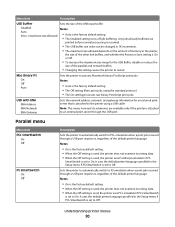
... USB port. Any jobs already buffered are printed before normal processing is resumed. • The USB buffer size value can be changed in 1K increments. • The maximum size allowed depends on the amount of memory in the Setup menu if PCL SmartSwitch is the factory default setting. • The Disabled setting turns off job buffering. Mac Binary PS On Off Auto Sets the printer to process Macintosh binary PostScript print jobs Notes: • Auto...
... USB port. Any jobs already buffered are printed before normal processing is resumed. • The USB buffer size value can be changed in 1K increments. • The maximum size allowed depends on the amount of memory in the Setup menu if PCL SmartSwitch is the factory default setting. • The Disabled setting turns off job buffering. Mac Binary PS On Off Auto Sets the printer to process Macintosh binary PostScript print jobs Notes: • Auto...
User's Guide
Page 94
... message to clear. Remove paper from standard output bin Remove the stack of the following : • Load the tray or other source with Try one or more of paper from the standard exit bin. Load manual feeder with the correct paper type and size. • Cancel the current job. Not Ready Press and release either or to return to receive print jobs. Warning-Potential Damage: Do not turn the printer power...
... message to clear. Remove paper from standard output bin Remove the stack of the following : • Load the tray or other source with Try one or more of paper from the standard exit bin. Load manual feeder with the correct paper type and size. • Cancel the current job. Not Ready Press and release either or to return to receive print jobs. Warning-Potential Damage: Do not turn the printer power...
User's Guide
Page 95
...; Remove the toner cartridge, and then install a new one. 32.yy Cartridge part number unsupported by device Remove the toner cartridge, and then install a supported one. 34 Short paper Try one or more of the following : • Load the appropriate paper in the tray. • Press to clear the message and print the job using a different paper tray. • Check tray length and width guides and make sure the paper is properly loaded in the tray. • Check the Print Properties or Print Dialog settings...
...; Remove the toner cartridge, and then install a new one. 32.yy Cartridge part number unsupported by device Remove the toner cartridge, and then install a supported one. 34 Short paper Try one or more of the following : • Load the appropriate paper in the tray. • Press to clear the message and print the job using a different paper tray. • Check tray length and width guides and make sure the paper is properly loaded in the tray. • Check the Print Properties or Print Dialog settings...

User's Guide
Page 101
...-6275 for information about Lexmark authorized supplies dealers in the U.S., contact Lexmark at www.lexmark.comor contact the place where you may be able to extend the life of the toner cartridge: 1 Remove the toner cartridge. 2 Firmly shake the cartridge side-to-side and front-to-back several times to redistribute toner. 3 Reinsert the cartridge and continue printing. or A4-size plain paper. The part numbers are as follows.
...-6275 for information about Lexmark authorized supplies dealers in the U.S., contact Lexmark at www.lexmark.comor contact the place where you may be able to extend the life of the toner cartridge: 1 Remove the toner cartridge. 2 Firmly shake the cartridge side-to-side and front-to-back several times to redistribute toner. 3 Reinsert the cartridge and continue printing. or A4-size plain paper. The part numbers are as follows.
User's Guide
Page 126
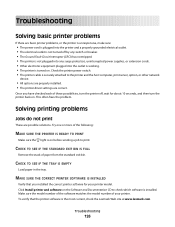
... sending a job to the printer and the host computer, print server, option, or other network device. • All options are properly installed. • The printer driver settings are correct. Troubleshooting 126 CHECK TO SEE IF THE TRAY IS EMPTY Load paper in the tray. Make sure the model number of the software matches the model number of these possibilities, turn the printer back on . Troubleshooting Solving basic printer problems If there are possible solutions. Check the printer power switch. • The printer cable...
... sending a job to the printer and the host computer, print server, option, or other network device. • All options are properly installed. • The printer driver settings are correct. Troubleshooting 126 CHECK TO SEE IF THE TRAY IS EMPTY Load paper in the tray. Make sure the model number of the software matches the model number of these possibilities, turn the printer back on . Troubleshooting Solving basic printer problems If there are possible solutions. Check the printer power switch. • The printer cable...
User's Guide
Page 127
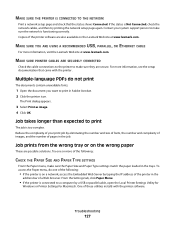
... Paper Menu • If the printer is too complex. MAKE SURE YOU ARE USING A RECOMMENDED USB, PARALLEL, OR ETHERNET CABLE For more of a Web browser. Reduce the complexity of your system support person to make sure the Paper Size and Paper Type settings match the paper loaded in the address bar of the following : • If the printer is Not Connected, check the network cables, and then try printing the network setup page again. MAKE SURE PRINTER CABLES ARE SECURELY CONNECTED Check...
... Paper Menu • If the printer is too complex. MAKE SURE YOU ARE USING A RECOMMENDED USB, PARALLEL, OR ETHERNET CABLE For more of a Web browser. Reduce the complexity of your system support person to make sure the Paper Size and Paper Type settings match the paper loaded in the address bar of the following : • If the printer is Not Connected, check the network cables, and then try printing the network setup page again. MAKE SURE PRINTER CABLES ARE SECURELY CONNECTED Check...
User's Guide
Page 128
... menu. Troubleshooting 128 To exit Hex Trace mode, turn the printer off and back on a network, access the Embedded Web Server by a USB or parallel cable, open the Local Printer Settings Utility for Windows or Printer Settings for Macintosh. Note: Clearing the Collate check box overrides the setting in a Macintosh operating system. To access the Finishing menu, do not collate These are possible solutions. Make sure the "Page layout" setting for Paper size, Paper tray, and Paper type correspond with the printer software. CHECK THE PAPER...
... menu. Troubleshooting 128 To exit Hex Trace mode, turn the printer off and back on a network, access the Embedded Web Server by a USB or parallel cable, open the Local Printer Settings Utility for Windows or Printer Settings for Macintosh. Note: Clearing the Collate check box overrides the setting in a Macintosh operating system. To access the Finishing menu, do not collate These are possible solutions. Make sure the "Page layout" setting for Paper size, Paper tray, and Paper type correspond with the printer software. CHECK THE PAPER...
User's Guide
Page 131
... problems Print the print quality test pages to isolate print quality problems. 1 Turn the printer off, and then open the Local Printer Settings Utility for Windows or Printer Settings for print quality test pages, as indicated on the printer settings configuration sheet. 6 Press and hold while turning the printer on a network, access the Embedded Web Server: 1 Type the printer IP address into the address field of the following topics may have a printer part that requires adjustment or replacement. On - Page that jammed does not reprint after the jam is cleared Jam...
... problems Print the print quality test pages to isolate print quality problems. 1 Turn the printer off, and then open the Local Printer Settings Utility for Windows or Printer Settings for print quality test pages, as indicated on the printer settings configuration sheet. 6 Press and hold while turning the printer on a network, access the Embedded Web Server: 1 Type the printer IP address into the address field of the following topics may have a printer part that requires adjustment or replacement. On - Page that jammed does not reprint after the jam is cleared Jam...

User's Guide
Page 139
... front cover of paper or specialty media loaded in the tray or feeder. • Make sure the Paper Texture setting is loaded in the tray or feeder. THERE MAY BE EXCESS TONER IN THE PAPER PATH Contact Customer Support. In the U.S. Solid black or white streaks appear on the menu settings page. CHECK THE PAPER TYPE • Try a different type of paper. • For transparencies, use only ones recommended by the printer manufacturer. • Make sure the Paper Type setting...
... front cover of paper or specialty media loaded in the tray or feeder. • Make sure the Paper Texture setting is loaded in the tray or feeder. THERE MAY BE EXCESS TONER IN THE PAPER PATH Contact Customer Support. In the U.S. Solid black or white streaks appear on the menu settings page. CHECK THE PAPER TYPE • Try a different type of paper. • For transparencies, use only ones recommended by the printer manufacturer. • Make sure the Paper Type setting...
User's Guide
Page 148
... durability or longevity of prints produced by any maintenance items included with Lexmark user's guides, manuals, instructions or guidance -Unsuitable physical or operating environment -Maintenance by anyone other than Lexmark or a Lexmark authorized servicer -Operation of a product beyond repair, or if the product is not free of failures caused by: -Modification or unauthorized attachments -Accidents, misuse, abuse or use inconsistent with the printer shall end earlier if...
... durability or longevity of prints produced by any maintenance items included with Lexmark user's guides, manuals, instructions or guidance -Unsuitable physical or operating environment -Maintenance by anyone other than Lexmark or a Lexmark authorized servicer -Operation of a product beyond repair, or if the product is not free of failures caused by: -Modification or unauthorized attachments -Accidents, misuse, abuse or use inconsistent with the printer shall end earlier if...

User's Guide
Page 153
... sides of paper (duplexing) printing manually 59 Busy 93 C cables Ethernet 18 parallel 18 USB 18 calling Customer Support 139 Canceling 93 canceling a job from the printer control panel 65 canceling a print job from Macintosh 65 from Windows 65 card stock tips 63 checking an unresponsive printer 126 checking device status on Embedded Web Server 109 checking virtual display on Embedded Web Server 93 cleaning exterior of the printer 99 Close front door 93 collate setting Finishing menu 70 configurations printer 9 configuring multiple printers 111 configuring...
... sides of paper (duplexing) printing manually 59 Busy 93 C cables Ethernet 18 parallel 18 USB 18 calling Customer Support 139 Canceling 93 canceling a job from the printer control panel 65 canceling a print job from Macintosh 65 from Windows 65 card stock tips 63 checking an unresponsive printer 126 checking device status on Embedded Web Server 109 checking virtual display on Embedded Web Server 93 cleaning exterior of the printer 99 Close front door 93 collate setting Finishing menu 70 configurations printer 9 configuring multiple printers 111 configuring...
User's Guide
Page 155
... 94 Load manual feeder with 94 Not Ready 94 Power Saver 94 Programming Engine Code 94 Programming System Code 94 Ready 94 Remove paper from standard output bin 94 Restoring Factory Defaults 94 Waiting 95 printer options troubleshooting drawers 129 memory card 130 option not working 129 printer problems, solving basic 126 printer settings configuration sheet printing 38 printer status not ready 94 printing booklet 63 duplex (2-sided) 58, 59 duplex, manual 59 from Macintosh 57 from Windows 57 installing printer software 19 menu settings page 63 network setup page...
... 94 Load manual feeder with 94 Not Ready 94 Power Saver 94 Programming Engine Code 94 Programming System Code 94 Ready 94 Remove paper from standard output bin 94 Restoring Factory Defaults 94 Waiting 95 printer options troubleshooting drawers 129 memory card 130 option not working 129 printer problems, solving basic 126 printer settings configuration sheet printing 38 printer status not ready 94 printing booklet 63 duplex (2-sided) 58, 59 duplex, manual 59 from Macintosh 57 from Windows 57 installing printer software 19 menu settings page 63 network setup page...
User's Guide
Page 156
... Remove paper from standard output bin 94 replacing photoconductor kit 104 toner cartridge 102 reports viewing 109 reprint page after paper jam 65 Restoring Factory Defaults 94 S safeguarding menus 110 safety information 7 security protecting menus 110 separator sheet setting Finishing menu 70 setting paper size 40 paper type 40 TCP/IP address 87 Universal Paper Size 40 Setup menu 79 shipping the printer 107 Size/Type menu 71 standard 250-sheet tray loading 41 standard exit bin, using 47 status of supplies, checking 100 storing paper...
... Remove paper from standard output bin 94 replacing photoconductor kit 104 toner cartridge 102 reports viewing 109 reprint page after paper jam 65 Restoring Factory Defaults 94 S safeguarding menus 110 safety information 7 security protecting menus 110 separator sheet setting Finishing menu 70 setting paper size 40 paper type 40 TCP/IP address 87 Universal Paper Size 40 Setup menu 79 shipping the printer 107 Size/Type menu 71 standard 250-sheet tray loading 41 standard exit bin, using 47 status of supplies, checking 100 storing paper...


