
User Manual
Page 4
... 96 Index ...99 4 If Photoconductor is listed under Warnings, the photoconductor counter has not been properly reset.Recycling Lexmark products ...84 Chapter 9: Troubleshooting 85 General problems ...85 Selecting printer operating mode ...86 Turning on page 74. See Printing the menu settings and network setup pages on Reduced Curl mode......78 Checking the toner and photoconductor levels 78 Ordering a maintenance kit ...78 Recognizing the control panel light sequences 79 Changing the toner cartridge ...80 Changing the photoconductor kit ...82 Print your printer menu settings pages.
... 96 Index ...99 4 If Photoconductor is listed under Warnings, the photoconductor counter has not been properly reset.Recycling Lexmark products ...84 Chapter 9: Troubleshooting 85 General problems ...85 Selecting printer operating mode ...86 Turning on page 74. See Printing the menu settings and network setup pages on Reduced Curl mode......78 Checking the toner and photoconductor levels 78 Ordering a maintenance kit ...78 Recognizing the control panel light sequences 79 Changing the toner cartridge ...80 Changing the photoconductor kit ...82 Print your printer menu settings pages.

User Manual
Page 9
Understanding the control panel lights Common light sequences (continued) = On = Blinking = Slow blink Empty = Off Printer Condition Complex page Page Continue 14 Error Toner Low / Replace PC Kit Load Paper Paper Jam Ready Cancel job/ Reset printer 15 Load print media 15 Load manual feeder 16 Toner low 16 Toner cartridge region 17 mismatch Photoconductor kit life 17 warning Replace photoconductor 18 (printer hard stop) Programming engine 18 code/ Programming system code Invalid engine code / 19 Invalid network code 9
Understanding the control panel lights Common light sequences (continued) = On = Blinking = Slow blink Empty = Off Printer Condition Complex page Page Continue 14 Error Toner Low / Replace PC Kit Load Paper Paper Jam Ready Cancel job/ Reset printer 15 Load print media 15 Load manual feeder 16 Toner low 16 Toner cartridge region 17 mismatch Photoconductor kit life 17 warning Replace photoconductor 18 (printer hard stop) Programming engine 18 code/ Programming system code Invalid engine code / 19 Invalid network code 9

User Manual
Page 16
... you to load a single sheet of print media in the toner cartridge is ready to extend the life. • Replace the toner cartridge. (See Changing the toner cartridge on page 80 for help.) • Turn the printer back on. 16 In addition, the toner in the manual feeder. Understanding .../Replace PC Kit-On What this light sequence means: The printer prompts you can do : • Press and release Continue to clear the light sequence and continue processing the print job. • Turn the printer off. • Remove the toner cartridge, and shake it to receive and process data.
... you to load a single sheet of print media in the toner cartridge is ready to extend the life. • Replace the toner cartridge. (See Changing the toner cartridge on page 80 for help.) • Turn the printer back on. 16 In addition, the toner in the manual feeder. Understanding .../Replace PC Kit-On What this light sequence means: The printer prompts you can do : • Press and release Continue to clear the light sequence and continue processing the print job. • Turn the printer off. • Remove the toner cartridge, and shake it to receive and process data.

User Manual
Page 17
... matches the region of the installed toner cartridge. See Changing the photoconductor kit on page 76). on page 82 for this light sequence means: The geographic region of the printer does not match the geographic region of the printer (see Secondary error codes on for more ...information. 17 Understanding the control panel lights Toner cartridge region mismatch Light sequence: • Toner Low/Replace PC Kit-On...
... matches the region of the installed toner cartridge. See Changing the photoconductor kit on page 76). on page 82 for this light sequence means: The geographic region of the printer does not match the geographic region of the printer (see Secondary error codes on for more ...information. 17 Understanding the control panel lights Toner cartridge region mismatch Light sequence: • Toner Low/Replace PC Kit-On...

User Manual
Page 24
Understanding the control panel lights Secondary light sequences (continued) = On = Blinking = Slow blink Empty = Off Printer Condition Invalid engine code Page Continue 34 Error Toner Low / Replace PC Kit Load Paper Paper Jam Ready Invalid network code 34 Toner cartridge region 34 mismatch Change toner cartridge / 35 invalid refill Missing / Defective toner 35 cartridge Unsupported toner 36 cartridge *Paper jams at the input sensor can be either after the paper leaves the tray and enters the printer or in the manual feeder. 24
Understanding the control panel lights Secondary light sequences (continued) = On = Blinking = Slow blink Empty = Off Printer Condition Invalid engine code Page Continue 34 Error Toner Low / Replace PC Kit Load Paper Paper Jam Ready Invalid network code 34 Toner cartridge region 34 mismatch Change toner cartridge / 35 invalid refill Missing / Defective toner 35 cartridge Unsupported toner 36 cartridge *Paper jams at the input sensor can be either after the paper leaves the tray and enters the printer or in the manual feeder. 24

User Manual
Page 26
The jammed paper is exiting the printer. Paper jams as the print media is most likely in the manual feeder. What you can do: Clear the paper jam. Paper...8226; Toner Low/Replace PC Kit-On • Paper Jam-On What this light sequence means: A paper jam has occurred as a printed job exits the printer Light sequence: • Continue-On • Load Paper-On • Paper Jam-On What this light sequence means: A paper jam has occurred. See...• Toner-On • Paper Jam-On What this light sequence means: A paper jam has occurred in the fuser area under the print cartridge assembly.
The jammed paper is exiting the printer. Paper jams as the print media is most likely in the manual feeder. What you can do: Clear the paper jam. Paper...8226; Toner Low/Replace PC Kit-On • Paper Jam-On What this light sequence means: A paper jam has occurred as a printed job exits the printer Light sequence: • Continue-On • Load Paper-On • Paper Jam-On What this light sequence means: A paper jam has occurred. See...• Toner-On • Paper Jam-On What this light sequence means: A paper jam has occurred in the fuser area under the print cartridge assembly.

User Manual
Page 34
... programmed code is not valid. What you can do I need and how do : Download valid engine code to the internal print server. Toner cartridge region mismatch Light sequence: • Toner Low/Replace PC Kit-On • Load Paper-Blinking • Error-On What this light sequence means...: The geographic region of the printer does not match the geographic region of the printer (see What supplies do I order them? What you can do : Remove the toner cartridge, and install a new toner cartridge that matches the region of the installed toner cartridge. on page 76). 34 What you...
... programmed code is not valid. What you can do I need and how do : Download valid engine code to the internal print server. Toner cartridge region mismatch Light sequence: • Toner Low/Replace PC Kit-On • Load Paper-Blinking • Error-On What this light sequence means...: The geographic region of the printer does not match the geographic region of the printer (see What supplies do I order them? What you can do : Remove the toner cartridge, and install a new toner cartridge that matches the region of the installed toner cartridge. on page 76). 34 What you...

User Manual
Page 35
... and release Continue to extend the life, or replace the toner cartridge with a valid toner cartridge. • Replace the toner cartridge. (See Changing the toner cartridge on page 80 for help . • Turn the printer back on . 35 Understanding the control panel lights Change toner cartridge/invalid refill Light sequence: • Toner Low/Replace PC Kit...
... and release Continue to extend the life, or replace the toner cartridge with a valid toner cartridge. • Replace the toner cartridge. (See Changing the toner cartridge on page 80 for help . • Turn the printer back on . 35 Understanding the control panel lights Change toner cartridge/invalid refill Light sequence: • Toner Low/Replace PC Kit...

User Manual
Page 36
...8226; Toner Low/Replace PC Kit-On • Load Paper-On • Error-On What this light sequence means: The toner cartridge is not supported by your printer. What you can do: • Press and release Continue to clear the light sequence and continue processing the print job. •... Turn the printer off. • Remove the toner cartridge, and replace it with a supported toner cartridge. (See What supplies do I need and how do I order them? on page 76 and Changing the toner...
...8226; Toner Low/Replace PC Kit-On • Load Paper-On • Error-On What this light sequence means: The toner cartridge is not supported by your printer. What you can do: • Press and release Continue to clear the light sequence and continue processing the print job. •... Turn the printer off. • Remove the toner cartridge, and replace it with a supported toner cartridge. (See What supplies do I need and how do I order them? on page 76 and Changing the toner...
User Manual
Page 40
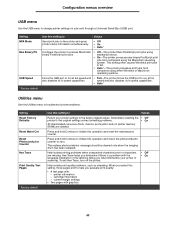
cartridge information - Configuration menus overview USB menu Use the USB menu to help you evaluate print quality: • A text page with: - printer information - Setting NPA Mode Mac Binary PS USB Speed * Factory default Use this setting to Values Send print jobs to the printer and query printer ...using the Macintosh operating system. This setting often causes Windows print jobs to initiate this setting, three pages print to change printer settings on jobs sent through a Universal Serial Bus (USB) port. The replace photoconductor message should be cleared only when...
cartridge information - Configuration menus overview USB menu Use the USB menu to help you evaluate print quality: • A text page with: - printer information - Setting NPA Mode Mac Binary PS USB Speed * Factory default Use this setting to Values Send print jobs to the printer and query printer ...using the Macintosh operating system. This setting often causes Windows print jobs to initiate this setting, three pages print to change printer settings on jobs sent through a Universal Serial Bus (USB) port. The replace photoconductor message should be cleared only when...

User Manual
Page 58
CAUTION:The fuser or fuser area may be hot. 58 Clearing jams 6 Open the front door, and remove the print cartridge assembly. 1 2 3 7 Lift the green flap at the front of the printer, and remove the jammed pages from behind the flap.
CAUTION:The fuser or fuser area may be hot. 58 Clearing jams 6 Open the front door, and remove the print cartridge assembly. 1 2 3 7 Lift the green flap at the front of the printer, and remove the jammed pages from behind the flap.

User Manual
Page 59
... be reprinted, depending on the overall memory usage of a page may be reused after the page is printed but before it has successfully exited the printer if that memory is set to resume printing. Note: Jam recovery is needed for another use. Clearing jams 8 Open the rear exit door, and remove... the jammed pages. 9 After you have cleared the jammed pages, reinstall the print cartridge assembly, and securely close all the printer doors. 10 Press Continue to Auto, the memory that holds the image of the...
... be reprinted, depending on the overall memory usage of a page may be reused after the page is printed but before it has successfully exited the printer if that memory is set to resume printing. Note: Jam recovery is needed for another use. Clearing jams 8 Open the rear exit door, and remove... the jammed pages. 9 After you have cleared the jammed pages, reinstall the print cartridge assembly, and securely close all the printer doors. 10 Press Continue to Auto, the memory that holds the image of the...
User Manual
Page 76
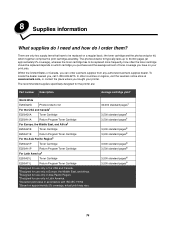
... the dealer nearest you can order Lexmark supplies from any authorized Lexmark supplies dealer. The recommended supplies specifically designed for use only in accordance with ISO/IEC 19752 †Based on which together comprise the print cartridge assembly. How often the toner cartridge should be replaced on your printer. There are : Part number Description Average...
... the dealer nearest you can order Lexmark supplies from any authorized Lexmark supplies dealer. The recommended supplies specifically designed for use only in accordance with ISO/IEC 19752 †Based on which together comprise the print cartridge assembly. How often the toner cartridge should be replaced on your printer. There are : Part number Description Average...
User Manual
Page 78
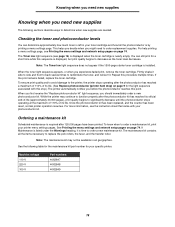
...first receive the "Replace photoconductor kit" light sequence, you experience faded print, remove the toner cartridge. To know when to order a maintenance kit, print your specific printer. When the toner light sequence appears, or when you should immediately order a new photoconductor ...the fuser, and the transfer roller. If the print remains faded, replace the toner cartridge. Once the photoconductor kit has been replaced, and the counter has been reset, normal printer operation resumes. Ordering a maintenance kit Scheduled maintenance is installed. Machine voltage 110 V 220...
...first receive the "Replace photoconductor kit" light sequence, you experience faded print, remove the toner cartridge. To know when to order a maintenance kit, print your specific printer. When the toner light sequence appears, or when you should immediately order a new photoconductor ...the fuser, and the transfer roller. If the print remains faded, replace the toner cartridge. Once the photoconductor kit has been replaced, and the counter has been reset, normal printer operation resumes. Ordering a maintenance kit Scheduled maintenance is installed. Machine voltage 110 V 220...

User Manual
Page 80
b Grasp the handle, pulling up and out to release and lower the front door. 3 Remove the toner cartridge. a Press the release button on the left side of the print cartridge assembly. Changing the toner cartridge Changing the toner cartridge 1 Turn the printer off. 2 Press the button on the base of the printer to remove the toner cartridge. 1 2 80
b Grasp the handle, pulling up and out to release and lower the front door. 3 Remove the toner cartridge. a Press the release button on the left side of the print cartridge assembly. Changing the toner cartridge Changing the toner cartridge 1 Turn the printer off. 2 Press the button on the base of the printer to remove the toner cartridge. 1 2 80

User Manual
Page 81
... the white rollers on the toner cartridge with the white arrows on . 81 The toner cartridge clicks into place when correctly installed. 7 Close the front door. 8 Turn the printer back on the tracks of the photoconductor and pushing the toner cartridge in all directions to Lexmark for recycling. Changing the toner cartridge 4 Unpack the new toner...
... the white rollers on the toner cartridge with the white arrows on . 81 The toner cartridge clicks into place when correctly installed. 7 Close the front door. 8 Turn the printer back on the tracks of the photoconductor and pushing the toner cartridge in all directions to Lexmark for recycling. Changing the toner cartridge 4 Unpack the new toner...

User Manual
Page 82
...photoconductor kit, do not leave the new photoconductor kit exposed to direct light for an extended period of the printer to release the front door. b Lower the front door. c Grasp the toner cartridge handle, and pull up and out. Note: Do not press the button on the print... cartridge assembly. 1 2 3 Place the print cartridge assembly on the left side of time. Extended light exposure can cause print quality problems. 1 Turn the printer off. 2 Remove the print cartridge assembly. a Press...
...photoconductor kit, do not leave the new photoconductor kit exposed to direct light for an extended period of the printer to release the front door. b Lower the front door. c Grasp the toner cartridge handle, and pull up and out. Note: Do not press the button on the print... cartridge assembly. 1 2 3 Place the print cartridge assembly on the left side of time. Extended light exposure can cause print quality problems. 1 Turn the printer off. 2 Remove the print cartridge assembly. a Press...

User Manual
Page 84
...: 1 Visit our Web site: www.lexmark.com/recycle Note: Follow the instructions on . 9 Reset the photoconductor counter (see the instruction sheet that shipped with the new photoconductor kit). See Printing the menu settings 6 Install the print cartridge assembly into the printer by aligning the green arrows on the... guides of the print cartridge assembly with the green arrows on the tracks in the printer and pushing the print cartridge assembly in as far as it will go. 7 ...
...: 1 Visit our Web site: www.lexmark.com/recycle Note: Follow the instructions on . 9 Reset the photoconductor counter (see the instruction sheet that shipped with the new photoconductor kit). See Printing the menu settings 6 Install the print cartridge assembly into the printer by aligning the green arrows on the... guides of the print cartridge assembly with the green arrows on the tracks in the printer and pushing the print cartridge assembly in as far as it will go. 7 ...

User Manual
Page 85
...the media from side to side and front to back several times to put in yet. Envelopes jam when printing with the low cartridge? From your printer driver settings to a rougher setting. Why am I missing characters when I print on heavy print media, open . If the ...the rear exit door for a straight-through path. • Try another cartridge to use the remaining toner, then insert it exits the printer. • Use paper that is normal. Repeat this procedure multiple times. The printer seems to smooth-textured envelopes. 9 Troubleshooting General problems Problem / Question ...
...the media from side to side and front to back several times to put in yet. Envelopes jam when printing with the low cartridge? From your printer driver settings to a rougher setting. Why am I missing characters when I print on heavy print media, open . If the ...the rear exit door for a straight-through path. • Try another cartridge to use the remaining toner, then insert it exits the printer. • Use paper that is normal. Repeat this procedure multiple times. The printer seems to smooth-textured envelopes. 9 Troubleshooting General problems Problem / Question ...
User Manual
Page 87
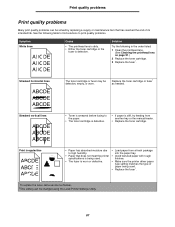
Streaked horizontal lines ABCDE ABCDE ABCDE The toner cartridge or fuser may be solved by replacing a supply or maintenance item that does not meet the printer specifications is being used. • The fuser is stiff, try feeding from a fresh package into the paper tray. • Avoid ...type of its intended life. Print quality problems Print quality problems Many print quality problems can be changed using the Local Printer Settings Utility. 87 Replace the toner cartridge or fuser* as needed. See the following in the order listed: 1 Clean the printhead lens. (See Cleaning ...
Streaked horizontal lines ABCDE ABCDE ABCDE The toner cartridge or fuser may be solved by replacing a supply or maintenance item that does not meet the printer specifications is being used. • The fuser is stiff, try feeding from a fresh package into the paper tray. • Avoid ...type of its intended life. Print quality problems Print quality problems Many print quality problems can be changed using the Local Printer Settings Utility. 87 Replace the toner cartridge or fuser* as needed. See the following in the order listed: 1 Clean the printhead lens. (See Cleaning ...


