
User Manual
Page 3
... 2: Using the control panel 7 Overview of the control panel ...7 Understanding the control panel lights ...8 Primary codes ...11 Secondary errors ...22 Chapter 3: Understanding the printer configuration menus 37 Printing the Printer Settings Configuration sheet 37 Configuration menus overview ...38 Network menu ...38 Parallel menu ...39 Setup menu ...39 USB menu ...40 Utilities menu ...40 Chapter 4: Print media tasks and tips 41 What types of the paper (duplex printing 62 Printing multiple page images on one page (N-up printing 64 Printing a booklet ...65 Printing on preventing jams...
... 2: Using the control panel 7 Overview of the control panel ...7 Understanding the control panel lights ...8 Primary codes ...11 Secondary errors ...22 Chapter 3: Understanding the printer configuration menus 37 Printing the Printer Settings Configuration sheet 37 Configuration menus overview ...38 Network menu ...38 Parallel menu ...39 Setup menu ...39 USB menu ...40 Utilities menu ...40 Chapter 4: Print media tasks and tips 41 What types of the paper (duplex printing 62 Printing multiple page images on one page (N-up printing 64 Printing a booklet ...65 Printing on preventing jams...

User Manual
Page 4
... Equipment (WEEE) directive 96 Laser notice ...96 Statement of Limited Warranty for Lexmark E250d and E250dn 96 Index ...99 4 If Photoconductor is listed under Warnings, the photoconductor counter has not been properly reset.Recycling Lexmark products ...84 Chapter 9: Troubleshooting 85 General problems ...85 Selecting printer operating mode ...86 Turning on page 74. See Printing the menu settings and network setup pages on Reduced Curl mode ...86 Print quality problems ...87 Cleaning the printhead lens ...91...
... Equipment (WEEE) directive 96 Laser notice ...96 Statement of Limited Warranty for Lexmark E250d and E250dn 96 Index ...99 4 If Photoconductor is listed under Warnings, the photoconductor counter has not been properly reset.Recycling Lexmark products ...84 Chapter 9: Troubleshooting 85 General problems ...85 Selecting printer operating mode ...86 Turning on page 74. See Printing the menu settings and network setup pages on Reduced Curl mode ...86 Print quality problems ...87 Cleaning the printhead lens ...91...

User Manual
Page 9
Understanding the control panel lights Common light sequences (continued) = On = Blinking = Slow blink Empty = Off Printer Condition Complex page Page Continue 14 Error Toner Low / Replace PC Kit Load Paper Paper Jam Ready Cancel job/ Reset printer 15 Load print media 15 Load manual feeder 16 Toner low 16 Toner cartridge region 17 mismatch Photoconductor kit life 17 warning Replace photoconductor 18 (printer hard stop) Programming engine 18 code/ Programming system code Invalid engine code / 19 Invalid network code 9
Understanding the control panel lights Common light sequences (continued) = On = Blinking = Slow blink Empty = Off Printer Condition Complex page Page Continue 14 Error Toner Low / Replace PC Kit Load Paper Paper Jam Ready Cancel job/ Reset printer 15 Load print media 15 Load manual feeder 16 Toner low 16 Toner cartridge region 17 mismatch Photoconductor kit life 17 warning Replace photoconductor 18 (printer hard stop) Programming engine 18 code/ Programming system code Invalid engine code / 19 Invalid network code 9

User Manual
Page 11
... release Cancel to stop processing. - The Ready light is displayed as the pages print. What you can do : • Busy: - Press and hold Cancel to clear. - Wait for the message to reset the printer. • Printing a directory, a font list, menu settings pages, or Print Quality Test Pages: - Press and release Cancel to cancel the print job. - Press and hold Cancel to clear. - Understanding the control panel lights Primary codes Ready / Power Saver Light sequence: • Ready...
... release Cancel to stop processing. - The Ready light is displayed as the pages print. What you can do : • Busy: - Press and hold Cancel to clear. - Wait for the message to reset the printer. • Printing a directory, a font list, menu settings pages, or Print Quality Test Pages: - Press and release Cancel to cancel the print job. - Press and hold Cancel to clear. - Understanding the control panel lights Primary codes Ready / Power Saver Light sequence: • Ready...

User Manual
Page 18
... the control panel lights Replace photoconductor (printer hard stop) Light sequence: • Continue-On • Toner Low/Replace PC Kit-Blinking • Error-Blinking What this light sequence means: New code is being programmed into the engine or firmware code flash. The printer will not print any more pages until the photoconductor kit is full and must be replaced. What you can do : Wait for the message to print a photoconductor kit instruction page. • Replace the photoconductor kit. (See Changing...
... the control panel lights Replace photoconductor (printer hard stop) Light sequence: • Continue-On • Toner Low/Replace PC Kit-Blinking • Error-Blinking What this light sequence means: New code is being programmed into the engine or firmware code flash. The printer will not print any more pages until the photoconductor kit is full and must be replaced. What you can do : Wait for the message to print a photoconductor kit instruction page. • Replace the photoconductor kit. (See Changing...

User Manual
Page 32
Enable the USB or parallel port by selecting a value other than Disabled for the USB Buffer or Parallel Buffer item in the Local Printer Settings Utility (see Using the Local Printer Settings Utility on page 75). 32 What you can do : • Press Continue to clear the code. Understanding the control panel lights ENA connection lost Light sequence: • Continue-On • Paper Jam-Blinking • Error-On What this light sequence means: The...
Enable the USB or parallel port by selecting a value other than Disabled for the USB Buffer or Parallel Buffer item in the Local Printer Settings Utility (see Using the Local Printer Settings Utility on page 75). 32 What you can do : • Press Continue to clear the code. Understanding the control panel lights ENA connection lost Light sequence: • Continue-On • Paper Jam-Blinking • Error-On What this light sequence means: The...

User Manual
Page 38
... , Ready , Toner Low/Replace PC Kit , and Load Paper light sequences. Setting NPA Mode Mac Binary PS Set Card Speed * Factory default Use this setting to Values Send print jobs to the printer and query printer status information simultaneously. • Off • On • Auto* Configure the printer to fail. • Auto*-The printer processes print jobs from computers using either Windows or Macintosh operating systems. Configure the printer card speed. • Auto* 38 Menu items and their settings are represented by Paper Jam and Error light sequences. •...
... , Ready , Toner Low/Replace PC Kit , and Load Paper light sequences. Setting NPA Mode Mac Binary PS Set Card Speed * Factory default Use this setting to Values Send print jobs to the printer and query printer status information simultaneously. • Off • On • Auto* Configure the printer to fail. • Auto*-The printer processes print jobs from computers using either Windows or Macintosh operating systems. Configure the printer card speed. • Auto* 38 Menu items and their settings are represented by Paper Jam and Error light sequences. •...

User Manual
Page 39
... PostScript print jobs from computers using the Macintosh operating system. Setting NPA Mode Protocol Parallel Mode 2 Mac Binary PS * Factory default Use this setting to Values Specify whether the printer automatically performs a carriage return after a • Off* line feed control command. • On Specify whether the printer automatically performs a line feed after CR Demo mode * Factory default Use this setting to Values Send print jobs to the printer and query printer status information simultaneously. • Off • On • Auto* Receive...
... PostScript print jobs from computers using the Macintosh operating system. Setting NPA Mode Protocol Parallel Mode 2 Mac Binary PS * Factory default Use this setting to Values Specify whether the printer automatically performs a carriage return after a • Off* line feed control command. • On Specify whether the printer automatically performs a line feed after CR Demo mode * Factory default Use this setting to Values Send print jobs to the printer and query printer status information simultaneously. • Off • On • Auto* Receive...
User Manual
Page 40
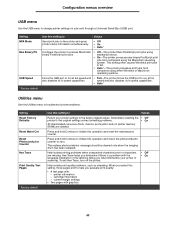
...troubleshoot printer problems. Setting Reset Factory Defaults Reset Maint Cnt Reset Photoconductor Counter Hex Trace Print Quality Test Pages * Factory default Use this operation and reset the maintenance counter. speed and also disables its hi-speed capabilities. current margin settings • Two pages with the language interpreter or the cable by telling you determine if there is receiving. Hex Trace helps you what information your printer settings to change printer settings on jobs sent through a Universal Serial Bus (USB) port. printer information - The replace...
...troubleshoot printer problems. Setting Reset Factory Defaults Reset Maint Cnt Reset Photoconductor Counter Hex Trace Print Quality Test Pages * Factory default Use this operation and reset the maintenance counter. speed and also disables its hi-speed capabilities. current margin settings • Two pages with the language interpreter or the cable by telling you determine if there is receiving. Hex Trace helps you what information your printer settings to change printer settings on jobs sent through a Universal Serial Bus (USB) port. printer information - The replace...
User Manual
Page 44
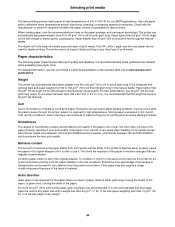
... duplex unit only supports certain sizes and types of material. The printer does not support duplex printing on the paper package, and load paper accordingly. For detailed information, see the Card Stock & Label Guide available on the Lexmark Web site at its edges. Weight The printer can automatically feed paper weights from 60 to 90 g/m2 (16 to 24 lb bond) grain long in the integrated and optional trays and paper...
... duplex unit only supports certain sizes and types of material. The printer does not support duplex printing on the paper package, and load paper accordingly. For detailed information, see the Card Stock & Label Guide available on the Lexmark Web site at its edges. Weight The printer can automatically feed paper weights from 60 to 90 g/m2 (16 to 24 lb bond) grain long in the integrated and optional trays and paper...

User Manual
Page 54
... can use in the tray. For more information, see Using the Local Printer Settings Utility on acceptable print media to use the manual feeder to make quick runs of print media at the center of the sheet entering first. 54 Using only the specified print media helps prevent paper jams and print-quality problems. To load the manual feeder: 1 Place a sheet of the selected print media, print side facing up, at a time. For information on page 75. You must set the paper size before using the manual feeder. Note...
... can use in the tray. For more information, see Using the Local Printer Settings Utility on acceptable print media to use the manual feeder to make quick runs of print media at the center of the sheet entering first. 54 Using only the specified print media helps prevent paper jams and print-quality problems. To load the manual feeder: 1 Place a sheet of the selected print media, print side facing up, at a time. For information on page 75. You must set the paper size before using the manual feeder. Note...
User Manual
Page 73
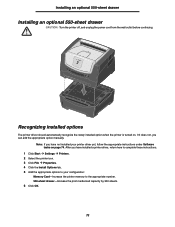
... installed your configuration: Memory Card-Increase the printer memory to the appropriate number. 550-sheet drawer-Increase the print media load capacity by 300 sheets. 6 Click OK. 73 After you can add the appropriate option manually. Recognizing installed options The printer driver should automatically recognize the newly installed option when the printer is turned on page 74. Installing an optional 550-sheet drawer Installing an optional 550-sheet drawer CAUTION: Turn the printer off, and unplug the power...
... installed your configuration: Memory Card-Increase the printer memory to the appropriate number. 550-sheet drawer-Increase the print media load capacity by 300 sheets. 6 Click OK. 73 After you can add the appropriate option manually. Recognizing installed options The printer driver should automatically recognize the newly installed option when the printer is turned on page 74. Installing an optional 550-sheet drawer Installing an optional 550-sheet drawer CAUTION: Turn the printer off, and unplug the power...
User Manual
Page 78
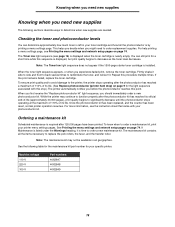
... displayed when the toner cartridge is time to replace the pick rollers, the fuser, and the transfer roller. See Printing the menu settings and network setup pages on page 74. If Maintenance is listed under the Warnings heading, it is nearly empty. When the toner light sequence appears, or when you should immediately order a new photoconductor kit. When you first receive the "Replace photoconductor kit" light sequence, you experience faded print, remove the toner cartridge. Note: The maintenance kit...
... displayed when the toner cartridge is time to replace the pick rollers, the fuser, and the transfer roller. See Printing the menu settings and network setup pages on page 74. If Maintenance is listed under the Warnings heading, it is nearly empty. When the toner light sequence appears, or when you should immediately order a new photoconductor kit. When you first receive the "Replace photoconductor kit" light sequence, you experience faded print, remove the toner cartridge. Note: The maintenance kit...

User Manual
Page 85
... information about clearing paper jams. How do the blinking lights See Understanding the control panel lights on . Factory defaults have another kind or brand of the toner cartridge somewhat, remove the toner cartridge, firmly shake it from the manual feeder. The toner low light sequence is already selected, try printing it back into the printer. If you see voids (missing characters) when printing envelopes, check your printer driver, select Custom 6-Rough Env from the Paper Type menu. The Load Paper, Toner Low / Replace PC Kit...
... information about clearing paper jams. How do the blinking lights See Understanding the control panel lights on . Factory defaults have another kind or brand of the toner cartridge somewhat, remove the toner cartridge, firmly shake it from the manual feeder. The toner low light sequence is already selected, try printing it back into the printer. If you see voids (missing characters) when printing envelopes, check your printer driver, select Custom 6-Rough Env from the Paper Type menu. The Load Paper, Toner Low / Replace PC Kit...
User Manual
Page 87
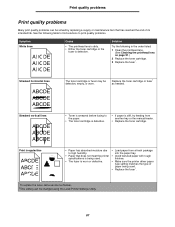
... ABCDE • Paper has absorbed moisture due to print quality problems. Symptom White lines ABCDE ABCDE ABCDE Cause • The printhead lens is dirty. • Either the toner cartridge or the fuser is worn or defective. • Load paper from another tray or the manual feeder. • Replace the toner cartridge. See the following in the order listed: 1 Clean the printhead lens. (See Cleaning the printhead lens on page 91.) 2 Replace the toner cartridge. 3 Replace the fuser*.
... ABCDE • Paper has absorbed moisture due to print quality problems. Symptom White lines ABCDE ABCDE ABCDE Cause • The printhead lens is dirty. • Either the toner cartridge or the fuser is worn or defective. • Load paper from another tray or the manual feeder. • Replace the toner cartridge. See the following in the order listed: 1 Clean the printhead lens. (See Cleaning the printhead lens on page 91.) 2 Replace the toner cartridge. 3 Replace the fuser*.
User Manual
Page 88
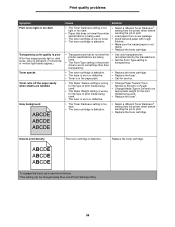
... service. • Change Paper Texture† from Normal to Smooth or Rough. • Change Media Type in Drivers to an appropriate weight for the print media being used . • Replace the fuser*. • Select a different Toner Darkness† setting from a new package. • Avoid textured paper with rough finishes. • Make sure the loaded paper is not damp. • Replace the toner cartridge. • Transparencies that does not meet the printer specifications is being used...
... service. • Change Paper Texture† from Normal to Smooth or Rough. • Change Media Type in Drivers to an appropriate weight for the print media being used . • Replace the fuser*. • Select a different Toner Darkness† setting from a new package. • Avoid textured paper with rough finishes. • Make sure the loaded paper is not damp. • Replace the toner cartridge. • Transparencies that does not meet the printer specifications is being used...
User Manual
Page 89
... toner cartridge. • Replace the toner cartridge. 89 Remove and then reinsert the toner cartridge. (Print only appears on one side of the print media. Blank pages The toner cartridge is defective, empty, or improperly installed. *To replace the fuser, call a service technician. †This setting can be changed to match the paper size that is loaded in the tray. Symptom Ghost Images Print quality problems Cause Solution • The Form Type setting in the printer driver is set incorrectly. • Toner level is low in the toner cartridge...
... toner cartridge. • Replace the toner cartridge. 89 Remove and then reinsert the toner cartridge. (Print only appears on one side of the print media. Blank pages The toner cartridge is defective, empty, or improperly installed. *To replace the fuser, call a service technician. †This setting can be changed to match the paper size that is loaded in the tray. Symptom Ghost Images Print quality problems Cause Solution • The Form Type setting in the printer driver is set incorrectly. • Toner level is low in the toner cartridge...
User Manual
Page 90
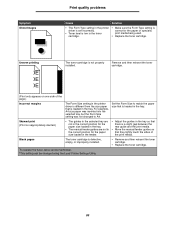
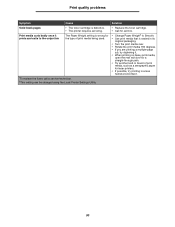
... replace the fuser, call a service technician. †This setting can be changed using the Local Printer Settings Utility. Print quality problems Symptom Solid black pages Print media curls badly once it prints and exits to Smooth. • Use print media that is sealed in its original packaging. • Turn the print media over. • Rotate the print media 180 degrees. • If you are printing a multiple-page job, try printing in a less humid environment. 90 Solution • Replace the toner cartridge...
... replace the fuser, call a service technician. †This setting can be changed using the Local Printer Settings Utility. Print quality problems Symptom Solid black pages Print media curls badly once it prints and exits to Smooth. • Use print media that is sealed in its original packaging. • Turn the print media over. • Rotate the print media 180 degrees. • If you are printing a multiple-page job, try printing in a less humid environment. 90 Solution • Replace the toner cartridge...
User Manual
Page 97
... technical support is set forth in the following paragraph. Lexmark's and its warranty period. If you transfer this product to another user, warranty service under this limited warranty is provided for Lexmark E250d and E250dn 97 Extent of limited warranty Lexmark does not warrant uninterrupted or error-free operation of this document. ALL INFORMATION, SPECIFICATIONS, PRICES, AND SERVICES ARE SUBJECT TO CHANGE AT ANY TIME WITHOUT...
... technical support is set forth in the following paragraph. Lexmark's and its warranty period. If you transfer this product to another user, warranty service under this limited warranty is provided for Lexmark E250d and E250dn 97 Extent of limited warranty Lexmark does not warrant uninterrupted or error-free operation of this document. ALL INFORMATION, SPECIFICATIONS, PRICES, AND SERVICES ARE SUBJECT TO CHANGE AT ANY TIME WITHOUT...
User Manual
Page 100
... printing 64 O Operating modes 86 options memory card 72 overlays 66 P paper choosing 43 jams 56 loading 49, 54 recommended types 43 storing 47 unsatisfactory types 45 Parallel menu 39 photoconductor kit changing 82 level 78 light sequences 79 ordering 76 recycling 84 Photoconductor kit near full light 17 ports parallel 39 USB 38, 40 print cartridge See toner cartridge print media guidelines paper 43 print media specifications characteristics 44 print quality problems 87 Print Quality Test Pages (Utilities menu) 40 Printer Settings Configuration sheet printing 37 printhead lens, cleaning...
... printing 64 O Operating modes 86 options memory card 72 overlays 66 P paper choosing 43 jams 56 loading 49, 54 recommended types 43 storing 47 unsatisfactory types 45 Parallel menu 39 photoconductor kit changing 82 level 78 light sequences 79 ordering 76 recycling 84 Photoconductor kit near full light 17 ports parallel 39 USB 38, 40 print cartridge See toner cartridge print media guidelines paper 43 print media specifications characteristics 44 print quality problems 87 Print Quality Test Pages (Utilities menu) 40 Printer Settings Configuration sheet printing 37 printhead lens, cleaning...


