
User Manual
Page 3
......15 Additional printer setup 17 Installing internal options...17 Available internal options...17 Accessing the system board to install internal options...18 Installing a memory card ...20 Installing a flash memory or firmware card...22 Installing an Internal Solutions Port...24 Installing a printer hard disk ...30 Installing hardware options...34 Order of installation ...34...
......15 Additional printer setup 17 Installing internal options...17 Available internal options...17 Accessing the system board to install internal options...18 Installing a memory card ...20 Installing a flash memory or firmware card...22 Installing an Internal Solutions Port...24 Installing a printer hard disk ...30 Installing hardware options...34 Order of installation ...34...

User Manual
Page 8
5-bin mailbox ...184 Output options ...184 Memory card ...184 Flash memory card...184 Hard disk with adapter...184 Internal Solutions Port ...185 Solving paper feed problems...185 Paper frequently jams ...185 Paper jam message remains after ...
5-bin mailbox ...184 Output options ...184 Memory card ...184 Flash memory card...184 Hard disk with adapter...184 Internal Solutions Port ...185 Solving paper feed problems...185 Paper frequently jams ...185 Paper jam message remains after ...

User Manual
Page 9
... the wall outlet. • Disconnect all external connections (such as Ethernet and telephone system connections) are accessing the system board or installing optional hardware or memory devices sometime after setting up the printer, then turn them off of the optional drawer and set it aside instead of misuse. CAUTION-POTENTIAL INJURY...
... the wall outlet. • Disconnect all external connections (such as Ethernet and telephone system connections) are accessing the system board or installing optional hardware or memory devices sometime after setting up the printer, then turn them off of the optional drawer and set it aside instead of misuse. CAUTION-POTENTIAL INJURY...

User Manual
Page 17
...Bar Code and Forms - IPDS and SCS/TNe - MarkNetTM N8150 802.11 b/g/n Wireless ISP - Printer memory - MarkNet N8130 10/100 Fiber ISP - Additional printer setup 17 Parallel 1284-B ISP - Flash memory - Fonts • Firmware cards - For more information, contact the place where you are accessing the ...system board or installing optional hardware or memory devices sometime after setting up the printer, then turn them off , and unplug the power cord from the wall outlet before continuing...
...Bar Code and Forms - IPDS and SCS/TNe - MarkNetTM N8150 802.11 b/g/n Wireless ISP - Printer memory - MarkNet N8130 10/100 Fiber ISP - Additional printer setup 17 Parallel 1284-B ISP - Flash memory - Fonts • Firmware cards - For more information, contact the place where you are accessing the ...system board or installing optional hardware or memory devices sometime after setting up the printer, then turn them off , and unplug the power cord from the wall outlet before continuing...

User Manual
Page 18
Note: This task requires a #2 Phillips screwdriver. 1 Open the system board door. 2 Loosen the screw on the system board cover. Accessing the system board to the printer, then turn the printer off as well, and unplug any cables going into the printer. Additional printer setup 18 If you have any other devices attached to install internal options CAUTION-SHOCK HAZARD: If you are accessing the system board or installing optional hardware or memory devices sometime after setting up the printer, then turn them off , and unplug the power cord from the wall outlet before continuing.
Note: This task requires a #2 Phillips screwdriver. 1 Open the system board door. 2 Loosen the screw on the system board cover. Accessing the system board to the printer, then turn the printer off as well, and unplug any cables going into the printer. Additional printer setup 18 If you have any other devices attached to install internal options CAUTION-SHOCK HAZARD: If you are accessing the system board or installing optional hardware or memory devices sometime after setting up the printer, then turn them off , and unplug the power cord from the wall outlet before continuing.

User Manual
Page 19
Warning-Potential Damage: System board electronic components are easily damaged by static electricity. 3 Remove the system board cover. 4 Use the illustration below to locate the appropriate connector. Touch something metal on the printer before touching any system board electronic components or connectors. 1 2 3 1 Firmware and flash memory card connectors 2 Memory card connector 3 Lexmark Internal Solutions Port or printer hard disk connector Additional printer setup 19
Warning-Potential Damage: System board electronic components are easily damaged by static electricity. 3 Remove the system board cover. 4 Use the illustration below to locate the appropriate connector. Touch something metal on the printer before touching any system board electronic components or connectors. 1 2 3 1 Firmware and flash memory card connectors 2 Memory card connector 3 Lexmark Internal Solutions Port or printer hard disk connector Additional printer setup 19

User Manual
Page 20
... static electricity. Note: Avoid touching the connection points along the edge of the card. 3 Open the memory card connector latches. Additional printer setup 20 An optional memory card can be purchased separately and attached to the printer, then turn the printer off as well, and...board electronic components or connectors. Warning-Potential Damage: System board electronic components are accessing the system board or installing optional hardware or memory devices sometime after setting up the printer, then turn them off , and unplug the power cord from the wall outlet before ...
... static electricity. Note: Avoid touching the connection points along the edge of the card. 3 Open the memory card connector latches. Additional printer setup 20 An optional memory card can be purchased separately and attached to the printer, then turn the printer off as well, and...board electronic components or connectors. Warning-Potential Damage: System board electronic components are accessing the system board or installing optional hardware or memory devices sometime after setting up the printer, then turn them off , and unplug the power cord from the wall outlet before ...
User Manual
Page 21
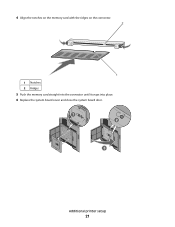
4 Align the notches on the memory card with the ridges on the connector. 2 1 1 Notches 2 Ridges 5 Push the memory card straight into the connector until it snaps into place. 6 Replace the system board cover and close the system board door. 1 2 3 Additional printer setup 21
4 Align the notches on the memory card with the ridges on the connector. 2 1 1 Notches 2 Ridges 5 Push the memory card straight into the connector until it snaps into place. 6 Replace the system board cover and close the system board door. 1 2 3 Additional printer setup 21

User Manual
Page 22
... board. 3 2 1 2 Unpack the card. Only one of each may be installed, but the connectors are accessing the system board or installing optional hardware or memory devices sometime after setting up the printer, then turn them off , and unplug the power cord from the wall outlet before touching any electrical components... on the system board. 1 1 Plastic pins 2 Metal pins 2 Additional printer setup 22 Touch something metal on the printer before continuing. Installing a flash memory or firmware card The system board has two connections for an optional flash...
... board. 3 2 1 2 Unpack the card. Only one of each may be installed, but the connectors are accessing the system board or installing optional hardware or memory devices sometime after setting up the printer, then turn them off , and unplug the power cord from the wall outlet before touching any electrical components... on the system board. 1 1 Plastic pins 2 Metal pins 2 Additional printer setup 22 Touch something metal on the printer before continuing. Installing a flash memory or firmware card The system board has two connections for an optional flash...

User Manual
Page 24
... setup 24 Note: This task requires a #2 Phillips screwdriver. Warning-Potential Damage: System board electronic components are accessing the system board or installing optional hardware or memory devices sometime after setting up the printer, then turn them off , and unplug the power cord from the wall outlet before touching any cables going...
... setup 24 Note: This task requires a #2 Phillips screwdriver. Warning-Potential Damage: System board electronic components are accessing the system board or installing optional hardware or memory devices sometime after setting up the printer, then turn them off , and unplug the power cord from the wall outlet before touching any cables going...

User Manual
Page 30
... damaged by static electricity. Additional printer setup 30 Warning-Potential Damage: System board electronic components are accessing the system board or installing optional hardware or memory devices sometime after setting up the printer, then turn them off , and unplug the power cord from the wall outlet before touching any cables going... the system board cover and close the system board door. 1 2 3 Installing a printer hard disk The optional printer hard disk can be installed with or without a Lexmark Internal Solutions Port (ISP).
... damaged by static electricity. Additional printer setup 30 Warning-Potential Damage: System board electronic components are accessing the system board or installing optional hardware or memory devices sometime after setting up the printer, then turn them off , and unplug the power cord from the wall outlet before touching any cables going... the system board cover and close the system board door. 1 2 3 Installing a printer hard disk The optional printer hard disk can be installed with or without a Lexmark Internal Solutions Port (ISP).

User Manual
Page 34
...stability. A drawer consists of a tray and a support unit. Note: If you are accessing the system board or installing optional hardware or memory devices sometime after setting up to the printer, then turn them off , and unplug the power cord from the wall outlet before continuing. You...18 kg (40 lb) and requires two or more information on installing a printer stand, caster base, or 2000-sheet drawer, see www.lexmark.com/publications/furniture_safety. Additional printer setup 34 Installing paper drawers The printer supports up the printer, then turn the printer off as well, ...
...stability. A drawer consists of a tray and a support unit. Note: If you are accessing the system board or installing optional hardware or memory devices sometime after setting up to the printer, then turn them off , and unplug the power cord from the wall outlet before continuing. You...18 kg (40 lb) and requires two or more information on installing a printer stand, caster base, or 2000-sheet drawer, see www.lexmark.com/publications/furniture_safety. Additional printer setup 34 Installing paper drawers The printer supports up the printer, then turn the printer off as well, ...

User Manual
Page 35
... printer, below the standard tray and above any cables going into the printer. If you are accessing the system board or installing optional hardware or memory devices sometime after setting up the printer, then turn them off , and unplug the power cord from a drawer without pushing in the safety latches could...
... printer, below the standard tray and above any cables going into the printer. If you are accessing the system board or installing optional hardware or memory devices sometime after setting up the printer, then turn them off , and unplug the power cord from a drawer without pushing in the safety latches could...

User Manual
Page 76
...may contaminate the printer. The PIN must create a PIN from the Held Jobs menu. The job is automatically deleted from printer memory. Job type Description Confidential When you send a Confidential print job to the printer, you must be deleted if the printer requires extra... When you send a Repeat print job, the printer prints all copies are called held jobs include: • Profiles from various sources including Lexmark Document Solutions Suite (LDSS) • Forms from a kiosk • Bookmarks • Jobs not printed, which are printed, the job is held in...
...may contaminate the printer. The PIN must create a PIN from the Held Jobs menu. The job is automatically deleted from printer memory. Job type Description Confidential When you send a Confidential print job to the printer, you must be deleted if the printer requires extra... When you send a Repeat print job, the printer prints all copies are called held jobs include: • Profiles from various sources including Lexmark Document Solutions Suite (LDSS) • Forms from a kiosk • Bookmarks • Jobs not printed, which are printed, the job is held in...

User Manual
Page 77
... 1 With a document open , choose File > Print. Repeat and Reserve jobs continue to be held jobs Note: Confidential and Verify print jobs are automatically deleted from memory after they print. If necessary, click the disclosure triangle to print, and then press .
... 1 With a document open , choose File > Print. Repeat and Reserve jobs continue to be held jobs Note: Confidential and Verify print jobs are automatically deleted from memory after they print. If necessary, click the disclosure triangle to print, and then press .

User Manual
Page 79
After the other jobs, then Printer Busy appears. If you leave the flash drive in flash memory or on the hard disk. 1 Make sure the printer is on and Ready appears. 2 From the printer control panel, press . 3 Press the arrow buttons until ...
After the other jobs, then Printer Busy appears. If you leave the flash drive in flash memory or on the hard disk. 1 Make sure the printer is on and Ready appears. 2 From the printer control panel, press . 3 Press the arrow buttons until ...
User Manual
Page 108
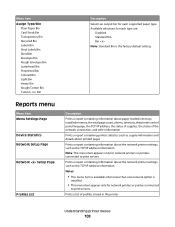
...; This menu item appears only for network printers or printers connected to print servers. Description Prints a report containing information about paper loaded into trays, installed memory, the total page count, alarms, timeouts, the printer control panel language, the TCP/IP address, the status of supplies, the status of profiles stored in...
...; This menu item appears only for network printers or printers connected to print servers. Description Prints a report containing information about paper loaded into trays, installed memory, the total page count, alarms, timeouts, the printer control panel language, the TCP/IP address, the status of supplies, the status of profiles stored in...
User Manual
Page 109
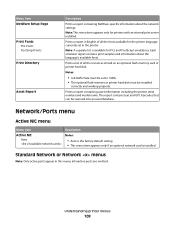
... report containing NetWare-specific information about the language's available fonts. Prints a report in English of all the resources stored on an optional flash memory card or printer hard disk Notes: • Job Buffer Size must be set in this menu; Network/Ports menu Active NIC menu Menu ...with an internal print server installed. all the fonts available for the printer language currently set to 100%. • The optional flash memory or printer hard disk must be scanned into an asset database. Understanding printer menus 109 The report contains text and UPC barcodes that can...
... report containing NetWare-specific information about the language's available fonts. Prints a report in English of all the resources stored on an optional flash memory card or printer hard disk Notes: • Job Buffer Size must be set in this menu; Network/Ports menu Active NIC menu Menu ...with an internal print server installed. all the fonts available for the printer language currently set to 100%. • The optional flash memory or printer hard disk must be scanned into an asset database. Understanding printer menus 109 The report contains text and UPC barcodes that can...
User Manual
Page 110
... • Auto is the factory default setting. • The value can be changed in 1-K increments. • The maximum size allowed depends on the amount of memory in the Setup menu if PS SmartSwitch is set to Off. The menu selection is updated. It uses the default printer language specified in the...
... • Auto is the factory default setting. • The value can be changed in 1-K increments. • The maximum size allowed depends on the amount of memory in the Setup menu if PS SmartSwitch is set to Off. The menu selection is updated. It uses the default printer language specified in the...

User Manual
Page 117
... on the disk are printed before printing Notes: • Off is the factory default setting. • The On setting buffers jobs on the amount of memory in 1-K increments. • The maximum size allowed depends on the printer hard disk. • The Auto setting buffers print jobs only if the printer is...
... on the disk are printed before printing Notes: • Off is the factory default setting. • The On setting buffers jobs on the amount of memory in 1-K increments. • The maximum size allowed depends on the printer hard disk. • The Auto setting buffers print jobs only if the printer is...


