
User Guide
Page 2
... a network setup page...13 Printing from Windows or DOS...13 Using IBM emulation mode...13 Using Epson emulation mode...14 Using Okidata MICROLINE emulation mode 15 Using the control panel 16 Understanding the control panel buttons 16 Understanding the control panel lights 18 Setting the printer online or offline...19 Advancing paper...19 Using the Load/Unload function...19 Locking and unlocking the control panel 19 Selecting a Tractor mode...20 Selecting and locking a font...20 Disabling Font Lock...20 Selecting and locking a pitch...21 Disabling Pitch Lock...21 Loading paper 22 Setting...
... a network setup page...13 Printing from Windows or DOS...13 Using IBM emulation mode...13 Using Epson emulation mode...14 Using Okidata MICROLINE emulation mode 15 Using the control panel 16 Understanding the control panel buttons 16 Understanding the control panel lights 18 Setting the printer online or offline...19 Advancing paper...19 Using the Load/Unload function...19 Locking and unlocking the control panel 19 Selecting a Tractor mode...20 Selecting and locking a font...20 Disabling Font Lock...20 Selecting and locking a pitch...21 Disabling Pitch Lock...21 Loading paper 22 Setting...
User Guide
Page 3
... Main menu options...49 Forms Macro options...50 Data options ...51 Control options ...52 Emulation options...54 Interface options...54 Maintaining the printer 56 Ordering supplies...56 Removing the ribbon cartridge...56 Cleaning the printer...56 Recycling Lexmark products...57 Administrative support 58 Restoring the factory default settings...58 Supporting IPSec...59 Supporting SNMPv3...59 Using 802.1x authentication...60 Contents 3 Loading a cut form or envelope manually ...36 Aligning the left margin ...38 Setting Top-of-Form...39 Setting...
... Main menu options...49 Forms Macro options...50 Data options ...51 Control options ...52 Emulation options...54 Interface options...54 Maintaining the printer 56 Ordering supplies...56 Removing the ribbon cartridge...56 Cleaning the printer...56 Recycling Lexmark products...57 Administrative support 58 Restoring the factory default settings...58 Supporting IPSec...59 Supporting SNMPv3...59 Using 802.1x authentication...60 Contents 3 Loading a cut form or envelope manually ...36 Aligning the left margin ...38 Setting Top-of-Form...39 Setting...
User Guide
Page 4
...4 Troubleshooting 61 Checking an unresponsive printer...61 Testing the printer...61 Checking the printer status...62 Adjusting character (bidirectional) alignment 64 Solving printing problems...65 Printer test works, but does not print 66 Printer alarm sounds ...66 Printer goes to the right during printing 67 Incorrect line length; lines do not start at the left margin 67 Printer speed slows...67 Incorrect characters print, left margin changes, or printing stops 68 Printing continues beyond the edges of the continuous forms 68 Selected font or pitch is not printing or is changing 68...
...4 Troubleshooting 61 Checking an unresponsive printer...61 Testing the printer...61 Checking the printer status...62 Adjusting character (bidirectional) alignment 64 Solving printing problems...65 Printer test works, but does not print 66 Printer alarm sounds ...66 Printer goes to the right during printing 67 Incorrect line length; lines do not start at the left margin 67 Printer speed slows...67 Incorrect characters print, left margin changes, or printing stops 68 Printing continues beyond the edges of the continuous forms 68 Selected font or pitch is not printing or is changing 68...
User Guide
Page 10
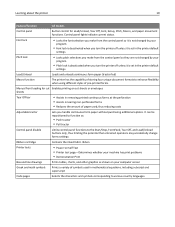
...;printed forms. Manual front loading for Load/Unload, Tear Off, Font, Setup, Pitch, Macro, and paper movement functions. Font lock • Locks the font selection you make from the control panel so it is not changed by your computer screen Greek and math symbols Prints a variety of symbols used , thus reducing costs Adjustable tractor Lets you turn the printer off unless it is set in the printer default settings. Control panel lights indicate current status. Learning about the printer 10 Feature/function All models Control panel Button control for cut sheets...
...;printed forms. Manual front loading for Load/Unload, Tear Off, Font, Setup, Pitch, Macro, and paper movement functions. Font lock • Locks the font selection you make from the control panel so it is not changed by your computer screen Greek and math symbols Prints a variety of symbols used , thus reducing costs Adjustable tractor Lets you turn the printer off unless it is set in the printer default settings. Control panel lights indicate current status. Learning about the printer 10 Feature/function All models Control panel Button control for cut sheets...
User Guide
Page 11
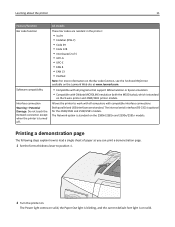
... Reference available on the Lexmark Web site at www.lexmark.com. • Compatible with all programs that support IBM emulation or Epson emulation • Compatible with Okidata MICROLINE emulation (with compatible interface connections Both parallel and USB interfaces are resident in the printer: • 3 of 9 • Codabar (NW‑7) • Code 39 • Code 128 • Interleaved 2 of paper so you can print a demonstration page. 1 Set the forms thickness lever to work with all computers...
... Reference available on the Lexmark Web site at www.lexmark.com. • Compatible with all programs that support IBM emulation or Epson emulation • Compatible with Okidata MICROLINE emulation (with compatible interface connections Both parallel and USB interfaces are resident in the printer: • 3 of 9 • Codabar (NW‑7) • Code 39 • Code 128 • Interleaved 2 of paper so you can print a demonstration page. 1 Set the forms thickness lever to work with all computers...
User Guide
Page 13
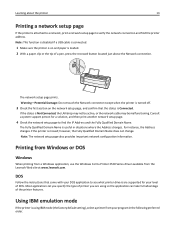
... a USB cable is connected. 1 Make sure the printer is on the network setup page, and confirm that came with your level of the printer features. Consult a system support person for your DOS application to see what printer drivers are using IBM mode (the factory default setting), select a printer from the Lexmark Web site at www.lexmark.com. Using IBM emulation mode If the printer is Connected. Note: The network setup page also provides important network configuration information. DOS Follow the instructions...
... a USB cable is connected. 1 Make sure the printer is on the network setup page, and confirm that came with your level of the printer features. Consult a system support person for your DOS application to see what printer drivers are using IBM mode (the factory default setting), select a printer from the Lexmark Web site at www.lexmark.com. Using IBM emulation mode If the printer is Connected. Note: The network setup page also provides important network configuration information. DOS Follow the instructions...
User Guide
Page 25
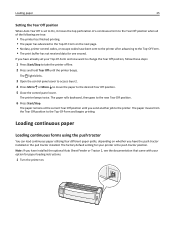
... current Tear Off position until the printer beeps. The factory default setting for paper loading instructions. 1 Turn the printer on. The light blinks. 3 Open the control panel cover to access layer 2. 4 Press Micro or Micro to move the paper to the new Tear Off position. 6 Press Start/Stop. The paper rolls backward, then goes to the desired Tear Off position. 5 Close the control panel cover. The paper moves from the Tear Off position to the Top‑Of‑Form. • The print buffer has...
... current Tear Off position until the printer beeps. The factory default setting for paper loading instructions. 1 Turn the printer on. The light blinks. 3 Open the control panel cover to access layer 2. 4 Press Micro or Micro to move the paper to the new Tear Off position. 6 Press Start/Stop. The paper rolls backward, then goes to the desired Tear Off position. 5 Close the control panel cover. The paper moves from the Tear Off position to the Top‑Of‑Form. • The print buffer has...

User Guide
Page 39
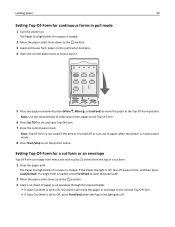
... push mode 1 Clear the paper path. The Paper Out light blinks if no paper is off, tear off . 5 Open the control panel cover to access layer 2. 1 2 3 4 Power Set TOF LineFeed Macro Micro Micro Setup Pitch Lock 10 20 12 24 15 17 6 Press any paper movement button (LineFeed, Micro , Micro ) to the Tear Off position. Sending a print job or pressing Tear Off returns the paper to the current Top‑Of‑Form. Setting Top‑Of‑Form for continuous forms, cut form is loaded, press...
... push mode 1 Clear the paper path. The Paper Out light blinks if no paper is off, tear off . 5 Open the control panel cover to access layer 2. 1 2 3 4 Power Set TOF LineFeed Macro Micro Micro Setup Pitch Lock 10 20 12 24 15 17 6 Press any paper movement button (LineFeed, Micro , Micro ) to the Tear Off position. Sending a print job or pressing Tear Off returns the paper to the current Top‑Of‑Form. Setting Top‑Of‑Form for continuous forms, cut form is loaded, press...
User Guide
Page 40
... inches from the top of paper when the printer is in pull mode 1 Turn the printer on the pull tractor feed pins. 4 Open the control panel cover to access layer 2. 1 2 3 4 Power Set TOF LineFeed Macro Micro Micro Setup Pitch Lock 10 20 12 24 15 17 5 Press any paper movement button (Micro , Micro , or LineFeed) to move the paper or envelope to the current Top‑Of‑Form. • If Auto Cut Sheet is loaded, press FormFeed to clear the paper path. 2 Move the paper select...
... inches from the top of paper when the printer is in pull mode 1 Turn the printer on the pull tractor feed pins. 4 Open the control panel cover to access layer 2. 1 2 3 4 Power Set TOF LineFeed Macro Micro Micro Setup Pitch Lock 10 20 12 24 15 17 5 Press any paper movement button (Micro , Micro , or LineFeed) to move the paper or envelope to the current Top‑Of‑Form. • If Auto Cut Sheet is loaded, press FormFeed to clear the paper path. 2 Move the paper select...

User Guide
Page 49
... the printer exits Setup mode. • If the printer runs out of paper while you are using Setup mode, load more Menu Language options. 5 For this example, press Macro to select French. Main menu Main menu options Note: Use Setup mode to configure the printer according to exit Setup mode and save the new setting. Menu Language To Select Press No Change Set TOF English LineFeed French Macro German Micro Italian Micro (More) Setup Return to Main menu Pitch Printer menus now print in...
... the printer exits Setup mode. • If the printer runs out of paper while you are using Setup mode, load more Menu Language options. 5 For this example, press Macro to select French. Main menu Main menu options Note: Use Setup mode to configure the printer according to exit Setup mode and save the new setting. Menu Language To Select Press No Change Set TOF English LineFeed French Macro German Micro Italian Micro (More) Setup Return to Main menu Pitch Printer menus now print in...

User Guide
Page 50
... computer to set Pitch Lock as the default even after the printer has been turned off and back on . Forms Macro options Note: Use Setup mode to configure the printer according to use with the program. To print a list of the following options to select character option changes, as detailed: • Default Font-Select the font you want from the Main menu. Notes: - Character options Use the following code pages for the European Union. Emulation Options Emulation Options...
... computer to set Pitch Lock as the default even after the printer has been turned off and back on . Forms Macro options Note: Use Setup mode to configure the printer according to use with the program. To print a list of the following options to select character option changes, as detailed: • Default Font-Select the font you want from the Main menu. Notes: - Character options Use the following code pages for the European Union. Emulation Options Emulation Options...
User Guide
Page 62
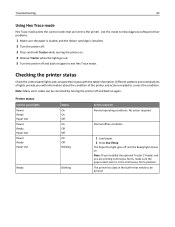
.... Checking the printer status Check the control panel lights and compare their status with information about the condition of lights provide you are sent to exit Hex Trace mode. Use this mode to help diagnose software/driver problems. 1 Make sure the paper is loaded, and the ribbon cartridge is in the buffer that are printing continuous forms, make sure the paper select lever is installed. 2 Turn the printer off. 3 Press and hold Tractor while turning the printer on. 4 Release Tractor when the lights go out. 5 Turn...
.... Checking the printer status Check the control panel lights and compare their status with information about the condition of lights provide you are sent to exit Hex Trace mode. Use this mode to help diagnose software/driver problems. 1 Make sure the paper is loaded, and the ribbon cartridge is in the buffer that are printing continuous forms, make sure the paper select lever is installed. 2 Turn the printer off. 3 Press and hold Tractor while turning the printer on. 4 Release Tractor when the lights go out. 5 Turn...
User Guide
Page 63
... paper was loaded. a Replace the ribbon cartridge, and make sure paper is loaded. b Turn the printer off . 3 Remove the ribbon cartridge, and then check for a paper or ribbon jam. 2 Turn the printer off . For more information, see the documentation that came with the option. Troubleshooting Control panel lights Power Ready Paper Out Panel Lock Font Lock Status On Blinking Blinking Blinking Blinking Power Power Ready Paper Out Panel Lock Power Ready Paper Out Panel Lock Power Ready Paper Out Tractor 2 Off On Off Blinking Blinking On Blinking Blinking Blinking On Blinking Blinking Blinking...
... paper was loaded. a Replace the ribbon cartridge, and make sure paper is loaded. b Turn the printer off . 3 Remove the ribbon cartridge, and then check for a paper or ribbon jam. 2 Turn the printer off . For more information, see the documentation that came with the option. Troubleshooting Control panel lights Power Ready Paper Out Panel Lock Font Lock Status On Blinking Blinking Blinking Blinking Power Power Ready Paper Out Panel Lock Power Ready Paper Out Panel Lock Power Ready Paper Out Tractor 2 Off On Off Blinking Blinking On Blinking Blinking Blinking On Blinking Blinking Blinking...

User Guide
Page 64
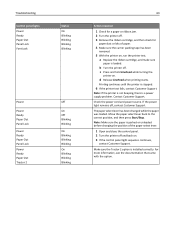
...www.lexmark.com. Troubleshooting 64 Control panel lights Power Ready Paper Out Font Lock All lights on solid Panel Lock Power Ready Tractor 2 Paper Out Font Lock Power Ready Paper Out Panel Lock Font Lock Power Ready Tractor 2 Paper Out Panel Lock Font Lock Power Ready Tractor 2 Paper Out Panel Lock Status On Blinking Blinking Blinking On Blinking On Blinking Blinking Blinking Blinking On Blinking Blinking Blinking Blinking On Blinking Blinking Blinking Blinking Blinking On Blinking Blinking Blinking Blinking Action required 1 Turn the printer off . 2 Open the control panel cover to access...
...www.lexmark.com. Troubleshooting 64 Control panel lights Power Ready Paper Out Font Lock All lights on solid Panel Lock Power Ready Tractor 2 Paper Out Font Lock Power Ready Paper Out Panel Lock Font Lock Power Ready Tractor 2 Paper Out Panel Lock Font Lock Power Ready Tractor 2 Paper Out Panel Lock Status On Blinking Blinking Blinking On Blinking On Blinking Blinking Blinking Blinking On Blinking Blinking Blinking Blinking On Blinking Blinking Blinking Blinking Blinking On Blinking Blinking Blinking Blinking Action required 1 Turn the printer off . 2 Open the control panel cover to access...

User Guide
Page 66
...; Replace the ribbon cartridge if it is present, these are using Windows, use the Windows Forms Printer 2500 Series driver available from the Lexmark Web site at the new Top‑Of‑Form position until the printer beeps and the light blinks. 3 Open the control panel to access layer 2. 4 Press Micro or Micro to move the paper to the new Top‑Of‑Form position. 6 Press Start/Stop. Printer goes to the Tear Off position before the print job finishes Set Auto Tear...
...; Replace the ribbon cartridge if it is present, these are using Windows, use the Windows Forms Printer 2500 Series driver available from the Lexmark Web site at the new Top‑Of‑Form position until the printer beeps and the light blinks. 3 Open the control panel to access layer 2. 4 Press Micro or Micro to move the paper to the new Top‑Of‑Form position. 6 Press Start/Stop. Printer goes to the Tear Off position before the print job finishes Set Auto Tear...
User Guide
Page 68
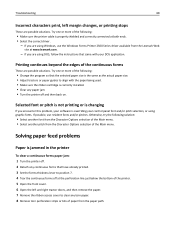
... instructions that have already printed. 3 Set the forms thickness lever to position 7. 4 Tear the continuous forms off . 2 Detach any torn paper. 8 Remove torn perforation strips or bits of the Main menu. Try one or more of the continuous forms These are possible solutions. Solving paper feed problems Paper is overriding your DOS application. Troubleshooting 68 Incorrect characters print, left and right tractor doors, and then remove the paper. 7 Remove the ribbon access cover to align with your control panel font and/or pitch selection, or using Windows, use...
... instructions that have already printed. 3 Set the forms thickness lever to position 7. 4 Tear the continuous forms off . 2 Detach any torn paper. 8 Remove torn perforation strips or bits of the Main menu. Try one or more of the continuous forms These are possible solutions. Solving paper feed problems Paper is overriding your DOS application. Troubleshooting 68 Incorrect characters print, left and right tractor doors, and then remove the paper. 7 Remove the ribbon access cover to align with your control panel font and/or pitch selection, or using Windows, use...
User Guide
Page 72
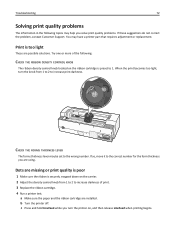
...: CHECK THE RIBBON DENSITY CONTROL KNOB The ribbon density control knob located on , and then release LineFeed when printing begins. CHECK THE FORMS THICKNESS LEVER The forms thickness lever may have a printer part that requires adjustment or replacement. When the print becomes too light, turn the printer on the ribbon cartridge is preset to the wrong number. Dots are using. If so, move it to the correct number for the form thickness you solve print quality problems...
...: CHECK THE RIBBON DENSITY CONTROL KNOB The ribbon density control knob located on , and then release LineFeed when printing begins. CHECK THE FORMS THICKNESS LEVER The forms thickness lever may have a printer part that requires adjustment or replacement. When the print becomes too light, turn the printer on the ribbon cartridge is preset to the wrong number. Dots are using. If so, move it to the correct number for the form thickness you solve print quality problems...
User Guide
Page 80
... period of all print cartridges, programs, data, and removable storage media (unless directed otherwise by a Lexmark warranty, technical support may be available for any maintenance items included with Lexmark user's guides, manuals, instructions or guidance -Unsuitable physical or operating environment -Maintenance by anyone other than Lexmark or a Lexmark authorized servicer -Operation of a product beyond the limit of its duty cycle -Use of printing media outside of Lexmark specifications -Refurbishment, repair, refilling or remanufacture...
... period of all print cartridges, programs, data, and removable storage media (unless directed otherwise by a Lexmark warranty, technical support may be available for any maintenance items included with Lexmark user's guides, manuals, instructions or guidance -Unsuitable physical or operating environment -Maintenance by anyone other than Lexmark or a Lexmark authorized servicer -Operation of a product beyond the limit of its duty cycle -Use of printing media outside of Lexmark specifications -Refurbishment, repair, refilling or remanufacture...
User Guide
Page 82
... mode using 61 I IBM emulation mode using 13 Interface options 54 IPSec 59 J jams and misfeeds troubleshooting paper is jammed in the printer 68 L left margin aligning 38 lights control panel 18 Load/Unload function using 19 loading continuous forms 25 cut form or envelope 36 locking control panel 19 M Main menu options 49 menu settings changing 48 N network setup page 13 noise emission levels 77 notices 76, 77, 78, 79 O offline setting printer 19 Okidata MICROLINE emulation mode using 15 online setting printer 19 ordering supplies 56 P paper advancing 19 paper feed troubleshooting Auto Sheet...
... mode using 61 I IBM emulation mode using 13 Interface options 54 IPSec 59 J jams and misfeeds troubleshooting paper is jammed in the printer 68 L left margin aligning 38 lights control panel 18 Load/Unload function using 19 loading continuous forms 25 cut form or envelope 36 locking control panel 19 M Main menu options 49 menu settings changing 48 N network setup page 13 noise emission levels 77 notices 76, 77, 78, 79 O offline setting printer 19 Okidata MICROLINE emulation mode using 15 online setting printer 19 ordering supplies 56 P paper advancing 19 paper feed troubleshooting Auto Sheet...
User Guide
Page 83
...56 T Tear Off function using 24 Tear Off position setting 24 Top‑Of‑Form setting 39, 40, 41 tractor pull position 43 push position 43 Tractor mode selecting 20 troubleshooting checking an unresponsive printer 61 contacting Customer Support 74 restoring factory default settings 58 troubleshooting, jams and misfeeds paper is jammed in the printer 68 troubleshooting, paper feed Auto Sheet Feeder feeds at incorrect rate 70 Auto Sheet Feeder feeds multiple sheets 71 Auto Sheet Feeder positions paper incorrectly 71 incorrect Top‑Of‑Form position 70, 71 jam in Tractor 2 Feeder...
...56 T Tear Off function using 24 Tear Off position setting 24 Top‑Of‑Form setting 39, 40, 41 tractor pull position 43 push position 43 Tractor mode selecting 20 troubleshooting checking an unresponsive printer 61 contacting Customer Support 74 restoring factory default settings 58 troubleshooting, jams and misfeeds paper is jammed in the printer 68 troubleshooting, paper feed Auto Sheet Feeder feeds at incorrect rate 70 Auto Sheet Feeder feeds multiple sheets 71 Auto Sheet Feeder positions paper incorrectly 71 incorrect Top‑Of‑Form position 70, 71 jam in Tractor 2 Feeder...


