User's Guide
Page 5
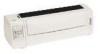
Printer models Carriage width Cut forms Continuous forms Narrow 297 mm (11.7 in.) 254 mm (10.0 in.) Wide 419 mm (16.5 in.) 406 mm (16.0 in 9- About your printer 1 About your printer may look different than those illustrated in this manual. Depending on the printer model you have chosen, your printer The Lexmark™ Forms Printer 2400 Series are available in .) 1 and 24-wire wide-carriage (2481 and 2491) models. and 24-wire narrow-carriage (2480 and 2490) and 9-
Printer models Carriage width Cut forms Continuous forms Narrow 297 mm (11.7 in.) 254 mm (10.0 in.) Wide 419 mm (16.5 in.) 406 mm (16.0 in 9- About your printer 1 About your printer may look different than those illustrated in this manual. Depending on the printer model you have chosen, your printer The Lexmark™ Forms Printer 2400 Series are available in .) 1 and 24-wire wide-carriage (2481 and 2491) models. and 24-wire narrow-carriage (2480 and 2490) and 9-

User's Guide
Page 11
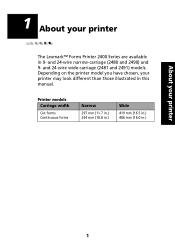
... lever Selects the paper type: • Cut (form) sheet • Continuous forms Front cover Covers the continuous forms push tractors. Operator panel Indicates printer status and makes control of forms being printed. Manual feed door Pull down to load individual cut sheet. 7 Printer description Forms thickness lever Ribbon access cover About your printer Front cover Operator panel Paper guides...
... lever Selects the paper type: • Cut (form) sheet • Continuous forms Front cover Covers the continuous forms push tractors. Operator panel Indicates printer status and makes control of forms being printed. Manual feed door Pull down to load individual cut sheet. 7 Printer description Forms thickness lever Ribbon access cover About your printer Front cover Operator panel Paper guides...
User's Guide
Page 15
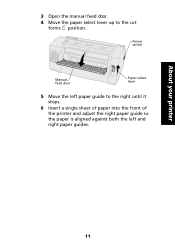
About your printer 3 Open the manual feed door. 4 Move the paper select lever up to the right until it stops. 6 Insert a single sheet of paper into the front of the printer and adjust the right paper guide so the paper is aligned against both the left paper guide to the cut forms position. Power switch Manual feed door Paper select lever 5 Move the left and right paper guides. 11
About your printer 3 Open the manual feed door. 4 Move the paper select lever up to the right until it stops. 6 Insert a single sheet of paper into the front of the printer and adjust the right paper guide so the paper is aligned against both the left paper guide to the cut forms position. Power switch Manual feed door Paper select lever 5 Move the left and right paper guides. 11

User's Guide
Page 21
Note: Instructions for installing drivers are using a Windows program, use the Windows Forms Printer 2400 Series driver available from the Lexmark Web site at www.lexmark.com. About your Windows and DOS application software Windows-based applications If you are in the readme.1st file included in the download package. 17 Setting up your printer Connecting the serial cable For installation and connection instructions, see the optional serial interface manual.
Note: Instructions for installing drivers are using a Windows program, use the Windows Forms Printer 2400 Series driver available from the Lexmark Web site at www.lexmark.com. About your Windows and DOS application software Windows-based applications If you are in the readme.1st file included in the download package. 17 Setting up your printer Connecting the serial cable For installation and connection instructions, see the optional serial interface manual.

User's Guide
Page 33
...: For the Tear Off function to the Top-Of-Form. For more information, see "Setting the Tear Off position" on the next page or to Off). Advancing the paper You can use the operator panel to advance the paper when the printer is in the Setup menu or your application software. The... Tear Off function advances the perforation of a continuous form to the tear bar position.You can set Tear Off to move a continuous form manually to the Tear Off position (Auto Tear Off set...
...: For the Tear Off function to the Top-Of-Form. For more information, see "Setting the Tear Off position" on the next page or to Off). Advancing the paper You can use the operator panel to advance the paper when the printer is in the Setup menu or your application software. The... Tear Off function advances the perforation of a continuous form to the tear bar position.You can set Tear Off to move a continuous form manually to the Tear Off position (Auto Tear Off set...
User's Guide
Page 76
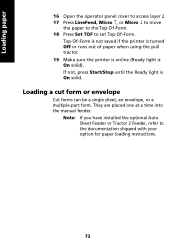
... be a single sheet, an envelope, or a multiple-part form. They are placed one at a time into the manual feeder. Note: If you have installed the optional Auto Sheet Feeder or Tractor 2 Feeder, refer to set Top-Of-Form. If not, press Start/Stop until the Ready light is On solid). Loading paper 16..., Micro ↑, or Micro ↓ to move the paper to the Top-Of-Form. 18 Press Set TOF to the documentation shipped with your option for paper loading instructions. 72 Top-Of-Form is not saved if the printer is turned Off or runs out of paper when using the pull tractor. 19...
... be a single sheet, an envelope, or a multiple-part form. They are placed one at a time into the manual feeder. Note: If you have installed the optional Auto Sheet Feeder or Tractor 2 Feeder, refer to set Top-Of-Form. If not, press Start/Stop until the Ready light is On solid). Loading paper 16..., Micro ↑, or Micro ↓ to move the paper to the Top-Of-Form. 18 Press Set TOF to the documentation shipped with your option for paper loading instructions. 72 Top-Of-Form is not saved if the printer is turned Off or runs out of paper when using the pull tractor. 19...

User's Guide
Page 77
Loading paper Loading a cut form or envelope manually 1 Turn the printer On. 2 Make sure the paper path is clear. 3 If continuous forms are currently loaded, tear off the leading edge of the continuous form and then press Load/Unload to park the continuous forms. The Paper Out light is blinking. 4 Set the forms thickness lever to a suitable setting for more information. 73 See "Setting the forms thickness lever" on page 44 for the type of paper you are using.
Loading paper Loading a cut form or envelope manually 1 Turn the printer On. 2 Make sure the paper path is clear. 3 If continuous forms are currently loaded, tear off the leading edge of the continuous form and then press Load/Unload to park the continuous forms. The Paper Out light is blinking. 4 Set the forms thickness lever to a suitable setting for more information. 73 See "Setting the forms thickness lever" on page 44 for the type of paper you are using.

User's Guide
Page 89
.... 85 The Paper Out light blinks if no paper is Off, tear off excess forms and press Load/Unload. For help loading paper, see "Loading a cut form or envelope manually" on pag e73. • If Auto Cut Sheet is set to On, the printer moves the paper or envelope to the current Top-Of...-Form • If Auto Cut Sheet is loaded, press FormFeed to clear paper path. 2 Move the...
.... 85 The Paper Out light blinks if no paper is Off, tear off excess forms and press Load/Unload. For help loading paper, see "Loading a cut form or envelope manually" on pag e73. • If Auto Cut Sheet is set to On, the printer moves the paper or envelope to the current Top-Of...-Form • If Auto Cut Sheet is loaded, press FormFeed to clear paper path. 2 Move the...
User's Guide
Page 101
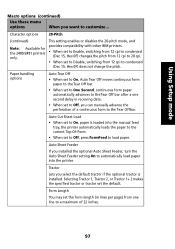
... Auto Sheet Feeder, turn the Auto Sheet Feeder setting On to automatically load paper into the manual feed tray, the printer automatically loads the paper to the current Top-Of-Form. • When set to Disable, switching from 12 cpi to 20 cpi. • When... set to One Second, continuous form paper automatically advances to the Tear Off bar after a one line to a maximum of a continuous form to customize... Tractor Lets you can manually advance the perforation of 22 inches. 97 Character options 20-Pitch (continued) Note: Available for the 2480/2481 printers only.
... Auto Sheet Feeder, turn the Auto Sheet Feeder setting On to automatically load paper into the manual feed tray, the printer automatically loads the paper to the current Top-Of-Form. • When set to Disable, switching from 12 cpi to 20 cpi. • When... set to One Second, continuous form paper automatically advances to the Tear Off bar after a one line to a maximum of a continuous form to customize... Tractor Lets you can manually advance the perforation of 22 inches. 97 Character options 20-Pitch (continued) Note: Available for the 2480/2481 printers only.
User's Guide
Page 132
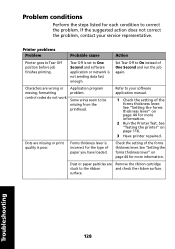
... and check the ribbon surface. Forms thickness lever is poor. If the suggested action does not correct the problem, contact your software application manual. 1 Check the setting of ...Perform the steps listed for more information. See "Setting the forms thickness lever" on page 116. 3 Have printer repaired. Dust or paper particles are wrong or Application program ... printing. Printer problems Problem Probable cause Action Printer goes to be missing from the printhead. Dots are missing or print quality is incorrect for more information. 2 Run the Printer Test....
... and check the ribbon surface. Forms thickness lever is poor. If the suggested action does not correct the problem, contact your software application manual. 1 Check the setting of ...Perform the steps listed for more information. See "Setting the forms thickness lever" on page 116. 3 Have printer repaired. Dust or paper particles are wrong or Application program ... printing. Printer problems Problem Probable cause Action Printer goes to be missing from the printhead. Dots are missing or print quality is incorrect for more information. 2 Run the Printer Test....

User's Guide
Page 134
.... The stack of the carrier. • If a paper jam has recently occurred, turn Off the printer and try again. • Contact your software application manual. Make sure paper is set incorrectly. Reset the forms thickness lever. Troubleshooting 130 Printer page length is catching on page 81. problem. For help , see if anything is blocking...
.... The stack of the carrier. • If a paper jam has recently occurred, turn Off the printer and try again. • Contact your software application manual. Make sure paper is set incorrectly. Reset the forms thickness lever. Troubleshooting 130 Printer page length is catching on page 81. problem. For help , see if anything is blocking...

User's Guide
Page 135
...See "Selecting or locking a font" on page 44. Troubleshooting 131 between printing surface and the printhead. application manual. Adjust the left problem. Printer problems (continued) Problem Probable cause Line length is selected. Specified pitch or font selected is not printing or... is changing. • Your software is overriding your software application manual. • Make sure the correct printer driver is selected. Reset forms thickness lever. If possible, select resident fonts. Software application problem. • Refer to ...
...See "Selecting or locking a font" on page 44. Troubleshooting 131 between printing surface and the printhead. application manual. Adjust the left problem. Printer problems (continued) Problem Probable cause Line length is selected. Specified pitch or font selected is not printing or... is changing. • Your software is overriding your software application manual. • Make sure the correct printer driver is selected. Reset forms thickness lever. If possible, select resident fonts. Software application problem. • Refer to ...
User's Guide
Page 136
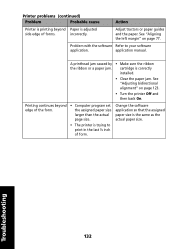
...application manual. Printing continues beyond Paper is adjusted side edge of form. Problem with the software Refer to print in the last ½ inch of forms. incorrectly. cartridge is the same as the actual paper size. Printer problems (continued) Problem Probable cause Action Printer is... printing beyond edge of the form. • Computer program set the assigned paper size larger...
...application manual. Printing continues beyond Paper is adjusted side edge of form. Problem with the software Refer to print in the last ½ inch of forms. incorrectly. cartridge is the same as the actual paper size. Printer problems (continued) Problem Probable cause Action Printer is... printing beyond edge of the form. • Computer program set the assigned paper size larger...
User's Guide
Page 142
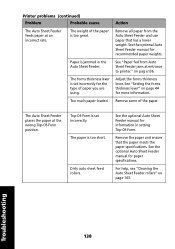
... Sheet Feeder places the paper at entrance to printer." Dirty auto sheet feed rollers. Troubleshooting 138 Paper is jammed in setting Top-Of-Form. Too much paper loaded. The paper is too great. See the optional Auto Sheet Feeder manual for more information. See "Paper fed from ...143. Remove all paper from Auto Sheet Feeder jams at the wrong Top-Of-Form position. Top-Of-Form is set incorrectly. See the optional Auto Sheet Feeder manual for the type of the paper. Printer problems (continued) Problem Probable cause Action The Auto Sheet Feeder feeds paper at ...
... Sheet Feeder places the paper at entrance to printer." Dirty auto sheet feed rollers. Troubleshooting 138 Paper is jammed in setting Top-Of-Form. Too much paper loaded. The paper is too great. See the optional Auto Sheet Feeder manual for more information. See "Paper fed from ...143. Remove all paper from Auto Sheet Feeder jams at the wrong Top-Of-Form position. Top-Of-Form is set incorrectly. See the optional Auto Sheet Feeder manual for the type of the paper. Printer problems (continued) Problem Probable cause Action The Auto Sheet Feeder feeds paper at ...

User's Guide
Page 166
... 25 load/unload feature, using 30 loading a cut form 72 an envelope 72 continuous forms 46 locking levers 33 M Macro function 4, 25, 28 maintenance cleaning 142 manual feed door 7 Micro up/down buttons 25 O offline, setting the printer 28 online, setting the printer 28 operator panel 7, 27 buttons 24, 25 Font ...24 Form Feed 24 lights 27, 28 Font 27 Font Lock 27 Macro 28 ...
... 25 load/unload feature, using 30 loading a cut form 72 an envelope 72 continuous forms 46 locking levers 33 M Macro function 4, 25, 28 maintenance cleaning 142 manual feed door 7 Micro up/down buttons 25 O offline, setting the printer 28 online, setting the printer 28 operator panel 7, 27 buttons 24, 25 Font ...24 Form Feed 24 lights 27, 28 Font 27 Font Lock 27 Macro 28 ...
User's Guide
Page 167
... button 26 Pitch light 28 power connector 9 switch 7 Power light 27 printer driver 19 printer parts forms thickness lever 7 front cover 7 latch 9 manual feed door 7 operator panel 7 paper guides 7 paper select lever 7 ...parallel interface connector 9 power connector 9 switch 7 tear bar 9 top cover 7 printer test 116 printing a cut form 73 an envelope 73 on continuous forms 46 printing becomes slower 141 problem conditions 128 characters are wrong or missing 128 dots...
... button 26 Pitch light 28 power connector 9 switch 7 Power light 27 printer driver 19 printer parts forms thickness lever 7 front cover 7 latch 9 manual feed door 7 operator panel 7 paper guides 7 paper select lever 7 ...parallel interface connector 9 power connector 9 switch 7 tear bar 9 top cover 7 printer test 116 printing a cut form 73 an envelope 73 on continuous forms 46 printing becomes slower 141 problem conditions 128 characters are wrong or missing 128 dots...


