
User's Guide
Page 2
... in Technical Data and Computer Software clause at any time. This publication could include technical inaccuracies or typographical errors. Lexmark, Lexmark with other countries, contact your point of purchase. All rights reserved. therefore, this publication to products, programs, ...changes in which it believes appropriate without incurring any existing intellectual property right may be used . Personal Printer Series is not intended to Lexmark International Ltd., Marketing and Services Department, Westhorpe House, Westhorpe, Marlow Bucks SL7 3RQ. Some states do...
... in Technical Data and Computer Software clause at any time. This publication could include technical inaccuracies or typographical errors. Lexmark, Lexmark with other countries, contact your point of purchase. All rights reserved. therefore, this publication to products, programs, ...changes in which it believes appropriate without incurring any existing intellectual property right may be used . Personal Printer Series is not intended to Lexmark International Ltd., Marketing and Services Department, Westhorpe House, Westhorpe, Marlow Bucks SL7 3RQ. Some states do...

User's Guide
Page 3
... your computer 14 Setting up your Windows and DOS application software 17 Chapter 2: Using the operator panel 21 Operator panel layers 22 Setting the printer online or offline 28 Advancing the paper 29 Using Tear Off 29 Using the Load/Unload feature 30 Locking/unlocking the operator panel 30 Selecting ... Converting the push tractor to pull tractor position 36 Converting the pull tractor to the push tractor position 40 Chapter 4: Loading paper 43 Setting the forms thickness lever 44 Loading continuous...
... your computer 14 Setting up your Windows and DOS application software 17 Chapter 2: Using the operator panel 21 Operator panel layers 22 Setting the printer online or offline 28 Advancing the paper 29 Using Tear Off 29 Using the Load/Unload feature 30 Locking/unlocking the operator panel 30 Selecting ... Converting the push tractor to pull tractor position 36 Converting the pull tractor to the push tractor position 40 Chapter 4: Loading paper 43 Setting the forms thickness lever 44 Loading continuous...
User's Guide
Page 4
... Using the Tear Off bar 87 Chapter 5: Using Setup mode 89 Using Setup mode to change printer settings 89 Setup menu options 95 Forms Macro menu options 96 Data menu options 100 Control menu options 102 Emulation menu options 103 Interface menu options 105 Chapter 6: ...Supplies 107 Ordering supplies 107 Parallel cable 108 USB cable ...108 Serial adapter and cable 108 Printer ribbon 108 Paper specifications 109...
... Using the Tear Off bar 87 Chapter 5: Using Setup mode 89 Using Setup mode to change printer settings 89 Setup menu options 95 Forms Macro menu options 96 Data menu options 100 Control menu options 102 Emulation menu options 103 Interface menu options 105 Chapter 6: ...Supplies 107 Ordering supplies 107 Parallel cable 108 USB cable ...108 Serial adapter and cable 108 Printer ribbon 108 Paper specifications 109...
User's Guide
Page 5
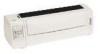
Depending on the printer model you have chosen, your printer The Lexmark™ Forms Printer 2400 Series are available in 9- Printer models Carriage width Cut forms Continuous forms Narrow 297 mm (11.7 in.) 254 mm (10.0 in.) Wide 419 mm (16.5 in.) 406 mm (16.0 in this manual. About your printer 1 About your printer may look different than those illustrated in .) 1 and 24-wire wide-carriage (2481 and 2491) models. and 24-wire narrow-carriage (2480 and 2490) and 9-
Depending on the printer model you have chosen, your printer The Lexmark™ Forms Printer 2400 Series are available in 9- Printer models Carriage width Cut forms Continuous forms Narrow 297 mm (11.7 in.) 254 mm (10.0 in.) Wide 419 mm (16.5 in.) 406 mm (16.0 in this manual. About your printer 1 About your printer may look different than those illustrated in .) 1 and 24-wire wide-carriage (2481 and 2491) models. and 24-wire narrow-carriage (2480 and 2490) and 9-

User's Guide
Page 6
..., and Fast Draft 2 Prints in 10, 12, 15, 17, 20, and 24 (cpi), as well as proportional spacing. About your printer Features and functions Printer features by model Feature/function 2480/2481 2490/2491 Multi-speed printing FastDft (Fast Draft) • 10 characters per inch (cpi) • 12 cpi • 438 characters per...
..., and Fast Draft 2 Prints in 10, 12, 15, 17, 20, and 24 (cpi), as well as proportional spacing. About your printer Features and functions Printer features by model Feature/function 2480/2481 2490/2491 Multi-speed printing FastDft (Fast Draft) • 10 characters per inch (cpi) • 12 cpi • 438 characters per...

User's Guide
Page 7
... by model (continued) Feature/function 2480/2481 2490/2491 Print styles Highlighting Available through capability: printer commands. • Double-high • Double-strike • Double-wide • Emphasized • Italics • Overscore &#... Shading • Outline Graphics printing Supports existing graphics software applications. Multiple-part forms Prints original plus three copies (fourpart forms). 3 Prints original plus five copies (six-part forms). Resolution of up to 144 x 240 dots per square inch (dpi). Resolution of up to 360 x 360 (dpi).
... by model (continued) Feature/function 2480/2481 2490/2491 Print styles Highlighting Available through capability: printer commands. • Double-high • Double-strike • Double-wide • Emphasized • Italics • Overscore &#... Shading • Outline Graphics printing Supports existing graphics software applications. Multiple-part forms Prints original plus three copies (fourpart forms). 3 Prints original plus five copies (six-part forms). Resolution of up to 144 x 240 dots per square inch (dpi). Resolution of up to 360 x 360 (dpi).

User's Guide
Page 8
... you set them as the menu default. Loads and unloads continuous form paper. About your application software. • Font or Pitch lock is deactivated when you turn the printer Off unless you in removing printed continuous forms at the perforation. • Reduces the amount of storing 4 unique...paper handling options (page length, margins and so on page 96. Enables printing on page 31. For more information, see "Forms Macro menu options" on ). This printer has the capability of paper used, reducing costs. 4 For information on setting up macros see "Selecting or locking a font"...
... you set them as the menu default. Loads and unloads continuous form paper. About your application software. • Font or Pitch lock is deactivated when you turn the printer Off unless you in removing printed continuous forms at the perforation. • Reduces the amount of storing 4 unique...paper handling options (page length, margins and so on page 96. Enables printing on page 31. For more information, see "Forms Macro menu options" on ). This printer has the capability of paper used, reducing costs. 4 For information on setting up macros see "Selecting or locking a font"...

User's Guide
Page 9
...(continued) Features/functions All models Adjustable tractor Built-in mathematical equations, including subscript and superscript. Greek and math symbols Prints a variety of all printer functions to designated persons only. About your monitor. These code pages contain the characters and symbols corresponding to the Start/Stop, FormFeed, Tear Off..., and Load/Unload buttons only, restricting the use of symbols used in adjustable tractor lets you handle continuous form paper without purchasing any options. It can be repositioned to function as shown on page 10.
...(continued) Features/functions All models Adjustable tractor Built-in mathematical equations, including subscript and superscript. Greek and math symbols Prints a variety of all printer functions to designated persons only. About your monitor. These code pages contain the characters and symbols corresponding to the Start/Stop, FormFeed, Tear Off..., and Load/Unload buttons only, restricting the use of symbols used in adjustable tractor lets you handle continuous form paper without purchasing any options. It can be repositioned to function as shown on page 10.
User's Guide
Page 10
...Software compatibility • Compatible with all computers with Okidata MICROLINE emulation (option must be installed). Available for 2480/2481 printers only. About your printer Features and functions (continued) Features/functions All models Bar code function These bar codes are standard. Both parallel... and USB interfaces are resident in the printer: • 3 of 9 • Code 128 • Interleaved 2 of 5 • UPC-A • EAN 8 • EAN 13 • PostNet For more information, see "Connecting the printer to the Technical Reference (www.lexmark.com).
...Software compatibility • Compatible with all computers with Okidata MICROLINE emulation (option must be installed). Available for 2480/2481 printers only. About your printer Features and functions (continued) Features/functions All models Bar code function These bar codes are standard. Both parallel... and USB interfaces are resident in the printer: • 3 of 9 • Code 128 • Interleaved 2 of 5 • UPC-A • EAN 8 • EAN 13 • PostNet For more information, see "Connecting the printer to the Technical Reference (www.lexmark.com).

User's Guide
Page 11
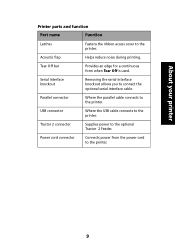
.... Manual feed door Pull down to load individual cut sheet. 7 Operator panel Indicates printer status and makes control of forms being printed. Paper guides Align the margins of a cut forms and envelopes. Printer description Forms thickness lever Ribbon access cover About your printer Front cover Operator panel Paper guides Manual feed door Power switch Paper select...
.... Manual feed door Pull down to load individual cut sheet. 7 Operator panel Indicates printer status and makes control of forms being printed. Paper guides Align the margins of a cut forms and envelopes. Printer description Forms thickness lever Ribbon access cover About your printer Front cover Operator panel Paper guides Manual feed door Power switch Paper select...

User's Guide
Page 12
About your printer Latch Acoustic Tear Off flap bar Latch Power cord connector Tractor 2 connector USB connector Parallel connector Optional serial interface knockout 8
About your printer Latch Acoustic Tear Off flap bar Latch Power cord connector Tractor 2 connector USB connector Parallel connector Optional serial interface knockout 8
User's Guide
Page 13
... cable. Serial interface knockout Removing the serial interface knockout allows you to the printer. USB connector Where the USB cable connects to the printer. 9 Tear Off bar Provides an edge for a continuous form when Tear Off is used. Power cord connector Connects power from the power ...cord to the printer. About your printer Printer parts and function Part name Function Latches Fastens the...
... cable. Serial interface knockout Removing the serial interface knockout allows you to the printer. USB connector Where the USB cable connects to the printer. 9 Tear Off bar Provides an edge for a continuous form when Tear Off is used. Power cord connector Connects power from the power ...cord to the printer. About your printer Printer parts and function Part name Function Latches Fastens the...
User's Guide
Page 14
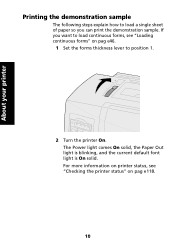
The Power light comes On solid, the Paper Out light is blinking, and the current default font light is On solid. For more information on printer status, see "Loading continuous forms" on pag e118. 10 About your printer Printing the demonstration sample The following steps explain how to load a single sheet of paper so you want to load continuous forms, see "Checking the printer status" on pag e46. 1 Set the forms thickness lever to position 1. 2 Turn the printer On. If you can print the demonstration sample.
The Power light comes On solid, the Paper Out light is blinking, and the current default font light is On solid. For more information on printer status, see "Loading continuous forms" on pag e118. 10 About your printer Printing the demonstration sample The following steps explain how to load a single sheet of paper so you want to load continuous forms, see "Checking the printer status" on pag e46. 1 Set the forms thickness lever to position 1. 2 Turn the printer On. If you can print the demonstration sample.
User's Guide
Page 15
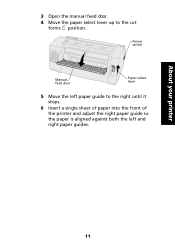
About your printer 3 Open the manual feed door. 4 Move the paper select lever up to the right until it stops. 6 Insert a single sheet of paper into the front of the printer and adjust the right paper guide so the paper is aligned against both the left and right paper guides. 11 Power switch Manual feed door Paper select lever 5 Move the left paper guide to the cut forms position.
About your printer 3 Open the manual feed door. 4 Move the paper select lever up to the right until it stops. 6 Insert a single sheet of paper into the front of the printer and adjust the right paper guide so the paper is aligned against both the left and right paper guides. 11 Power switch Manual feed door Paper select lever 5 Move the left paper guide to the cut forms position.

User's Guide
Page 16
Left paper guide Right paper guide 12 About your printer 7 Insert paper into the printer until the Paper Out light stops blinking. • If Auto Cut Sheet Load is set to On, the paper feeds automatically to the Top-OfForm. • If Auto Cut Sheet Load is set to Off, press FormFeed.
Left paper guide Right paper guide 12 About your printer 7 Insert paper into the printer until the Paper Out light stops blinking. • If Auto Cut Sheet Load is set to On, the paper feeds automatically to the Top-OfForm. • If Auto Cut Sheet Load is set to Off, press FormFeed.

User's Guide
Page 17
Continue pressing Font until all the operator panel lights blink. 10 Release the Font button. Power Ready Tractor2 Paper out Start/Stop LineFeed FormFeed Tear Off Load/Unload Tractor Font Lock Courier Prestige Gothic Presentor Orator Script Draft FastDft 13 The Power and Ready lights stay On and the demonstration page prints. About your printer 8 Turn the printer Off. 9 While pressing Font on the operator panel turn the printer On.
Continue pressing Font until all the operator panel lights blink. 10 Release the Font button. Power Ready Tractor2 Paper out Start/Stop LineFeed FormFeed Tear Off Load/Unload Tractor Font Lock Courier Prestige Gothic Presentor Orator Script Draft FastDft 13 The Power and Ready lights stay On and the demonstration page prints. About your printer 8 Turn the printer Off. 9 While pressing Font on the operator panel turn the printer On.
User's Guide
Page 18
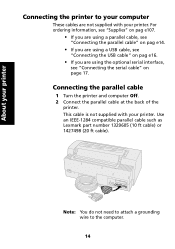
... computer Off. 2 Connect the parallel cable at the back of the printer. Use an IEEE-1284 compatible parallel cable such as Lexmark part number 1329605 (10 ft cable) or 1427498 (20 ft cable). Note: You do not need to attach a grounding wire to your computer These cables ...are using a USB cable, see "Connecting the serial cable" on page 17. This cable is not supplied with your printer. For ordering information...
... computer Off. 2 Connect the parallel cable at the back of the printer. Use an IEEE-1284 compatible parallel cable such as Lexmark part number 1329605 (10 ft cable) or 1427498 (20 ft cable). Note: You do not need to attach a grounding wire to your computer These cables ...are using a USB cable, see "Connecting the serial cable" on page 17. This cable is not supplied with your printer. For ordering information...
User's Guide
Page 19
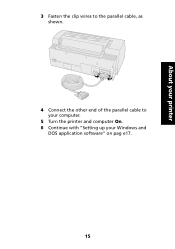
About your printer 3 Fasten the clip wires to the parallel cable, as shown. 4 Connect the other end of the parallel cable to your computer. 5 Turn the printer and computer On. 6 Continue with "Setting up your Windows and DOS application software" on pag e17. 15
About your printer 3 Fasten the clip wires to the parallel cable, as shown. 4 Connect the other end of the parallel cable to your computer. 5 Turn the printer and computer On. 6 Continue with "Setting up your Windows and DOS application software" on pag e17. 15

User's Guide
Page 20
Order the Lexmark USB cable using part number 12A2405. 3 Connect the other end of the printer. About your Windows and DOS application software" on pag e17. 16 This cable is not supplied with "Setting up your printer Connecting the USB cable 1 Turn the printer and computer Off. 2 Connect the USB cable at the back of the USB cable to your computer. 4 Turn the printer and computer On. 5 Continue with your printer.
Order the Lexmark USB cable using part number 12A2405. 3 Connect the other end of the printer. About your Windows and DOS application software" on pag e17. 16 This cable is not supplied with "Setting up your printer Connecting the USB cable 1 Turn the printer and computer Off. 2 Connect the USB cable at the back of the USB cable to your computer. 4 Turn the printer and computer On. 5 Continue with your printer.

User's Guide
Page 21
About your Windows and DOS application software Windows-based applications If you are in the readme.1st file included in the download package. 17 Setting up your printer Connecting the serial cable For installation and connection instructions, see the optional serial interface manual. Note: Instructions for installing drivers are using a Windows program, use the Windows Forms Printer 2400 Series driver available from the Lexmark Web site at www.lexmark.com.
About your Windows and DOS application software Windows-based applications If you are in the readme.1st file included in the download package. 17 Setting up your printer Connecting the serial cable For installation and connection instructions, see the optional serial interface manual. Note: Instructions for installing drivers are using a Windows program, use the Windows Forms Printer 2400 Series driver available from the Lexmark Web site at www.lexmark.com.


