Service Manual
Page 4
... Roller Removal 4-9 Bottom Cover Removal 4-10 Carrier Removal 4-12 Carrier Motor Assembly Removal 4-16 Carrier Plate Removal 4-18 Download or Print Buffer Module Removal 4-21 Form Thickness Lever Removal 4-22 Head Gap Sensor Removal (238X-001 4-23 Head Gap Sensor Removal (23XX-002, 003 4-24 Home Position Sensor Removal 4-25 Label... Removal 4-47 Printhead Removal 4-48 Printhead Cables Removal 4-49 Pull Tractor Removal 4-50 Pull Tractor Actuator Removal 4-51 Pull Tractor Sensor Removal 4-52 vi Service Manual
... Roller Removal 4-9 Bottom Cover Removal 4-10 Carrier Removal 4-12 Carrier Motor Assembly Removal 4-16 Carrier Plate Removal 4-18 Download or Print Buffer Module Removal 4-21 Form Thickness Lever Removal 4-22 Head Gap Sensor Removal (238X-001 4-23 Head Gap Sensor Removal (23XX-002, 003 4-24 Home Position Sensor Removal 4-25 Label... Removal 4-47 Printhead Removal 4-48 Printhead Cables Removal 4-49 Pull Tractor Removal 4-50 Pull Tractor Actuator Removal 4-51 Pull Tractor Sensor Removal 4-52 vi Service Manual

Service Manual
Page 6
Parts Catalog 7-1 How To Use This Parts Catalog 7-1 Assembly 1: Major Components 7-2 Assembly 2: Covers 7-6 Assembly 3: Carrier 7-10 Assembly 4: Paper Guide / Platen / Feed Roller 7-16 Assembly 5: Electronics 7-20 Assembly 6: ASF - Roller / Support 7-26 Assembly 7: ASF - Side Frame / Covers 7-28 Assembly 8:Tractor 2 Option 7-30 viii Service Manual
Parts Catalog 7-1 How To Use This Parts Catalog 7-1 Assembly 1: Major Components 7-2 Assembly 2: Covers 7-6 Assembly 3: Carrier 7-10 Assembly 4: Paper Guide / Platen / Feed Roller 7-16 Assembly 5: Electronics 7-20 Assembly 6: ASF - Roller / Support 7-26 Assembly 7: ASF - Side Frame / Covers 7-28 Assembly 8:Tractor 2 Option 7-30 viii Service Manual

Service Manual
Page 11
...replaceable units (FRUs). • "Diagnostic Aids" contains tests and checks used to locate or repeat symptoms of the printer and the maintenance approach used to prevent problems and maintain optimum performance. • "Parts Catalog" contains illustrations and... part numbers for individual FRUs. Preface This manual is divided into the following chapters: • "General Information" contains a general description of printer problems. • "Repair Information" provides instructions for making printer adjustments and removing and installing FRUs. • "Connector...
...replaceable units (FRUs). • "Diagnostic Aids" contains tests and checks used to locate or repeat symptoms of the printer and the maintenance approach used to prevent problems and maintain optimum performance. • "Parts Catalog" contains illustrations and... part numbers for individual FRUs. Preface This manual is divided into the following chapters: • "General Information" contains a general description of printer problems. • "Repair Information" provides instructions for making printer adjustments and removing and installing FRUs. • "Connector...

Service Manual
Page 42
Check the belt and pulley engagement. Manually move the carrier again. If the carrier still binds: Remove the belt and move the carrier the full length of the carriage to check for ... carrier binds check the following: • Correct printhead-to make sure the ribbon advances when the carriage moves in either direction. If the carrier moves manually without binding but the Home Position Error still occurs, verify that the 5 V dc home position sensor signal is gone, replace the carrier motor. . If the...
Check the belt and pulley engagement. Manually move the carrier again. If the carrier still binds: Remove the belt and move the carrier the full length of the carriage to check for ... carrier binds check the following: • Correct printhead-to make sure the ribbon advances when the carriage moves in either direction. If the carrier moves manually without binding but the Home Position Error still occurs, verify that the 5 V dc home position sensor signal is gone, replace the carrier motor. . If the...
Service Manual
Page 51
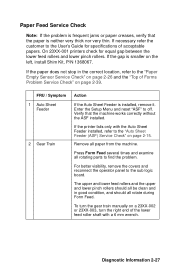
... Enter the Setup Menu and reset "ASF" to the sub logic board. To turn the gear train manually on page 2-15. If necessary refer the customer to the "Auto Sheet Feeder (ASF) Service Check"...on a 23XX-002 or 23XX-003, turn the right end of acceptable papers. On 23XX-001 printers check for specifications of the lower feed roller shaft with the Auto Sheet Feeder installed, refer to... pinch rollers should all rotate during Form Feed. FRU / Symptom 1 Auto Sheet Feeder 2 Gear Train Action If the Auto Sheet Feeder is neither very thick nor very thin. If the printer fails only with a 6 mm ...
... Enter the Setup Menu and reset "ASF" to the sub logic board. To turn the gear train manually on page 2-15. If necessary refer the customer to the "Auto Sheet Feeder (ASF) Service Check"...on a 23XX-002 or 23XX-003, turn the right end of acceptable papers. On 23XX-001 printers check for specifications of the lower feed roller shaft with the Auto Sheet Feeder installed, refer to... pinch rollers should all rotate during Form Feed. FRU / Symptom 1 Auto Sheet Feeder 2 Gear Train Action If the Auto Sheet Feeder is neither very thick nor very thin. If the printer fails only with a 6 mm ...
