User's Guide
Page 9
... the status of supplies...252 Checking the status of supplies from the printer control panel 252 Checking the status of supplies from a network computer 252 Ordering supplies...253 Ordering print cartridges ...253 Ordering a maintenance kit ...254 Ordering a fuser...255 Ordering ... ADF replacement parts...256 Ordering staple cartridges...256 Recycling Lexmark products...256 Moving the printer...256 Before moving the printer ...256 Moving the printer to another location...257 Setting the printer up in a new location ...257 Shipping the printer ...258 Administrative support 259 Finding advanced...
... the status of supplies...252 Checking the status of supplies from the printer control panel 252 Checking the status of supplies from a network computer 252 Ordering supplies...253 Ordering print cartridges ...253 Ordering a maintenance kit ...254 Ordering a fuser...255 Ordering ... ADF replacement parts...256 Ordering staple cartridges...256 Recycling Lexmark products...256 Moving the printer...256 Before moving the printer ...256 Moving the printer to another location...257 Setting the printer up in a new location ...257 Shipping the printer ...258 Administrative support 259 Finding advanced...
User's Guide
Page 21
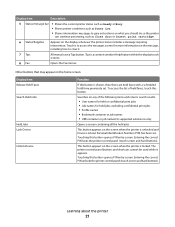
... and hard buttons). Display item Description 5 Status message bar • Shows the current printer status such as Ready or Busy. • Shows printer conditions such as Close door or Insert print cartridge. 6 Status/Supplies Appears on the display whenever the printer status includes a message requiring intervention. This button appears on the screen when the...
... and hard buttons). Display item Description 5 Status message bar • Shows the current printer status such as Ready or Busy. • Shows printer conditions such as Close door or Insert print cartridge. 6 Status/Supplies Appears on the display whenever the printer status includes a message requiring intervention. This button appears on the screen when the...

User's Guide
Page 91
... types and weights supported by the finisher Use this table to determine the possible output destinations of each output bin is included with the special cartridge required for label applications. The label fuser cleaner is listed in parentheses. or 550-sheet trays (standard or optional) Optional 2000-sheet tray Multipurpose feeder.... The duplex unit supports 63-170 g/m2 (17-45 lb) paper weights. Paper and specialty media guidelines 91 Paper types and weights supported by the printer The printer engine supports 60-176 g/m2 (16-47 lb) paper weights. Paper type 250-
... types and weights supported by the finisher Use this table to determine the possible output destinations of each output bin is included with the special cartridge required for label applications. The label fuser cleaner is listed in parentheses. or 550-sheet trays (standard or optional) Optional 2000-sheet tray Multipurpose feeder.... The duplex unit supports 63-170 g/m2 (17-45 lb) paper weights. Paper and specialty media guidelines 91 Paper types and weights supported by the printer The printer engine supports 60-176 g/m2 (16-47 lb) paper weights. Paper type 250-
User's Guide
Page 132
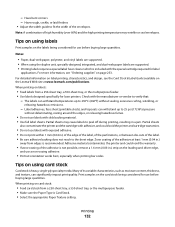
... setting. For more information, see the Card Stock & Label Guide available on the Lexmark Web site at least 1 mm (0.04 in .) strip on page 253. Partial sheets also contaminate the printer and the cartridge with exposed adhesive. • Do not print within 1 mm (0.04 in a ... the perforations, or between die-cuts of the envelopes. Partial sheets may wrinkle or seal envelopes. Adhesive material contaminates the printer and could void the printer and cartridge warranties. • Do not use a non-oozing adhesive. • Portrait orientation works best, especially when printing bar ...
... setting. For more information, see the Card Stock & Label Guide available on the Lexmark Web site at least 1 mm (0.04 in .) strip on page 253. Partial sheets also contaminate the printer and the cartridge with exposed adhesive. • Do not print within 1 mm (0.04 in a ... the perforations, or between die-cuts of the envelopes. Partial sheets may wrinkle or seal envelopes. Adhesive material contaminates the printer and could void the printer and cartridge warranties. • Do not use a non-oozing adhesive. • Portrait orientation works best, especially when printing bar ...
User's Guide
Page 141
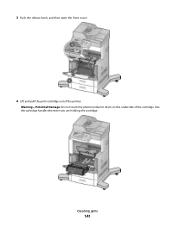
3 Push the release latch, and then open the front cover. 4 Lift and pull the print cartridge out of the cartridge. Clearing jams 141 Use the cartridge handle whenever you are holding the cartridge. Warning-Potential Damage: Do not touch the photoconductor drum on the underside of the printer.
3 Push the release latch, and then open the front cover. 4 Lift and pull the print cartridge out of the cartridge. Clearing jams 141 Use the cartridge handle whenever you are holding the cartridge. Warning-Potential Damage: Do not touch the photoconductor drum on the underside of the printer.
User's Guide
Page 142
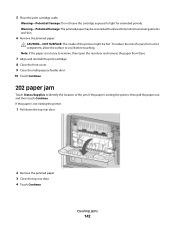
.... Warning-Potential Damage: The jammed paper may be hot. CAUTION-HOT SURFACE: The inside of injury from there. 7 Align and reinstall the print cartridge. 8 Close the front cover. 9 Close the multipurpose feeder door. 10 Touch Continue. 202 paper jam Touch Status/Supplies to light for extended periods.... Warning-Potential Damage: Do not leave the cartridge exposed to identify the location of the jam. If the paper is exiting the printer, then pull the paper out, and then touch Continue. To reduce the risk of the...
.... Warning-Potential Damage: The jammed paper may be hot. CAUTION-HOT SURFACE: The inside of injury from there. 7 Align and reinstall the print cartridge. 8 Close the front cover. 9 Close the multipurpose feeder door. 10 Touch Continue. 202 paper jam Touch Status/Supplies to light for extended periods.... Warning-Potential Damage: Do not leave the cartridge exposed to identify the location of the jam. If the paper is exiting the printer, then pull the paper out, and then touch Continue. To reduce the risk of the...

User's Guide
Page 146
... the location of the stack; the bottom envelope will have to be pulled out, then lift the envelope feeder up and then out of the printer, and then set it snaps into a bin, then pull the paper straight out, and then touch Continue. For more information, see "200 and 201... door. 5 Touch Continue. Note: If you cannot remove the envelope, then the print cartridge will be the one that is jammed. 1 Lift the envelope weight. 2 Remove all envelopes. 3 If the jammed envelope has entered the printer and cannot be removed. 260 paper jam Touch Status/Supplies to identify the location of...
... the location of the stack; the bottom envelope will have to be pulled out, then lift the envelope feeder up and then out of the printer, and then set it snaps into a bin, then pull the paper straight out, and then touch Continue. For more information, see "200 and 201... door. 5 Touch Continue. Note: If you cannot remove the envelope, then the print cartridge will be the one that is jammed. 1 Lift the envelope weight. 2 Remove all envelopes. 3 If the jammed envelope has entered the printer and cannot be removed. 260 paper jam Touch Status/Supplies to identify the location of...
User's Guide
Page 147
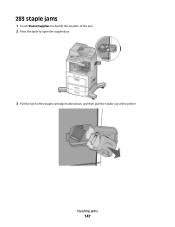
Clearing jams 147 283 staple jams 1 Touch Status/Supplies to identify the location of the jam. 2 Press the latch to open the stapler door. 3 Pull the latch of the staple cartridge holder down, and then pull the holder out of the printer.
Clearing jams 147 283 staple jams 1 Touch Status/Supplies to identify the location of the jam. 2 Press the latch to open the stapler door. 3 Pull the latch of the staple cartridge holder down, and then pull the holder out of the printer.
User's Guide
Page 186
...Errors can be customized with the following options: None IP Address Hostname Contact Name Location Date/Time mDNS/DDNS Service Name Zero Configuration Name Cartridge Level Custom Text Notes: • IP Address is the factory default setting for Left side. • Date/Time is the factory... default setting for Display When Supply Registers. • Default is the factory default setting for Type of Message to Display. Understanding printer menus 186 Menu item Displayed Information Left side Right side Custom Text Black Toner Display When Supply Registers Off Early Warning Low Near ...
...Errors can be customized with the following options: None IP Address Hostname Contact Name Location Date/Time mDNS/DDNS Service Name Zero Configuration Name Cartridge Level Custom Text Notes: • IP Address is the factory default setting for Left side. • Date/Time is the factory... default setting for Display When Supply Registers. • Default is the factory default setting for Type of Message to Display. Understanding printer menus 186 Menu item Displayed Information Left side Right side Custom Text Black Toner Display When Supply Registers Off Early Warning Low Near ...
User's Guide
Page 189
... quick beeps. • Off is installed. Specifies the number of minutes of time the printer waits for Toner Alarm and Staple Alarm. Menu item Location Alarms Alarm Control Cartridge Alarm Staple Alarm Timeouts Job Hold Timeout Disabled 5-255 Timeouts Standby Mode Disabled 2-240 Timeouts ...Power Saver Mode Disabled 2-240 Timeouts Screen Timeout 15-300 Description Specifies the location of time in seconds the printer waits before it holds ...
... quick beeps. • Off is installed. Specifies the number of minutes of time the printer waits for Toner Alarm and Staple Alarm. Menu item Location Alarms Alarm Control Cartridge Alarm Staple Alarm Timeouts Job Hold Timeout Disabled 5-255 Timeouts Standby Mode Disabled 2-240 Timeouts ...Power Saver Mode Disabled 2-240 Timeouts Screen Timeout 15-300 Description Specifies the location of time in seconds the printer waits before it holds ...
User's Guide
Page 232
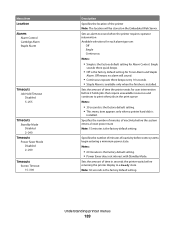
... Canceled The scan job canceled or stopped due to send the fax job. Fax memory full There is too long to clear. Insert the cartridge and close all the files currently stored on a corrupted hard disk, and the hard disk cannot be repaired. Wait for the message to ... disk space. Wait for the message to be reformatted. Note: is dialed. Disk corrupted The printer attempted a hard disk recovery on the disk. Touch Continue to clear. Understanding printer messages 232 Dialing A fax number is the baud rate per second. Disk Full - Fax failed The fax failed to clear. ...
... Canceled The scan job canceled or stopped due to send the fax job. Fax memory full There is too long to clear. Insert the cartridge and close all the files currently stored on a corrupted hard disk, and the hard disk cannot be repaired. Wait for the message to ... disk space. Wait for the message to be reformatted. Note: is dialed. Disk corrupted The printer attempted a hard disk recovery on the disk. Touch Continue to clear. Understanding printer messages 232 Dialing A fax number is the baud rate per second. Disk Full - Fax failed The fax failed to clear. ...
User's Guide
Page 233
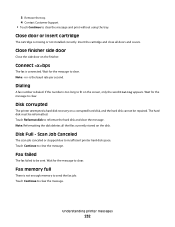
... the message appears again, then contact your system support person. Sending and receiving faxes is disabled until fax is configured properly. Insert staple cartridge Try one or more of the following : • Touch Continue to clear the message. • Complete the Fax Server setup. Try...Complete the Analog Fax Setup. Try one or more of the following : • Touch Continue to clear the message. • Turn the printer off and then back on to clear the message. • Complete the Analog Fax Setup. Contact system administrator. Insert Tray Insert the specified ...
... the message appears again, then contact your system support person. Sending and receiving faxes is disabled until fax is configured properly. Insert staple cartridge Try one or more of the following : • Touch Continue to clear the message. • Complete the Fax Server setup. Try...Complete the Analog Fax Setup. Try one or more of the following : • Touch Continue to clear the message. • Turn the printer off and then back on to clear the message. • Complete the Analog Fax Setup. Contact system administrator. Insert Tray Insert the specified ...

User's Guide
Page 235
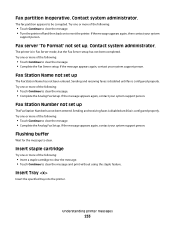
...print server. Held faxes will attempt to modem, fax is connected to clear the message and continue printing. Network indicates that the printer is disabled. If the printer cannot find a tray with the correct paper type and size, it prints from the default source. • Cancel the current ... board. If the printer cannot find a tray with the correct paper type and size, then it prints from the default source. • Cancel the current job. Try one or more of the following : • Replace the specified staple cartridge in the tray. • Touch Continue to cancel the ...
...print server. Held faxes will attempt to modem, fax is connected to clear the message and continue printing. Network indicates that the printer is disabled. If the printer cannot find a tray with the correct paper type and size, it prints from the default source. • Cancel the current ... board. If the printer cannot find a tray with the correct paper type and size, then it prints from the default source. • Cancel the current job. Try one or more of the following : • Replace the specified staple cartridge in the tray. • Touch Continue to cancel the ...
User's Guide
Page 240
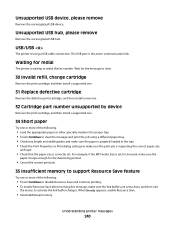
...then exit the menus to redial the fax number. When Ready appears, enable Resource Save. • Install additional memory. Understanding printer messages 240 For example, if the MP Feeder Size is the active communication link. Wait for the message to clear. 30 Invalid ...refill, change cartridge Remove the print cartridge, and then install a supported one. 31 Replace defective cartridge Remove the defective print cartridge, and then install a new one. 32 Cartridge part number unsupported by device Remove the print cartridge, and then install a supported one. 34 ...
...then exit the menus to redial the fax number. When Ready appears, enable Resource Save. • Install additional memory. Understanding printer messages 240 For example, if the MP Feeder Size is the active communication link. Wait for the message to clear. 30 Invalid ...refill, change cartridge Remove the print cartridge, and then install a supported one. 31 Replace defective cartridge Remove the defective print cartridge, and then install a new one. 32 Cartridge part number unsupported by device Remove the print cartridge, and then install a supported one. 34 ...
User's Guide
Page 241
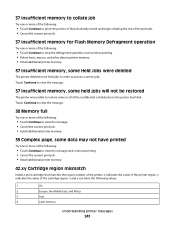
... the message and continue printing. • Cancel the current print job. • Install additional printer memory. 42.xy Cartridge region mismatch Install a print cartridge that matches the region number of the cartridge region. Touch Continue to clear the message. 37 Insufficient memory, some held jobs will not be... restored The printer was unable to restore some or all of the printer region. Touch Continue to clear the message. 38 Memory full ...
... the message and continue printing. • Cancel the current print job. • Install additional printer memory. 42.xy Cartridge region mismatch Install a print cartridge that matches the region number of the cartridge region. Touch Continue to clear the message. 37 Insufficient memory, some held jobs will not be... restored The printer was unable to restore some or all of the printer region. Touch Continue to clear the message. 38 Memory full ...
User's Guide
Page 246
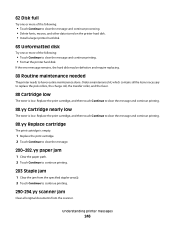
... the print cartridge. 2 Touch Continue to clear the message. 200-282.yy paper jam 1 Clear the paper path. 2 Touch Continue to continue printing. 283 Staple jam 1 Clear the jam from the specified stapler area(s). 2 Touch Continue to clear the message and continue printing. • Format the printer hard disk. Understanding printer messages 246...
... the print cartridge. 2 Touch Continue to clear the message. 200-282.yy paper jam 1 Clear the paper path. 2 Touch Continue to continue printing. 283 Staple jam 1 Clear the jam from the specified stapler area(s). 2 Touch Continue to clear the message and continue printing. • Format the printer hard disk. Understanding printer messages 246...

User's Guide
Page 253
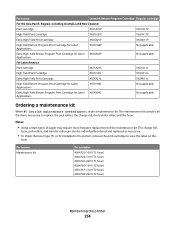
... X651A11E X651H11E X654X11E Not applicable Not applicable Maintaining the printer 253 Recommended print cartridges and part numbers Part name For the US and Canada Print cartridge Lexmark Return Program Cartridge Regular cartridge X651A11A X651A21A High Yield Print Cartridge X651H11A X651H21A Extra High Yield Print Cartridge High Yield Return Program Print Cartridge for Label Applications Extra High Yield Return Program...
... X651A11E X651H11E X654X11E Not applicable Not applicable Maintaining the printer 253 Recommended print cartridges and part numbers Part name For the US and Canada Print cartridge Lexmark Return Program Cartridge Regular cartridge X651A11A X651A21A High Yield Print Cartridge X651H11A X651H21A Extra High Yield Print Cartridge High Yield Return Program Print Cartridge for Label Applications Extra High Yield Return Program...
User's Guide
Page 254
... individually ordered and replaced as necessary. • To check the fuser type (T1 or T2) installed in the printer, remove the print cartridge to replace the pick rollers, the charge roll, the transfer roller, and the fuser. Notes: • Using certain...fuser. Part name Lexmark Return Program Cartridge Regular cartridge For the Asia Pacific Region, including Australia and New Zealand Print cartridge X651A21P X651A11P High Yield Print Cartridge X651H21P X651H11P Extra High Yield Print Cartridge X654X21P X654X11P High Yield Return Program Print Cartridge for Label Applications ...
... individually ordered and replaced as necessary. • To check the fuser type (T1 or T2) installed in the printer, remove the print cartridge to replace the pick rollers, the charge roll, the transfer roller, and the fuser. Notes: • Using certain...fuser. Part name Lexmark Return Program Cartridge Regular cartridge For the Asia Pacific Region, including Australia and New Zealand Print cartridge X651A21P X651A11P High Yield Print Cartridge X651H21P X651H11P Extra High Yield Print Cartridge X654X21P X654X11P High Yield Return Program Print Cartridge for Label Applications ...
User's Guide
Page 255
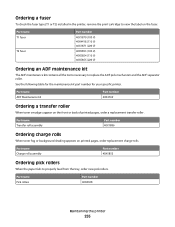
...the fuser type (T1 or T2) installed in the printer, remove the print cartridge to view the label on the front or back of printed pages, order a replacement transfer roller. Part name Pick rollers Part number 40X4308 Maintaining the printer 255 Part name ADF Maintenance kit Part number 40X4769 ...to properly feed from the tray, order new pick rollers. See the following table for the maintenance kit part number for your specific printer. Part name Transfer roll assembly Part number 40X1886 Ordering charge rolls When toner fog or background shading appears on printed pages, order ...
...the fuser type (T1 or T2) installed in the printer, remove the print cartridge to view the label on the front or back of printed pages, order a replacement transfer roller. Part name Pick rollers Part number 40X4308 Maintaining the printer 255 Part name ADF Maintenance kit Part number 40X4769 ...to properly feed from the tray, order new pick rollers. See the following table for the maintenance kit part number for your specific printer. Part name Transfer roll assembly Part number 40X1886 Ordering charge rolls When toner fog or background shading appears on printed pages, order ...
User's Guide
Page 256
Maintaining the printer 256 Part name Staple Cartridges-3 pack Part number 25A0013 Recycling Lexmark products To return Lexmark products to Lexmark for recycling: 1 Visit our Web site at www.lexmark.com/recycle. 2 Find the product type you experience problems with paper double-feeding or failing to feed through the automatic document feeder. Moving the printer Before moving the...
Maintaining the printer 256 Part name Staple Cartridges-3 pack Part number 25A0013 Recycling Lexmark products To return Lexmark products to Lexmark for recycling: 1 Visit our Web site at www.lexmark.com/recycle. 2 Find the product type you experience problems with paper double-feeding or failing to feed through the automatic document feeder. Moving the printer Before moving the...


