
User Manual
Page 3
...29 Installing a flash memory or firmware card...30 Installing an Internal Solutions Port...32 Installing a printer hard disk ...38 Installing a fax card ...42 Attaching cables...44 Verifying printer setup...45 Printing a menu settings page...45 Printing a network setup page ...46 Setting up the...wireless printing...48 Information you will need to set up the printer on a wireless network 48 Installing the printer on a wireless network (Windows 49 Installing the printer on a wireless network (Macintosh 50 Installing the printer on a wired network...53 Changing port settings after installing a...
...29 Installing a flash memory or firmware card...30 Installing an Internal Solutions Port...32 Installing a printer hard disk ...38 Installing a fax card ...42 Attaching cables...44 Verifying printer setup...45 Printing a menu settings page...45 Printing a network setup page ...46 Setting up the...wireless printing...48 Information you will need to set up the printer on a wireless network 48 Installing the printer on a wireless network (Windows 49 Installing the printer on a wireless network (Macintosh 50 Installing the printer on a wired network...53 Changing port settings after installing a...

User Manual
Page 4
... paper and other office papers ...87 Storing paper...87 Supported paper sizes, types, and weights...88 Paper sizes supported by the printer ...88 Paper types and weights supported by the printer ...90 Paper types and weights supported by the finisher...90 Copying 92 Making copies...92 Making a quick copy...92 Copying using...
... paper and other office papers ...87 Storing paper...87 Supported paper sizes, types, and weights...88 Paper sizes supported by the printer ...88 Paper types and weights supported by the printer ...90 Paper types and weights supported by the finisher...90 Copying 92 Making copies...92 Making a quick copy...92 Copying using...

User Manual
Page 6
... File Name...109 E-mail Message ...110 Resolution...110 Send As ...110 Content...110 Advanced Options...110 Faxing 111 Sending a fax...111 Sending a fax using the printer control panel...111 Sending a fax using the computer ...112 Creating shortcuts...112 Creating a fax destination shortcut using the Embedded Web Server 112 Creating a fax destination...
... File Name...109 E-mail Message ...110 Resolution...110 Send As ...110 Content...110 Advanced Options...110 Faxing 111 Sending a fax...111 Sending a fax using the printer control panel...111 Sending a fax using the computer ...112 Creating shortcuts...112 Creating a fax destination shortcut using the Embedded Web Server 112 Creating a fax destination...

User Manual
Page 8
...130 Tips on using labels...131 Tips on using card stock ...131 Printing confidential and other held jobs...132 Holding jobs in the printer ...132 Printing confidential and other held jobs from Windows 133 Printing confidential and other held jobs from a Macintosh computer 133 Printing from......135 Printing a directory list...135 Printing the print quality test pages ...135 Canceling a print job...135 Canceling a print job from the printer control panel ...135 Canceling a print job from the computer ...136 Clearing jams 138 Avoiding jams...138 Understanding jam numbers and locations...139 200...
...130 Tips on using labels...131 Tips on using card stock ...131 Printing confidential and other held jobs...132 Holding jobs in the printer ...132 Printing confidential and other held jobs from Windows 133 Printing confidential and other held jobs from a Macintosh computer 133 Printing from......135 Printing a directory list...135 Printing the print quality test pages ...135 Canceling a print job...135 Canceling a print job from the printer control panel ...135 Canceling a print job from the computer ...136 Clearing jams 138 Avoiding jams...138 Understanding jam numbers and locations...139 200...
User Manual
Page 10
......253 Storing supplies...255 Conserving supplies...255 Checking the status of supplies...255 Checking the status of supplies from the printer control panel 255 Checking the status of supplies from a network computer 255 Ordering supplies...256 Ordering print cartridges ...256...parts...259 Ordering staple cartridges...259 Recycling Lexmark products...259 Moving the printer...259 Before moving the printer...259 Moving the printer to another location...260 Setting the printer up in a new location ...260 Shipping the printer ...261 Administrative support 262 Finding advanced networking...
......253 Storing supplies...255 Conserving supplies...255 Checking the status of supplies...255 Checking the status of supplies from the printer control panel 255 Checking the status of supplies from a network computer 255 Ordering supplies...256 Ordering print cartridges ...256...parts...259 Ordering staple cartridges...259 Recycling Lexmark products...259 Moving the printer...259 Before moving the printer...259 Moving the printer to another location...260 Setting the printer up in a new location ...260 Shipping the printer ...261 Administrative support 262 Finding advanced networking...

User Manual
Page 11
Troubleshooting 266 Solving basic printer problems...266 Printer control panel display is blank or displays only diamonds 266 Solving printing problems...266 Multiple-language PDFs do not print...266 Error message about reading ...
Troubleshooting 266 Solving basic printer problems...266 Printer control panel display is blank or displays only diamonds 266 Solving printing problems...266 Multiple-language PDFs do not print...266 Error message about reading ...

User Manual
Page 13
... media to avoid the possibility of lithium battery. Do not recharge, disassemble, or incinerate a lithium battery. CAUTION-POTENTIAL INJURY: The printer weight is not responsible for signs of misuse. If the power cord is incorrectly replaced. CAUTION-POTENTIAL INJURY: This product uses a ...CAUTION-SHOCK HAZARD: Make sure that all cords and cables from the electrical outlet before touching. Remove the power cord from the printer before continuing. Safety information 13 Safety information Connect the power cord to a properly grounded electrical outlet that is designed, tested,...
... media to avoid the possibility of lithium battery. Do not recharge, disassemble, or incinerate a lithium battery. CAUTION-POTENTIAL INJURY: The printer weight is not responsible for signs of misuse. If the power cord is incorrectly replaced. CAUTION-POTENTIAL INJURY: This product uses a ...CAUTION-SHOCK HAZARD: Make sure that all cords and cables from the electrical outlet before touching. Remove the power cord from the printer before continuing. Safety information 13 Safety information Connect the power cord to a properly grounded electrical outlet that is designed, tested,...

User Manual
Page 14
If you purchased a multifunction printer (MFP) that scans, copies, and faxes, you are using a high-capacity input tray, a duplex unit and an input option, or more information, see www.lexmark.com/multifunctionprinters. You must use the fax feature during a lightning storm. For more than ...those described in the user documentation, to a professional service person. CAUTION-SHOCK HAZARD: To avoid the risk of electric shock when cleaning the exterior of the printer, ...
If you purchased a multifunction printer (MFP) that scans, copies, and faxes, you are using a high-capacity input tray, a duplex unit and an input option, or more information, see www.lexmark.com/multifunctionprinters. You must use the fax feature during a lightning storm. For more than ...those described in the user documentation, to a professional service person. CAUTION-SHOCK HAZARD: To avoid the risk of electric shock when cleaning the exterior of the printer, ...
User Manual
Page 15
... Support link. • Canada: 1-800-539-6275 Note: For additional information about Monday-Friday (8:00 AM-11:00 PM contacting Lexmark, see the printed warranty statement that came with your printer. Saturday (Noon-6:00 PM ET) • Mexico: 001-888-377-0063 Monday-Friday (8:00 AM-8:00 PM ET) Note: ...what you instructions for You can find (rest of instructions box or on the side of the printer setting up the printer. Monday-Friday (8:00 AM-11:00 PM Visit our Web site at www.lexmark.com. Help Description Where to find The Help gives you need. Follow the set of world...
... Support link. • Canada: 1-800-539-6275 Note: For additional information about Monday-Friday (8:00 AM-11:00 PM contacting Lexmark, see the printed warranty statement that came with your printer. Saturday (Noon-6:00 PM ET) • Mexico: 001-888-377-0063 Monday-Friday (8:00 AM-8:00 PM ET) Note: ...what you instructions for You can find (rest of instructions box or on the side of the printer setting up the printer. Monday-Friday (8:00 AM-11:00 PM Visit our Web site at www.lexmark.com. Help Description Where to find The Help gives you need. Follow the set of world...

User Manual
Page 16
... panel 3 Standard exit bin 4 Multipurpose feeder 5 550-sheet tray (Tray 1) 6 550-sheet tray (Tray 2) 7 Optional output bin Learning about contacting Lexmark, see the printed warranty that came with your printer model. 5 From the Support Tools section, click e-Mail Support. 6 Complete the form, and then click Submit Request. Visit our Web site at...
... panel 3 Standard exit bin 4 Multipurpose feeder 5 550-sheet tray (Tray 1) 6 550-sheet tray (Tray 2) 7 Optional output bin Learning about contacting Lexmark, see the printed warranty that came with your printer model. 5 From the Support Tools section, click e-Mail Support. 6 Complete the form, and then click Submit Request. Visit our Web site at...

User Manual
Page 17
... extremes, or temperature fluctuations - You can: • Make quick copies, or change the settings on the printer control panel to perform specific copy jobs. • Send a fax using the printer control panel. • Send a fax to multiple fax destinations at the same time. • Scan documents..., fax, and scan-to-network capability for large workgroups. Clean, dry, and free of dust • Allow the following recommended amount of space around the printer for proper ventilation: 5 5 3 2 1 1 Right Side 20 cm (8 in.) 2 Left Side 31 cm (12 in.) 3 Front 51 cm (20 in.) 4 Rear 20 ...
... extremes, or temperature fluctuations - You can: • Make quick copies, or change the settings on the printer control panel to perform specific copy jobs. • Send a fax using the printer control panel. • Send a fax to multiple fax destinations at the same time. • Scan documents..., fax, and scan-to-network capability for large workgroups. Clean, dry, and free of dust • Allow the following recommended amount of space around the printer for proper ventilation: 5 5 3 2 1 1 Right Side 20 cm (8 in.) 2 Left Side 31 cm (12 in.) 3 Front 51 cm (20 in.) 4 Rear 20 ...
User Manual
Page 18
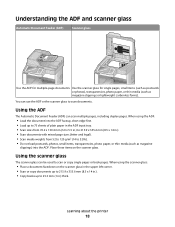
... document into the ADF faceup, short edge first. • Load up to scan documents. Use the scanner glass for multiple-page documents. Learning about the printer 18 Place these items on the scanner glass in the upper left corner. • Scan or copy documents up to 215.9 x 355.6 mm (8.5 x 14 in...
... document into the ADF faceup, short edge first. • Load up to scan documents. Use the scanner glass for multiple-page documents. Learning about the printer 18 Place these items on the scanner glass in the upper left corner. • Scan or copy documents up to 215.9 x 355.6 mm (8.5 x 14 in...

User Manual
Page 19
... the Fax Destination List, press to delete the right-most digit of 1 appears if the entire number is represented by pressing numerous times. Understanding the printer control panel 1 1 2 3 ABC DEF 4 5 6 GHI JKL MNO 7 8 9 PQRS TUV WXYZ * 0 # 2 3 4 5 8 7 6 Item 1 Display 2 Keypad 1 2 ABC 4 5 GHI JKL 7 8...menu, fax function, or home screen, pressing causes an error beep. Once an entire line is deleted. Learning about the printer 19 or three-second dial pause in a shortcut, then the shortcut is deleted, another press of a number entered manually....
... the Fax Destination List, press to delete the right-most digit of 1 appears if the entire number is represented by pressing numerous times. Understanding the printer control panel 1 1 2 3 ABC DEF 4 5 6 GHI JKL MNO 7 8 9 PQRS TUV WXYZ * 0 # 2 3 4 5 8 7 6 Item 1 Display 2 Keypad 1 2 ABC 4 5 GHI JKL 7 8...menu, fax function, or home screen, pressing causes an error beep. Once an entire line is deleted. Learning about the printer 19 or three-second dial pause in a shortcut, then the shortcut is deleted, another press of a number entered manually....

User Manual
Page 20
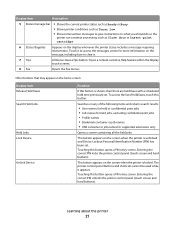
... set up by pressing a number on the display. Use the home screen buttons to initiate an action such as the home screen. Learning about the printer 20 or to respond to messages. 1 2 8 Display item 1 Copy 2 E-mail 3 Menus 4 FTP Ready Touch any button to begin. 7 6 5 43 ... job is scanning, the button has no effect. 7 Indicator light Indicates the printer status: • Off-The power is off. • Blinking green-The printer is warming up, processing data, or printing. • Solid green-The printer is on, but idle. • Blinking red-Operator intervention is needed. 8 ...
... set up by pressing a number on the display. Use the home screen buttons to initiate an action such as the home screen. Learning about the printer 20 or to respond to messages. 1 2 8 Display item 1 Copy 2 E-mail 3 Menus 4 FTP Ready Touch any button to begin. 7 6 5 43 ... job is scanning, the button has no effect. 7 Indicator light Indicates the printer status: • Off-The power is off. • Blinking green-The printer is warming up, processing data, or printing. • Solid green-The printer is on, but idle. • Blinking red-Operator intervention is needed. 8 ...
User Manual
Page 21
... to access the messages screen for supported extensions only Opens a screen containing all the held faxes with a scheduled hold time previously set . The printer control panel buttons and shortcuts cannot be used while it . 7 Tips All menus have a Tips button. Searches on any of held jobs, ...• Profile names • Bookmark container or job names • USB container or job names for more information on the screen when the printer is a context-sensitive Help feature within the display touch screens. 8 Fax Opens the Fax menus Other buttons that may appear on the home...
... to access the messages screen for supported extensions only Opens a screen containing all the held faxes with a scheduled hold time previously set . The printer control panel buttons and shortcuts cannot be used while it . 7 Tips All menus have a Tips button. Searches on any of held jobs, ...• Profile names • Bookmark container or job names • USB container or job names for more information on the screen when the printer is a context-sensitive Help feature within the display touch screens. 8 Fax Opens the Fax menus Other buttons that may appear on the home...

User Manual
Page 22
... home screen Scroll down Opens a drop-down list Learning about the job. Each job appears as a button which can touch to access information about the printer 22 The Cancel Jobs screen shows three headings: Print, Fax, and Network. Display item Cancel Jobs Function Opens the Cancel Jobs screen. Using the touch...
... home screen Scroll down Opens a drop-down list Learning about the job. Each job appears as a button which can touch to access information about the printer 22 The Cancel Jobs screen shows three headings: Print, Fax, and Network. Display item Cancel Jobs Function Opens the Cancel Jobs screen. Using the touch...

User Manual
Page 23
Button Function Left scroll decrease Scrolls to another value in decreasing order Right scroll increase Scrolls to another value in increasing order Left arrow Scrolls left Right arrow Scrolls right Submit Saves a value as the new user default setting Back Navigates back to the previous screen Other touch-screen buttons Button Down arrow Function Moves down to the next screen Up arrow Moves up to show it is an unselected radio button. The radio button is gray to the next screen Unselected radio button This is unselected. Learning about the printer 23
Button Function Left scroll decrease Scrolls to another value in decreasing order Right scroll increase Scrolls to another value in increasing order Left arrow Scrolls left Right arrow Scrolls right Submit Saves a value as the new user default setting Back Navigates back to the previous screen Other touch-screen buttons Button Down arrow Function Moves down to the next screen Up arrow Moves up to show it is an unselected radio button. The radio button is gray to the next screen Unselected radio button This is unselected. Learning about the printer 23

User Manual
Page 24
... job • Copy job • Fax profile • FTP • E-mail send Each heading has a list of a screen and returns to access information about the printer 24 Touch this button when more than three jobs exist in a column under it is a selected radio button.
... job • Copy job • Fax profile • FTP • E-mail send Each heading has a list of a screen and returns to access information about the printer 24 Touch this button when more than three jobs exist in a column under it is a selected radio button.

User Manual
Page 25
... message alert Description A Menu trail line is located at the current menu. If you touch an underlined word on the home screen. Learning about the printer 25 If an attendance message occurs which closes a function, such as a trail, showing the path taken to that an attendance message exists. This feature acts...
... message alert Description A Menu trail line is located at the current menu. If you touch an underlined word on the home screen. Learning about the printer 25 If an attendance message occurs which closes a function, such as a trail, showing the path taken to that an attendance message exists. This feature acts...

User Manual
Page 26
...accessing the system board or installing optional hardware or memory devices sometime after setting up the printer, then turn the printer off as well, and unplug any other devices attached to the printer, then turn them to install the available cards; Available internal options • Memory ... The instructions in this section explain how to locate a card for removal. Bar Code and Forms - RS-232-C Serial ISP - PRESCRIBE • Printer hard disk • LexmarkTM Internal Solutions Ports (ISP) - MarkNet N8130 10/100 Fiber ISP - Flash memory - You can also use them off...
...accessing the system board or installing optional hardware or memory devices sometime after setting up the printer, then turn the printer off as well, and unplug any other devices attached to the printer, then turn them to install the available cards; Available internal options • Memory ... The instructions in this section explain how to locate a card for removal. Bar Code and Forms - RS-232-C Serial ISP - PRESCRIBE • Printer hard disk • LexmarkTM Internal Solutions Ports (ISP) - MarkNet N8130 10/100 Fiber ISP - Flash memory - You can also use them off...


