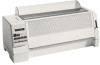

Lexmark 4227 Plus User's Guide
Page 3
...30 Using the Function Menus 31 Overview of Printer 25 Supplies 26 Chapter 3 - Features and Functions 21 Front View of Printer 23 Rear View of Function Menus 32 Menu Options 34 Setting the Printer Online or Offline 41 Stopping the Printer 42 Advancing the Paper 42 Using Tear-...off 42 Auto Tear-off Set to do Next 19 Chapter 2 - Getting Started 1 Unpacking 1 Installing the Ribbon Cartridge 3 Connecting the Parallel Cable 8 Connecting the ...
...30 Using the Function Menus 31 Overview of Printer 25 Supplies 26 Chapter 3 - Features and Functions 21 Front View of Printer 23 Rear View of Function Menus 32 Menu Options 34 Setting the Printer Online or Offline 41 Stopping the Printer 42 Advancing the Paper 42 Using Tear-...off 42 Auto Tear-off Set to do Next 19 Chapter 2 - Getting Started 1 Unpacking 1 Installing the Ribbon Cartridge 3 Connecting the Parallel Cable 8 Connecting the ...
Lexmark 4227 Plus User's Guide
Page 5
... Cleaning the Auto Sheet Feeder Rollers 113 Removing the Ribbon Cartridge 114 Appendix A - Solving Printer Problems 101 Testing the Printer 101 Clearing Paper Jams 102 Problem Conditions 103 Problems Indicated by Error Codes or Messages 103 Paper Feed Problems 106 Printing and... Print Quality Problems 107 Alarm and Abnormal Noise 109 Power Problems 110 Operator Panel Button Problem 110 Display Messages 110 Chapter 7 - Printer Options 75 Auto Sheet Feeder 76 Installing the Auto Sheet Feeder 77 Loading Paper in the Auto Sheet Feeder 80 Tractor 2 Feeder 85 Installing...
... Cleaning the Auto Sheet Feeder Rollers 113 Removing the Ribbon Cartridge 114 Appendix A - Solving Printer Problems 101 Testing the Printer 101 Clearing Paper Jams 102 Problem Conditions 103 Problems Indicated by Error Codes or Messages 103 Paper Feed Problems 106 Printing and... Print Quality Problems 107 Alarm and Abnormal Noise 109 Power Problems 110 Operator Panel Button Problem 110 Display Messages 110 Chapter 7 - Printer Options 75 Auto Sheet Feeder 76 Installing the Auto Sheet Feeder 77 Loading Paper in the Auto Sheet Feeder 80 Tractor 2 Feeder 85 Installing...

Lexmark 4227 Plus User's Guide
Page 7
User's Guide Reference Card Acoustic Cover Printer Registration Card Ribbon Cartridge Power Cord If any items are missing or damaged, contact your point of purchase. Getting Started Getting Started Chapter 1 Unpacking 1 Remove the printer from the carton. Caution: Do not lift the printer by yourself; If you need to purchase a parallel printer cable, we recommend Chapter 1: Getting Started 1 it weighs 21 kilograms (46 pounds).
User's Guide Reference Card Acoustic Cover Printer Registration Card Ribbon Cartridge Power Cord If any items are missing or damaged, contact your point of purchase. Getting Started Getting Started Chapter 1 Unpacking 1 Remove the printer from the carton. Caution: Do not lift the printer by yourself; If you need to purchase a parallel printer cable, we recommend Chapter 1: Getting Started 1 it weighs 21 kilograms (46 pounds).

Lexmark 4227 Plus User's Guide
Page 9
If you need help, see step 4 on page 2. 5 Remove the protective cardboard. Chapter 1: Getting Started 3 Getting Started Installing the Ribbon Cartridge 1 Make sure the printer is Off. 2 Make sure the top cover is removed.
If you need help, see step 4 on page 2. 5 Remove the protective cardboard. Chapter 1: Getting Started 3 Getting Started Installing the Ribbon Cartridge 1 Make sure the printer is Off. 2 Make sure the top cover is removed.
Lexmark 4227 Plus User's Guide
Page 30
Covers the ribbon cartridge and internal components. Switches power On or Off. Features and Functions 24 Chapter 2: Features and Functions Part Name Paper select lever Paper supports Power switch Top cover Function Selects the paper type: • Cut form sheets ( ) • Continuous forms ( ) Supports cut forms when they are ejected from the printer.
Covers the ribbon cartridge and internal components. Switches power On or Off. Features and Functions 24 Chapter 2: Features and Functions Part Name Paper select lever Paper supports Power switch Top cover Function Selects the paper type: • Cut form sheets ( ) • Continuous forms ( ) Supports cut forms when they are ejected from the printer.

Lexmark 4227 Plus User's Guide
Page 32
... and Functions Supplies A parallel or serial cable, ribbon cartridges, and paper are the only supplies you bought your printer. You can order a parallel cable from Lexmark through our web site (http:\\www.lexmark.com). In other countries, contact the place where you need a new ribbon cartridge, order Lexmark part number 13L0034. If you may order supplies...
... and Functions Supplies A parallel or serial cable, ribbon cartridges, and paper are the only supplies you bought your printer. You can order a parallel cable from Lexmark through our web site (http:\\www.lexmark.com). In other countries, contact the place where you need a new ribbon cartridge, order Lexmark part number 13L0034. If you may order supplies...
Lexmark 4227 Plus User's Guide
Page 75
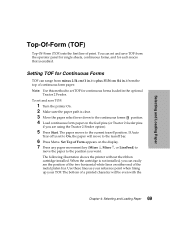
...the paper to the position you want. To set and save TOF: 1 Turn the printer On. 2 Make sure the paper path is enabled. The bottom of print. The following illustration shows the printer without the ribbon cartridge installed. Use these lines as your reference point when lining up your TOF. You can...the feed pins (or Tractor 2 feeder pins if you can range from minus 2.54 cm (1 in.) to the tearoff bar. 6 Press Menu. When the cartridge is set TOF for Continuous Forms TOF can easily see the position of the two horizontal white lines on the display. 7 Press any paper movement...
...the paper to the position you want. To set and save TOF: 1 Turn the printer On. 2 Make sure the paper path is enabled. The bottom of print. The following illustration shows the printer without the ribbon cartridge installed. Use these lines as your reference point when lining up your TOF. You can...the feed pins (or Tractor 2 feeder pins if you can range from minus 2.54 cm (1 in.) to the tearoff bar. 6 Press Menu. When the cartridge is set TOF for Continuous Forms TOF can easily see the position of the two horizontal white lines on the display. 7 Press any paper movement...

Lexmark 4227 Plus User's Guide
Page 76
...to plus 55.88 cm (22 in.) from minus 2.54 cm (1 in.) to save TOF: 1 Turn the printer On. 2 Make sure continuous forms are parked (press Load/Unload). 70 Chapter 4: Selecting and Loading Paper The Ready ... TOF is set to one second. White lines Selecting and Loading Paper Note: When the ribbon cartridge is installed and the top edge of the paper is even with the top edge of cut ...setting, tear off is not correct, see "Changing Tearoff position" on page 72. This ensures the printer goes to the current tearoff position. To set to On, the paper advances to the current tearoff ...
...to plus 55.88 cm (22 in.) from minus 2.54 cm (1 in.) to save TOF: 1 Turn the printer On. 2 Make sure continuous forms are parked (press Load/Unload). 70 Chapter 4: Selecting and Loading Paper The Ready ... TOF is set to one second. White lines Selecting and Loading Paper Note: When the ribbon cartridge is installed and the top edge of the paper is even with the top edge of cut ...setting, tear off is not correct, see "Changing Tearoff position" on page 72. This ensures the printer goes to the current tearoff position. To set to On, the paper advances to the current tearoff ...

Lexmark 4227 Plus User's Guide
Page 108
... and open the left and right forms tractor doors and remove the forms from your printer. The menu settings print. Go to step 6. 4 Remove the remaining forms by the ribbon, remove the ribbon cartridge before attempting to step 5. 3 Remove the remaining forms by pulling them slowly toward ... of purchase or see "Removing the Ribbon Cartridge" on page 114 or "Installing the Ribbon Cartridge" on page 3. 5 Make sure all paper is on and the 002 Paper Jam message appears on removing and loading the ribbon cartridge, see the printer registration card for the number appropriate for your...
... and open the left and right forms tractor doors and remove the forms from your printer. The menu settings print. Go to step 6. 4 Remove the remaining forms by the ribbon, remove the ribbon cartridge before attempting to step 5. 3 Remove the remaining forms by pulling them slowly toward ... of purchase or see "Removing the Ribbon Cartridge" on page 114 or "Installing the Ribbon Cartridge" on page 3. 5 Make sure all paper is on and the 002 Paper Jam message appears on removing and loading the ribbon cartridge, see the printer registration card for the number appropriate for your...

Lexmark 4227 Plus User's Guide
Page 109
...: Change the ribbon cartridge. Action: Load forms or paper in the printer and press Start/ Stop. • Forms are loaded correctly. Action: Check that meet specifications. For help , see "Installing the Ribbon Cartridge" on page 62). Action: Turn off the printer and remove the jammed... paper from the printer (see "Clearing Paper Jams" on page 102). • Forms used do not meet specifications. ...
...: Change the ribbon cartridge. Action: Load forms or paper in the printer and press Start/ Stop. • Forms are loaded correctly. Action: Check that meet specifications. For help , see "Installing the Ribbon Cartridge" on page 62). Action: Turn off the printer and remove the jammed... paper from the printer (see "Clearing Paper Jams" on page 102). • Forms used do not meet specifications. ...

Lexmark 4227 Plus User's Guide
Page 112
...Check that the forms tractor doors are properly closed properly or the tractor locking levers are properly locked. • Ribbon cartridge is set correctly. Solving Printer Problems Paper Feed Problems Symptom Paper does not feed. Action: Align the pinfeed holes of multi-part forms do not align... locked properly. Action: Adjust AutoGap (see "Installing the Ribbon Cartridge" on page 3. • AutoGap is not set incorrectly. Action: Straighten or use new forms. • Forms have debris in the printer. Tip: Even if the printer does not detect a paper jam, a piece of the form...
...Check that the forms tractor doors are properly closed properly or the tractor locking levers are properly locked. • Ribbon cartridge is set correctly. Solving Printer Problems Paper Feed Problems Symptom Paper does not feed. Action: Align the pinfeed holes of multi-part forms do not align... locked properly. Action: Adjust AutoGap (see "Installing the Ribbon Cartridge" on page 3. • AutoGap is not set incorrectly. Action: Straighten or use new forms. • Forms have debris in the printer. Tip: Even if the printer does not detect a paper jam, a piece of the form...
Lexmark 4227 Plus User's Guide
Page 113
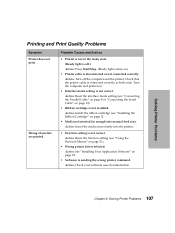
... function setting (see "Using the Function Menus" on page 10). • Ribbon cartridge is sending the wrong printer command. Solving Printer Problems Printing and Print Quality Problems Symptom Printer does not print. Action: Reset the interface mode setting (see "Installing the Ribbon Cartridge" on page 18. • Software is not installed. Wrong characters are printed...
... function setting (see "Using the Function Menus" on page 10). • Ribbon cartridge is sending the wrong printer command. Solving Printer Problems Printing and Print Quality Problems Symptom Printer does not print. Action: Reset the interface mode setting (see "Installing the Ribbon Cartridge" on page 18. • Software is not installed. Wrong characters are printed...

Lexmark 4227 Plus User's Guide
Page 114
... missing. Nothing is printed on page 3. • AutoGap is set incorrectly. Action: Replace the ribbon cartridge. Action: Adjust AutoGap (see page 35). 108 Chapter 6: Solving Printer Problems Action: Reset the ribbon cartridge correctly. Action: The printer needs repair. • Ribbon cartridge is folded. Action: Adjust AutoGap (see page 35). For help, see "Installing the Ribbon...
... missing. Nothing is printed on page 3. • AutoGap is set incorrectly. Action: Replace the ribbon cartridge. Action: Adjust AutoGap (see page 35). 108 Chapter 6: Solving Printer Problems Action: Reset the ribbon cartridge correctly. Action: The printer needs repair. • Ribbon cartridge is folded. Action: Adjust AutoGap (see page 35). For help, see "Installing the Ribbon...
Lexmark 4227 Plus User's Guide
Page 115
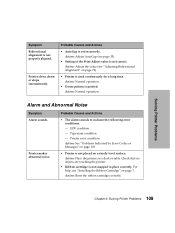
... help, see "Adjusting Bidirectional Alignment" on a sturdy level surface. Action: Normal operation. • Dense pattern is not properly aligned. Printer makes abnormal noise. Action: Reset the ribbon cartridge correctly. Action: Normal operation. Solving Printer Problems Symptom Bidirectional alignment is printed. Action: Adjust AutoGap (see page 35). • Setting of the Print Adjust value...
... help, see "Adjusting Bidirectional Alignment" on a sturdy level surface. Action: Normal operation. • Dense pattern is not properly aligned. Printer makes abnormal noise. Action: Reset the ribbon cartridge correctly. Action: Normal operation. Solving Printer Problems Symptom Bidirectional alignment is printed. Action: Adjust AutoGap (see page 35). • Setting of the Print Adjust value...
Lexmark 4227 Plus User's Guide
Page 119
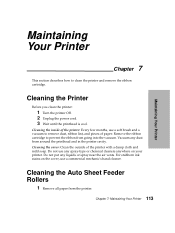
... a vacuum to remove dust, ribbon lint, and pieces of the printer with a damp cloth and mild soap. Vacuum any liquids or spray near the air vents. Remove the ribbon cartridge to clean the printer and remove the ribbon cartridge. Maintaining Your Printer Maintaining Your Printer Chapter 7 This section describes how to prevent the ribbon from going...
... a vacuum to remove dust, ribbon lint, and pieces of the printer with a damp cloth and mild soap. Vacuum any liquids or spray near the air vents. Remove the ribbon cartridge to clean the printer and remove the ribbon cartridge. Maintaining Your Printer Maintaining Your Printer Chapter 7 This section describes how to prevent the ribbon from going...

Lexmark 4227 Plus User's Guide
Page 120
Maintaining Your Printer 2 Turn the Auto Sheet Feeder upside down and place it on a flat surface. 3 Clean the two paper-guide wheels located inside the bottom of the Auto Sheet Feeder using isopropyl alcohol and a clean cloth. Removing the Ribbon Cartridge 1 Turn the printer Off. 2 Remove the top cover. 114 Chapter 7: Maintaining Your Printer You can rotate one roller while applying the cleaning cloth to the other roller.
Maintaining Your Printer 2 Turn the Auto Sheet Feeder upside down and place it on a flat surface. 3 Clean the two paper-guide wheels located inside the bottom of the Auto Sheet Feeder using isopropyl alcohol and a clean cloth. Removing the Ribbon Cartridge 1 Turn the printer Off. 2 Remove the top cover. 114 Chapter 7: Maintaining Your Printer You can rotate one roller while applying the cleaning cloth to the other roller.
Lexmark 4227 Plus User's Guide
Page 121
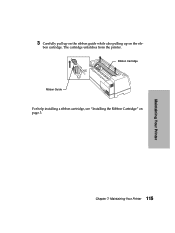
Ribbon Cartridge Ribbon Guide For help installing a ribbon cartridge, see "Installing the Ribbon Cartridge" on the rib- Chapter 7: Maintaining Your Printer 115 The cartridge unlatches from the printer. bon cartridge. Maintaining Your Printer 3 Carefully pull up on the ribbon guide while also pulling up on page 3.
Ribbon Cartridge Ribbon Guide For help installing a ribbon cartridge, see "Installing the Ribbon Cartridge" on the rib- Chapter 7: Maintaining Your Printer 115 The cartridge unlatches from the printer. bon cartridge. Maintaining Your Printer 3 Carefully pull up on the ribbon guide while also pulling up on page 3.
Lexmark 4227 Plus User's Guide
Page 136
... 117 font, selecting or locking 46 function menus overview 32-33 table 34-41 I installing application software 18 auto sheet feeder 77 ribbon cartridge 3-7 Interface Options 40 J jams, clearing 102 L language, setting 16 left margin, aligning continuous forms 68 envelopes 67 single sheets 67 ...feeder 94 with continuous forms 57 locking font 46 pitch 46 M Macro x Options 35 macros, setting and using 47 maintenance cleaning printer 113 ribbon cartridge 114 Manual AutoGap settings 45 margins, aligning 66 O operator panel advancing paper 42 buttons 28 disabling/enabling 48 function menus overview ...
... 117 font, selecting or locking 46 function menus overview 32-33 table 34-41 I installing application software 18 auto sheet feeder 77 ribbon cartridge 3-7 Interface Options 40 J jams, clearing 102 L language, setting 16 left margin, aligning continuous forms 68 envelopes 67 single sheets 67 ...feeder 94 with continuous forms 57 locking font 46 pitch 46 M Macro x Options 35 macros, setting and using 47 maintenance cleaning printer 113 ribbon cartridge 114 Manual AutoGap settings 45 margins, aligning 66 O operator panel advancing paper 42 buttons 28 disabling/enabling 48 function menus overview ...

Lexmark 4227 Plus User's Guide
Page 137
... 37 paper jams 102 parallel cable, connecting 8 pitch, selecting or locking 46 power cord, connecting 11 Print Adjust 41 Print Demo 34 Print Settings 34 printer driver 19 features and functions 21 function menus options AutoGap 38 Control Opt. 39 Data Opt. 39 Default Macro 35 Emulation Opt. 40 Interface Opt... Tractor 34 Set Top of Form 34 Trace Mode 41 overview 32 setting 31 options 75 parts 23, 25 problems. see solving problems R removing ribbon cartridge 114 top cover 2 tractor 2 feeder 99 ribbon cartridge, installing 3 S safety information 118 Select Tractor 34 selecting font 46 131 Index
... 37 paper jams 102 parallel cable, connecting 8 pitch, selecting or locking 46 power cord, connecting 11 Print Adjust 41 Print Demo 34 Print Settings 34 printer driver 19 features and functions 21 function menus options AutoGap 38 Control Opt. 39 Data Opt. 39 Default Macro 35 Emulation Opt. 40 Interface Opt... Tractor 34 Set Top of Form 34 Trace Mode 41 overview 32 setting 31 options 75 parts 23, 25 problems. see solving problems R removing ribbon cartridge 114 top cover 2 tractor 2 feeder 99 ribbon cartridge, installing 3 S safety information 118 Select Tractor 34 selecting font 46 131 Index


