
Lexmark 4227 Plus User's Guide
Page 3
...Emulation Mode 19 What to On 43 Contents iii Features and Functions 21 Front View of Printer 23 Rear View of Function Menus 32 Menu Options 34 Setting the Printer Online or Offline 41 Stopping the Printer 42 Advancing the Paper 42 Using Tear-off 42 Auto Tear-off Set to do ...Next 19 Chapter 2 - Contents Contents Chapter 1 - Using the Operator Panel 27 Buttons 28 Lights 30 Using the Function Menus 31 Overview of Printer 25 Supplies 26...
...Emulation Mode 19 What to On 43 Contents iii Features and Functions 21 Front View of Printer 23 Rear View of Function Menus 32 Menu Options 34 Setting the Printer Online or Offline 41 Stopping the Printer 42 Advancing the Paper 42 Using Tear-off 42 Auto Tear-off Set to do ...Next 19 Chapter 2 - Contents Contents Chapter 1 - Using the Operator Panel 27 Buttons 28 Lights 30 Using the Function Menus 31 Overview of Printer 25 Supplies 26...
Lexmark 4227 Plus User's Guide
Page 5
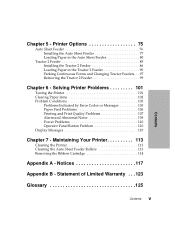
... Cleaning the Auto Sheet Feeder Rollers 113 Removing the Ribbon Cartridge 114 Appendix A - Notices 117 Appendix B - Printer Options 75 Auto Sheet Feeder 76 Installing the Auto Sheet Feeder 77 Loading Paper in the Auto Sheet Feeder 80 Tractor 2 ... 2 Feeder 90 Parking Continuous Forms and Changing Tractor Feeders. . . 97 Removing the Tractor 2 Feeder 99 Chapter 6 - Contents Chapter 5 - Solving Printer Problems 101 Testing the Printer 101 Clearing Paper Jams 102 Problem Conditions 103 Problems Indicated by Error Codes or Messages 103 Paper Feed Problems 106 Printing and Print...
... Cleaning the Auto Sheet Feeder Rollers 113 Removing the Ribbon Cartridge 114 Appendix A - Notices 117 Appendix B - Printer Options 75 Auto Sheet Feeder 76 Installing the Auto Sheet Feeder 77 Loading Paper in the Auto Sheet Feeder 80 Tractor 2 ... 2 Feeder 90 Parking Continuous Forms and Changing Tractor Feeders. . . 97 Removing the Tractor 2 Feeder 99 Chapter 6 - Contents Chapter 5 - Solving Printer Problems 101 Testing the Printer 101 Clearing Paper Jams 102 Problem Conditions 103 Problems Indicated by Error Codes or Messages 103 Paper Feed Problems 106 Printing and Print...

Lexmark 4227 Plus User's Guide
Page 7
Caution: Do not lift the printer by yourself; If you need to purchase a parallel printer cable, we recommend Chapter 1: Getting Started 1 User's Guide Reference Card Acoustic Cover Printer Registration Card Ribbon Cartridge Power Cord If any items are missing or damaged, contact your point of purchase. Getting Started Getting Started Chapter 1 Unpacking 1 Remove the printer from the carton. it weighs 21 kilograms (46 pounds).
Caution: Do not lift the printer by yourself; If you need to purchase a parallel printer cable, we recommend Chapter 1: Getting Started 1 User's Guide Reference Card Acoustic Cover Printer Registration Card Ribbon Cartridge Power Cord If any items are missing or damaged, contact your point of purchase. Getting Started Getting Started Chapter 1 Unpacking 1 Remove the printer from the carton. it weighs 21 kilograms (46 pounds).
Lexmark 4227 Plus User's Guide
Page 8
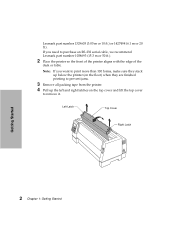
Lexmark part number 1329605 (3.05 m or 10 ft.) or 1427498 (6.1 m or 20 ft.). Note: If you need to remove it. Left Latch Top Cover Right Latch Getting Started 2 Chapter 1: Getting Started If you want to print more than 100 forms, make sure they stack up below the printer (on the floor) when they... all packing tape from the printer. 4 Pull up the left and right latches on the top cover and lift the top cover to purchase an RS-232 serial cable, we recommend Lexmark part number 1038693 (15.3 m or 50 ft.). 2 Place the printer so the front of the printer aligns with the edge of the...
Lexmark part number 1329605 (3.05 m or 10 ft.) or 1427498 (6.1 m or 20 ft.). Note: If you need to remove it. Left Latch Top Cover Right Latch Getting Started 2 Chapter 1: Getting Started If you want to print more than 100 forms, make sure they stack up below the printer (on the floor) when they... all packing tape from the printer. 4 Pull up the left and right latches on the top cover and lift the top cover to purchase an RS-232 serial cable, we recommend Lexmark part number 1038693 (15.3 m or 50 ft.). 2 Place the printer so the front of the printer aligns with the edge of the...

Lexmark 4227 Plus User's Guide
Page 9
If you need help, see step 4 on page 2. Chapter 1: Getting Started 3 Getting Started Installing the Ribbon Cartridge 1 Make sure the printer is Off. 2 Make sure the top cover is removed. 5 Remove the protective cardboard.
If you need help, see step 4 on page 2. Chapter 1: Getting Started 3 Getting Started Installing the Ribbon Cartridge 1 Make sure the printer is Off. 2 Make sure the top cover is removed. 5 Remove the protective cardboard.

Lexmark 4227 Plus User's Guide
Page 10
If necessary, untwist the ribbon. 4 Chapter 1: Getting Started Getting Started 3 Manually move the printhead to the side of the printer as shown. 4 Rotate the ribbon advance knob counterclockwise to ensure the ribbon feeds smoothly.
If necessary, untwist the ribbon. 4 Chapter 1: Getting Started Getting Started 3 Manually move the printhead to the side of the printer as shown. 4 Rotate the ribbon advance knob counterclockwise to ensure the ribbon feeds smoothly.

Lexmark 4227 Plus User's Guide
Page 14
Getting Started b Snap the acoustic cover into place. If you are installing a serial cable, see "Connecting the Serial Cable" on page 10 for help. 1 Make sure your computer and the printer is Off. 2 Unplug your computer and printer. 8 Chapter 1: Getting Started Connecting the Parallel Cable You will need to connect either a parallel cable or a serial cable to the printer. c Close the acoustic cover.
Getting Started b Snap the acoustic cover into place. If you are installing a serial cable, see "Connecting the Serial Cable" on page 10 for help. 1 Make sure your computer and the printer is Off. 2 Unplug your computer and printer. 8 Chapter 1: Getting Started Connecting the Parallel Cable You will need to connect either a parallel cable or a serial cable to the printer. c Close the acoustic cover.

Lexmark 4227 Plus User's Guide
Page 15
3 Connect the parallel cable. An IEEE 1284-compliant parallel cable such as Lexmark part number 1329605 (3.05 m or 10 ft.) or 1427498 (6.1 m or 20 ft.) is not supplied with "Connecting the Power Cord" on page 11. You will hear a click. 5 Connect the other end of the parallel cable to the parallel cable. Getting Started Note: You do not need to attach a grounding wire to the computer. 4 Fasten the clip wires to your computer. 6 Continue with your printer. This cable is recommended. Chapter 1: Getting Started 9
3 Connect the parallel cable. An IEEE 1284-compliant parallel cable such as Lexmark part number 1329605 (3.05 m or 10 ft.) or 1427498 (6.1 m or 20 ft.) is not supplied with "Connecting the Power Cord" on page 11. You will hear a click. 5 Connect the other end of the parallel cable to the parallel cable. Getting Started Note: You do not need to attach a grounding wire to the computer. 4 Fasten the clip wires to your computer. 6 Continue with your printer. This cable is recommended. Chapter 1: Getting Started 9

Lexmark 4227 Plus User's Guide
Page 16
The cable is not supplied with your computer. 10 Chapter 1: Getting Started Note: You do not need to attach a grounding wire to the computer. 3 Tighten the screws. 4 Connect the other end of the serial cable to DB 25 Male) serial cable, part number 1038693 (50 ft.). We recommend Lexmark's null modem RS-232 (DB 25 Female to your printer. Getting Started Connecting the Serial Cable 1 Make sure both the printer and your computer are turned off and unplugged. 2 Connect the serial cable.
The cable is not supplied with your computer. 10 Chapter 1: Getting Started Note: You do not need to attach a grounding wire to the computer. 3 Tighten the screws. 4 Connect the other end of the serial cable to DB 25 Male) serial cable, part number 1038693 (50 ft.). We recommend Lexmark's null modem RS-232 (DB 25 Female to your printer. Getting Started Connecting the Serial Cable 1 Make sure both the printer and your computer are turned off and unplugged. 2 Connect the serial cable.

Lexmark 4227 Plus User's Guide
Page 17
Power Switch Chapter 1: Getting Started 11 Getting Started Connecting the Power Cord 1 Make sure the printer is Off. 2 Connect the smaller end of the power cord to the printer. 3 Connect the other end of the power cord to a properly grounded electrical outlet. Changing the Serial Settings 1 Turn the printer On.
Power Switch Chapter 1: Getting Started 11 Getting Started Connecting the Power Cord 1 Make sure the printer is Off. 2 Connect the smaller end of the power cord to the printer. 3 Connect the other end of the power cord to a properly grounded electrical outlet. Changing the Serial Settings 1 Turn the printer On.

Lexmark 4227 Plus User's Guide
Page 19
... are loaded. Chapter 1: Getting Started 13 If you expected, see "Loading Continuous Forms" on page 31 to change them. 5 Press Quit to print the current printer-function settings. Note: To temporarily stop the Paper Out alarm, press the Start/Stop button. 2 Move the paper select lever up to exit the function... Serial Interface Settings 1 Make sure that forms are not what you want to load continuous forms, see "Loading Continuous Forms" on page 62. 1 Turn the printer On.
... are loaded. Chapter 1: Getting Started 13 If you expected, see "Loading Continuous Forms" on page 31 to change them. 5 Press Quit to print the current printer-function settings. Note: To temporarily stop the Paper Out alarm, press the Start/Stop button. 2 Move the paper select lever up to exit the function... Serial Interface Settings 1 Make sure that forms are not what you want to load continuous forms, see "Loading Continuous Forms" on page 62. 1 Turn the printer On.

Lexmark 4227 Plus User's Guide
Page 21
... paper guide is aligned flush with the right edge of the paper. Push the sheet in until the feed rollers draw the sheet into the printer. Left Paper Guide Right Paper Guide The Paper Empty/Add Paper message disappears. For help, see "Aligning the Left Margin" on the margin guide. Margin...
... paper guide is aligned flush with the right edge of the paper. Push the sheet in until the feed rollers draw the sheet into the printer. Left Paper Guide Right Paper Guide The Paper Empty/Add Paper message disappears. For help, see "Aligning the Left Margin" on the margin guide. Margin...

Lexmark 4227 Plus User's Guide
Page 22
... prints. 10 Press Quit to enter the function menu. 16 Chapter 1: Getting Started Setting the Language of the Operator Panel Messages To set up your printer in a language other than English: 1 Turn the printer On. 2 Press Menu to exit the function menu.
... prints. 10 Press Quit to enter the function menu. 16 Chapter 1: Getting Started Setting the Language of the Operator Panel Messages To set up your printer in a language other than English: 1 Turn the printer On. 2 Press Menu to exit the function menu.

Lexmark 4227 Plus User's Guide
Page 24
...) Brazil. do Brasil) 8 Press Store to exit the function menu. Most application software programs let you specify the type of the printer's features. To change the selected language, repeat steps 2 through 8. 9 Press Quit to save the selected language. Getting Started Installing ...language is configured for PPDS Mode (the factory default), select a printer from the printer selection menu of your application software to see what printer drivers are using so the program can take full advantage of printer you want to the selected language. Follow the instructions that specific...
...) Brazil. do Brasil) 8 Press Store to exit the function menu. Most application software programs let you specify the type of the printer's features. To change the selected language, repeat steps 2 through 8. 9 Press Quit to save the selected language. Getting Started Installing ...language is configured for PPDS Mode (the factory default), select a printer from the printer selection menu of your application software to see what printer drivers are using so the program can take full advantage of printer you want to the selected language. Follow the instructions that specific...

Lexmark 4227 Plus User's Guide
Page 25
... application software. Epson Emulation Mode If your printer is configured for Epson mode, select the Epson FX-1050 or DFX-5000 printer from the printer selection menu of your application's user documentation for more about your printer for your printer. Chapter 1: Getting Started 19 If your ...software does not allow you to select the Forms Printer 4227 Printer driver, you select for the ...
... application software. Epson Emulation Mode If your printer is configured for Epson mode, select the Epson FX-1050 or DFX-5000 printer from the printer selection menu of your application's user documentation for more about your printer for your printer. Chapter 1: Getting Started 19 If your ...software does not allow you to select the Forms Printer 4227 Printer driver, you select for the ...

Lexmark 4227 Plus User's Guide
Page 27
... excellent print quality along with the ability to help you perform your printer. Feature Function Multi-speed Printing FastDraft-720 characters per second (cps) Draft-600 cps Courier and Gothic (near-letter quality)-150 cps Character Spacing Prints ... Multiple-part Forms Printing 8-part forms (carbonless) 6-part forms (carbon and carbonless) 21 Chapter 2: Features and Functions Features and Functions Features and Functions Chapter 2 Your printer has many features to print several print styles and graphics.
... excellent print quality along with the ability to help you perform your printer. Feature Function Multi-speed Printing FastDraft-720 characters per second (cps) Draft-600 cps Courier and Gothic (near-letter quality)-150 cps Character Spacing Prints ... Multiple-part Forms Printing 8-part forms (carbonless) 6-part forms (carbon and carbonless) 21 Chapter 2: Features and Functions Features and Functions Features and Functions Chapter 2 Your printer has many features to print several print styles and graphics.
Lexmark 4227 Plus User's Guide
Page 28
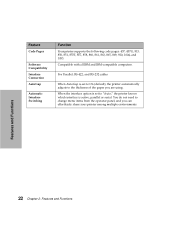
... When AutoGap is active, parallel or serial. When the interface option is set to "Auto," the printer knows which interface is set to On (default), the printer automatically adjusts to change menu items from the operator panel, and you are using. Compatible with all IBM...computers. You do not need to the thickness of the paper you can effortlessly share your printer among multiple environments. Feature Code Pages Software Compatibility Interface Connection AutoGap Automatic Interface Switching Function Your printer supports the following code pages: 437, 437G, 813, 850, 851, 853T, 857, ...
... When AutoGap is active, parallel or serial. When the interface option is set to "Auto," the printer knows which interface is set to On (default), the printer automatically adjusts to change menu items from the operator panel, and you are using. Compatible with all IBM...computers. You do not need to the thickness of the paper you can effortlessly share your printer among multiple environments. Feature Code Pages Software Compatibility Interface Connection AutoGap Automatic Interface Switching Function Your printer supports the following code pages: 437, 437G, 813, 850, 851, 853T, 857, ...

Lexmark 4227 Plus User's Guide
Page 29
Covers the continuous forms tractor. Enables manual feed of cut form sheet. 23 Chapter 2: Features and Functions Aligns the margins of a cut forms. Indicates printer status and makes control of Printer Operator Panel Top Cover Manual Feed Door Paper Supports Acoustic Cover Features and Functions Paper Guides Front Cover Paper Select Lever Power Switch Part Name Acoustic cover Front cover Manual feed door Operator panel Paper guides Function Lowers noise level produced by the printer. Front View of printer functions simple and convenient.
Covers the continuous forms tractor. Enables manual feed of cut form sheet. 23 Chapter 2: Features and Functions Aligns the margins of a cut forms. Indicates printer status and makes control of Printer Operator Panel Top Cover Manual Feed Door Paper Supports Acoustic Cover Features and Functions Paper Guides Front Cover Paper Select Lever Power Switch Part Name Acoustic cover Front cover Manual feed door Operator panel Paper guides Function Lowers noise level produced by the printer. Front View of printer functions simple and convenient.
Lexmark 4227 Plus User's Guide
Page 30
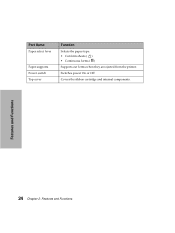
Covers the ribbon cartridge and internal components. Features and Functions 24 Chapter 2: Features and Functions Part Name Paper select lever Paper supports Power switch Top cover Function Selects the paper type: • Cut form sheets ( ) • Continuous forms ( ) Supports cut forms when they are ejected from the printer. Switches power On or Off.
Covers the ribbon cartridge and internal components. Features and Functions 24 Chapter 2: Features and Functions Part Name Paper select lever Paper supports Power switch Top cover Function Selects the paper type: • Cut form sheets ( ) • Continuous forms ( ) Supports cut forms when they are ejected from the printer. Switches power On or Off.

Lexmark 4227 Plus User's Guide
Page 31
Features and Functions Rear View of Printer Tear-Off Bar Power Connector Tractor Connector Serial Connector Parallel Connector Part Name Parallel connector Serial connector Tear-Off bar Tractor connector Power connector Function Connects the parallel cable. Connects the serial cable. Connects power from the power cord to the optional Tractor 2 Feeder. Allows you to tear off continuous forms. Supplies power to the printer. 25 Chapter 2: Features and Functions
Features and Functions Rear View of Printer Tear-Off Bar Power Connector Tractor Connector Serial Connector Parallel Connector Part Name Parallel connector Serial connector Tear-Off bar Tractor connector Power connector Function Connects the parallel cable. Connects the serial cable. Connects power from the power cord to the optional Tractor 2 Feeder. Allows you to tear off continuous forms. Supplies power to the printer. 25 Chapter 2: Features and Functions


