
Setup Guide
Page 3
Table of contents Preface vii About your printer vii About this book ix Other sources of information x Step 1: Select a location for your printer 1 Allowing enough space 1 Considering environmental issues 4 Moving the printer 4 Step 2: Unpack the printer 5 Step 3: Install the multipurpose feeder 6 Step 4: Set up the optional high capacity feeder 9 Attaching a high capacity feeder or base cabinet 11 Step 5: Set up printer supplies 17 Installing the print cartridge 17 Preparing the fuser 20 Applying the operator panel overlay (non-English only) . . . . .22 iii
Table of contents Preface vii About your printer vii About this book ix Other sources of information x Step 1: Select a location for your printer 1 Allowing enough space 1 Considering environmental issues 4 Moving the printer 4 Step 2: Unpack the printer 5 Step 3: Install the multipurpose feeder 6 Step 4: Set up the optional high capacity feeder 9 Attaching a high capacity feeder or base cabinet 11 Step 5: Set up printer supplies 17 Installing the print cartridge 17 Preparing the fuser 20 Applying the operator panel overlay (non-English only) . . . . .22 iii
Setup Guide
Page 16
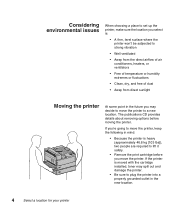
... people are required to lift it safely. • Remove the print cartridge before moving the printer. If the printer is moved with the cartridge installed, toner may decide to move the printer to a new location. Considering environmental issues When choosing a place to set up the printer, make sure the location you select is: • A firm, level...
... people are required to lift it safely. • Remove the print cartridge before moving the printer. If the printer is moved with the cartridge installed, toner may decide to move the printer to a new location. Considering environmental issues When choosing a place to set up the printer, make sure the location you select is: • A firm, level...
Setup Guide
Page 17
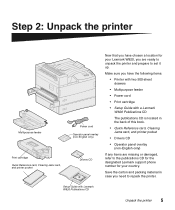
..., you are missing or damaged, refer to the publications CD for the designated Lexmark support phone number for your country. Step 2: Unpack the printer Multipurpose feeder Print cartridge Quick Reference card, Clearing Jams card, and printer pocket Power cord Operator panel overlay (non-English only) Drivers CD Now that you have the following items...
..., you are missing or damaged, refer to the publications CD for the designated Lexmark support phone number for your country. Step 2: Unpack the printer Multipurpose feeder Print cartridge Quick Reference card, Clearing Jams card, and printer pocket Power cord Operator panel overlay (non-English only) Drivers CD Now that you have the following items...
Setup Guide
Page 29
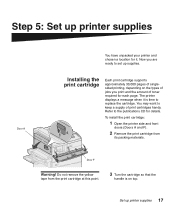
... approximately 30,000 pages of singlesided printing, depending on top. Set up supplies. Now you print and the amount of print cartridges handy. The printer displays a message when it . You may want to keep a supply of toner required for details. Door F Warning! Refer to the publications CD for each page. ...
... approximately 30,000 pages of singlesided printing, depending on top. Set up supplies. Now you print and the amount of print cartridges handy. The printer displays a message when it . You may want to keep a supply of toner required for details. Door F Warning! Refer to the publications CD for each page. ...
Setup Guide
Page 30
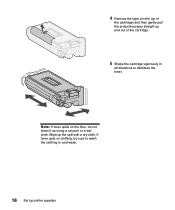
4 Remove the tape (on the top of the cartridge) and then gently pull the protective paper straight up and out of the cartridge. 5 Shake the cartridge vigorously in cold water. 18 Set up printer supplies If toner gets on the floor, do not clean it up the spill with a dry cloth. Wipe up using a vacuum or a wet cloth. Note: If toner spills on clothing, be sure to wash the clothing in all directions to distribute the toner.
4 Remove the tape (on the top of the cartridge) and then gently pull the protective paper straight up and out of the cartridge. 5 Shake the cartridge vigorously in cold water. 18 Set up printer supplies If toner gets on the floor, do not clean it up the spill with a dry cloth. Wipe up using a vacuum or a wet cloth. Note: If toner spills on clothing, be sure to wash the clothing in all directions to distribute the toner.
Setup Guide
Page 31
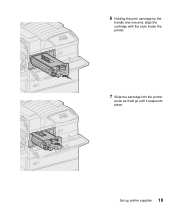
Set up printer supplies 19 6 Holding the print cartridge by the handle and one end, align the cartridge with the slots inside the printer. 7 Slide the cartridge into the printer as far as it will go until it snaps into place.
Set up printer supplies 19 6 Holding the print cartridge by the handle and one end, align the cartridge with the slots inside the printer. 7 Slide the cartridge into the printer as far as it will go until it snaps into place.
Setup Guide
Page 32
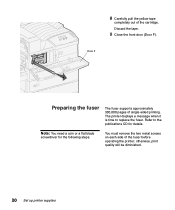
Door F Preparing the fuser The fuser supports approximately 300,000 pages of the fuser before operating the printer; Note: You need a coin or a flat blade screwdriver for details. otherwise, print quality will be diminished. 20 Set up printer supplies You must remove the two metal screws on each side of single-sided printing. The printer displays a message when it is time to the publications CD for the following steps. 8 Carefully pull the yellow tape completely out of the cartridge. Discard the tape. 9 Close the front door (Door F). Refer to replace the fuser.
Door F Preparing the fuser The fuser supports approximately 300,000 pages of the fuser before operating the printer; Note: You need a coin or a flat blade screwdriver for details. otherwise, print quality will be diminished. 20 Set up printer supplies You must remove the two metal screws on each side of single-sided printing. The printer displays a message when it is time to the publications CD for the following steps. 8 Carefully pull the yellow tape completely out of the cartridge. Discard the tape. 9 Close the front door (Door F). Refer to replace the fuser.
Setup Guide
Page 116
... information to users Several types of users may need access to the information about the printer operator panel • Tips for successful printing • Instructions for replacing a print cartridge • Solutions to problems with options like the duplex unit, mailbox, and finisher ...• Solutions to printing problems: - Note: The Lexmark W820 Publications CD is located in the convenient printer pocket. Solving print quality problems - The...
... information to users Several types of users may need access to the information about the printer operator panel • Tips for successful printing • Instructions for replacing a print cartridge • Solutions to problems with options like the duplex unit, mailbox, and finisher ...• Solutions to printing problems: - Note: The Lexmark W820 Publications CD is located in the convenient printer pocket. Solving print quality problems - The...
Setup Guide
Page 120
...MarkNet print server 30 memory cards 25 metal shield 33 multipurpose feeder 6 option cards 30 Parallel Interface Card 30 print cartridge 17 print servers 30 printer drivers 99 printer memory 25 Tri-Port Adapter 30 USB/Parallel Interface Card 30 108 Index internal network adapter (INA) See print ...server internal print server See print server IP address setting 97 IP settings verifying 98 L labels 73 leveling feet 37 Lexmark W820 Publications CD x Lexmark ...
...MarkNet print server 30 memory cards 25 metal shield 33 multipurpose feeder 6 option cards 30 Parallel Interface Card 30 print cartridge 17 print servers 30 printer drivers 99 printer memory 25 Tri-Port Adapter 30 USB/Parallel Interface Card 30 108 Index internal network adapter (INA) See print ...server internal print server See print server IP address setting 97 IP settings verifying 98 L labels 73 leveling feet 37 Lexmark W820 Publications CD x Lexmark ...
Setup Guide
Page 121
... tray icons Trays 1, 2, 3 76 Trays 4 and 5 81 Paper Type setting changing 94 parallel cable 91 Parallel Interface Card 30 power 92 print cartridge 17 print media 73 print server installed in network models vii installing printer memory vii, 25 models vii moving 4 options viii powering on 92 settings 94 supplies 17 unpack...
... tray icons Trays 1, 2, 3 76 Trays 4 and 5 81 Paper Type setting changing 94 parallel cable 91 Parallel Interface Card 30 power 92 print cartridge 17 print media 73 print server installed in network models vii installing printer memory vii, 25 models vii moving 4 options viii powering on 92 settings 94 supplies 17 unpack...
User's Guide
Page 5
... jams 99 Chapter 26: Ordering supplies and maintenance items 102 Chapter 27: Replacing the print cartridge 103 Removing the old print cartridge 103 Installing the new print cartridge 105 Chapter 28: Cleaning the printer 109 Chapter 29: Replacing a staple cartridge 110 Chapter 30: Emptying the hole punch box 113 Chapter 31: Replacing the items in...
... jams 99 Chapter 26: Ordering supplies and maintenance items 102 Chapter 27: Replacing the print cartridge 103 Removing the old print cartridge 103 Installing the new print cartridge 105 Chapter 28: Cleaning the printer 109 Chapter 29: Replacing a staple cartridge 110 Chapter 30: Emptying the hole punch box 113 Chapter 31: Replacing the items in...
User's Guide
Page 47
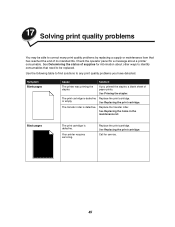
If you have detected. The transfer roller is defective. Replace the print cartridge. Symptom Blank pages Cause Solution The printer was priming the stapler. or empty. Replace the transfer roller. Your printer requires servicing. See Determining the status of supplies for information about a printer consumable. Use the following table to find solutions to be able...
If you have detected. The transfer roller is defective. Replace the print cartridge. Symptom Blank pages Cause Solution The printer was priming the stapler. or empty. Replace the transfer roller. Your printer requires servicing. See Determining the status of supplies for information about a printer consumable. Use the following table to find solutions to be able...
User's Guide
Page 48
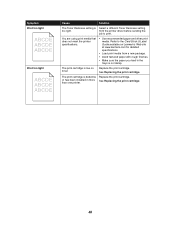
... light Cause Solution The Toner Darkness setting is low on Lexmark's Web site at www.lexmark.com for detailed specifications. • Load print media from the printer driver before sending the job to the Card Stock & Label Guide available on toner. The print cartridge is Select a different Toner Darkness setting too light. Replace the...
... light Cause Solution The Toner Darkness setting is low on Lexmark's Web site at www.lexmark.com for detailed specifications. • Load print media from the printer driver before sending the job to the Card Stock & Label Guide available on toner. The print cartridge is Select a different Toner Darkness setting too light. Replace the...
User's Guide
Page 49
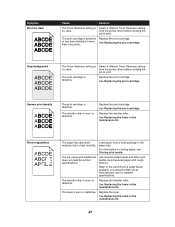
...roller. You are using print media that does not meet the printer specifications. The fuser is worn or defective. from the printer driver before sending the job to print. Replace the print cartridge. The transfer roller is worn or defective. Replace the fuser....in more than one printer. Load paper from the printer driver before sending the job to print. Replace the transfer roller. The print cartridge is defective Replace the print cartridge. See Replacing the print cartridge. For information on Lexmark's Web site at www.lexmark.com for detailed ...
...roller. You are using print media that does not meet the printer specifications. The fuser is worn or defective. from the printer driver before sending the job to print. Replace the print cartridge. The transfer roller is worn or defective. Replace the fuser....in more than one printer. Load paper from the printer driver before sending the job to print. Replace the transfer roller. The print cartridge is defective Replace the print cartridge. See Replacing the print cartridge. For information on Lexmark's Web site at www.lexmark.com for detailed ...
User's Guide
Page 50
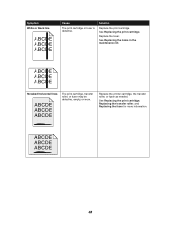
Replace the fuser. Solution Replace the print cartridge. See Replacing the print cartridge. Streaked horizontal lines The print cartridge, transfer roller, or fuser may be defective, empty, or worn. Replace the printer cartridge, the transfer roller, or fuser as needed. See Replacing the items in the maintenance kit. See Replacing the print cartridge, Replacing the transfer roller, and Replacing the fuser for more information. 48 Symptom White or black line Cause The print cartridge or fuser is defective.
Replace the fuser. Solution Replace the print cartridge. See Replacing the print cartridge. Streaked horizontal lines The print cartridge, transfer roller, or fuser may be defective, empty, or worn. Replace the printer cartridge, the transfer roller, or fuser as needed. See Replacing the items in the maintenance kit. See Replacing the print cartridge, Replacing the transfer roller, and Replacing the fuser for more information. 48 Symptom White or black line Cause The print cartridge or fuser is defective.

User's Guide
Page 61
...correctly. See Clearing staple jams. Staples are not stapled. Staple priming fails. Insert a new staple cartridge. not installed or is jammed. If necessary, reformat your print job using the printer driver to avoid stapled sets that are trying to the leading edge of paper from the software application... or rotate your print job from bin 2. Reduce the number of paper, the finisher ejects the stack without stapling it. The staple cartridge is full. ...
...correctly. See Clearing staple jams. Staples are not stapled. Staple priming fails. Insert a new staple cartridge. not installed or is jammed. If necessary, reformat your print job using the printer driver to avoid stapled sets that are trying to the leading edge of paper from the software application... or rotate your print job from bin 2. Reduce the number of paper, the finisher ejects the stack without stapling it. The staple cartridge is full. ...

User's Guide
Page 73
Clearing jams from the printer Tray 1 and the print cartridge area Note: The following instructions are written assuming you must remove it before opening the duplex unit door. If you are using the envelope feeder, you are using the multipurpose feeder and the duplex unit. For instructions, see Removing the optional envelope feeder. 1 Open the multipurpose feeder. 2 Push up on the latch to release the duplex unit door (Door E). 3 Gently lower the door to the open position. 4 Pull up on handle to open the printer side door (Door A). 71
Clearing jams from the printer Tray 1 and the print cartridge area Note: The following instructions are written assuming you must remove it before opening the duplex unit door. If you are using the envelope feeder, you are using the multipurpose feeder and the duplex unit. For instructions, see Removing the optional envelope feeder. 1 Open the multipurpose feeder. 2 Push up on the latch to release the duplex unit door (Door E). 3 Gently lower the door to the open position. 4 Pull up on handle to open the printer side door (Door A). 71
User's Guide
Page 104
..., call 1-800-438-2468 for more information.) Ordering a print cartridge When the 88 Toner Low message appears, you bought your area. You can also visit the Lexmark online store at the rear of the printer to determine the voltage of maintenance kit 12G4182 300K low-voltage maintenance... kit 12G4183 300K high-voltage maintenance kit Check the tag at www.lexmark.com to replace the items in your printer. Ordering a maintenance kit 80 Scheduled Maintenance appears on the tag, order a low-voltage maintenance kit. 26 ...
..., call 1-800-438-2468 for more information.) Ordering a print cartridge When the 88 Toner Low message appears, you bought your area. You can also visit the Lexmark online store at the rear of the printer to determine the voltage of maintenance kit 12G4182 300K low-voltage maintenance... kit 12G4183 300K high-voltage maintenance kit Check the tag at www.lexmark.com to replace the items in your printer. Ordering a maintenance kit 80 Scheduled Maintenance appears on the tag, order a low-voltage maintenance kit. 26 ...
User's Guide
Page 105
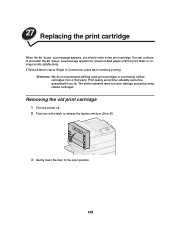
Print quality and printer reliability cannot be guaranteed if you should order a new print cartridge. 27 Replacing the print cartridge When the 88 Toner Low message appears, you do not recommend refilling used print cartridges or purchasing refilled cartridges from a third party. You can continue to continue printing. If ... 88 Toner Low message appears for a few hundred pages until the print fades or no longer prints satisfactorily. Removing the old print cartridge 1 Turn the printer off. 2 Push up on the latch to release the duplex unit door (Door E). 3 Gently lower the door to the open...
Print quality and printer reliability cannot be guaranteed if you should order a new print cartridge. 27 Replacing the print cartridge When the 88 Toner Low message appears, you do not recommend refilling used print cartridges or purchasing refilled cartridges from a third party. You can continue to continue printing. If ... 88 Toner Low message appears for a few hundred pages until the print fades or no longer prints satisfactorily. Removing the old print cartridge 1 Turn the printer off. 2 Push up on the latch to release the duplex unit door (Door E). 3 Gently lower the door to the open...

User's Guide
Page 140
... the replacement supply. Follow the instructions on the outside of the box to send the used supplies Lexmark's Operation ReSourceSM program lets you participate in the shipping box used printer cartridges or purchasing refilled cartridges from a third party. If a prepaid shipping label is not available for your country, contact the place where you bought...
... the replacement supply. Follow the instructions on the outside of the box to send the used supplies Lexmark's Operation ReSourceSM program lets you participate in the shipping box used printer cartridges or purchasing refilled cartridges from a third party. If a prepaid shipping label is not available for your country, contact the place where you bought...


