
Setup Guide
Page 7
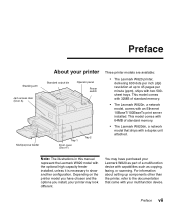
... capabilities such as copying, faxing, or scanning. Preface vii Note: The illustrations in this manual represent the Lexmark W820 model with the optional high capacity feeder installed, unless it is necessary to the documentation that ships with a duplex unit attached. Preface Stacking arm Jam access door (Door A) Multipurpose feeder About your printer Standard output bin Operator panel Power switch Tray 1 Front cover (Door F) Tray 2 Three printer models are available: • The Lexmark W820 printer, delivering 600 dots...
... capabilities such as copying, faxing, or scanning. Preface vii Note: The illustrations in this manual represent the Lexmark W820 model with the optional high capacity feeder installed, unless it is necessary to the documentation that ships with a duplex unit attached. Preface Stacking arm Jam access door (Door A) Multipurpose feeder About your printer Standard output bin Operator panel Power switch Tray 1 Front cover (Door F) Tray 2 Three printer models are available: • The Lexmark W820 printer, delivering 600 dots...

Setup Guide
Page 114
... about Lexmark support for network printer installation. Click View Documentation and look for non-NDPS (queue-based) environments, click View Documentation on a printer attached to a computer using a parallel or USB connection. Updated system and custom drivers are provided for local printing, you are available on the drivers CD. Detailed instructions are available at www.lexmark.com. Installation instructions Read the detailed online instructions on the drivers CD. Macintosh If you need to install the Lexmark...
... about Lexmark support for network printer installation. Click View Documentation and look for non-NDPS (queue-based) environments, click View Documentation on a printer attached to a computer using a parallel or USB connection. Updated system and custom drivers are provided for local printing, you are available on the drivers CD. Detailed instructions are available at www.lexmark.com. Installation instructions Read the detailed online instructions on the drivers CD. Macintosh If you need to install the Lexmark...
Setup Guide
Page 115
... printer is located both on the drivers CD and on the Lexmark Web site at www.lexmark.com. The user's guide contained in UNIX and Linux environments. You can be found on the CD. The driver package for installing and using a parallel connection. Lexmark provides a printer driver package for each package gives detailed instructions for Sun Solaris supports USB connections to verify your printer. All the driver packages support local printing using Lexmark printers in each supported...
... printer is located both on the drivers CD and on the Lexmark Web site at www.lexmark.com. The user's guide contained in UNIX and Linux environments. You can be found on the CD. The driver package for installing and using a parallel connection. Lexmark provides a printer driver package for each package gives detailed instructions for Sun Solaris supports USB connections to verify your printer. All the driver packages support local printing using Lexmark printers in each supported...

User's Guide
Page 11
... send the job to the Setup Guide for more information about choosing and installing drivers. Updated drivers, as well as the pages you can also use the Lexmark custom printer drivers. Modify the printer settings as appropriate (such as a complete description of the available printer settings you want to see all the printer features, use the system drivers built into your printer. When you are available from a software application, a window representing the printer driver opens. To support...
... send the job to the Setup Guide for more information about choosing and installing drivers. Updated drivers, as well as the pages you can also use the Lexmark custom printer drivers. Modify the printer settings as appropriate (such as a complete description of the available printer settings you want to see all the printer features, use the system drivers built into your printer. When you are available from a software application, a window representing the printer driver opens. To support...
User's Guide
Page 49
... on Lexmark's Web site at www.lexmark.com for detailed specifications. The fuser is defective. See Replacing the print cartridge. from the printer driver before sending the job to the Card Stock & Label Guide available on storing paper, see Storing print media. from a fresh package in the paper tray. The print cartridge is worn or defective. The transfer roller is defective. Use recommended paper and other print media. The transfer roller is defective Replace the print cartridge. See Replacing the items in the maintenance...
... on Lexmark's Web site at www.lexmark.com for detailed specifications. The fuser is defective. See Replacing the print cartridge. from the printer driver before sending the job to the Card Stock & Label Guide available on storing paper, see Storing print media. from a fresh package in the paper tray. The print cartridge is worn or defective. The transfer roller is defective. Use recommended paper and other print media. The transfer roller is defective Replace the print cartridge. See Replacing the items in the maintenance...
User's Guide
Page 52
... Rough. or worn. Auto size sensing is wrong Change Paper Texture from Normal to for the size loaded. See Replacing the print cartridge. See Replacing the items in the maintenance kit. the fuser were not removed. Move the guides in the tray to the proper positions for the type of print media you loaded a different size print media in each tray. The paper pick rollers are using. The transfer roller is defective. See Replacing the fuser. See Replacing the items in...
... Rough. or worn. Auto size sensing is wrong Change Paper Texture from Normal to for the size loaded. See Replacing the print cartridge. See Replacing the items in the maintenance kit. the fuser were not removed. Move the guides in the tray to the proper positions for the type of print media you loaded a different size print media in each tray. The paper pick rollers are using. The transfer roller is defective. See Replacing the fuser. See Replacing the items in...

User's Guide
Page 57
... trays: • Make sure the Tray x Type value in the Paper Type menu item in the Paper Menu is cable. The job prints from the Setup Menu. See Loading the trays for the standard parallel port. You are using a recommended interface interface cable, or the cable is the same for all linked trays. 55 Reduce the complexity of your print job by the operator panel message. Tray linking is set up properly or is too complex. Load paper in the printer driver...
... trays: • Make sure the Tray x Type value in the Paper Type menu item in the Paper Menu is cable. The job prints from the Setup Menu. See Loading the trays for the standard parallel port. You are using a recommended interface interface cable, or the cable is the same for all linked trays. 55 Reduce the complexity of your print job by the operator panel message. Tray linking is set up properly or is too complex. Load paper in the printer driver...

User's Guide
Page 61
... your print job using the printer driver to avoid stapled sets that are not properly positioned in the Finishing Menu. See Clearing staple jams. Staples are difficult to read. See Priming the stapler. The staple cartridge is jammed. The stapler is empty. For more information. If you attempt to staple a larger stack of 20 lb paper. correctly. Check the stapler for instructions. Insert a new staple cartridge...
... your print job using the printer driver to avoid stapled sets that are not properly positioned in the Finishing Menu. See Clearing staple jams. Staples are difficult to read. See Priming the stapler. The staple cartridge is jammed. The stapler is empty. For more information. If you attempt to staple a larger stack of 20 lb paper. correctly. Check the stapler for instructions. Insert a new staple cartridge...

User's Guide
Page 63
... is not configured properly. The infrared port is set up correctly in connector slot 1 is installed, or it . 22 Solving other option problems Use the following table to find solutions to problems with communication. Your printer driver may interfere with other options. Open the driver and verify that the option is not installed correctly. The cables connecting the option to the Setup Guide for instructions. Make sure the...
... is not configured properly. The infrared port is set up correctly in connector slot 1 is installed, or it . 22 Solving other option problems Use the following table to find solutions to problems with communication. Your printer driver may interfere with other options. Open the driver and verify that the option is not installed correctly. The cables connecting the option to the Setup Guide for instructions. Make sure the...
User's Guide
Page 104
...-size pages at the rear of the printer to maintain top performance, optimize print quality, and avoid printing problems. Order the appropriate maintenance kit: Part number Type of staple cartridges on the tag, order a low-voltage maintenance kit. You can also visit the Lexmark online store at www.lexmark.com to order supplies. Replace these items at this time to determine the voltage of three staple cartridges. (See Replacing a staple cartridge...
...-size pages at the rear of the printer to maintain top performance, optimize print quality, and avoid printing problems. Order the appropriate maintenance kit: Part number Type of staple cartridges on the tag, order a low-voltage maintenance kit. You can also visit the Lexmark online store at www.lexmark.com to order supplies. Replace these items at this time to determine the voltage of three staple cartridges. (See Replacing a staple cartridge...

User's Guide
Page 143
... using the operator panel to inadvertently change other printer settings. Use the numbers located next to the names of the buttons to enter your Lexmark printer driver to override printer user defaults and select settings for a brief overview of the printer menus available from the operator panel. 141 Button Select Return Stop 1, 2, 3, 4, 5, 6 Function Press Select to: • Open the menu shown on the display when you press Menu from the Ready state. If your printer is configured as a network printer...
... using the operator panel to inadvertently change other printer settings. Use the numbers located next to the names of the buttons to enter your Lexmark printer driver to override printer user defaults and select settings for a brief overview of the printer menus available from the operator panel. 141 Button Select Return Stop 1, 2, 3, 4, 5, 6 Function Press Select to: • Open the menu shown on the display when you press Menu from the Ready state. If your printer is configured as a network printer...

User's Guide
Page 211
... the printer driver to duplex only specific jobs.) Values: Off* On Prints on both sides of the paper. For example, if you want for all print jobs. (Select Duplex from the operator panel.) Values: 1...999 (1*) See also: Collation Duplex Purpose: To set Copies to 2 and send three pages to print, the printer prints page 1, page 1, page 2, page 2, page 3, page 3. Values: Off* On Prints each page of a job the number of times specified by the Copies menu item. Prints entire job the number of times specified by the Copies menu item...
... the printer driver to duplex only specific jobs.) Values: Off* On Prints on both sides of the paper. For example, if you want for all print jobs. (Select Duplex from the operator panel.) Values: 1...999 (1*) See also: Collation Duplex Purpose: To set Copies to 2 and send three pages to print, the printer prints page 1, page 1, page 2, page 2, page 3, page 3. Values: Off* On Prints each page of a job the number of times specified by the Copies menu item. Prints entire job the number of times specified by the Copies menu item...

User's Guide
Page 232
... may not support the entire range of values.) The factory default Power Saver setting depends on the page, or increase the installed printer memory. Select 1 if your printer is in Power Saver mode one minute after a print job before the printer goes into a reduced power state. If the Disabled value is not available from the Power Saver menu item, see Disabling Power Saver for the printer. Select 1 to receive print jobs. Under most print jobs, you...
... may not support the entire range of values.) The factory default Power Saver setting depends on the page, or increase the installed printer memory. Select 1 if your printer is in Power Saver mode one minute after a print job before the printer goes into a reduced power state. If the Disabled value is not available from the Power Saver menu item, see Disabling Power Saver for the printer. Select 1 to receive print jobs. Under most print jobs, you...
User's Guide
Page 255
... the drivers CD for this menu item are supplied by the specific print server. Note: This setting often causes Windows print jobs to maximum size allowed Printer automatically calculates the Network Buffer size (recommended setting). Printer processes print jobs from computers using the Macintosh operating system. To maximize the range for the Network Buffer size, disable or reduce the size of the other link buffers, and whether Resource Save is set to the documentation on...
... the drivers CD for this menu item are supplied by the specific print server. Note: This setting often causes Windows print jobs to maximum size allowed Printer automatically calculates the Network Buffer size (recommended setting). Printer processes print jobs from computers using the Macintosh operating system. To maximize the range for the Network Buffer size, disable or reduce the size of the other link buffers, and whether Resource Save is set to the documentation on...

User's Guide
Page 325
... 13 sending 15 Configure Bins (Paper Menu) 200 Configure MP (Paper Menu) 201 Copies (Finishing Menu) 209 copies, specifying number 209 current menu settings 183 with menu settings page 183 Custom Types (Paper Menu) 201 D Data Bits (Serial Menu) 247 default bin selection 202 default settings 184 factory 184 restoring 184 user 184 Defragment Flash (Utilities Menu) 215 determining supplies status 136 disabling 180 auto size sensing 180 operator panel menus 178 Power Saver 179 disk See hard disk Display Language (Setup Menu) 227 double-sided printing 209 See duplex 209 Download Target (Setup Menu...
... 13 sending 15 Configure Bins (Paper Menu) 200 Configure MP (Paper Menu) 201 Copies (Finishing Menu) 209 copies, specifying number 209 current menu settings 183 with menu settings page 183 Custom Types (Paper Menu) 201 D Data Bits (Serial Menu) 247 default bin selection 202 default settings 184 factory 184 restoring 184 user 184 Defragment Flash (Utilities Menu) 215 determining supplies status 136 disabling 180 auto size sensing 180 operator panel menus 178 Power Saver 179 disk See hard disk Display Language (Setup Menu) 227 double-sided printing 209 See duplex 209 Download Target (Setup Menu...

User's Guide
Page 326
fax 220 fax, canceling 220 finisher 38, 159 bins 38 cables, unplugging 161 check installation 273 disconnecting from printer 160 divertor cover, removing 164 removing 159 bin 2 160 from printer 159 from stand 163 stand, disassembling 166 staple cartridge, replacing 110 staple jam, clearing 99 staple positions 40 Finishing Menu 208 Blank Pages 208 Collation 209 Copies 209 Duplex 209 Duplex Bind 210 Hole Punch 210 Multipage Border 210 Multipage Order...
fax 220 fax, canceling 220 finisher 38, 159 bins 38 cables, unplugging 161 check installation 273 disconnecting from printer 160 divertor cover, removing 164 removing 159 bin 2 160 from printer 159 from stand 163 stand, disassembling 166 staple cartridge, replacing 110 staple jam, clearing 99 staple positions 40 Finishing Menu 208 Blank Pages 208 Collation 209 Copies 209 Duplex 209 Duplex Bind 210 Hole Punch 210 Multipage Border 210 Multipage Order...
User's Guide
Page 328
... 263 network port 254 parallel port 243 serial port 248 USB port 266 numbers, operator panel 141 numerical values, selecting 140 O Offset Pages (Finishing Menu) 212 operator panel 140 buttons 140 menus disabled 141 numbers 141 using 140 optional duplex unit 146 clearing jams 84 options removing duplex unit 146 envelope feeder 144 finisher 159 mailbox 149 verifying installation with menu settings page 183 ordering 102 maintenance kit 102 print cartridge 102 staple cartridge 102 ordering supplies 102 Orientation (PCL Emul Menu) 237 Output Bin (Paper Menu) 202 output bins...
... 263 network port 254 parallel port 243 serial port 248 USB port 266 numbers, operator panel 141 numerical values, selecting 140 O Offset Pages (Finishing Menu) 212 operator panel 140 buttons 140 menus disabled 141 numbers 141 using 140 optional duplex unit 146 clearing jams 84 options removing duplex unit 146 envelope feeder 144 finisher 159 mailbox 149 verifying installation with menu settings page 183 ordering 102 maintenance kit 102 print cartridge 102 staple cartridge 102 ordering supplies 102 Orientation (PCL Emul Menu) 237 Output Bin (Paper Menu) 202 output bins...

User's Guide
Page 330
... finisher 8 duplex and mailbox 8 finisher 8 mailbox 8 resetting 223 standard printer 7 taking offline 140 with Menu button 140 with Stop button 141 Printer Language (Setup Menu) 231 printer memory option, removing 173 printer menu settings, changing 185 printer menus 196 disabling 178 enabling 178 locking operator panel 178 understanding 196 printer messages 268 Menus Disabled 141 Priming Failed 139 see also messages 268 understanding 268 printer power cord, removing 149 printer system board 173 accessing 173 closing 177 printer testing 218 Hex Trace mode 217 print defaults 218 print hardware...
... finisher 8 duplex and mailbox 8 finisher 8 mailbox 8 resetting 223 standard printer 7 taking offline 140 with Menu button 140 with Stop button 141 Printer Language (Setup Menu) 231 printer memory option, removing 173 printer menu settings, changing 185 printer menus 196 disabling 178 enabling 178 locking operator panel 178 understanding 196 printer messages 268 Menus Disabled 141 Priming Failed 139 see also messages 268 understanding 268 printer power cord, removing 149 printer system board 173 accessing 173 closing 177 printer testing 218 Hex Trace mode 217 print defaults 218 print hardware...
User's Guide
Page 331
... box 114 trays 78 Remove Held Jobs (Utilities Menu) 219 removing 159 duplex unit 146 envelope feeder 144 finisher 159 divertor cover 164 from stand 163 plate 167 firmware card 176 flash memory option 173 high capacity feeder 170 mailbox 149, 153 multipurpose feeder 143 option cards 174 printer memory option 173 printer power cord 149 transport unit 165 Repeat Print 14 replacing fuser 116 pick rollers 126 print cartridge 103 staple cartridge 110 transfer roller 122 Reserve Print 15 Reset Printer (Job Menu) 223 resetting printer 223...
... box 114 trays 78 Remove Held Jobs (Utilities Menu) 219 removing 159 duplex unit 146 envelope feeder 144 finisher 159 divertor cover 164 from stand 163 plate 167 firmware card 176 flash memory option 173 high capacity feeder 170 mailbox 149, 153 multipurpose feeder 143 option cards 174 printer memory option 173 printer power cord 149 transport unit 165 Repeat Print 14 replacing fuser 116 pick rollers 126 print cartridge 103 staple cartridge 110 transfer roller 122 Reserve Print 15 Reset Printer (Job Menu) 223 resetting printer 223...

User's Guide
Page 332
... loading trays 4 and 5 27 Tri-Port Adapter 61 TrueType fonts 188 typeface 186 U United Kingdom Telecommunications Act 1984 321 Universal Setup (Paper Menu) 207 unlocking menus 178 USB Buffer (USB Menu) 267 USB Menu 265 Job Buffering 265 MAC Binary PS 266 NPA Mode 266 PCL SmartSwitch 266 PS SmartSwitch 267 USB Buffer 267 USB port 267 configuring 267 buffer size 267 NPA mode 266 PCL SmartSwitch 266 PS SmartSwitch 267 user default settings...
... loading trays 4 and 5 27 Tri-Port Adapter 61 TrueType fonts 188 typeface 186 U United Kingdom Telecommunications Act 1984 321 Universal Setup (Paper Menu) 207 unlocking menus 178 USB Buffer (USB Menu) 267 USB Menu 265 Job Buffering 265 MAC Binary PS 266 NPA Mode 266 PCL SmartSwitch 266 PS SmartSwitch 267 USB Buffer 267 USB port 267 configuring 267 buffer size 267 NPA mode 266 PCL SmartSwitch 266 PS SmartSwitch 267 user default settings...


