
Setup Guide
Page 3
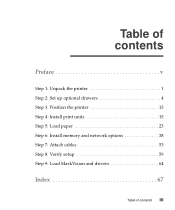
Table of contents Preface v Step 1: Unpack the printer 1 Step 2: Set up optional drawers 4 Step 3: Position the printer 13 Step 4: Install print units 15 Step 5: Load paper 23 Step 6: Install memory and network options 38 Step 7: Attach cables 53 Step 8: Verify setup 59 Step 9: Load MarkVision and drivers 64 Index 67 Table of contents iii
Table of contents Preface v Step 1: Unpack the printer 1 Step 2: Set up optional drawers 4 Step 3: Position the printer 13 Step 4: Install print units 15 Step 5: Load paper 23 Step 6: Install memory and network options 38 Step 7: Attach cables 53 Step 8: Verify setup 59 Step 9: Load MarkVision and drivers 64 Index 67 Table of contents iii
Setup Guide
Page 5
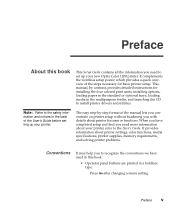
... to the safety infor- It provides information about printer features or functions. Preface About this book: • Operator panel buttons are printed in a boldface type: Press Go after changing a menu setting. Preface v It complements the wordless setup poster, which provides a quick overview of the User's Guide before setting up your new Optra Color 1200 printer.
... to the safety infor- It provides information about printer features or functions. Preface About this book: • Operator panel buttons are printed in a boldface type: Press Go after changing a menu setting. Preface v It complements the wordless setup poster, which provides a quick overview of the User's Guide before setting up your new Optra Color 1200 printer.

Setup Guide
Page 6
.... • Optional steps you may find useful. Caution! A warning identifies something that appear on the operator panel display are identified in a colored arrow at the bottom of selected pages: Colored arrows, like this one, identify optional steps you may want to skip. vi Preface Warning! A caution identifies something that might cause you...
.... • Optional steps you may find useful. Caution! A warning identifies something that appear on the operator panel display are identified in a colored arrow at the bottom of selected pages: Colored arrows, like this one, identify optional steps you may want to skip. vi Preface Warning! A caution identifies something that might cause you...
Setup Guide
Page 7
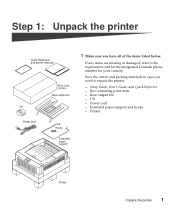
... items are missing or damaged, refer to repack the printer. - Save the carton and packing materials in box) Rear output bin Hooks Extended paper support 1 Make sure you need to the registration card for the designated Lexmark phone number for your country. Rear output bin - Extended... paper support and hooks - Box containing print units - Step 1: Unpack the printer Quick Reference and printer manuals CD Power cord Print units (in case you have ...
... items are missing or damaged, refer to repack the printer. - Save the carton and packing materials in box) Rear output bin Hooks Extended paper support 1 Make sure you need to the registration card for the designated Lexmark phone number for your country. Rear output bin - Extended... paper support and hooks - Box containing print units - Step 1: Unpack the printer Quick Reference and printer manuals CD Power cord Print units (in case you have ...

Setup Guide
Page 8
Toner cartridge Photoconductor The print unit box includes: • 4 color-coded toner cartridges • 4 color-coded photoconductors 2 Unpack the printer
Toner cartridge Photoconductor The print unit box includes: • 4 color-coded toner cartridges • 4 color-coded photoconductors 2 Unpack the printer

Setup Guide
Page 9
Otherwise, skip to Step 3: "Position the printer" on page 4. Unpack the printer 3 2 Remove any visible tape or other packing material from the printer. If you purchased an optional drawer, continue with Step 2: "Set up optional drawers" on page 13.
Otherwise, skip to Step 3: "Position the printer" on page 4. Unpack the printer 3 2 Remove any visible tape or other packing material from the printer. If you purchased an optional drawer, continue with Step 2: "Set up optional drawers" on page 13.
Setup Guide
Page 10
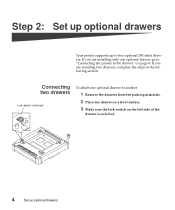
Connecting two drawers Lock switch (unlocked) To attach one optional drawer to another: 1 Remove the drawers from the packing materials. 2 Place one optional drawer, go to "Connecting the printer to two optional 250-sheet drawers. Step 2: Set up optional drawers Your printer supports up optional drawers If you are installing only one drawer on a level surface. 3 Make sure the lock switch on the left side of the drawer is unlocked. 4 Set up to the drawer" on page 8. If you are installing two drawers, complete the steps in the following section.
Connecting two drawers Lock switch (unlocked) To attach one optional drawer to another: 1 Remove the drawers from the packing materials. 2 Place one optional drawer, go to "Connecting the printer to two optional 250-sheet drawers. Step 2: Set up optional drawers Your printer supports up optional drawers If you are installing only one drawer on a level surface. 3 Make sure the lock switch on the left side of the drawer is unlocked. 4 Set up to the drawer" on page 8. If you are installing two drawers, complete the steps in the following section.

Setup Guide
Page 13
8 Locate the lock switch on the left side of the lower drawer. 9 Push the lock switch toward the back of the drawer to lock the options together. 10 Continue with "Connecting the printer to the drawer" on page 8. Set up optional drawers 7
8 Locate the lock switch on the left side of the lower drawer. 9 Push the lock switch toward the back of the drawer to lock the options together. 10 Continue with "Connecting the printer to the drawer" on page 8. Set up optional drawers 7

Setup Guide
Page 14
... the drawer Lock switch (unlocked) Complete the following steps to attach the printer to one or more information about the appropriate environment for the printer. 3 Make sure the lock switch on the left side of the printer. 5 If you have chosen for more optional drawers: 1 Remove the drawer from the ... materials. 2 Place the drawer (or the two drawers you already connected) in the location you 're installing the optional drawer sometime after initial printer setup, turn the printer off and disconnect the printer cables and the power cord. 8 Set up optional drawers See page 14 for your...
... the drawer Lock switch (unlocked) Complete the following steps to attach the printer to one or more information about the appropriate environment for the printer. 3 Make sure the lock switch on the left side of the printer. 5 If you have chosen for more optional drawers: 1 Remove the drawer from the ... materials. 2 Place the drawer (or the two drawers you already connected) in the location you 're installing the optional drawer sometime after initial printer setup, turn the printer off and disconnect the printer cables and the power cord. 8 Set up optional drawers See page 14 for your...

Setup Guide
Page 15
Set up optional drawers 9 This printer weighs 43 kg (95 lb) and requires at least two people to lift. 6 Have someone help you lift the printer. Use the handholds under the printer. Caution!
Set up optional drawers 9 This printer weighs 43 kg (95 lb) and requires at least two people to lift. 6 Have someone help you lift the printer. Use the handholds under the printer. Caution!

Setup Guide
Page 16
7 Carefully place the printer on top of the drawer(s), as shown. 8 Plug the option cable from the drawer into the connector on the back of the printer. 10 Set up optional drawers
7 Carefully place the printer on top of the drawer(s), as shown. 8 Plug the option cable from the drawer into the connector on the back of the printer. 10 Set up optional drawers

Setup Guide
Page 17
9 Reattach the connector cover on the back of the printer. 10 Locate the lock switch on the left side of the drawer. 11 Push the lock switch toward the back of the drawer to lock the drawer to the printer. Set up optional drawers 11
9 Reattach the connector cover on the back of the printer. 10 Locate the lock switch on the left side of the drawer. 11 Push the lock switch toward the back of the drawer to lock the drawer to the printer. Set up optional drawers 11

Setup Guide
Page 19
Step 3: Position the printer Caution! Use the handholds under the printer. This printer weighs 43 kg (95 Ib) and requires at least two people to lift. 1 Have someone help you lift the printer. Position the printer 13
Step 3: Position the printer Caution! Use the handholds under the printer. This printer weighs 43 kg (95 Ib) and requires at least two people to lift. 1 Have someone help you lift the printer. Position the printer 13

Setup Guide
Page 20
ventilated area. In dusty or dirty environments Quick Reference 3 Find a convenient location for the Quick Refer- Leave enough space in front of the printer to the designated area. 14 Position the printer ence: a Locate a visible spot in a well- In direct sunlight - b Remove the protective paper from the back of the plastic sleeve. c ...Firmly attach the adhesive-backed sleeve to allow for easy paper loading. If you plan to install the rear output bin, leave room behind the printer as well. 305 mm (12 in.) 381 mm (15 in.) 508 mm (20 in.) 381 mm (15 in.) 2 Place the...
ventilated area. In dusty or dirty environments Quick Reference 3 Find a convenient location for the Quick Refer- Leave enough space in front of the printer to the designated area. 14 Position the printer ence: a Locate a visible spot in a well- In direct sunlight - b Remove the protective paper from the back of the plastic sleeve. c ...Firmly attach the adhesive-backed sleeve to allow for easy paper loading. If you plan to install the rear output bin, leave room behind the printer as well. 305 mm (12 in.) 381 mm (15 in.) 508 mm (20 in.) 381 mm (15 in.) 2 Place the...

Setup Guide
Page 21
...: 1 Open the box containing the toner cartridges and photoconductors. 2 Remove a toner cartridge from the packing mate- Step 4: Install print units Assembling the print units Your printer ships with four color-coded toner cartridges and four photoconductors. Complete the following steps to distribute the toner evenly. 4 Place the toner cartridge on a flat surface.
...: 1 Open the box containing the toner cartridges and photoconductors. 2 Remove a toner cartridge from the packing mate- Step 4: Install print units Assembling the print units Your printer ships with four color-coded toner cartridges and four photoconductors. Complete the following steps to distribute the toner evenly. 4 Place the toner cartridge on a flat surface.

Setup Guide
Page 25
Complete the following steps to install each print unit. We recommend installing the magenta print unit first, followed by cyan, yellow, and black. 1 Press the release button on the printer's top cover. 2 Raise the cover. Transport belt Install print units 19 Do not touch the LEDs inside the top cover or the LEDs transport belt in the printer. Installing the print units Now that you've assembled the print units, you must install them in the bottom of the printer. Each color print unit has its appropriate color-coded position in the printer.
Complete the following steps to install each print unit. We recommend installing the magenta print unit first, followed by cyan, yellow, and black. 1 Press the release button on the printer's top cover. 2 Raise the cover. Transport belt Install print units 19 Do not touch the LEDs inside the top cover or the LEDs transport belt in the printer. Installing the print units Now that you've assembled the print units, you must install them in the bottom of the printer. Each color print unit has its appropriate color-coded position in the printer.

Setup Guide
Page 26
... place. You cannot install the print unit if the tab is pressed in. 5 Slide the print unit into the appropriate color- If the print unit does not slide easily into the printer, or you may damage the photoconductor. This opens the protective cover over the photoconductor drum. Do not force the print...
... place. You cannot install the print unit if the tab is pressed in. 5 Slide the print unit into the appropriate color- If the print unit does not slide easily into the printer, or you may damage the photoconductor. This opens the protective cover over the photoconductor drum. Do not force the print...
Setup Guide
Page 29
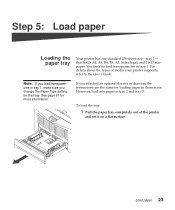
... A3, letter, legal, and 11x17 size paper. To load the tray: 1 Pull the paper tray completely out of media your printer supports, refer to the User's Guide. Step 5: Load paper Loading the paper tray Your printer has one standard 250-sheet tray-tray 1- that tray. For details about the types of the... printer and set it on a flat surface. However, load only paper in tray 1. You can also load transparencies in tray 2 and ...
... A3, letter, legal, and 11x17 size paper. To load the tray: 1 Pull the paper tray completely out of media your printer supports, refer to the User's Guide. Step 5: Load paper Loading the paper tray Your printer has one standard 250-sheet tray-tray 1- that tray. For details about the types of the... printer and set it on a flat surface. However, load only paper in tray 1. You can also load transparencies in tray 2 and ...

Setup Guide
Page 30
Straighten the edges on a level surface. 24 Load paper 2 Squeeze the rear paper guide and slide it to the appropriate position for the appropriate paper size. 3 Before loading paper, flex the sheets back and forth to loosen them, then fan them. If you may already be set up for the size paper you are loading A4 or letter size paper, the tray may experience paper feeding problems or incorrect formatting of the paper in the wrong position, you are loading. If the rear paper guide is in the tray. The position of the rear paper guide tells the printer the size of pages.
Straighten the edges on a level surface. 24 Load paper 2 Squeeze the rear paper guide and slide it to the appropriate position for the appropriate paper size. 3 Before loading paper, flex the sheets back and forth to loosen them, then fan them. If you may already be set up for the size paper you are loading A4 or letter size paper, the tray may experience paper feeding problems or incorrect formatting of the paper in the wrong position, you are loading. If the rear paper guide is in the tray. The position of the rear paper guide tells the printer the size of pages.

Setup Guide
Page 31
... A4, A5, B5, and letter size paper, place the long edge of the paper at the front of the tray. If you 're loading: - The printer recognizes either B4 and A3 size paper or legal and 11x17 size paper, depending on the paper conventions in the tray depends on the size... size paper, place the short edge of the paper at the front of the paper in your geographic region. If you need to change this printer setting, refer to the right. Short edge Corner tab Load paper 25 If you 're loading preprinted letterhead, place the top of the tray. Make...
... A4, A5, B5, and letter size paper, place the long edge of the paper at the front of the tray. If you 're loading: - The printer recognizes either B4 and A3 size paper or legal and 11x17 size paper, depending on the paper conventions in the tray depends on the size... size paper, place the short edge of the paper at the front of the paper in your geographic region. If you need to change this printer setting, refer to the right. Short edge Corner tab Load paper 25 If you 're loading preprinted letterhead, place the top of the tray. Make...


