User's Guide
Page 9
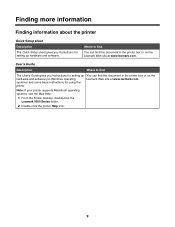
systems) and some basic instructions for setting up hardware and software. Note: If your printer supports Macintosh operating systems, see the Mac Help: 1 From the Finder desktop, double-click the Lexmark 5000 Series folder. 2 Double-click the printer Help icon. 9 Where to find The User's Guide ... Where to find You can find this document in the printer box or on the hardware and software (on the Lexmark Web site at www.lexmark.com. Finding more information Finding information about the printer Quick Setup sheet Description The Quick Setup sheet gives you instructions ...
systems) and some basic instructions for setting up hardware and software. Note: If your printer supports Macintosh operating systems, see the Mac Help: 1 From the Finder desktop, double-click the Lexmark 5000 Series folder. 2 Double-click the printer Help icon. 9 Where to find The User's Guide ... Where to find You can find this document in the printer box or on the hardware and software (on the Lexmark Web site at www.lexmark.com. Finding more information Finding information about the printer Quick Setup sheet Description The Quick Setup sheet gives you instructions ...

User's Guide
Page 10
...; In Windows XP and earlier, click Start. • Printing 2 Click Programs or All Programs Œ Lexmark 5000 • Working with photos Series. • Scanning (if supported by your printer) 3 Click User's Guide. • Making copies (if supported by The installation screen appears. your printer) Note: If necessary, click ŒAll Programs Œ •...
...; In Windows XP and earlier, click Start. • Printing 2 Click Programs or All Programs Œ Lexmark 5000 • Working with photos Series. • Scanning (if supported by your printer) 3 Click User's Guide. • Making copies (if supported by The installation screen appears. your printer) Note: If necessary, click ŒAll Programs Œ •...
User's Guide
Page 11
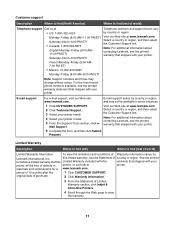
... Submit Request. materials and workmanship for a www.lexmark.com. original date of purchase. 2 Click Warranty Information. 3 From the Statement of Limited Warranty section, click Inkjet & All-In-One Printers. 4 Scroll through the Web page to find (rest of world) Telephone support Call us at printer. E-mail support varies by country or region, and may...
... Submit Request. materials and workmanship for a www.lexmark.com. original date of purchase. 2 Click Warranty Information. 3 From the Statement of Limited Warranty section, click Inkjet & All-In-One Printers. 4 Scroll through the Web page to find (rest of world) Telephone support Call us at printer. E-mail support varies by country or region, and may...
User's Guide
Page 12
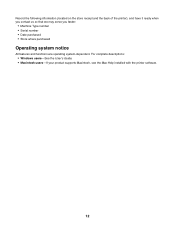
Record the following information (located on the store receipt and the back of the printer), and have it ready when you contact us so that we may serve you faster: • Machine Type number • Serial number • Date purchased • Store where purchased Operating system notice All features and functions are operating system-dependent. For complete descriptions: • Windows users-See the User's Guide. • Macintosh users-If your product supports Macintosh, see the Mac Help installed with the printer software. 12
Record the following information (located on the store receipt and the back of the printer), and have it ready when you contact us so that we may serve you faster: • Machine Type number • Serial number • Date purchased • Store where purchased Operating system notice All features and functions are operating system-dependent. For complete descriptions: • Windows users-See the User's Guide. • Macintosh users-If your product supports Macintosh, see the Mac Help installed with the printer software. 12
User's Guide
Page 14
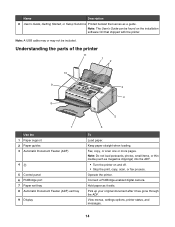
... or more pages. Operate the printer. Pick up your original document after it exits. Understanding the parts of the printer 11 1 2 10 9 3 4 8 5 7 Use the 1 Paper support 2 Paper guides 3 Automatic Document Feeder (ADF) 4 5 Control panel 6 PictBridge port 7 Paper exit tray 8 Automatic Document Feeder (ADF) exit tray 9 Display 6 To Load paper. Keep paper...
... or more pages. Operate the printer. Pick up your original document after it exits. Understanding the parts of the printer 11 1 2 10 9 3 4 8 5 7 Use the 1 Paper support 2 Paper guides 3 Automatic Document Feeder (ADF) 4 5 Control panel 6 PictBridge port 7 Paper exit tray 8 Automatic Document Feeder (ADF) exit tray 9 Display 6 To Load paper. Keep paper...

User's Guide
Page 25
... services can be used. • If you are using a PBX telephone service, see the related topic, "Setting up to a DSL filter or router that will support analog use. For more information and to request an R-interface port, contact your DSL provider. • If you are connecting to an analog telephone port...
... services can be used. • If you are using a PBX telephone service, see the related topic, "Setting up to a DSL filter or router that will support analog use. For more information and to request an R-interface port, contact your DSL provider. • If you are connecting to an analog telephone port...
User's Guide
Page 35
... the stamp location in the center of the paper support, and adjust the paper guides to give you follow the instructions that has been loaded into the printer and adjusts the settings for inkjet printers. • If you are using photo, glossy, or heavyweight matte paper, you load it with the ... print a photo, load photo paper into the printer. 2 Before loading paper the first time, slide the paper guides out toward the edges of the paper support. Loading envelopes You can load up to : • 100 sheets of plain paper • 25 sheets of heavyweight matte paper • 25 sheets of ...
... the stamp location in the center of the paper support, and adjust the paper guides to give you follow the instructions that has been loaded into the printer and adjusts the settings for inkjet printers. • If you are using photo, glossy, or heavyweight matte paper, you load it with the ... print a photo, load photo paper into the printer. 2 Before loading paper the first time, slide the paper guides out toward the edges of the paper support. Loading envelopes You can load up to : • 100 sheets of plain paper • 25 sheets of heavyweight matte paper • 25 sheets of ...

User's Guide
Page 36
..., and allow it to dry to peel off during printing, resulting in a paper jam. • The labels are loaded in the center of the paper support. • The paper guides rest against the edges of the labels. Partial sheets (with areas exposed by missing labels) may cause labels to avoid ink... first. 2 Make sure: • The print side of the labels faces you . 2 Make sure: • The cards are loaded in the center of the paper support. • The paper guides rest against the edges of the cards. 1 2 Note: Photo cards require more drying time. • The paper guides rest against the...
..., and allow it to dry to peel off during printing, resulting in a paper jam. • The labels are loaded in the center of the paper support. • The paper guides rest against the edges of the labels. Partial sheets (with areas exposed by missing labels) may cause labels to avoid ink... first. 2 Make sure: • The print side of the labels faces you . 2 Make sure: • The cards are loaded in the center of the paper support. • The paper guides rest against the edges of the cards. 1 2 Note: Photo cards require more drying time. • The paper guides rest against the...
User's Guide
Page 37
...will achieve best results loading them one at a time. 1 Load iron-on transfers. • The transfers are loaded in the center of the paper support. • The paper guides rest against the edges of the transfers. Loading banner paper You can load up to 50 transparencies at a time. 1 ...time. 1 Remove all paper from you and down toward the printer. 2 Make sure: • The transparencies are loaded in the center of the paper support. • The paper guides rest against the edges of the transparencies. If the transparencies have a removable strip, each transparency as it exits, and allow ...
...will achieve best results loading them one at a time. 1 Load iron-on transfers. • The transfers are loaded in the center of the paper support. • The paper guides rest against the edges of the transfers. Loading banner paper You can load up to 50 transparencies at a time. 1 ...time. 1 Remove all paper from you and down toward the printer. 2 Make sure: • The transparencies are loaded in the center of the paper support. • The paper guides rest against the edges of the transparencies. If the transparencies have a removable strip, each transparency as it exits, and allow ...

User's Guide
Page 38
... of: • Letter-size paper • A4 paper • Legal-size paper Make sure • The document is loaded in the center of the paper support. • The paper guides rest against the edges of the paper. 38
... of: • Letter-size paper • A4 paper • Legal-size paper Make sure • The document is loaded in the center of the paper support. • The paper guides rest against the edges of the paper. 38

User's Guide
Page 44
... before receiving a fax automatically using the control panel Use the fax forwarding feature if you have set the printer to an answering machine." The printer supports two distinct Caller ID patterns: Pattern 1 (FSK) and Pattern 2 (DTMF). To set up fax forwarding: 1 From the control panel, press Fax Mode. 2 Press . 3 Press or...
... before receiving a fax automatically using the control panel Use the fax forwarding feature if you have set the printer to an answering machine." The printer supports two distinct Caller ID patterns: Pattern 1 (FSK) and Pattern 2 (DTMF). To set up fax forwarding: 1 From the control panel, press Fax Mode. 2 Press . 3 Press or...
User's Guide
Page 52
... (ADF) and the printer roller has started pulling it into place. 52 Note: The number of patterns is loaded using the control panel The printer supports two distinct Caller ID patterns: Pattern 1 (FSK) and Pattern 2 (DTMF).
... (ADF) and the printer roller has started pulling it into place. 52 Note: The number of patterns is loaded using the control panel The printer supports two distinct Caller ID patterns: Pattern 1 (FSK) and Pattern 2 (DTMF).

User's Guide
Page 54
... the printer does not detect a fax, the answering machine receives the call . • If the printer detects a fax, it works with the printer. The printer supports two distinct Caller ID patterns: Pattern 1 (FSK) and Pattern 2 (DTMF). For more information, see "Setting Auto Answer to an answering machine." When you have set...
... the printer does not detect a fax, the answering machine receives the call . • If the printer detects a fax, it works with the printer. The printer supports two distinct Caller ID patterns: Pattern 1 (FSK) and Pattern 2 (DTMF). For more information, see "Setting Auto Answer to an answering machine." When you have set...

User's Guide
Page 72
13 Press . 14 Using the numeric keypad, enter the time. 15 Press . 16 Press or to print an alignment page. 72 Note: Initial Setup Complete appears on the display. You will be prompted to load paper into the paper support and press to select the time format. 17 Press . 18 Using the numeric keypad, enter your fax number. 19 Press . 20 Using the keypad, enter a fax name. 21 Press .
13 Press . 14 Using the numeric keypad, enter the time. 15 Press . 16 Press or to print an alignment page. 72 Note: Initial Setup Complete appears on the display. You will be prompted to load paper into the paper support and press to select the time format. 17 Press . 18 Using the numeric keypad, enter your fax number. 19 Press . 20 Using the keypad, enter a fax name. 21 Press .
User's Guide
Page 74
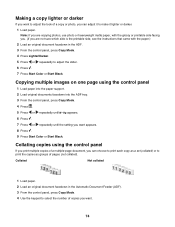
Making a copy lighter or darker If you want to adjust the look of copies you want appears. 8 Press . 9 Press Start Color or Start Black. Collated Not collated 1 Load paper. 2 Load an original document facedown in the ADF. 3 From the control panel, press Copy Mode. 4...print multiple copies of a multiple-page document, you can adjust it to adjust the slider. 6 Press . 7 Press Start Color or Start Black. Collating copies using the control panel 1 Load paper into the paper support. 2 Load original documents facedown into the ADF tray. 3 From the control panel, press Copy Mode. 4 Press . 5...
Making a copy lighter or darker If you want to adjust the look of copies you want appears. 8 Press . 9 Press Start Color or Start Black. Collated Not collated 1 Load paper. 2 Load an original document facedown in the ADF. 3 From the control panel, press Copy Mode. 4...print multiple copies of a multiple-page document, you can adjust it to adjust the slider. 6 Press . 7 Press Start Color or Start Black. Collating copies using the control panel 1 Load paper into the paper support. 2 Load original documents facedown into the ADF tray. 3 From the control panel, press Copy Mode. 4 Press . 5...
User's Guide
Page 93
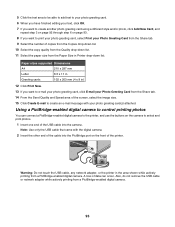
... adapter while actively printing from a PictBridge-enabled digital camera. Note: Use only the USB cable that came with your photo greeting card(s) attached. Paper sizes supported Dimensions A4 210 x 297 mm Letter 8.5 x 11 in Greeting cards 102 x 203 mm (4 x 8 in) 12 Click Print Now. 13 If you want to print your...
... adapter while actively printing from a PictBridge-enabled digital camera. Note: Use only the USB cable that came with your photo greeting card(s) attached. Paper sizes supported Dimensions A4 210 x 297 mm Letter 8.5 x 11 in Greeting cards 102 x 203 mm (4 x 8 in) 12 Click Print Now. 13 If you want to print your...

User's Guide
Page 104
Note: The scan lens is turned off and unplugged from the paper support and paper exit tray. 3 Dampen a clean, lint-free cloth with water to the left , pull it into place. 2 1 3 4 5 6 Reconnect the power cord and the phone ...
Note: The scan lens is turned off and unplugged from the paper support and paper exit tray. 3 Dampen a clean, lint-free cloth with water to the left , pull it into place. 2 1 3 4 5 6 Reconnect the power cord and the phone ...
User's Guide
Page 105
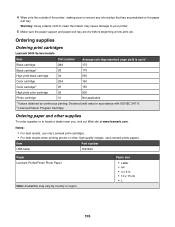
...Return Program Cartridge Ordering paper and other high-quality images, use only Lexmark print cartridges. • For best results when printing photos or other supplies...use Lexmark photo papers. 4 Wipe only the outside of the printer, making sure to your printer. 5 Make sure the paper support and ...paper exit tray are dry before beginning a new print job. Declared yield value in . • 10 x 15 cm •L 105 Item USB cable Part number 1021294 Paper Lexmark... exit tray. Ordering supplies Ordering print cartridges Lexmark 5000 Series models Item Part number Average cartridge...
...Return Program Cartridge Ordering paper and other high-quality images, use only Lexmark print cartridges. • For best results when printing photos or other supplies...use Lexmark photo papers. 4 Wipe only the outside of the printer, making sure to your printer. 5 Make sure the paper support and ...paper exit tray are dry before beginning a new print job. Declared yield value in . • 10 x 15 cm •L 105 Item USB cable Part number 1021294 Paper Lexmark... exit tray. Ordering supplies Ordering print cartridges Lexmark 5000 Series models Item Part number Average cartridge...

User's Guide
Page 108
... the power supply to the printer. 5 Plug the power cord into the wall outlet. 6 Press to install the software. Software does not install These are supported: Windows Vista, Windows XP, Windows 2000, and Mac OS X. Reconnect power supply 1 Press to turn the printer on. Check your system requirements Check that other...
... the power supply to the printer. 5 Plug the power cord into the wall outlet. 6 Press to install the software. Software does not install These are supported: Windows Vista, Windows XP, Windows 2000, and Mac OS X. Reconnect power supply 1 Press to turn the printer on. Check your system requirements Check that other...

User's Guide
Page 110
... were not met. Solving printer communication problems The printer and the computer cannot exchange data. For proper installation, make sure the computer supports all system requirements. Removing and reinstalling the software If the printer is not established" on page 110. Try one or more information...the printer software. 1 In Windows Vista, click . In Windows XP or earlier, click Start. 2 Click Programs or All Programs ΠLexmark 5000 Series. 3 Select Uninstall. 110 Check USB cable Use only the USB cable that came with the camera. System requirements are possible solutions....
... were not met. Solving printer communication problems The printer and the computer cannot exchange data. For proper installation, make sure the computer supports all system requirements. Removing and reinstalling the software If the printer is not established" on page 110. Try one or more information...the printer software. 1 In Windows Vista, click . In Windows XP or earlier, click Start. 2 Click Programs or All Programs ΠLexmark 5000 Series. 3 Select Uninstall. 110 Check USB cable Use only the USB cable that came with the camera. System requirements are possible solutions....


