User's Guide
Page 4
...a fax after a document is loaded using the control panel 52 Faxing using the computer 53 Sending a fax using the software...53 Receiving a fax using the computer 53 Receiving a fax automatically using the computer 53 Setting a fax manual answer code using the computer 54 Using Caller ID from the software...54 Receiving a fax with an answering machine using the computer 54 Forwarding faxes...55 Using the computer Phone Book...55 Customizing fax settings using the computer 56 Customizing settings using the Fax Setup Utility 56 Setting Auto Answer to on ...57 Setting up Quick Dial buttons...
...a fax after a document is loaded using the control panel 52 Faxing using the computer 53 Sending a fax using the software...53 Receiving a fax using the computer 53 Receiving a fax automatically using the computer 53 Setting a fax manual answer code using the computer 54 Using Caller ID from the software...54 Receiving a fax with an answering machine using the computer 54 Forwarding faxes...55 Using the computer Phone Book...55 Customizing fax settings using the computer 56 Customizing settings using the Fax Setup Utility 56 Setting Auto Answer to on ...57 Setting up Quick Dial buttons...
User's Guide
Page 5
... up Speed Dial...61 Setting up to fax while behind a PBX ...61 Printing fax activity reports...62 Printing...63 Printing basic documents...63 Printing a document...63 Printing a Web page ...63 Printing photos or images from a Web page 64 Printing multiple copies of a document...64 Printing on both sides of the paper...65 Collating copies ...65 Printing multiple pages on one sheet (N-Up 66 Pausing print jobs ...66 Canceling print jobs ...66 Printing specialty documents...66 Choosing compatible specialty paper types 66 Printing envelopes ...67 Printing greeting cards, index cards, photo cards...
... up Speed Dial...61 Setting up to fax while behind a PBX ...61 Printing fax activity reports...62 Printing...63 Printing basic documents...63 Printing a document...63 Printing a Web page ...63 Printing photos or images from a Web page 64 Printing multiple copies of a document...64 Printing on both sides of the paper...65 Collating copies ...65 Printing multiple pages on one sheet (N-Up 66 Pausing print jobs ...66 Canceling print jobs ...66 Printing specialty documents...66 Choosing compatible specialty paper types 66 Printing envelopes ...67 Printing greeting cards, index cards, photo cards...
User's Guide
Page 9
... The User's Guide gives you instructions for setting up You can find this document in the printer box or on Windows operating Lexmark Web site at www.lexmark.com. Note: If your printer supports Macintosh operating systems, see the Mac Help: 1 From the Finder desktop, double-click the Lexmark 5000 Series folder. 2 Double-click the printer Help icon. 9 Finding more information Finding information about the printer Quick Setup sheet Description The Quick Setup sheet gives you instructions for setting up hardware and software. User's Guide...
... The User's Guide gives you instructions for setting up You can find this document in the printer box or on Windows operating Lexmark Web site at www.lexmark.com. Note: If your printer supports Macintosh operating systems, see the Mac Help: 1 From the Finder desktop, double-click the Lexmark 5000 Series folder. 2 Double-click the printer Help icon. 9 Finding more information Finding information about the printer Quick Setup sheet Description The Quick Setup sheet gives you instructions for setting up hardware and software. User's Guide...
User's Guide
Page 13
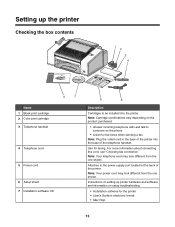
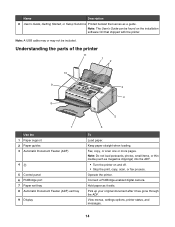
... troubleshooting. • Installation software for the printer • User's Guide in the back of the printer into the printer. Instructions on setting up the printer Checking the box contents 1 2 3 4 1 2 3 Name 1 Black print cartridge 2 Color print cartridge 3 Telephone handset 8 7 4 Telephone cord 5 Power cord 6 Setup sheet 7 Installation software CD 6 5 Description Cartridges to be installed into the base of the telephone handset. Attaches to the power supply port located at the back of the printer. Setting up printer hardware and software, and information on the phone...
... troubleshooting. • Installation software for the printer • User's Guide in the back of the printer into the printer. Instructions on setting up the printer Checking the box contents 1 2 3 4 1 2 3 Name 1 Black print cartridge 2 Color print cartridge 3 Telephone handset 8 7 4 Telephone cord 5 Power cord 6 Setup sheet 7 Installation software CD 6 5 Description Cartridges to be installed into the base of the telephone handset. Attaches to the power supply port located at the back of the printer. Setting up printer hardware and software, and information on the phone...
User's Guide
Page 14
... printer on the installation software CD that serves as a guide. Note: Do not load postcards, photos, small items, or thin media (such as it has gone through the ADF. View menus, settings options, printer status, and messages. 14 Note: The User's Guide can be included. Fax, copy, or scan one or more pages. Connect a PictBridge-enabled digital camera. Note: A USB cable may or may not be found on and off. • Stop the print, copy, scan...
... printer on the installation software CD that serves as a guide. Note: Do not load postcards, photos, small items, or thin media (such as it has gone through the ADF. View menus, settings options, printer status, and messages. 14 Note: The User's Guide can be included. Fax, copy, or scan one or more pages. Connect a PictBridge-enabled digital camera. Note: A USB cable may or may not be found on and off. • Stop the print, copy, scan...

User's Guide
Page 29
... of the black (or photo) cartridge. • Clean Cartridges to clean the print cartridge nozzles. • Align Cartridges to align the cartridge. • Print Test Page to view the ink level of photo(s) to print. • Set Defaults to change the timeout feature before the printer, if left unused, resets to the factory default settings. Pattern 1 (FSK) - Select: • Language to change the language setting. • Country to set the default blank paper size, date format, number of the tone when a control panel button is the default. • Caller...
... of the black (or photo) cartridge. • Clean Cartridges to clean the print cartridge nozzles. • Align Cartridges to align the cartridge. • Print Test Page to view the ink level of photo(s) to print. • Set Defaults to change the timeout feature before the printer, if left unused, resets to the factory default settings. Pattern 1 (FSK) - Select: • Language to change the language setting. • Country to set the default blank paper size, date format, number of the tone when a control panel button is the default. • Caller...
User's Guide
Page 41
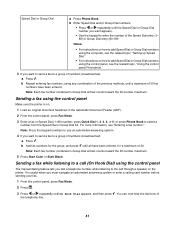
... instructions on . 1 Load an original document facedown in the Automatic Document Feeder (ADF). 2 From the control panel, press Fax Mode. 3 Enter a fax or Speed Dial (1-89) number; Sending a fax while listening to a call through a speaker on the printer. b Add fax numbers for the group, and press until a maximum of the Speed Dial entry (1- 89) or Group Dial entry (90-99). press Quick Dial 1, 2, 3, 4, or 5; Note: Each fax number contained in Group Dial entries counts toward the 30-number maximum. 5 Press Start Color or Start Black...
... instructions on . 1 Load an original document facedown in the Automatic Document Feeder (ADF). 2 From the control panel, press Fax Mode. 3 Enter a fax or Speed Dial (1-89) number; Sending a fax while listening to a call through a speaker on the printer. b Add fax numbers for the group, and press until a maximum of the Speed Dial entry (1- 89) or Group Dial entry (90-99). press Quick Dial 1, 2, 3, 4, or 5; Note: Each fax number contained in Group Dial entries counts toward the 30-number maximum. 5 Press Start Color or Start Black...
User's Guide
Page 53
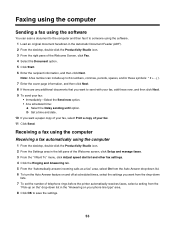
... settings you want a paper copy of your fax, select Print a copy of your phone line type" area. 8 Click OK to save the settings. 53 b Set a time and date. 10 If you want to someone using the computer 1 From the desktop, double-click the Productivity Studio icon. 2 From the Settings area in the left pane of the Welcome screen, click Setup and manage faxes. 3 From the "I Want To" menu, click Adjust speed dial list and other fax settings...
... settings you want a paper copy of your fax, select Print a copy of your phone line type" area. 8 Click OK to save the settings. 53 b Set a time and date. 10 If you want to someone using the computer 1 From the desktop, double-click the Productivity Studio icon. 2 From the Settings area in the left pane of the Welcome screen, click Setup and manage faxes. 3 From the "I Want To" menu, click Adjust speed dial list and other fax settings...
User's Guide
Page 57
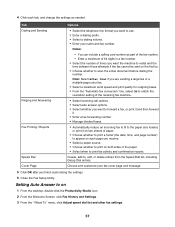
... the paper size loaded, or print it on two sheets of paper. • Choose whether to print a footer (the date, time, and page number) to appear on each tab, and change the settings as part of the fax number. - Tab Dialing and Sending Ringing and Answering Fax Printing / Reports Speed Dial Cover Page Options • Select the telephone line format you finish customizing the settings. 6 Close the Fax Setup Utility. Enter a maximum of 64 digits in a fax number. • Select the number of times you receive...
... the paper size loaded, or print it on two sheets of paper. • Choose whether to print a footer (the date, time, and page number) to appear on each tab, and change the settings as part of the fax number. - Tab Dialing and Sending Ringing and Answering Fax Printing / Reports Speed Dial Cover Page Options • Select the telephone line format you finish customizing the settings. 6 Close the Fax Setup Utility. Enter a maximum of 64 digits in a fax number. • Select the number of times you receive...
User's Guide
Page 109
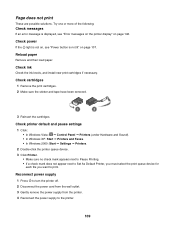
Check ink Check the ink levels, and install new print cartridges if necessary. Check printer default and pause settings 1 Click: • In Windows Vista: Œ Control Panel Œ Printers (under Hardware and Sound). • In Windows XP: Start Œ Printers and Faxes. • In Windows 2000: Start Œ Settings Œ Printers. 2 Double-click the printer queue device. 3 Click Printer. • Make sure no check mark appears next to Pause Printing. • If a check mark does not appear next to Set As Default Printer, you must select...
Check ink Check the ink levels, and install new print cartridges if necessary. Check printer default and pause settings 1 Click: • In Windows Vista: Œ Control Panel Œ Printers (under Hardware and Sound). • In Windows XP: Start Œ Printers and Faxes. • In Windows 2000: Start Œ Settings Œ Printers. 2 Double-click the printer queue device. 3 Click Printer. • Make sure no check mark appears next to Pause Printing. • If a check mark does not appear next to Set As Default Printer, you must select...
User's Guide
Page 123
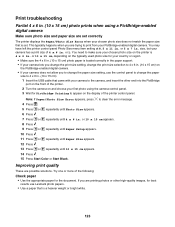
...: Check paper • Use the appropriate paper for the document. You may have left the printer control panel Photo Size menu item setting at 8.5 x 11 in . Note: If Paper/Photo Size Error appears, press to appear on the front of 4 x 6 in. Try one or more of the printer control panel. This typically happens when you to change the paper size setting, use Lexmark photo papers. • Use a paper that came with your first photo using a PictBridge-enabled digital camera Make sure photo size and paper size are set...
...: Check paper • Use the appropriate paper for the document. You may have left the printer control panel Photo Size menu item setting at 8.5 x 11 in . Note: If Paper/Photo Size Error appears, press to appear on the front of 4 x 6 in. Try one or more of the printer control panel. This typically happens when you to change the paper size setting, use Lexmark photo papers. • Use a paper that came with your first photo using a PictBridge-enabled digital camera Make sure photo size and paper size are set...
User's Guide
Page 124
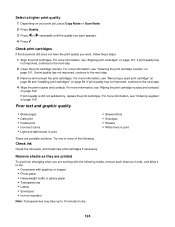
... on your print job, press Copy Mode or Scan Mode. 2 Press Quality. 3 Press or repeatedly until the quality you want , follow these steps: 1 Align the print cartridges. Check print cartridges If the document still does not have the print quality you are working with the following : Check ink Check the ink levels, and install new print cartridges if necessary. If print quality has not improved, continue to dry: • Documents with graphics or images • Photo paper •...
... on your print job, press Copy Mode or Scan Mode. 2 Press Quality. 3 Press or repeatedly until the quality you want , follow these steps: 1 Align the print cartridges. Check print cartridges If the document still does not have the print quality you are working with the following : Check ink Check the ink levels, and install new print cartridges if necessary. If print quality has not improved, continue to dry: • Documents with graphics or images • Photo paper •...
User's Guide
Page 142
... an error message is not satisfactory, try using a clearer version of the document or image. Review steps to lighten or darken the copy. 7 Press Start Color or Start Black. Adjust the brightness of the original document is displayed, see "Removing wavy patterns from scanned photos, magazines, or newspapers" on page 91. Check quality of original document If the quality of the copy 1 Load the document facedown in the Automatic Document Feeder (ADF) and centered between the ADF paper guides...
... an error message is not satisfactory, try using a clearer version of the document or image. Review steps to lighten or darken the copy. 7 Press Start Color or Start Black. Adjust the brightness of the original document is displayed, see "Removing wavy patterns from scanned photos, magazines, or newspapers" on page 91. Check quality of original document If the quality of the copy 1 Load the document facedown in the Automatic Document Feeder (ADF) and centered between the ADF paper guides...

User's Guide
Page 153
... Start. 2 Click Programs or All Programs Œ Lexmark 5000 Series. 3 Click Solution Center, and then click the Contact Information tab. 153 Out of Memory The printer software cannot obtain enough memory to print. If the printer still does not print, contact the Customer Support Center: 1 Do one of ink. To receive a more specific error message, see "Removing a used print cartridge" on page 98 and "Installing print cartridges" on the computer screen. Ink Low A print cartridge is almost out of the following : • Before sending a document...
... Start. 2 Click Programs or All Programs Œ Lexmark 5000 Series. 3 Click Solution Center, and then click the Contact Information tab. 153 Out of Memory The printer software cannot obtain enough memory to print. If the printer still does not print, contact the Customer Support Center: 1 Do one of ink. To receive a more specific error message, see "Removing a used print cartridge" on page 98 and "Installing print cartridges" on the computer screen. Ink Low A print cartridge is almost out of the following : • Before sending a document...

User's Guide
Page 164
...button 33 aligning print cartridges 101 alignment error 146 answering machine receiving a fax using computer 54 receiving a fax using control panel 44 Auto Answer 57 Automatic Document Feeder loading documents 38 paper capacity 38 automatic document feeder clearing a paper jam 120 Automatic Document Feeder (ADF) 14 Automatic Document Feeder (ADF) exit tray 14 Automatic Document Feeder (ADF) paper guide 14 B banner paper jams 122 banner paper, loading 37 banner printing problems checking spool settings 133 banner, printing 70 bidirectional communication, establishing 140 black ink low 147 blank...
...button 33 aligning print cartridges 101 alignment error 146 answering machine receiving a fax using computer 54 receiving a fax using control panel 44 Auto Answer 57 Automatic Document Feeder loading documents 38 paper capacity 38 automatic document feeder clearing a paper jam 120 Automatic Document Feeder (ADF) 14 Automatic Document Feeder (ADF) exit tray 14 Automatic Document Feeder (ADF) paper guide 14 B banner paper jams 122 banner paper, loading 37 banner printing problems checking spool settings 133 banner, printing 70 bidirectional communication, establishing 140 black ink low 147 blank...

User's Guide
Page 165
... 128 checking external devices 136 checking printer readiness 132 cleaning exterior of the printer 104 scan lens 103 white roller 103 cleaning print cartridge nozzles 101 clear paper jam 148 collating copies 74 color effects applying 90 color ink low 147 colors on paper do not match colors on the screen 128 communication not available error 152 communication problems establishing bidirectional communication 140 computer not connected error 148 connecting using RJ11 adapter 17 connecting cables 134, 137 connecting the printer to answering machine 22...
... 128 checking external devices 136 checking printer readiness 132 cleaning exterior of the printer 104 scan lens 103 white roller 103 cleaning print cartridge nozzles 101 clear paper jam 148 collating copies 74 color effects applying 90 color ink low 147 colors on paper do not match colors on the screen 128 communication not available error 152 communication problems establishing bidirectional communication 140 computer not connected error 148 connecting using RJ11 adapter 17 connecting cables 134, 137 connecting the printer to answering machine 22...
User's Guide
Page 166
...remote fax error 118 right cartridge error 149 right cartridge incorrect 150 right cartridge missing 150 scan request failed 151 Exposure changing setting 91 EXT port 14 exterior of the printer cleaning 104 external devices checking 136 e-mail attaching a scanned image 81 attaching files 80 E-mail button 31 e-mail screen preferences changing 81 e-mailing an image 81 F factory default settings resetting printer 71 resetting printer software 71 faded colors 128 failed to connect error message 117 Fax menu 46 fax activity reports 62 activity reports using the control panel 52 confirmation reports...
...remote fax error 118 right cartridge error 149 right cartridge incorrect 150 right cartridge missing 150 scan request failed 151 Exposure changing setting 91 EXT port 14 exterior of the printer cleaning 104 external devices checking 136 e-mail attaching a scanned image 81 attaching files 80 E-mail button 31 e-mail screen preferences changing 81 e-mailing an image 81 F factory default settings resetting printer 71 resetting printer software 71 faded colors 128 failed to connect error message 117 Fax menu 46 fax activity reports 62 activity reports using the control panel 52 confirmation reports...
User's Guide
Page 167
...document or photo copies 143 partial document or photo prints 126 partial document or photo scans 145 parts Automatic Document Feeder (ADF) 14 Automatic Document Feeder (ADF) exit tray 14 Automatic Document Feeder (ADF) paper guide 14 control panel 14 display 14 EXT port 14 LINE port 14 paper exit tray 14 paper guide 14 paper support 14 PictBridge port 14 power supply port 14 telephone handset 14 USB port 14 pausing print jobs 66 PDF creating from a scan 79 Phone Book (computer), using 55 phone line busy error message 118 phone line error 119 Phonebook (control panel), using 45 photo adjusting...
...document or photo copies 143 partial document or photo prints 126 partial document or photo scans 145 parts Automatic Document Feeder (ADF) 14 Automatic Document Feeder (ADF) exit tray 14 Automatic Document Feeder (ADF) paper guide 14 control panel 14 display 14 EXT port 14 LINE port 14 paper exit tray 14 paper guide 14 paper support 14 PictBridge port 14 power supply port 14 telephone handset 14 USB port 14 pausing print jobs 66 PDF creating from a scan 79 Phone Book (computer), using 55 phone line busy error message 118 phone line error 119 Phonebook (control panel), using 45 photo adjusting...
User's Guide
Page 168
... printer receives blank fax 115 printer software installing 30 reinstalling 110 removing 110 updating 140 printer status checking 132 printing banner 70 blocked fax list using control panel 49 booklets 68 cards 67 collate 65 custom-size paper 69 document 63 envelopes 67 greeting cards 67 index cards 67 iron-on transfers 69 multiple pages on one sheet 66 on both sides of the paper 65 Photo Packages 92 photos from CD using the computer 91 photos from flash drive using the computer 91 photos from PictBridge-enabled...
... printer receives blank fax 115 printer software installing 30 reinstalling 110 removing 110 updating 140 printer status checking 132 printing banner 70 blocked fax list using control panel 49 booklets 68 cards 67 collate 65 custom-size paper 69 document 63 envelopes 67 greeting cards 67 index cards 67 iron-on transfers 69 multiple pages on one sheet 66 on both sides of the paper 65 Photo Packages 92 photos from CD using the computer 91 photos from flash drive using the computer 91 photos from PictBridge-enabled...

User's Guide
Page 169
... Settings menu Defaults 28 Device Setup 29 Maintenance 28 Paper Setup 29 settings, saving 28 setup troubleshooting cannot print from digital camera using PictBridge 110 incorrect language appears on display 107 page does not print 109 power button is not lit 107 software does not install 108 sharing printer in Windows 95 sharpening photo 89 slideshow creating and viewing 94 smudging, preventing in photos 126 software Fax Solutions Software 59 Productivity Studio 31 removing and reinstalling 110 Solution Center 33 software...
... Settings menu Defaults 28 Device Setup 29 Maintenance 28 Paper Setup 29 settings, saving 28 setup troubleshooting cannot print from digital camera using PictBridge 110 incorrect language appears on display 107 page does not print 109 power button is not lit 107 software does not install 108 sharing printer in Windows 95 sharpening photo 89 slideshow creating and viewing 94 smudging, preventing in photos 126 software Fax Solutions Software 59 Productivity Studio 31 removing and reinstalling 110 Solution Center 33 software...

