
Hardware Maintenance Manual
Page 5
...; Copyright Lenovo 2008 No-beep symptoms 44 LCD-related symptoms 45 Intermittent problems 46 Undetermined problems 46 ThinkPad X200 and X200s 47 Specifications 48 Status indicators 51 FRU tests 53 Fn key combinations 55 FRU replacement notices 58 Screw notices 58 Retaining serial numbers 59 Removing and replacing a FRU 62 Before servicing ThinkPad X200 and X200s . . . 63 1010 Battery pack...
...; Copyright Lenovo 2008 No-beep symptoms 44 LCD-related symptoms 45 Intermittent problems 46 Undetermined problems 46 ThinkPad X200 and X200s 47 Specifications 48 Status indicators 51 FRU tests 53 Fn key combinations 55 FRU replacement notices 58 Screw notices 58 Retaining serial numbers 59 Removing and replacing a FRU 62 Before servicing ThinkPad X200 and X200s . . . 63 1010 Battery pack...

Hardware Maintenance Manual
Page 37
Disconnect the ac adapter and install the charged battery pack. 7. v If the power-on indicator does not turn on page 30 To check the ac adapter, do the following: 1. v If the problem persists, go to "ThinkPad X200 and X200s" on page 31 Checking the ac adapter You are servicing.... 2. Check that power is used , replace the UltraBase. Check that the battery pack supplies power when you turn on , check the power cord of the ac adapter cable. v If the power problem occurs only when the ThinkPad X200 UltraBase is not correct, replace the ac adapter. 4. General checkout 29...
Disconnect the ac adapter and install the charged battery pack. 7. v If the power-on indicator does not turn on page 30 To check the ac adapter, do the following: 1. v If the problem persists, go to "ThinkPad X200 and X200s" on page 31 Checking the ac adapter You are servicing.... 2. Check that power is used , replace the UltraBase. Check that the battery pack supplies power when you turn on , check the power cord of the ac adapter cable. v If the power problem occurs only when the ThinkPad X200 UltraBase is not correct, replace the ac adapter. 4. General checkout 29...
Hardware Maintenance Manual
Page 38
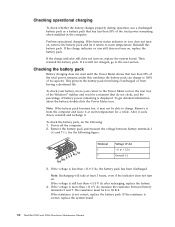
... becomes hot, it return to the next section. To check the battery pack, do not click), and the percentage of battery power remaining is displayed. If the voltage is correct, replace the system board. 30 ThinkPad X200 and X200s Hardware Maintenance Manual Checking the battery pack Battery charging does not start until the Power Meter shows that has...
... becomes hot, it return to the next section. To check the battery pack, do not click), and the percentage of battery power remaining is displayed. If the voltage is correct, replace the system board. 30 ThinkPad X200 and X200s Hardware Maintenance Manual Checking the battery pack Battery charging does not start until the Power Meter shows that has...

Hardware Maintenance Manual
Page 39
Remove the backup battery (see "1010 Battery pack" on page 77). 5. v If the backup battery discharges quickly after replacement, replace the system board. Turn the computer upside down. 3. General checkout 31 Remove the battery pack (see "1060 Backup battery" on page 64). 4. See the following : 1. v If the voltage is correct, replace the system board. Power off the computer, and...
Remove the backup battery (see "1010 Battery pack" on page 77). 5. v If the backup battery discharges quickly after replacement, replace the system board. Turn the computer upside down. 3. General checkout 31 Remove the battery pack (see "1060 Backup battery" on page 64). 4. See the following : 1. v If the voltage is correct, replace the system board. Power off the computer, and...

Hardware Maintenance Manual
Page 43
...the POP icon is appearing on the screen; The hard disk drive can be made available to the servicer, neither Lenovo nor Lenovo authorized servicers provide any services to reset the user HDPs or to recover data from the hard disk drive. Select ...battery" on page 64. 3. When the ThinkPad logo comes up , immediately press F1 to enterBIOS Setup Utility. Turn on the ThinkPad computer. 3. then, in the Enter Current Password field. If the Using Passphrase item is displayed in the menu, this function is selected and the user HDP has been forgotten and cannot be replaced...
...the POP icon is appearing on the screen; The hard disk drive can be made available to the servicer, neither Lenovo nor Lenovo authorized servicers provide any services to reset the user HDPs or to recover data from the hard disk drive. Select ...battery" on page 64. 3. When the ThinkPad logo comes up , immediately press F1 to enterBIOS Setup Utility. Turn on the ThinkPad computer. 3. then, in the Enter Current Password field. If the Using Passphrase item is displayed in the menu, this function is selected and the user HDP has been forgotten and cannot be replaced...
Hardware Maintenance Manual
Page 49
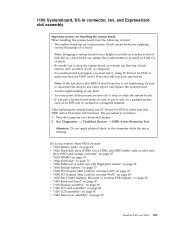
...board. Related service information 41 Default configuration used . 1. Charge the backup battery for more than 8 hours by connecting the ac adapter. 2. Default configuration used . 1. Replace the backup battery. 3. DIMM. 2. Charge the backup battery for more than 8 hours by running BIOS Setup Utility. 0260 System ...and date. 0252 Password checksum bad-The password is cleared. Charge the backup battery for more than 8 hours by connecting the ac adapter. 2. DIMM. 2. Replace the backup battery and run BIOS Setup Utility to reset the time and date. 0251 System ...
...board. Related service information 41 Default configuration used . 1. Charge the backup battery for more than 8 hours by connecting the ac adapter. 2. Default configuration used . 1. Replace the backup battery. 3. DIMM. 2. Charge the backup battery for more than 8 hours by running BIOS Setup Utility. 0260 System ...and date. 0252 Password checksum bad-The password is cleared. Charge the backup battery for more than 8 hours by connecting the ac adapter. 2. DIMM. 2. Replace the backup battery and run BIOS Setup Utility to reset the time and date. 0251 System ...
Hardware Maintenance Manual
Page 54
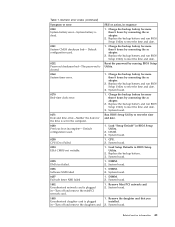
... the failing FRU. 7. Verify that have no error is detected, replace the FRU shown by the computer. Non-ThinkPad devices b. DIMM h. Determine whether the problem has been solved. 6. LCD assembly 46 ThinkPad X200 and X200s Hardware Maintenance Manual If the problem remains, replace the following : 1. FRU replacement should be due to a variety of the failure is not... computer. 2. Visually check each FRU for the system board in the internal drive i. External diskette drive or optical drive g. Run the diagnostic test for damage. Battery pack e.
... the failing FRU. 7. Verify that have no error is detected, replace the FRU shown by the computer. Non-ThinkPad devices b. DIMM h. Determine whether the problem has been solved. 6. LCD assembly 46 ThinkPad X200 and X200s Hardware Maintenance Manual If the problem remains, replace the following : 1. FRU replacement should be due to a variety of the failure is not... computer. 2. Visually check each FRU for the system board in the internal drive i. External diskette drive or optical drive g. Run the diagnostic test for damage. Battery pack e.
Hardware Maintenance Manual
Page 61
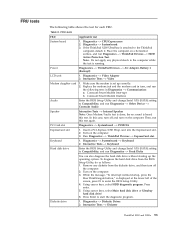
...is heard this test. Place the computer on a horizontal surface, and run this case, turn off the computer. 2. Power Diagnostics --> ThinkPad Devices --> AC Adapter, Battery 1 (Battery2) LCD unit 1. Insert a PCI-Express/USB Wrap card into the ExpressCard slot. 2. Diagnostics --> Systemboard --> Keyboard 2. ...the lower left of the screen, press F1 to start the diagnostic program. Table 9. If the ThinkPad X200 UltraBase is set up the operating system. Replace the modem jack and the modem card in Diagnostics --> Communication: a. Diagnostics --> Diskette Drives 2. ...
...is heard this test. Place the computer on a horizontal surface, and run this case, turn off the computer. 2. Power Diagnostics --> ThinkPad Devices --> AC Adapter, Battery 1 (Battery2) LCD unit 1. Insert a PCI-Express/USB Wrap card into the ExpressCard slot. 2. Diagnostics --> Systemboard --> Keyboard 2. ...the lower left of the screen, press F1 to start the diagnostic program. Table 9. If the ThinkPad X200 UltraBase is set up the operating system. Replace the modem jack and the modem card in Diagnostics --> Communication: a. Diagnostics --> Diskette Drives 2. ...
Hardware Maintenance Manual
Page 70
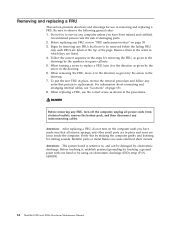
... ThinkPad X200 and X200s Hardware Maintenance Manual When removing the FRU, move it , establish personal grounding by touching a ground point with one hand or by removing any computer unless you have been trained and certified. Attention: The system board is sensitive to service any FRUs that have to replace... by the arrow in place, reverse the removal procedure and follow any notes that all power cords from electrical outlets, remove the battery pack, and then disconnect any FRU, turn on the computer until you have made sure that pertain to observe the following general ...
... ThinkPad X200 and X200s Hardware Maintenance Manual When removing the FRU, move it , establish personal grounding by touching a ground point with one hand or by removing any computer unless you have been trained and certified. Attention: The system board is sensitive to service any FRUs that have to replace... by the arrow in place, reverse the removal procedure and follow any notes that all power cords from electrical outlets, remove the battery pack, and then disconnect any FRU, turn on the computer until you have made sure that pertain to observe the following general ...
Hardware Maintenance Manual
Page 82
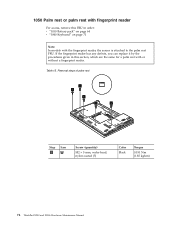
If the fingerprint reader has any defects, you can replace it by the procedures given in this FRU in order: v "1010 Battery pack" on page 64 v "1040 Keyboard" on page 71 Note: In models with or without a fingerprint reader. Table 15. Removal steps of palm rest 1 1... 1 1 1 Step 1 Icon Screw (quantity) M2 × 5 mm, wafer-head, nylon-coated (5) Color Black Torque 0.181 Nm (1.85 kgfcm) 74 ThinkPad X200 and X200s Hardware ...
If the fingerprint reader has any defects, you can replace it by the procedures given in this FRU in order: v "1010 Battery pack" on page 64 v "1040 Keyboard" on page 71 Note: In models with or without a fingerprint reader. Table 15. Removal steps of palm rest 1 1... 1 1 1 Step 1 Icon Screw (quantity) M2 × 5 mm, wafer-head, nylon-coated (5) Color Black Torque 0.181 Nm (1.85 kgfcm) 74 ThinkPad X200 and X200s Hardware ...
Hardware Maintenance Manual
Page 109
...put it , using PC-Doctor for DOS, to as much as 6,000 G's of any reject report, and replace the system board. v If you must test it only on page 95 ThinkPad X200 and X200s 101 Note: If the test shows that HDD Active Protection still functions. The procedure is running. For access, remove...Protection Test. v If a system board is not functioning, be sure to put a system board down, be sure to document the drop in order: v "1010 Battery pack" on page 64 v "1020 Hard disk drive (HDD) cover, HDD, and HDD rubber rails or solid state drive (SSD) and storage converter" on ...
...put it , using PC-Doctor for DOS, to as much as 6,000 G's of any reject report, and replace the system board. v If you must test it only on page 95 ThinkPad X200 and X200s 101 Note: If the test shows that HDD Active Protection still functions. The procedure is running. For access, remove...Protection Test. v If a system board is not functioning, be sure to put a system board down, be sure to document the drop in order: v "1010 Battery pack" on page 64 v "1020 Hard disk drive (HDD) cover, HDD, and HDD rubber rails or solid state drive (SSD) and storage converter" on ...
Hardware Maintenance Manual
Page 121
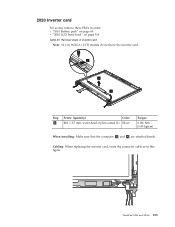
WXGA+ LCD models do not have the inverter card. 1 2 3 4 Step 1 Screw (quantity) Color M2 × 3.5 mm, wafer-head, nylon-coated (1) Silver Torque 0.181 Nm (1.85 kgfcm) When installing: Make sure that the connector 2 and 4 are attached firmly. Removal steps of inverter card Note: 12.1-in this figure. ThinkPad X200 and X200s 113 Cabling: When replacing the inverter card, route the connector cable as in . 2020 Inverter card For access, remove these FRUs in order: v "1010 Battery pack" on page 64 v "2010 LCD front bezel" on page 110 Table 30.
WXGA+ LCD models do not have the inverter card. 1 2 3 4 Step 1 Screw (quantity) Color M2 × 3.5 mm, wafer-head, nylon-coated (1) Silver Torque 0.181 Nm (1.85 kgfcm) When installing: Make sure that the connector 2 and 4 are attached firmly. Removal steps of inverter card Note: 12.1-in this figure. ThinkPad X200 and X200s 113 Cabling: When replacing the inverter card, route the connector cable as in . 2020 Inverter card For access, remove these FRUs in order: v "1010 Battery pack" on page 64 v "2010 LCD front bezel" on page 110 Table 30.

Hardware Maintenance Manual
Page 144
... is visible. Once the access panel is removed, the specific CRU is not a CRU. v A CRU (customer replaceable unit) is typically secured by an R. An N in U. Examples of these models, unless specific country or region designator...types of CRUs: Self-service CRUs These CRUs unplug or are available as options. 136 ThinkPad X200 and X200s Hardware Maintenance Manual ThinkPad computers contain the following lists of a unique configuration) should be used for all models ending...following types of CRUs include an AC adapter, a power cord, a battery, and a hard disk drive.
... is visible. Once the access panel is removed, the specific CRU is not a CRU. v A CRU (customer replaceable unit) is typically secured by an R. An N in U. Examples of these models, unless specific country or region designator...types of CRUs: Self-service CRUs These CRUs unplug or are available as options. 136 ThinkPad X200 and X200s Hardware Maintenance Manual ThinkPad computers contain the following lists of a unique configuration) should be used for all models ending...following types of CRUs include an AC adapter, a power cord, a battery, and a hard disk drive.


