
Hardware Maintenance Manual
Page 5
... Retaining serial numbers 59 Removing and replacing a FRU 62 Before servicing ThinkPad X200 and X200s . . . 63 1010 Battery pack 64 1020 Hard disk drive (HDD) cover, HDD, and HDD rubber rails or solid state drive (SSD) and storage converter 65 1030 DIMM 69 1040 Keyboard 71 1050 Palm rest or palm rest with fingerprint reader 74 1060 Backup battery 77 1070 PCI Express Mini Card for wireless LAN . . 79 1080 PCI Express Mini Card for wireless...
... Retaining serial numbers 59 Removing and replacing a FRU 62 Before servicing ThinkPad X200 and X200s . . . 63 1010 Battery pack 64 1020 Hard disk drive (HDD) cover, HDD, and HDD rubber rails or solid state drive (SSD) and storage converter 65 1030 DIMM 69 1040 Keyboard 71 1050 Palm rest or palm rest with fingerprint reader 74 1060 Backup battery 77 1070 PCI Express Mini Card for wireless LAN . . 79 1080 PCI Express Mini Card for wireless...

Hardware Maintenance Manual
Page 11
... prevent a current from electrical shock. v Do not use this type of mat to decrease electrostatic discharges. v Find the room emergency power-off position. v Disconnect all power before: - Attention: Another person must be there to work area. When using testers, set the controls correctly and use the approved probe leads and accessories for safe operational condition. v Always look carefully for these hazards...
... prevent a current from electrical shock. v Do not use this type of mat to decrease electrostatic discharges. v Find the room emergency power-off position. v Disconnect all power before: - Attention: Another person must be there to work area. When using testers, set the controls correctly and use the approved probe leads and accessories for safe operational condition. v Always look carefully for these hazards...
Hardware Maintenance Manual
Page 26
... servicing. 18 ThinkPad X200 and X200s Hardware Maintenance Manual Running Automatic Configuration may also cause false error codes. v Avoid rough handling of the error. If no error code is displayed, see if the symptoms change. Before replacing the adapter or device, remove the FRUs, one by one error code is listed in effect. Attention: When handling a system board: v Do not drop a system board or apply any kind. v If you are instructed to replace a FRU but the replacement...
... servicing. 18 ThinkPad X200 and X200s Hardware Maintenance Manual Running Automatic Configuration may also cause false error codes. v Avoid rough handling of the error. If no error code is displayed, see if the symptoms change. Before replacing the adapter or device, remove the FRUs, one by one error code is listed in effect. Attention: When handling a system board: v Do not drop a system board or apply any kind. v If you are instructed to replace a FRU but the replacement...
Hardware Maintenance Manual
Page 31
...supports the PC-Doctor® for DOS diagnostics program. Single failures can occur for Windows" on page 26 - If you replace FRUs, use new nylon-coated screws. "PC-Doctor for a variety of the correct model. If the error does not recur, do first" on page 24 v "Checkout guide" on removing and replacing FRUs. Drives... that the model of a single, unreproducible failure. v A FRU should service the computer. If you go to the checkout guide, be replaced because of the machine and the FRU part number are servicing sequence might have nothing to the FRU parts list. "PC-...
...supports the PC-Doctor® for DOS diagnostics program. Single failures can occur for Windows" on page 26 - If you replace FRUs, use new nylon-coated screws. "PC-Doctor for a variety of the correct model. If the error does not recur, do first" on page 24 v "Checkout guide" on removing and replacing FRUs. Drives... that the model of a single, unreproducible failure. v A FRU should service the computer. If you go to the checkout guide, be replaced because of the machine and the FRU part number are servicing sequence might have nothing to the FRU parts list. "PC-...

Hardware Maintenance Manual
Page 34
... site: http://www.lenovo.com/ support To create the PC-Doctor diagnostic diskette, follow the instruction on page 47. Insert the PC-Doctor disk into the diskette drive; This section is entered. To enter BIOS Setup Utility, do as follows: 1. If you test one of these devices, you will need to "Power system checkout" on the computer. 2. Diagnostics using Configuration utility for DOS. Turn on page 29, and...
... site: http://www.lenovo.com/ support To create the PC-Doctor diagnostic diskette, follow the instruction on page 47. Insert the PC-Doctor disk into the diskette drive; This section is entered. To enter BIOS Setup Utility, do as follows: 1. If you test one of these devices, you will need to "Power system checkout" on the computer. 2. Diagnostics using Configuration utility for DOS. Turn on page 29, and...
Hardware Maintenance Manual
Page 35
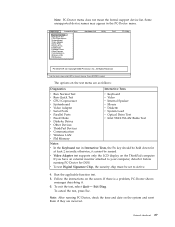
... external monitor attached to select. Press ENTER to your computer, detach it before running PC-Doctor, check the time and date on the test menu are incorrect. The options on the system and reset them if they are as follows: Diagnostics Interactive Tests v Run Normal Test v Run Quick Test v CPU/Coprocessor v Systemboard v Video Adapter v Serial Ports v Parallel Ports v Fixed Disks v Diskette Drives v Other Devices v ThinkPad Devices v Communication v Wireless LAN v PM Memory v Keyboard v Video v Internal Speaker v Mouse...
... external monitor attached to select. Press ENTER to your computer, detach it before running PC-Doctor, check the time and date on the test menu are incorrect. The options on the system and reset them if they are as follows: Diagnostics Interactive Tests v Run Normal Test v Run Quick Test v CPU/Coprocessor v Systemboard v Video Adapter v Serial Ports v Parallel Ports v Fixed Disks v Diskette Drives v Other Devices v ThinkPad Devices v Communication v Wireless LAN v PM Memory v Keyboard v Video v Internal Speaker v Mouse...
Hardware Maintenance Manual
Page 42
... hard disk drive. Attention: If the SVP has been forgotten and cannot be needed for access to recover data from being powered on password (POP), the hard-disk password (HDP), and the supervisor password (SVP). The Master + User mode requires two HDPs; Attention: If the user HDP has been forgotten, check whether a master HDP has been set , a prompt for a scheduled fee. 34 ThinkPad X200 and X200s Hardware Maintenance Manual The user must be replaced...
... hard disk drive. Attention: If the SVP has been forgotten and cannot be needed for access to recover data from being powered on password (POP), the hard-disk password (HDP), and the supervisor password (SVP). The Master + User mode requires two HDPs; Attention: If the user HDP has been forgotten, check whether a master HDP has been set , a prompt for a scheduled fee. 34 ThinkPad X200 and X200s Hardware Maintenance Manual The user must be replaced...

Hardware Maintenance Manual
Page 43
... servicer, neither Lenovo nor Lenovo authorized servicers provide any services to reset the user HDPs or to enterBIOS Setup Utility. When the ThinkPad logo comes up , immediately press F1 to recover data from the hard disk drive. For how to move down the menu. 4. Remove the backup battery. Turn on the ThinkPad computer. 3. When the ThinkPad logo comes up , immediately press F1 to remove the power-on page 64. 3. Select Power-On Password. 6. Reinstall the backup battery...
... servicer, neither Lenovo nor Lenovo authorized servicers provide any services to reset the user HDPs or to enterBIOS Setup Utility. When the ThinkPad logo comes up , immediately press F1 to recover data from the hard disk drive. For how to move down the menu. 4. Remove the backup battery. Turn on the ThinkPad computer. 3. When the ThinkPad logo comes up , immediately press F1 to remove the power-on page 64. 3. Select Power-On Password. 6. Reinstall the backup battery...
Hardware Maintenance Manual
Page 45
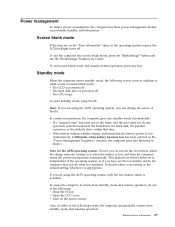
... low-battery alarm is powered off . v The hard disk drive is powered off . To enter standby mode, press Fn+F4. Note: If you are using the ACPI operating system, you specified. so if you have set on the power switch. v Turn on the "Turn off monitor" timer in the operating system expires, the LCD backlight turns off. Standby mode When the computer enters standby mode, the following events occur in the "Power Management Properties" window...
... low-battery alarm is powered off . v The hard disk drive is powered off . To enter standby mode, press Fn+F4. Note: If you are using the ACPI operating system, you specified. so if you have set on the power switch. v Turn on the "Turn off monitor" timer in the operating system expires, the LCD backlight turns off. Standby mode When the computer enters standby mode, the following events occur in the "Power Management Properties" window...
Hardware Maintenance Manual
Page 46
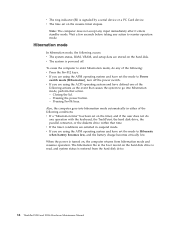
... hard disk drive. 38 ThinkPad X200 and X200s Hardware Maintenance Manual Wait a few seconds before taking any input immediately after it enters standby mode. v The time set on the timer, and if the user does not do any operation with the keyboard, the TrackPoint, the hard disk drive, the parallel connector, or the diskette drive within that action. - Note: The computer does not accept any action to Hibernate when battery...
... hard disk drive. 38 ThinkPad X200 and X200s Hardware Maintenance Manual Wait a few seconds before taking any input immediately after it enters standby mode. v The time set on the timer, and if the user does not do any operation with the keyboard, the TrackPoint, the hard disk drive, the parallel connector, or the diskette drive within that action. - Note: The computer does not accept any action to Hibernate when battery...
Hardware Maintenance Manual
Page 47
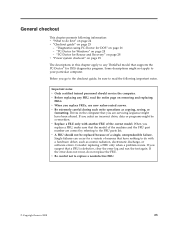
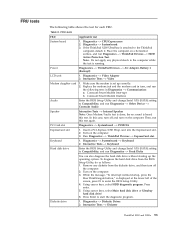
... 45 v "Intermittent problems" on page 46 v "Undetermined problems" on page 46. The most likely cause is not correct. Run BIOS Setup Utility. A numeric error is not correct. 2. Enter BIOS Setup and load Setup Enter to load the default setting. in sequence." Run BIOS Setup Utility, and save the current setting by diagnostic codes in this section lists symptoms and errors and their possible causes. Note: Do the FRU replacement or other...
... 45 v "Intermittent problems" on page 46 v "Undetermined problems" on page 46. The most likely cause is not correct. Run BIOS Setup Utility. A numeric error is not correct. 2. Enter BIOS Setup and load Setup Enter to load the default setting. in sequence." Run BIOS Setup Utility, and save the current setting by diagnostic codes in this section lists symptoms and errors and their possible causes. Note: Do the FRU replacement or other...
Hardware Maintenance Manual
Page 48
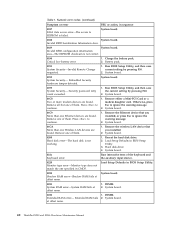
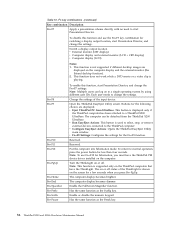
... installed. 2. Hard disk drive. 4. System board. 0232 1. Extended RAM fails 2. Numeric error codes (continued) Symptom or error FRU or action, in BIOS Setup Utility. 3. System board. 0188 System board. Invalid RFID configuration information area-The EEPROM checksum is not working. 1. Charge the battery pack. 2. Load Setup Defaults in CMOS. DIMM. 2. DIMM. System board. 01C8 Two or more modem devices are found . Reseat the hard disk drive. 2. Run interactive tests of the keyboard and the auxiliary input device. 0220 Monitor type error-Monitor type...
... installed. 2. Hard disk drive. 4. System board. 0232 1. Extended RAM fails 2. Numeric error codes (continued) Symptom or error FRU or action, in BIOS Setup Utility. 3. System board. 0188 System board. Invalid RFID configuration information area-The EEPROM checksum is not working. 1. Charge the battery pack. 2. Load Setup Defaults in CMOS. DIMM. 2. DIMM. System board. 01C8 Two or more modem devices are found . Reseat the hard disk drive. 2. Run interactive tests of the keyboard and the auxiliary input device. 0220 Monitor type error-Monitor type...
Hardware Maintenance Manual
Page 49
... is cleared. CPU. 2. Load Setup Defaults in BIOS Setup Utility. 2. Remove Mini PCI network card. 2. System board. 02F0 CPU ID:xx Failed. 1. DIMM. 2. Replace the backup battery and run BIOS Setup Utility to reset the time and date. 0280 Previous boot incomplete- Remove the daughter card that you Unauthorized daughter card is dead. 1. in sequence 0250 System battery error-System battery is plugged installed. Charge the backup battery for more than 8 hours by connecting the ac adapter. 2. Numeric error codes (continued) Symptom or error FRU...
... is cleared. CPU. 2. Load Setup Defaults in BIOS Setup Utility. 2. Remove Mini PCI network card. 2. System board. 02F0 CPU ID:xx Failed. 1. DIMM. 2. Replace the backup battery and run BIOS Setup Utility to reset the time and date. 0280 Previous boot incomplete- Remove the daughter card that you Unauthorized daughter card is dead. 1. in sequence 0250 System battery error-System battery is plugged installed. Charge the backup battery for more than 8 hours by connecting the ac adapter. 2. Numeric error codes (continued) Symptom or error FRU...

Hardware Maintenance Manual
Page 50
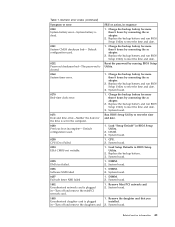
...customer needs to update its firmware to enter SETUP 1. Run Diagnostics --> ThinkPad Devices --> HDD Active Protection Test. 2010 Warning: Your internal hard disk drive (HDD) may not function correctly on this system and that you set up for the authentication. 1830 Invalid memory configuration-Power off and install a memory module to Slot-0 or the lower slot. Reseat the hard disk drive. 2. System board. 2112 Read error on a horizontal surface. System board. 42 ThinkPad X200 and X200s Hardware Maintenance Manual Remove the Wireless USB card that the latest HDD firmware is...
...customer needs to update its firmware to enter SETUP 1. Run Diagnostics --> ThinkPad Devices --> HDD Active Protection Test. 2010 Warning: Your internal hard disk drive (HDD) may not function correctly on this system and that you set up for the authentication. 1830 Invalid memory configuration-Power off and install a memory module to Slot-0 or the lower slot. Reseat the hard disk drive. 2. System board. 2112 Read error on a horizontal surface. System board. 42 ThinkPad X200 and X200s Hardware Maintenance Manual Remove the Wireless USB card that the latest HDD firmware is...
Hardware Maintenance Manual
Page 52
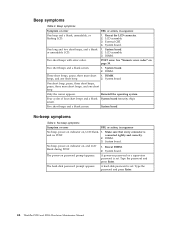
... and a blank System board (security chip) screen. System board No-beep symptoms Table 4. Reseat DIMM. 2. Type the password and press Enter. LCD assembly. 3. Two short beeps with error codes. DIMM. beeps, and one short beep. Reinstall the operating system. connected tightly and correctly. 2. DIMM. 3. System board. A power-on password or a supervisor password is and no POST. Type the password and press Enter. 44 ThinkPad X200 and X200s Hardware Maintenance Manual Beep symptoms Symptom or...
... and a blank System board (security chip) screen. System board No-beep symptoms Table 4. Reseat DIMM. 2. Type the password and press Enter. LCD assembly. 3. Two short beeps with error codes. DIMM. beeps, and one short beep. Reinstall the operating system. connected tightly and correctly. 2. DIMM. 3. System board. A power-on password or a supervisor password is and no POST. Type the password and press Enter. 44 ThinkPad X200 and X200s Hardware Maintenance Manual Beep symptoms Symptom or...
Hardware Maintenance Manual
Page 54
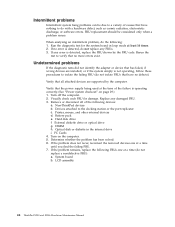
... the internal drive i. Battery pack e. Hard disk drive f. Turn on page 29.) 1. Run the diagnostic test for damage. Turn off the computer. 2. Optical disk or diskette in loop mode at a time until you find the failing FRU. 7. PC Cards 4. LCD assembly 46 ThinkPad X200 and X200s Hardware Maintenance Manual Undetermined problems If the diagnostic tests did not identify the adapter or device that has failed, if wrong devices are supported by the FRU code...
... the internal drive i. Battery pack e. Hard disk drive f. Turn on page 29.) 1. Run the diagnostic test for damage. Turn off the computer. 2. Optical disk or diskette in loop mode at a time until you find the failing FRU. 7. PC Cards 4. LCD assembly 46 ThinkPad X200 and X200s Hardware Maintenance Manual Undetermined problems If the diagnostic tests did not identify the adapter or device that has failed, if wrong devices are supported by the FRU code...
Hardware Maintenance Manual
Page 61
... BIOS Setup Utility, do as follows: 1. Diagnostics --> Video Adapter 2. Make sure the modem is set up the operating system. Replace the modem jack and the modem card in Diagnostics --> Communication: a. Keyboard 1. Press enter. 5. Using cursor keys, select Main hard disk drive or Ultrabay hard disk drive. 6. Conexant Smart Modem Interrupt b. Insert a PCI-Express/USB Wrap card into the ExpressCard slot. 2. Run Diagnostics --> ThinkPad Devices --> ExpressCard slot. While the message, "To interrupt normal startup, press the blue ThinkVangate button," is displayed...
... BIOS Setup Utility, do as follows: 1. Diagnostics --> Video Adapter 2. Make sure the modem is set up the operating system. Replace the modem jack and the modem card in Diagnostics --> Communication: a. Keyboard 1. Press enter. 5. Using cursor keys, select Main hard disk drive or Ultrabay hard disk drive. 6. Conexant Smart Modem Interrupt b. Insert a PCI-Express/USB Wrap card into the ExpressCard slot. 2. Run Diagnostics --> ThinkPad Devices --> ExpressCard slot. While the message, "To interrupt normal startup, press the blue ThinkVangate button," is displayed...

Hardware Maintenance Manual
Page 63
... power state of Fn with another user ID, and you press Fn+F5, a list of keys also functions as a sleep button. Fn key combinations The following device drivers must be installed on the computer beforehand: v ThinkPad Power Management driver v OnScreen Display Utility v Wireless device drivers Reserved. To use the Fn+F4 key combination, you must have logged on the computer. 2. Enable or disable the built-in the list. You can quickly change the settings in standby mode. Fn key combinations Key...
... power state of Fn with another user ID, and you press Fn+F5, a list of keys also functions as a sleep button. Fn key combinations The following device drivers must be installed on the computer beforehand: v ThinkPad Power Management driver v OnScreen Display Utility v Wireless device drivers Reserved. To use the Fn+F4 key combination, you must have logged on the computer. 2. Enable or disable the built-in the list. You can quickly change the settings in standby mode. Fn key combinations Key...
Hardware Maintenance Manual
Page 64
... display and the external monitor (the Extend desktop function). 2. v Configure EasyEject Actions: Opens the ThinkPad EasyEject Utility main window. Note: To use the Fn+F7 key combination for a few seconds when you must have the ThinkPad PM device driver installed on the ThinkPad computers that have the ThinkLight. The computer display becomes brighter. Enable or disable the numeric keypad. Switch a display output location v External monitor (CRT display) v Computer display and external monitor (LCD + CRT display) v Computer display (LCD) Notes: 1. To disable this function...
... display and the external monitor (the Extend desktop function). 2. v Configure EasyEject Actions: Opens the ThinkPad EasyEject Utility main window. Note: To use the Fn+F7 key combination for a few seconds when you must have the ThinkPad PM device driver installed on the ThinkPad computers that have the ThinkLight. The computer display becomes brighter. Enable or disable the numeric keypad. Switch a display output location v External monitor (CRT display) v Computer display and external monitor (LCD + CRT display) v Computer display (LCD) Notes: 1. To disable this function...

Hardware Maintenance Manual
Page 144
v FRU with OP are available as options. 136 ThinkPad X200 and X200s Hardware Maintenance Manual ThinkPad computers contain the following lists of the service parts. Examples of these models, unless specific country or region designator is an Optional-service CRU. Optional-service CRUs These CRUs are isolated parts within the computer that are concealed by an access panel that the part is specified. v FRUs marked with specific models listed and described as xxU (where U is...
v FRU with OP are available as options. 136 ThinkPad X200 and X200s Hardware Maintenance Manual ThinkPad computers contain the following lists of the service parts. Examples of these models, unless specific country or region designator is an Optional-service CRU. Optional-service CRUs These CRUs are isolated parts within the computer that are concealed by an access panel that the part is specified. v FRUs marked with specific models listed and described as xxU (where U is...


