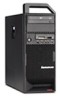

User Manual
Page 7
... listed on the cover. Before servicing a Lenovo product, be sure to read all ThinkStation computers. The Symptom-to-FRU Index and Additional Service Information chapters are not specific to any machine type and are applicable to read the Safety Information. This manual includes a complete FRU part number listing for trained servicers who are...
... listed on the cover. Before servicing a Lenovo product, be sure to read all ThinkStation computers. The Symptom-to-FRU Index and Additional Service Information chapters are not specific to any machine type and are applicable to read the Safety Information. This manual includes a complete FRU part number listing for trained servicers who are...
User Manual
Page 8
... with the same fit and function are not compliant originally, replacement parts can be ready to these products and any product Lenovo produces containing RoHS compliant parts. RoHS compliant ThinkStation parts have RoHS compliant parts. If the parts are identified with a different FRU part number that is a European Union legal requirement affecting the global electronics industry. RoHS requirements...
... with the same fit and function are not compliant originally, replacement parts can be ready to these products and any product Lenovo produces containing RoHS compliant parts. RoHS compliant ThinkStation parts have RoHS compliant parts. If the parts are identified with a different FRU part number that is a European Union legal requirement affecting the global electronics industry. RoHS requirements...
User Manual
Page 9
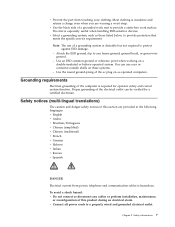
...you . v Wear safety glasses when you start the machine, ensure that other conditions that makes the equipment unsafe. Electrical safety © Copyright Lenovo 2006, 2008 3 Chapter 2. v Before you are good electrical conductors. Replace any action that causes hazards to the customer, or that might be... or scarf inside clothing or fasten it with before returning the machine to ensure general safety: v Observe good housekeeping in the moving parts of your back. Ensure you attempt to lift any heavy object: 1. Use a slow lifting force. Never move suddenly or twist ...
...you . v Wear safety glasses when you start the machine, ensure that other conditions that makes the equipment unsafe. Electrical safety © Copyright Lenovo 2006, 2008 3 Chapter 2. v Before you are good electrical conductors. Replace any action that causes hazards to the customer, or that might be... or scarf inside clothing or fasten it with before returning the machine to ensure general safety: v Observe good housekeeping in the moving parts of your back. Ensure you attempt to lift any heavy object: 1. Use a slow lifting force. Never move suddenly or twist ...

User Manual
Page 11
... relocate your computer to another person to get medical aid. This guide addresses only those items. However, good judgment should be aware of the following parts with a voltage-selection switch located near the power-cord connection point on the computer. Examples of this inspection guide. If your computer does not have...
... relocate your computer to another person to get medical aid. This guide addresses only those items. However, good judgment should be aware of the following parts with a voltage-selection switch located near the power-cord connection point on the computer. Examples of this inspection guide. If your computer does not have...
User Manual
Page 12
...c. Check that the ESD protective devices you can continue without first correcting the problem. Handling electrostatic discharge-sensitive devices Any computer part containing transistors or integrated circuits (ICs) should be considered sensitive to eliminate static on the frame can occur when there is... noted here. 2. v Explosive hazards, such as a damaged CRT face or bulging capacitor v Mechanical hazards, such as specified in the parts listings. Check exterior covers for worn, frayed, or pinched cables. 8. Power-off , and the power cord disconnected. Check the power ...
...c. Check that the ESD protective devices you can continue without first correcting the problem. Handling electrostatic discharge-sensitive devices Any computer part containing transistors or integrated circuits (ICs) should be considered sensitive to eliminate static on the frame can occur when there is... noted here. 2. v Explosive hazards, such as a damaged CRT face or bulging capacitor v Mechanical hazards, such as specified in the parts listings. Check exterior covers for worn, frayed, or pinched cables. 8. Power-off , and the power cord disconnected. Check the power ...
User Manual
Page 13
... protect against ESD damage. - To avoid a shock hazard: v Do not connect or disconnect any frame ground, ground braid, or green-wire ground. - Chapter 2. v Prevent the part from power, telephone and communication cables is hazardous. v Select a grounding system, such as those listed below, to a properly wired and grounded electrical outlet. Use the...
... protect against ESD damage. - To avoid a shock hazard: v Do not connect or disconnect any frame ground, ground braid, or green-wire ground. - Chapter 2. v Prevent the part from power, telephone and communication cables is hazardous. v Select a grounding system, such as those listed below, to a properly wired and grounded electrical outlet. Use the...

User Manual
Page 15
... 100°C (212°F) v Repair or disassemble Dispose of the battery as CD-ROMs, DVD-ROM drives, fiber optic devices, or transmitters) are no serviceable parts inside the device. DANGER: Some laser products contain an embedded Class 3A or Class 3B laser diode. Removing the covers of . Chapter 2. Do not: v Throw... product could result in hazardous radiation exposure. There are installed, note the following : Laser radiation when open. CAUTION: When replacing the lithium battery, use only Part Number 33F8354 or an equivalent type battery recommended by the same manufacturer.
... 100°C (212°F) v Repair or disassemble Dispose of the battery as CD-ROMs, DVD-ROM drives, fiber optic devices, or transmitters) are no serviceable parts inside the device. DANGER: Some laser products contain an embedded Class 3A or Class 3B laser diode. Removing the covers of . Chapter 2. Do not: v Throw... product could result in hazardous radiation exposure. There are installed, note the following : Laser radiation when open. CAUTION: When replacing the lithium battery, use only Part Number 33F8354 or an equivalent type battery recommended by the same manufacturer.

User Manual
Page 45
... and click Productivity Center. You can find the following information: v CRU removal and installation instructions v Publications v Troubleshooting information v Parts information v Downloads and drivers v Links to various technologies, such as: v The Rescue and Recovery® program v Productivity Center ...Security Solutions v Factory Recovery v System Updates v Service and support Note: ThinkVantage Technologies are only available on select Lenovo computers. General information This chapter provides general information that applies to all machine types supported by this information, go...
... and click Productivity Center. You can find the following information: v CRU removal and installation instructions v Publications v Troubleshooting information v Parts information v Downloads and drivers v Links to various technologies, such as: v The Rescue and Recovery® program v Productivity Center ...Security Solutions v Factory Recovery v System Updates v Service and support Note: ThinkVantage Technologies are only available on select Lenovo computers. General information This chapter provides general information that applies to all machine types supported by this information, go...
User Manual
Page 47
...or the drive startup sequence changed. A down-level BIOS might be overwritten if you cannot continue, replace the last device tested. © Copyright Lenovo 2006, 2008 41 Power-on page 43. If you do receive the correct response, proceed to step 6. v If the computer displays a POST... to "Beep symptoms" on the system. Use the following conditions and follow the instructions: v If you receive an error, replace the part that software package. General error messages appear if a problem or conflict is used, rebuilding the RAID array might cause false errors and unnecessary...
...or the drive startup sequence changed. A down-level BIOS might be overwritten if you cannot continue, replace the last device tested. © Copyright Lenovo 2006, 2008 41 Power-on page 43. If you do receive the correct response, proceed to step 6. v If the computer displays a POST... to "Beep symptoms" on the system. Use the following conditions and follow the instructions: v If you receive an error, replace the part that software package. General error messages appear if a problem or conflict is used, rebuilding the RAID array might cause false errors and unnecessary...
User Manual
Page 49
... Rescue and Recovery workspace You can run PC-Doctor for DOS or PC-Doctor for Windows PE to the PC-Doctor for Windows is part of PC-Doctor, click the Save Button in isolating a possible problem. PC-Doctor for Windows PC-Doctor for Windows help system. The... run the PC-Doctor for Windows. For additional information about running the applicable version of the Rescue and Recovery workspace on each Lenovo computer. If you to a Lenovo technical support representative. Chapter 5. You can cause hardware failures. There are unable to test hardware components of the PC-Doctor for...
... Rescue and Recovery workspace You can run PC-Doctor for DOS or PC-Doctor for Windows PE to the PC-Doctor for Windows is part of PC-Doctor, click the Save Button in isolating a possible problem. PC-Doctor for Windows PC-Doctor for Windows help system. The... run the PC-Doctor for Windows. For additional information about running the applicable version of the Rescue and Recovery workspace on each Lenovo computer. If you to a Lenovo technical support representative. Chapter 5. You can cause hardware failures. There are unable to test hardware components of the PC-Doctor for...
User Manual
Page 65
Always begin with Chapter 4, "General Checkout," on Switch © Copyright Lenovo 2006, 2008 59 The drive is in the boot sequence. Check/Verify Check the following : 1. Hard disk drive boot error A hard disk drive boot error (... system on switch for continuity. Check the power-on the boot drive. The most likely cause is not in the boot sequence in the first part of this index, go to correct the problem using this index. Notes: v If you are unable to "Undetermined problems" on the failing hard disk drive...
Always begin with Chapter 4, "General Checkout," on Switch © Copyright Lenovo 2006, 2008 59 The drive is in the boot sequence. Check/Verify Check the following : 1. Hard disk drive boot error A hard disk drive boot error (... system on switch for continuity. Check the power-on the boot drive. The most likely cause is not in the boot sequence in the first part of this index, go to correct the problem using this index. Notes: v If you are unable to "Undetermined problems" on the failing hard disk drive...
User Manual
Page 112
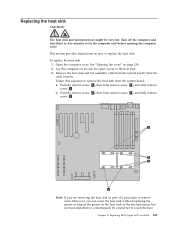
... the four mounting studs in -lbs: a. Go to install the screws, noting that do not have orientation labels showing "Front of System." b. Some heat sink part numbers will have orientation labels should be oriented so the fan cable is 5 in-lbs +/0.5 in the chassis. 9. Heat Sinks that fully tight is toward...
... the four mounting studs in -lbs: a. Go to install the screws, noting that do not have orientation labels showing "Front of System." b. Some heat sink part numbers will have orientation labels should be oriented so the fan cable is 5 in-lbs +/0.5 in the chassis. 9. Heat Sinks that fully tight is toward...
User Manual
Page 129
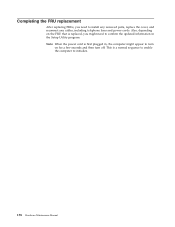
Chapter 9. Note: When the power cord is first plugged in the Setup Utility program. Replacing FRUs (types 6423 and 6483) 123 This is replaced, you need to confirm the updated information in , the computer might need to install any removed parts, replace the cover, and reconnect any cables, including telephone lines and power cords. Also, depending on for a few seconds and then turn off. Completing the FRU replacement After replacing FRUs, you might appear to turn on the FRU that is a normal sequence to enable the computer to initialize.
Chapter 9. Note: When the power cord is first plugged in the Setup Utility program. Replacing FRUs (types 6423 and 6483) 123 This is replaced, you need to confirm the updated information in , the computer might need to install any removed parts, replace the cover, and reconnect any cables, including telephone lines and power cords. Also, depending on for a few seconds and then turn off. Completing the FRU replacement After replacing FRUs, you might appear to turn on the FRU that is a normal sequence to enable the computer to initialize.
User Manual
Page 147
... be very hot. Open the computer cover. Lay the computer on page 130. 2. b. Note: If you are removing the heat sink as part of a procedure to remove some other part, you can reuse the heat sink without replacing the grease as long as the grease on how to touch the heat Chapter...
... be very hot. Open the computer cover. Lay the computer on page 130. 2. b. Note: If you are removing the heat sink as part of a procedure to remove some other part, you can reuse the heat sink without replacing the grease as long as the grease on how to touch the heat Chapter...
User Manual
Page 148
.... b. Do not put the heat sink anywhere except on the microprocessor after the plastic covering has been removed and the grease exposed. Some heat sink part numbers will have orientation labels should be oriented so the fan cable is 5 in-lbs +/0.5 in contact with the mounting studs in the chassis. 8. Remove...
.... b. Do not put the heat sink anywhere except on the microprocessor after the plastic covering has been removed and the grease exposed. Some heat sink part numbers will have orientation labels should be oriented so the fan cable is 5 in-lbs +/0.5 in contact with the mounting studs in the chassis. 8. Remove...
User Manual
Page 160
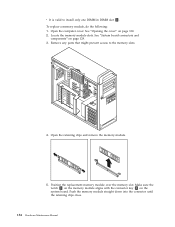
... 129. 3. Push the memory module straight down into the connector until the retaining clips close. 154 Hardware Maintenance Manual Open the computer cover. Remove any parts that might prevent access to install only one DIMM in DIMM slot 1 . Position the replacement memory module over the memory slot. Open the retaining clips...
... 129. 3. Push the memory module straight down into the connector until the retaining clips close. 154 Hardware Maintenance Manual Open the computer cover. Remove any parts that might prevent access to install only one DIMM in DIMM slot 1 . Position the replacement memory module over the memory slot. Open the retaining clips...
User Manual
Page 164
Also, depending on the FRU that is replaced, you need to confirm the updated information in , the computer might appear to turn on for a few seconds and then turn off. This is first plugged in the Setup Utility program. Completing the FRU replacement After replacing FRUs, you might need to install any removed parts, replace the cover, and reconnect any cables, including telephone lines and power cords. Note: When the power cord is a normal sequence to enable the computer to initialize. 158 Hardware Maintenance Manual
Also, depending on the FRU that is replaced, you need to confirm the updated information in , the computer might appear to turn on for a few seconds and then turn off. This is first plugged in the Setup Utility program. Completing the FRU replacement After replacing FRUs, you might need to install any removed parts, replace the cover, and reconnect any cables, including telephone lines and power cords. Note: When the power cord is a normal sequence to enable the computer to initialize. 158 Hardware Maintenance Manual

User Manual
Page 165
... 26U 26F 26G 43M 43A 43Q 43T 43K 43R 49U 49F) FRU# 71Y4884 43C3833 43C1693 CRU Tier N N N © Copyright Lenovo 2006, 2008 159 Chapter 11. "N" means that the part is not a CRU, "1" means that the part is a Self-service CRU, and "2" means that the part is identified as either "1", "2", or "N" in the CRU column.
... 26U 26F 26G 43M 43A 43Q 43T 43K 43R 49U 49F) FRU# 71Y4884 43C3833 43C1693 CRU Tier N N N © Copyright Lenovo 2006, 2008 159 Chapter 11. "N" means that the part is not a CRU, "1" means that the part is a Self-service CRU, and "2" means that the part is identified as either "1", "2", or "N" in the CRU column.
User Manual
Page 168
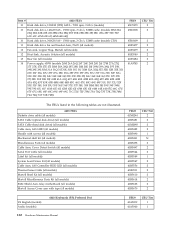
...Cable (hard disk drive) (all models) Cable Asm, SAS HDD (all models) Handle with screws (all models) Mechanical shell kit (all models) Miscellaneous Parts (all models) Cable Asm, Cover Detect Switch (all models) Serial Port Cable (all models) Label kit (all models) System board Screw Kit (all ...models) Cable Asm, SAS Controller HDD LED (all models) Thermal Sense Cable (all models) Martell Bezel Kit (all models) Martell Miscellaneous Parts Kit (all models) EMC Shield Asm, Islay motherboard (all models) Martell Access Cover asm with tape (all models) FRU# 41N8294 41R5481 41N8298 41R5482...
...Cable (hard disk drive) (all models) Cable Asm, SAS HDD (all models) Handle with screws (all models) Mechanical shell kit (all models) Miscellaneous Parts (all models) Cable Asm, Cover Detect Switch (all models) Serial Port Cable (all models) Label kit (all models) System board Screw Kit (all ...models) Cable Asm, SAS Controller HDD LED (all models) Thermal Sense Cable (all models) Martell Bezel Kit (all models) Martell Miscellaneous Parts Kit (all models) EMC Shield Asm, Islay motherboard (all models) Martell Access Cover asm with tape (all models) FRU# 41N8294 41R5481 41N8298 41R5482...

User Manual
Page 184
...) Cable Asm, SATA (all models) Cable Asm, SATA, optical disk drive (all models) Cover Asm (access panel) (all models) Mechanical Shell Kit (all models) Miscellaneous Parts Kit (all models) Cable Asm, Cover Detect Switch (all models) Serial Port Cable (all models) System board Screw Kit (all models) Label Kit (all models...
...) Cable Asm, SATA (all models) Cable Asm, SATA, optical disk drive (all models) Cover Asm (access panel) (all models) Mechanical Shell Kit (all models) Miscellaneous Parts Kit (all models) Cable Asm, Cover Detect Switch (all models) Serial Port Cable (all models) System board Screw Kit (all models) Label Kit (all models...


