User Manual
Page 5
... (IME) three to five disks, with an optional hot spare disk 56 Configuring the system BIOS to enable SAS RAID 1E functionality 56 Chapter 8. Installing and configuring RAID 53 Attaching SATA hard disk drives 53 Configuring...module 117 Replacing a fan assembly 119 Replacing the internal speaker 120 Replacing the front panel connector assembly . . 121 Completing the FRU replacement 123 © Copyright Lenovo 2006, 2008 iii Safety information . . . . . 3 General safety 3 Electrical safety 3 Voltage-selection switch 5 Safety inspection guide 5 Handling electrostatic discharge-...
... (IME) three to five disks, with an optional hot spare disk 56 Configuring the system BIOS to enable SAS RAID 1E functionality 56 Chapter 8. Installing and configuring RAID 53 Attaching SATA hard disk drives 53 Configuring...module 117 Replacing a fan assembly 119 Replacing the internal speaker 120 Replacing the front panel connector assembly . . 121 Completing the FRU replacement 123 © Copyright Lenovo 2006, 2008 iii Safety information . . . . . 3 General safety 3 Electrical safety 3 Voltage-selection switch 5 Safety inspection guide 5 Handling electrostatic discharge-...
User Manual
Page 6
... features 235 Hardware controlled Passwords 235 Operating system password 235 Vital product data 235 BIOS levels 235 Flash update procedures 235 Updating (flashing) BIOS from a diskette or CD-ROM 236 Updating (flashing) BIOS from the operating system 236 Recovering from a POST/BIOS update failure . . 236 Power management 238 Automatic configuration and power interface (ACPI...
... features 235 Hardware controlled Passwords 235 Operating system password 235 Vital product data 235 BIOS levels 235 Flash update procedures 235 Updating (flashing) BIOS from a diskette or CD-ROM 236 Updating (flashing) BIOS from the operating system 236 Recovering from a POST/BIOS update failure . . 236 Power management 238 Automatic configuration and power interface (ACPI...
User Manual
Page 47
...configured array, depending on which type of array is redundant, make sure to connect the new drive to determine and obtain the latest level BIOS, see "BIOS levels" on page 43. Check all external devices. 5. v If the test stops and you are servicing might have been rearranged or.... Attention When replacing a hard disk drive in the computer you cannot continue, replace the last device tested. © Copyright Lenovo 2006, 2008 41 A down-level BIOS might be overwritten if you select an incorrect drive. Power-on page 61. v If you do receive the correct response, proceed...
...configured array, depending on which type of array is redundant, make sure to connect the new drive to determine and obtain the latest level BIOS, see "BIOS levels" on page 43. Check all external devices. 5. v If the test stops and you are servicing might have been rearranged or.... Attention When replacing a hard disk drive in the computer you cannot continue, replace the last device tested. © Copyright Lenovo 2006, 2008 41 A down-level BIOS might be overwritten if you select an incorrect drive. Power-on page 61. v If you do receive the correct response, proceed...

User Manual
Page 48
... - Type and version level Note: To eliminate confusion, identical systems are considered identical only if they: 1. Have the same BIOS level 3. Is the failure repeatable? - Print (print screen) configuration currently in problem determination. BIOS level v Operating system software - Have the same software versions and levels 6. Have the same setup for the operating...
... - Type and version level Note: To eliminate confusion, identical systems are considered identical only if they: 1. Have the same BIOS level 3. Is the failure repeatable? - Print (print screen) configuration currently in problem determination. BIOS level v Operating system software - Have the same software versions and levels 6. Have the same setup for the operating...
User Manual
Page 59
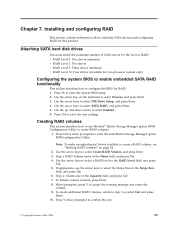
... Stripe Size field, and press Tab. 6. Use the arrow keys to create a RAID volume, see "Deleting RAID volumes" on the keyboard to enter the system BIOS setup. 2. v RAID Level 0: Two drives minimum v RAID Level 1: Two drives v RAID Level 5: Three drives minimum v RAID Level 10: Four drives (Available..., and press Tab. 7. If appropriate, use the Intel® Matrix Storage Manager option ROM Configuration Utility to confirm the exit. © Copyright Lenovo 2006, 2008 53 Use the arrow keys to step 3 or select Exit and press Enter. 10. To create additional RAID volumes, return to select...
... Stripe Size field, and press Tab. 6. Use the arrow keys to create a RAID volume, see "Deleting RAID volumes" on the keyboard to enter the system BIOS setup. 2. v RAID Level 0: Two drives minimum v RAID Level 1: Two drives v RAID Level 5: Three drives minimum v RAID Level 10: Four drives (Available..., and press Tab. 7. If appropriate, use the Intel® Matrix Storage Manager option ROM Configuration Utility to confirm the exit. © Copyright Lenovo 2006, 2008 53 Use the arrow keys to step 3 or select Exit and press Enter. 10. To create additional RAID volumes, return to select...
User Manual
Page 60
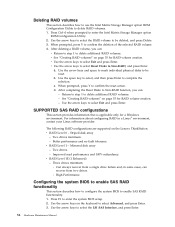
... for RAID volume creation. Use the arrow keys and space to mark individual physical disks to be reset. c. Return to step 1 to enter the system BIOS setup. 2. SUPPORTED SAS RAID configurations This section provides information that is applicable only for a Windows environment. Striped disk array - Two drives minimum. - Three drives minimum... and, in a Linux® environment, contact your Linux software provider. High Performance. Press F1 to delete additional RAID volumes. - Use the arrow keys on the Lenovo ThinkStation: v RAID Level 0 -
... for RAID volume creation. Use the arrow keys and space to mark individual physical disks to be reset. c. Return to step 1 to enter the system BIOS setup. 2. SUPPORTED SAS RAID configurations This section provides information that is applicable only for a Windows environment. Striped disk array - Two drives minimum. - Three drives minimum... and, in a Linux® environment, contact your Linux software provider. High Performance. Press F1 to delete additional RAID volumes. - Use the arrow keys on the Lenovo ThinkStation: v RAID Level 0 -
User Manual
Page 61
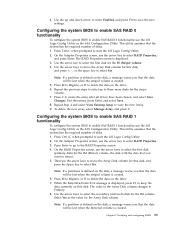
...RAID Properties screen is created. 6. To delete the new array, select Manage Array, and press Y. Configuring the system BIOS to enable SAS RAID 1 functionality To configure the system BIOS to select the first disk (primary disk) for the IM volume. Select Yes as the SAS Configuration Utility. Chapter...as the SAS Configuration Utility. Press M to Migrate, or D to select RAID Properties. 3. Configuring the system BIOS to enable SAS RAID 0 functionality To configure the system BIOS to keep the data currently on the drive. 6. When the Keep Data/Erase Disk message is displayed, press ...
...RAID Properties screen is created. 6. To delete the new array, select Manage Array, and press Y. Configuring the system BIOS to enable SAS RAID 1 functionality To configure the system BIOS to select the first disk (primary disk) for the IM volume. Select Yes as the SAS Configuration Utility. Chapter...as the SAS Configuration Utility. Press M to Migrate, or D to select RAID Properties. 3. Configuring the system BIOS to enable SAS RAID 0 functionality To configure the system BIOS to keep the data currently on the drive. 6. When the Keep Data/Erase Disk message is displayed, press ...

User Manual
Page 62
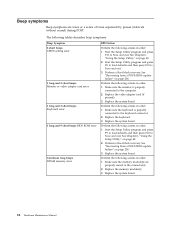
... a partition is defined on the disk, a message warns you that you that the system has the required number of disks. 1. Configuring the system BIOS to enable SAS RAID 1E functionality To configure the system BIOS to enable SAS RAID 1E functionality, use the arrow key to mirror. 5. Press Enter and select Save. 9.
... a partition is defined on the disk, a message warns you that you that the system has the required number of disks. 1. Configuring the system BIOS to enable SAS RAID 1E functionality To configure the system BIOS to enable SAS RAID 1E functionality, use the arrow key to mirror. 5. Press Enter and select Save. 9.

User Manual
Page 67
... Code 000-000-XXX BIOS Test Passed 000-002-XXX BIOS Timeout 000-024-XXX BIOS Addressing test failure 000-025-XXX BIOS Checksum Value error 000-026-XXX FLASH data error 000-027-XXX BIOS Configuration/Setup error 000-034-XXX BIOS Buffer Allocation failure 000-035-XXX BIOS Reset Condition detected 000-...036-XXX BIOS Register error 000-038-XXX BIOS Extension failure 000-039-XXX BIOS DMI data error 000-195-XXX BIOS Test aborted by user FRU/Action No...
... Code 000-000-XXX BIOS Test Passed 000-002-XXX BIOS Timeout 000-024-XXX BIOS Addressing test failure 000-025-XXX BIOS Checksum Value error 000-026-XXX FLASH data error 000-027-XXX BIOS Configuration/Setup error 000-034-XXX BIOS Buffer Allocation failure 000-035-XXX BIOS Reset Condition detected 000-...036-XXX BIOS Register error 000-038-XXX BIOS Extension failure 000-039-XXX BIOS DMI data error 000-195-XXX BIOS Test aborted by user FRU/Action No...

User Manual
Page 68
... 62 Hardware Maintenance Manual Diagnostic Error Code 000-196-XXX BIOS test halt, error threshold exceeded 000-197-XXX BIOS test warning 000-198-XXX BIOS test aborted 000-199-XXX BIOS test failed, cause unknown 000-250-XXX BIOS APM failure 000-270-XXX BIOS ACPI failure 001-000-XXX System Test Passed 001-00X...
... 62 Hardware Maintenance Manual Diagnostic Error Code 000-196-XXX BIOS test halt, error threshold exceeded 000-197-XXX BIOS test warning 000-198-XXX BIOS test aborted 000-199-XXX BIOS test failed, cause unknown 000-250-XXX BIOS APM failure 000-270-XXX BIOS ACPI failure 001-000-XXX System Test Passed 001-00X...

User Manual
Page 72
... drive 3. Re-run test 3. Replace the component called out in warning statement 4. Diagnostic Error Code 005-036-XXX Video Register error 005-038-XXX System BIOS extension failure 005-040-XXX Video IRQ failure 005-195-XXX Video Test aborted by user 005-196-XXX Video test halt, error threshold exceeded...
... drive 3. Re-run test 3. Replace the component called out in warning statement 4. Diagnostic Error Code 005-036-XXX Video Register error 005-038-XXX System BIOS extension failure 005-040-XXX Video IRQ failure 005-195-XXX Video Test aborted by user 005-196-XXX Video test halt, error threshold exceeded...
User Manual
Page 88
... is properly connected to the keyboard connector. 2. See Chapter 6, "Using the Setup Utility," on page 236. 3. See "Recovering from a POST/BIOS update failure" on page 49. 2. Perform the following actions in order. 1. Replace the system board. 82 Hardware Maintenance Manual See Chapter 6, "Using...and press F9 to load defaults and then press F10 to Save and exit. Perform a Boot block recovery. See "Recovering from a POST/BIOS update failure" on page 49. 2. Perform the following actions in order. 1. Replace the keyboard. 3. Replace the system board. Replace the ...
... is properly connected to the keyboard connector. 2. See Chapter 6, "Using the Setup Utility," on page 236. 3. See "Recovering from a POST/BIOS update failure" on page 49. 2. Perform the following actions in order. 1. Replace the system board. 82 Hardware Maintenance Manual See Chapter 6, "Using...and press F9 to load defaults and then press F10 to Save and exit. Perform a Boot block recovery. See "Recovering from a POST/BIOS update failure" on page 49. 2. Perform the following actions in order. 1. Replace the keyboard. 3. Replace the system board. Replace the ...
User Manual
Page 89
... system. nnnn is correctly installed. Pressing Esc skips the full memory test Cannot find or initialize the hard disk drive controller or the drive. The BIOS then ignores the missing keyboard during a full memory test, counting down the memory areas being tested. Chapter 8. CMOS checksum error - defaults loaded Replace the battery...
... system. nnnn is correctly installed. Pressing Esc skips the full memory test Cannot find or initialize the hard disk drive controller or the drive. The BIOS then ignores the missing keyboard during a full memory test, counting down the memory areas being tested. Chapter 8. CMOS checksum error - defaults loaded Replace the battery...

User Manual
Page 90
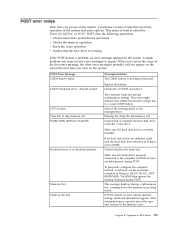
Make sure you have bootable media. 84 Hardware Maintenance Manual Make sure the boot drive is properly connected to toggle between the default POST display screen and a custom POST display screen. POST Error Message Press TAB to show POST screen Error: Non-System disk or disk error Replace and press any key when ready Description/Action Pressing the TAB key permits the user to the computer. The BIOS was unable to find a suitable boot device.
Make sure you have bootable media. 84 Hardware Maintenance Manual Make sure the boot drive is properly connected to toggle between the default POST display screen and a custom POST display screen. POST Error Message Press TAB to show POST screen Error: Non-System disk or disk error Replace and press any key when ready Description/Action Pressing the TAB key permits the user to the computer. The BIOS was unable to find a suitable boot device.
User Manual
Page 241
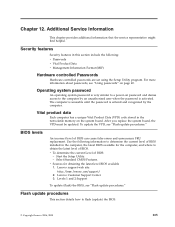
... replacement. Vital product data Each computer has a unique Vital Product Data (VPD) code stored in the computer, the latest BIOS available for obtaining the latest level BIOS available 1. Lenovo support web site: http://www.lenovo.com/support/ 2. Additional Service Information This chapter provides additional information that the service representative might find helpful. Operating system...
... replacement. Vital product data Each computer has a unique Vital Product Data (VPD) code stored in the computer, the latest BIOS available for obtaining the latest level BIOS available 1. Lenovo support web site: http://www.lenovo.com/support/ 2. Additional Service Information This chapter provides additional information that the service representative might find helpful. Operating system...

User Manual
Page 242
... a POST/BIOS update failure If power to change the serial number, press Y. 5. From your machine type and click Go. Type your browser, type http://www.lenovo.com/support in the following procedure commonly called Boot-block Recovery. 1. Click Continue. From your computer might not restart ...begins. When you must turn the computer on again. When prompted to your computer is interrupted while POST/BIOS is very important since they are available at http://www.lenovo.com/ support on your computer and then press Enter. 8. Click Downloads and drivers. Click the .txt...
... a POST/BIOS update failure If power to change the serial number, press Y. 5. From your machine type and click Go. Type your browser, type http://www.lenovo.com/support in the following procedure commonly called Boot-block Recovery. 1. Click Continue. From your computer might not restart ...begins. When you must turn the computer on again. When prompted to your computer is interrupted while POST/BIOS is very important since they are available at http://www.lenovo.com/ support on your computer and then press Enter. 8. Click Downloads and drivers. Click the .txt...
User Manual
Page 243
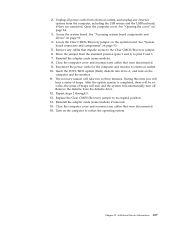
... of beeps. Chapter 12. Additional Service Information 237 Reconnect the power cords for the computer and monitor to its original position. 14. Insert the POST/BIOS update (flash) diskette into drive A, and turn off. The recovery session will automatically turn on page 93. 5. Repeat steps 2 through 5. 13. Remove any cables that...
... of beeps. Chapter 12. Additional Service Information 237 Reconnect the power cords for the computer and monitor to its original position. 14. Insert the POST/BIOS update (flash) diskette into drive A, and turn off. The recovery session will automatically turn on page 93. 5. Repeat steps 2 through 5. 13. Remove any cables that...
User Manual
Page 244
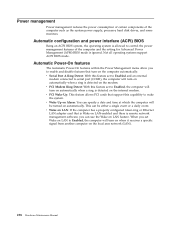
Automatic configuration and power interface (ACPI) BIOS Being an ACPI BIOS system, the operating system is allowed to control the power management features of the computer such as the ...monitors. When you can use the Wake on the local area network (LAN). 238 Hardware Maintenance Manual Not all operating systems support ACPI BIOS mode. This can specify a date and time at which the computer will turn on automatically. v Wake on LAN: If the computer... the power consumption of certain components of the computer and the setting for Advanced Power Management (APM) BIOS mode is ignored.
Automatic configuration and power interface (ACPI) BIOS Being an ACPI BIOS system, the operating system is allowed to control the power management features of the computer such as the ...monitors. When you can use the Wake on the local area network (LAN). 238 Hardware Maintenance Manual Not all operating systems support ACPI BIOS mode. This can specify a date and time at which the computer will turn on automatically. v Wake on LAN: If the computer... the power consumption of certain components of the computer and the setting for Advanced Power Management (APM) BIOS mode is ignored.

User Guide
Page 5
... or CD-ROM 29 Updating (flashing) BIOS from the Setup Utility program . . . . . 21 Chapter 6. Getting information, help, and service 45 Information resources 45 Online Books folder 45 ThinkVantage Productivity Center 45 Safety and Warranty 46 www.lenovo.com 46 Help and service 46 Using ... functionality 24 Configuring the system BIOS to enable SAS RAID 0 functionality 25 Configuring the system BIOS to enable SAS RAID 1 functionality 25 Configuring a mirrored volume with three to five disks, with your Windows operating system 17 Software provided by Lenovo 17 PC-Doctor for WINPE,...
... or CD-ROM 29 Updating (flashing) BIOS from the Setup Utility program . . . . . 21 Chapter 6. Getting information, help, and service 45 Information resources 45 Online Books folder 45 ThinkVantage Productivity Center 45 Safety and Warranty 46 www.lenovo.com 46 Help and service 46 Using ... functionality 24 Configuring the system BIOS to enable SAS RAID 0 functionality 25 Configuring the system BIOS to enable SAS RAID 1 functionality 25 Configuring a mirrored volume with three to five disks, with your Windows operating system 17 Software provided by Lenovo 17 PC-Doctor for WINPE,...
User Guide
Page 7
...disks, back up your computer for your hard disk drive to a previously saved state. v Appendix B, "Notices," on page 57 provides notices and trademark information. © Lenovo 2005, 2008. v v Chapter 10, "Getting information, help, and service," on page 45 provides information about setting up your computer," on page 5 provides information about...provides commands for this computer. Introduction This User Guide contains the following information: v Chapter 1, "Important safety information," on page 1 provides information about updating POST/BIOS and how to recover from Lenovo.
...disks, back up your computer for your hard disk drive to a previously saved state. v Appendix B, "Notices," on page 57 provides notices and trademark information. © Lenovo 2005, 2008. v v Chapter 10, "Getting information, help, and service," on page 45 provides information about setting up your computer," on page 5 provides information about...provides commands for this computer. Introduction This User Guide contains the following information: v Chapter 1, "Important safety information," on page 1 provides information about updating POST/BIOS and how to recover from Lenovo.


