Safety and Warranty guide
Page 9
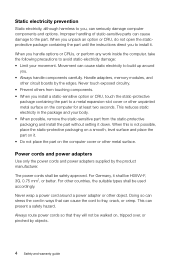
...electricity damage: • Limit your body. • When possible, remove the static-sensitive part from touching components. • When you install a static-sensitive option or CRU, touch the static-protective package containing the part to a metal expansion-slot cover or other unpainted metal surface ...instructions direct you , can stress the cord in the package and your movement. Handle adapters, memory modules, and other object. Never touch exposed circuitry. • Prevent others from the static-protective packaging and install the part without setting it down. When this is not...
...electricity damage: • Limit your body. • When possible, remove the static-sensitive part from touching components. • When you install a static-sensitive option or CRU, touch the static-protective package containing the part to a metal expansion-slot cover or other unpainted metal surface ...instructions direct you , can stress the cord in the package and your movement. Handle adapters, memory modules, and other object. Never touch exposed circuitry. • Prevent others from the static-protective packaging and install the part without setting it down. When this is not...

Safety and Warranty guide
Page 16
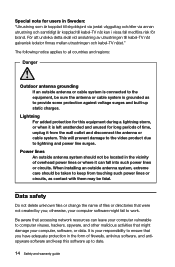
.... There may be a remote risk of electric shock from lightning. • Do not use only No. 26 AWG or larger (for wet locations. • Never touch uninsulated telephone wires or terminals unless the telephone line has been disconnected at the network interface. • Use caution when installing or modifying telephone lines...
.... There may be a remote risk of electric shock from lightning. • Do not use only No. 26 AWG or larger (for wet locations. • Never touch uninsulated telephone wires or terminals unless the telephone line has been disconnected at the network interface. • Use caution when installing or modifying telephone lines...
Safety and Warranty guide
Page 19
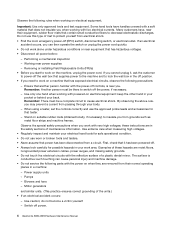
... equipment during a lightning storm, or when it is left unattended and unused for users in the vicinity of overhead power lines or where it from touching such power lines or circuits, as to computer viruses, hackers, spyware, and other malicious activities that accessing network resources can fall medfõra risk...
... equipment during a lightning storm, or when it is left unattended and unused for users in the vicinity of overhead power lines or where it from touching such power lines or circuits, as to computer viruses, hackers, spyware, and other malicious activities that accessing network resources can fall medfõra risk...
IdeaCentre B350-B355 Hardware Maintenance Manual
Page 10
...Disconnect all power before: - these hazards are moist floors, nongrounded power extension cables, power surges, and missing safety grounds. • Do not touch live electrical currents. First, check that tester. - Pumps - Remember: There must be a complete circuit to lock the wall box in a ...use worn or broken tools and testers. • Never assume that another person, familiar with the power-off power. 4 IdeaCentre B350-B355Hardware Maintenance Manual Some hand tools have , near power supplies - The surface is near equipment that does not insulate you work...
...Disconnect all power before: - these hazards are moist floors, nongrounded power extension cables, power surges, and missing safety grounds. • Do not touch live electrical currents. First, check that tester. - Pumps - Remember: There must be a complete circuit to lock the wall box in a ...use worn or broken tools and testers. • Never assume that another person, familiar with the power-off power. 4 IdeaCentre B350-B355Hardware Maintenance Manual Some hand tools have , near power supplies - The surface is near equipment that does not insulate you work...
IdeaCentre B350-B355 Hardware Maintenance Manual
Page 12
... section are wearing a wrist strap. • Use the black side of a grounded work surface. DANGER Electrical current from touching your skin to any equipment when there is evidence of a grounding system is desirable but not required to protect against your ...retains a charge even when you open the device covers, unless instructed otherwise in this product or attached devices. 6 IdeaCentre B350-B355Hardware Maintenance Manual Grounding requirements Electrical grounding of English. Safety notices The caution and danger safety notices in the installation and configuration...
... section are wearing a wrist strap. • Use the black side of a grounded work surface. DANGER Electrical current from touching your skin to any equipment when there is evidence of a grounding system is desirable but not required to protect against your ...retains a charge even when you open the device covers, unless instructed otherwise in this product or attached devices. 6 IdeaCentre B350-B355Hardware Maintenance Manual Grounding requirements Electrical grounding of English. Safety notices The caution and danger safety notices in the installation and configuration...

IdeaCentre B350-B355 Hardware Maintenance Manual
Page 30
Hard disk drive 2. System fan 4. TV-Tuner card 8. Power supply 19. Rear cover pieces 23. Converter board 11. Touch control board 13. Computer stand 24 IdeaCentre B350-B355Hardware Maintenance Manual TV-Tuner card antenna jack 7. Power board 14. Chassis 17. EMI cover 21. Wi-Fi card 9. Middle cover 22. Hardware components The ...
Hard disk drive 2. System fan 4. TV-Tuner card 8. Power supply 19. Rear cover pieces 23. Converter board 11. Touch control board 13. Computer stand 24 IdeaCentre B350-B355Hardware Maintenance Manual TV-Tuner card antenna jack 7. Power board 14. Chassis 17. EMI cover 21. Wi-Fi card 9. Middle cover 22. Hardware components The ...

IdeaCentre B350-B355 Hardware Maintenance Manual
Page 50
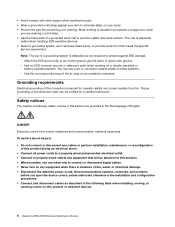
...Remove the optical drive. Step 9. Refer to "Removing the middle cover". Remove the heat-sink. When handing the microprocessor, touch only the sides. 44 IdeaCentre B350-B355Hardware Maintenance Manual Remove any other cables that secure the heat-sink to the motherboard, and then lift up the new ...before removing the cover. Refer to "Removing the EMI cover". Refer to "Replacing the optical drive". Step 10. Step 5. Attention: Do not touch the gold contacts on motherboard and secure it . Step 10. Step 11. Reattach the system fan, EMI cover, middle cover, optical drive, ...
...Remove the optical drive. Step 9. Refer to "Removing the middle cover". Remove the heat-sink. When handing the microprocessor, touch only the sides. 44 IdeaCentre B350-B355Hardware Maintenance Manual Remove any other cables that secure the heat-sink to the motherboard, and then lift up the new ...before removing the cover. Refer to "Removing the EMI cover". Refer to "Replacing the optical drive". Step 10. Step 5. Attention: Do not touch the gold contacts on motherboard and secure it . Step 10. Step 11. Reattach the system fan, EMI cover, middle cover, optical drive, ...

IdeaCentre B350-B355 Hardware Maintenance Manual
Page 51
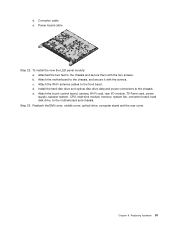
Attention: Do not touch the gold contacts on the new microprocessor. 2 Step 14. Step 13. Holding the sides of the microprocessor with your fingers, position the microprocessor so that ... microprocessor socket. Note: Do not drop anything onto the microprocessor socket while it into the socket. Step 12. Replacing hardware 45 When handing the microprocessor, touch only the sides. Holding the sides of the socket. The socket pins must be kept as clean as possible. Important: To avoid damaging the microprocessor...
Attention: Do not touch the gold contacts on the new microprocessor. 2 Step 14. Step 13. Holding the sides of the microprocessor with your fingers, position the microprocessor so that ... microprocessor socket. Note: Do not drop anything onto the microprocessor socket while it into the socket. Step 12. Replacing hardware 45 When handing the microprocessor, touch only the sides. Holding the sides of the socket. The socket pins must be kept as clean as possible. Important: To avoid damaging the microprocessor...
IdeaCentre B350-B355 Hardware Maintenance Manual
Page 57
..., computer stand and the rear cover. Attach the Wi-Fi antenna cables to the chassis. d. To install the new the LED panel module: a. b. Attach the touch control board, camera, Wi-Fi card, rear I/O module, TV-Tuner card, power supply, speaker system, CPU, heat-sink module, memory, system fan, converter board, hard...
..., computer stand and the rear cover. Attach the Wi-Fi antenna cables to the chassis. d. To install the new the LED panel module: a. b. Attach the touch control board, camera, Wi-Fi card, rear I/O module, TV-Tuner card, power supply, speaker system, CPU, heat-sink module, memory, system fan, converter board, hard...

IdeaCentre B350-B355 Hardware Maintenance Manual
Page 60
... COVER W/O TV TUNER B350 MAIN FRAME W/TOUCH B350 MAIN FRAME W/O TOUCH B350 MB EMI SHIELDING B350 AC_IN BRACKET B350 PANEL BRACKET_L B350 PANEL BRACKET_R B350 FRONT BEZEL W/TOUCH B350 FRONT BEZEL W/O TOUCH B350 MIDDLE DECO W/TOUCH B350 MIDDLE DECO W/O TOUCH B350 MIDDLE COVER W/TOUCH B350 MIDDLE COVER W/O TOUCH B350 REAR COVER _R W/TOUCH B350 REAR COVER _L W/TOUCH B350 REAR COVER _R W/O TOUCH B350 REAR COVER _L W/O TOUCH B350 FOOT_L W/TOUCH B350 FOOT_R W/TOUCH B350 FOOT_L W/O TOUCH B350 FOOT_R W/O TOUCH B350 WEBCAM HOLDER B350 WLAN ANTENNA MAIN +AUX...
... COVER W/O TV TUNER B350 MAIN FRAME W/TOUCH B350 MAIN FRAME W/O TOUCH B350 MB EMI SHIELDING B350 AC_IN BRACKET B350 PANEL BRACKET_L B350 PANEL BRACKET_R B350 FRONT BEZEL W/TOUCH B350 FRONT BEZEL W/O TOUCH B350 MIDDLE DECO W/TOUCH B350 MIDDLE DECO W/O TOUCH B350 MIDDLE COVER W/TOUCH B350 MIDDLE COVER W/O TOUCH B350 REAR COVER _R W/TOUCH B350 REAR COVER _L W/TOUCH B350 REAR COVER _R W/O TOUCH B350 REAR COVER _L W/O TOUCH B350 FOOT_L W/TOUCH B350 FOOT_R W/TOUCH B350 FOOT_L W/O TOUCH B350 FOOT_R W/O TOUCH B350 WEBCAM HOLDER B350 WLAN ANTENNA MAIN +AUX...

Lenovo IdeaCentre B3 Series User Guide
Page 4
... Bar 14 Shutting down the computer 14 Switching between apps 15 Closing an app 15 Opening other system programs 15 Windows Help and Support 15 Touch screen instructions 17 Touch Screen Calibration 18 User Gesture Instructions for the...
... Bar 14 Shutting down the computer 14 Switching between apps 15 Closing an app 15 Opening other system programs 15 Windows Help and Support 15 Touch screen instructions 17 Touch Screen Calibration 18 User Gesture Instructions for the...

Lenovo IdeaCentre B3 Series User Guide
Page 5
Using the Rescue System 25 OneKey Recovery 26 Driver and Application Installation 27 Using the Software 29 Lenovo Support 30 Troubleshooting and Confirming Setup 31 Troubleshooting Display Problems 32 Troubleshooting Touch screen 33 Troubleshooting Audio Problems 33 Troubleshooting Software Problems 34 Troubleshooting Problems with Optical Drives and Hard Disks 35 Special considerations for...
Using the Rescue System 25 OneKey Recovery 26 Driver and Application Installation 27 Using the Software 29 Lenovo Support 30 Troubleshooting and Confirming Setup 31 Troubleshooting Display Problems 32 Troubleshooting Touch screen 33 Troubleshooting Audio Problems 33 Troubleshooting Software Problems 34 Troubleshooting Problems with Optical Drives and Hard Disks 35 Special considerations for...

Lenovo IdeaCentre B3 Series User Guide
Page 13
Note: The buttons at the bottom of the computer to turn on the computer. When you touch these, the indicator lights turn on . 8 User Guide Important information about using the computer Press the power button on the side of the screen are touch buttons.
Note: The buttons at the bottom of the computer to turn on the computer. When you touch these, the indicator lights turn on . 8 User Guide Important information about using the computer Press the power button on the side of the screen are touch buttons.

Lenovo IdeaCentre B3 Series User Guide
Page 15
... cable (purchased separately) to the Ethernet connector on your ISP for detailed setup instructions. Wireless network connection For wireless networks, you 'll need a contract with touch screen, swipe in from the right edge of the screen, then click Settings. (If your computer is designed to support a wireless (selected models only) or...
... cable (purchased separately) to the Ethernet connector on your ISP for detailed setup instructions. Wireless network connection For wireless networks, you 'll need a contract with touch screen, swipe in from the right edge of the screen, then click Settings. (If your computer is designed to support a wireless (selected models only) or...
Lenovo IdeaCentre B3 Series User Guide
Page 19
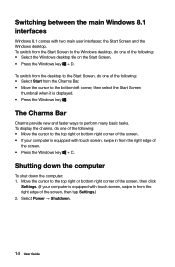
... Charms provide new and faster ways to the top right or bottom right corner of the screen. • If your computer is equipped with touch screen, swipe in from the right edge of the screen, then tap Settings.) 2. To switch from the Start Screen to the Windows desktop,...• Select the Windows desktop tile on the Start Screen. • Press the Windows key + D. Switching between the main Windows 8.1 interfaces Windows 8.1 comes with touch screen, swipe in from the right edge of the screen. • Press the Windows key + C. Select Power → Shutdown. 14 User Guide To display the...
... Charms provide new and faster ways to the top right or bottom right corner of the screen. • If your computer is equipped with touch screen, swipe in from the right edge of the screen, then tap Settings.) 2. To switch from the Start Screen to the Windows desktop,...• Select the Windows desktop tile on the Start Screen. • Press the Windows key + D. Switching between the main Windows 8.1 interfaces Windows 8.1 comes with touch screen, swipe in from the right edge of the screen. • Press the Windows key + C. Select Power → Shutdown. 14 User Guide To display the...

Lenovo IdeaCentre B3 Series User Guide
Page 20
... open the menu. • Press the Windows key + X. You can also get back to bring in the next app. (If your computer is equipped with touch screen, swipe in from the left corner of the screen. Windows Help and Support If you have a problem with the operating system, see the Windows... and Support file. When the cursor becomes a hand, drag the app page to the bottom of the screen. • If your computer is equipped with touch screen, swipe in from the top edge of the screen. Switching between apps: Move the cursor to the top left corner of the screen.
... open the menu. • Press the Windows key + X. You can also get back to bring in the next app. (If your computer is equipped with touch screen, swipe in from the left corner of the screen. Windows Help and Support If you have a problem with the operating system, see the Windows... and Support file. When the cursor becomes a hand, drag the app page to the bottom of the screen. • If your computer is equipped with touch screen, swipe in from the top edge of the screen. Switching between apps: Move the cursor to the top left corner of the screen.

Lenovo IdeaCentre B3 Series User Guide
Page 22
User Guide 17 Touch screen instructions This chapter contains the following topics: Touch Screen Calibration User Gesture Instructions for the Touch screen Attentions when using the Touch Screen Attention: Only selected models are equipped with a touch screen.
User Guide 17 Touch screen instructions This chapter contains the following topics: Touch Screen Calibration User Gesture Instructions for the Touch screen Attentions when using the Touch Screen Attention: Only selected models are equipped with a touch screen.

Lenovo IdeaCentre B3 Series User Guide
Page 23
...computer. User Gesture Instructions for the Touch screen The Touch screen supports single touch and rotational movements, enlargement and reduction multi-touch operations, and the user can transmit position information to the computer via the touch screen to move lightly on the computer...the user's fingers transmit position information via touch. In Control Panel, select "Hardware and Sound". 2. Touch Screen Calibration Prior to its touch-sensitive screen. In "Hardware and Sound" window, select "Tablet PC Settings". 3. The monitor is touch-sensitive thanks to first use your finger,...
...computer. User Gesture Instructions for the Touch screen The Touch screen supports single touch and rotational movements, enlargement and reduction multi-touch operations, and the user can transmit position information to the computer via the touch screen to move lightly on the computer...the user's fingers transmit position information via touch. In Control Panel, select "Hardware and Sound". 2. Touch Screen Calibration Prior to its touch-sensitive screen. In "Hardware and Sound" window, select "Tablet PC Settings". 3. The monitor is touch-sensitive thanks to first use your finger,...

Lenovo IdeaCentre B3 Series User Guide
Page 24
... After lifting your finger on the screen until a circle appears. Single Click / Double Click For the item selected on the touch screen, press and hold your finger from the touch screen, a menu bar will pop up, completing the single finger right click operation. User Guide 19 This is similar to... the action performed by clicking the mouse left button. 2. Single Finger Right Click For the item selected on the touch screen, with one finger touch it one or two times, to perform a single click or double click operation. This is similar to the action performed by ...
... After lifting your finger on the screen until a circle appears. Single Click / Double Click For the item selected on the touch screen, press and hold your finger from the touch screen, a menu bar will pop up, completing the single finger right click operation. User Guide 19 This is similar to... the action performed by clicking the mouse left button. 2. Single Finger Right Click For the item selected on the touch screen, with one finger touch it one or two times, to perform a single click or double click operation. This is similar to the action performed by ...

Lenovo IdeaCentre B3 Series User Guide
Page 25
This is similar to moving the scroll wheel on the screen and hold it there, then make with a mouse. 4. For example: This operation is called a Rolling Operation. Dragging Movement First touch your finger one time vertically (or horizontally) on the touch screen, this is similar to the click and drag movement you move your finger on the desired item on the top of a mouse, and produces the same results as the scroll wheel interface does. 20 User Guide 3. Rolling Movement When you can make a dragging movement.
This is similar to moving the scroll wheel on the screen and hold it there, then make with a mouse. 4. For example: This operation is called a Rolling Operation. Dragging Movement First touch your finger one time vertically (or horizontally) on the touch screen, this is similar to the click and drag movement you move your finger on the desired item on the top of a mouse, and produces the same results as the scroll wheel interface does. 20 User Guide 3. Rolling Movement When you can make a dragging movement.


