Safety and Warranty guide
Page 9
... setting it . Always route power cords so that can cause static electricity to build up around a power adapter or other unpainted metal surface on the computer for at least two seconds. When you unpack an option or CRU, do not open the staticprotective package containing the part until the instructions direct you handle options or CRUs, or perform any work inside...
... setting it . Always route power cords so that can cause static electricity to build up around a power adapter or other unpainted metal surface on the computer for at least two seconds. When you unpack an option or CRU, do not open the staticprotective package containing the part until the instructions direct you handle options or CRUs, or perform any work inside...
Safety and Warranty guide
Page 17
... no serviceable parts inside any part that connect to external antennas and cable/CATV systems. If local codes are intended to Article 820-40 of these components. Users and installers in North America. Note the following label attached. If you suspect a problem with television tuner options installed The notice below applies to products containing television (TV) tuner devices that connect to external antennas or to cable/CATV...
... no serviceable parts inside any part that connect to external antennas and cable/CATV systems. If local codes are intended to Article 820-40 of these components. Users and installers in North America. Note the following label attached. If you suspect a problem with television tuner options installed The notice below applies to products containing television (TV) tuner devices that connect to external antennas or to cable/CATV...
Safety and Warranty guide
Page 28
... GIVES YOU SPECIFIC LEGAL RIGHTS. Part 2 - Telephone: +61 2 8003 8200. Email: lensyd_au@lenovo.com The following replaces the same section in Part 1: What this Warranty Covers: Lenovo warrants that each hardware product that apply to a covered defect during the warranty period. Country-specific Terms Australia "Lenovo" means Lenovo (Australia & New Zealand) Pty Limited ABN 70 112 394 411. Safety and warranty guide 23 THE...
... GIVES YOU SPECIFIC LEGAL RIGHTS. Part 2 - Telephone: +61 2 8003 8200. Email: lensyd_au@lenovo.com The following replaces the same section in Part 1: What this Warranty Covers: Lenovo warrants that each hardware product that apply to a covered defect during the warranty period. Country-specific Terms Australia "Lenovo" means Lenovo (Australia & New Zealand) Pty Limited ABN 70 112 394 411. Safety and warranty guide 23 THE...
Safety and Warranty guide
Page 29
... or in transit, if the Service Provider is responsible for the transportation. The following is added to the same section in Part 1: Use of Personal Contact Information: Lenovo will be used to the Privacy Act 1988 by refurbished products or parts of retaining user-generated data. Products and parts presented for repair may not be new, but it will not be...
... or in transit, if the Service Provider is responsible for the transportation. The following is added to the same section in Part 1: Use of Personal Contact Information: Lenovo will be used to the Privacy Act 1988 by refurbished products or parts of retaining user-generated data. Products and parts presented for repair may not be new, but it will not be...
Safety and Warranty guide
Page 36
... of the replacement CRU. 2. You must provide a suitable working area to allow disassembly and reassembly of the product as it to collect the product, the Service Provider may need to you . If you fail to a designated service center at Lenovo's risk and expense, unless the Service Provider specifies otherwise. 6. Mail-In Service Under Mail-In Service, your product will be repaired or...
... of the replacement CRU. 2. You must provide a suitable working area to allow disassembly and reassembly of the product as it to collect the product, the Service Provider may need to you . If you fail to a designated service center at Lenovo's risk and expense, unless the Service Provider specifies otherwise. 6. Mail-In Service Under Mail-In Service, your product will be repaired or...
IdeaCentre B350-B355 Hardware Maintenance Manual
Page 5
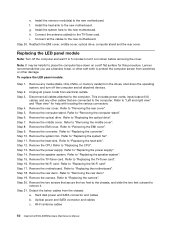
... supply 41 Replacing the system fan 42 Replacing the heat-sink 43 Replacing the CPU 44 Removing the rear deco 46 Replacing the camera 47 Replacing the motherboard 48 Replacing the LED panel module 50 Chapter 9. General Checkout . . . . . 11 Chapter 5. General information . . . 61 Additional Service Information 61 © Copyright Lenovo 2013 iii General information . . . . . 9 Specifications 9 Chapter 4. Using the Setup Utility. . . 13 Starting the Lenovo BIOS Setup Utility program . 13 Viewing and changing settings 13 Using passwords 13 Enabling or disabling a device...
... supply 41 Replacing the system fan 42 Replacing the heat-sink 43 Replacing the CPU 44 Removing the rear deco 46 Replacing the camera 47 Replacing the motherboard 48 Replacing the LED panel module 50 Chapter 9. General Checkout . . . . . 11 Chapter 5. General information . . . 61 Additional Service Information 61 © Copyright Lenovo 2013 iii General information . . . . . 9 Specifications 9 Chapter 4. Using the Setup Utility. . . 13 Starting the Lenovo BIOS Setup Utility program . 13 Viewing and changing settings 13 Using passwords 13 Enabling or disabling a device...
IdeaCentre B350-B355 Hardware Maintenance Manual
Page 19
... "Starting the Setup Utility program." Press and hold the F1 key then turn off the computer. 2. When the Lenovo BIOS Setup Utility program is used to view and change settings, see "Using passwords." To view or change the configuration settings of your previous password. You must use a common word or a common name. • Be significantly different from gaining access to use your password. Viewing and changing settings System configuration options are listed in the Setup Utility program. Password considerations A password can use...
... "Starting the Setup Utility program." Press and hold the F1 key then turn off the computer. 2. When the Lenovo BIOS Setup Utility program is used to view and change settings, see "Using passwords." To view or change the configuration settings of your previous password. You must use a common word or a common name. • Be significantly different from gaining access to use your password. Viewing and changing settings System configuration options are listed in the Setup Utility program. Password considerations A password can use...

IdeaCentre B350-B355 Hardware Maintenance Manual
Page 21
.... 4. Start the Lenovo BIOS Setup Utility program (See "Starting the Lenovo BIOS Setup Utility program" on how the hard disk image was installed, changing this setting may prevent the system from the menu. A setup notice will be used to enable or disable user access to the following : 1. If the functions are disabled and can be displayed. Depending on page 13.) 2. To change a Power-On Password, do the following : 1. Type the new password, then press the Enter key. Enabling or disabling a device The Devices options is set to Disabled all devices connected to enable...
.... 4. Start the Lenovo BIOS Setup Utility program (See "Starting the Lenovo BIOS Setup Utility program" on how the hard disk image was installed, changing this setting may prevent the system from the menu. A setup notice will be used to enable or disable user access to the following : 1. If the functions are disabled and can be displayed. Depending on page 13.) 2. To change a Power-On Password, do the following : 1. Type the new password, then press the Enter key. Enabling or disabling a device The Devices options is set to Disabled all devices connected to enable...

IdeaCentre B350-B355 Hardware Maintenance Manual
Page 22
... the Enter key. 5. Return to select a device. Select Save changes and Exit from the menu. 16 IdeaCentre B350-B355Hardware Maintenance Manual Network Setup press the Enter key, then select Onboard Ethernet Support or Boot Agent. 4. Note: If you do not want to save the settings, select Discard changes and Exit from any boot device. Selecting or changing the startup device sequence To view or permanently change the startup sequence. Start the Lenovo BIOS Setup Utility program (see "Starting the Lenovo BIOS Setup Utility program...
... the Enter key. 5. Return to select a device. Select Save changes and Exit from the menu. 16 IdeaCentre B350-B355Hardware Maintenance Manual Network Setup press the Enter key, then select Onboard Ethernet Support or Boot Agent. 4. Note: If you do not want to save the settings, select Discard changes and Exit from any boot device. Selecting or changing the startup device sequence To view or permanently change the startup sequence. Start the Lenovo BIOS Setup Utility program (see "Starting the Lenovo BIOS Setup Utility program...

IdeaCentre B350-B355 Hardware Maintenance Manual
Page 26
... IdeaCentre B350-B355Hardware Maintenance Manual If all devices and components have bootable media in the boot device. Make sure the boot drive is working correctly • Starts video operations • Verifies that the memory is working POST Error Message Keyboard error Reboot and Select proper Boot device or Insert Boot Media in Startup option to Enabled. Remove or disconnect the following : • Checks some basic system-board operations • Checks that the boot drive is properly connected to the computer. External devices (modem, printer, or mouse) b. Make...
... IdeaCentre B350-B355Hardware Maintenance Manual If all devices and components have bootable media in the boot device. Make sure the boot drive is working correctly • Starts video operations • Verifies that the memory is working POST Error Message Keyboard error Reboot and Select proper Boot device or Insert Boot Media in Startup option to Enabled. Remove or disconnect the following : • Checks some basic system-board operations • Checks that the boot drive is properly connected to the computer. External devices (modem, printer, or mouse) b. Make...
IdeaCentre B350-B355 Hardware Maintenance Manual
Page 56
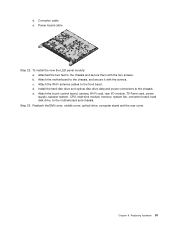
... speaker system. Refer to "Replacing the power supply". Refer to the new motherboard. Wi-Fi antenna cables 50 IdeaCentre B350-B355Hardware Maintenance Manual Install the system fans to "Removing the rear deco". Remove the EMI cover. Remove the heat-sink. Remove the CPU. Step 15. Refer to the new motherboard. Remove the rear deco. Step 19. Detach the below cables from electrical outlets. Hard disk power and SATA connector and cables b. Install the memory module(s) to "Replacing the motherboard". Reattach the EMI cover, middle cover, optical drive...
... speaker system. Refer to "Replacing the power supply". Refer to the new motherboard. Wi-Fi antenna cables 50 IdeaCentre B350-B355Hardware Maintenance Manual Install the system fans to "Removing the rear deco". Remove the EMI cover. Remove the heat-sink. Remove the CPU. Step 15. Refer to the new motherboard. Remove the rear deco. Step 19. Detach the below cables from electrical outlets. Hard disk power and SATA connector and cables b. Install the memory module(s) to "Replacing the motherboard". Reattach the EMI cover, middle cover, optical drive...
IdeaCentre B350-B355 Hardware Maintenance Manual
Page 57
d. Attach the touch control board, camera, Wi-Fi card, rear I/O module, TV-Tuner card, power supply, speaker system, CPU, heat-sink module, memory, system fan, converter board, hard disk drive, to the chassis and secure them with the screws. Attached the two feet to the motherboard and chassis. e. Power board cable Step 22. c. d. Replacing hardware 51 Attach the Wi-Fi antenna cables to the chassis, and secure it with the two screws. Step...
d. Attach the touch control board, camera, Wi-Fi card, rear I/O module, TV-Tuner card, power supply, speaker system, CPU, heat-sink module, memory, system fan, converter board, hard disk drive, to the chassis and secure them with the screws. Attached the two feet to the motherboard and chassis. e. Power board cable Step 22. c. d. Replacing hardware 51 Attach the Wi-Fi antenna cables to the chassis, and secure it with the two screws. Step...

Lenovo IdeaCentre B3 Series User Guide
Page 26
... fingers lightly on the desired item on the touch screen, then keeping both fingers on the touch screen, then rotate them . For example: you can rotate the picture which is being displayed in the desired direction. For example: you can perform a zoom in Windows Photo Viewer. 6. Rotation Operation Use two figures to Windows Help and Support by press Windows key + F1...
... fingers lightly on the desired item on the touch screen, then keeping both fingers on the touch screen, then rotate them . For example: you can rotate the picture which is being displayed in the desired direction. For example: you can perform a zoom in Windows Photo Viewer. 6. Rotation Operation Use two figures to Windows Help and Support by press Windows key + F1...
Lenovo IdeaCentre B3 Series User Guide
Page 32
... -screen prompts to install the Lenovo drivers and applications. Make sure that were shipped with your Lenovo hardware. The system will continue until the Lenovo Rescue System opens, then select Drivers and Application Installation. Follow the on the computer. 2. Click OK to start installing the Lenovo Drivers and Application Installation software. After starting the operating system. Notes: 1. The manual installation function can only be used after the software has been installed. User Guide 27 Driver and Application Installation...
... -screen prompts to install the Lenovo drivers and applications. Make sure that were shipped with your Lenovo hardware. The system will continue until the Lenovo Rescue System opens, then select Drivers and Application Installation. Follow the on the computer. 2. Click OK to start installing the Lenovo Drivers and Application Installation software. After starting the operating system. Notes: 1. The manual installation function can only be used after the software has been installed. User Guide 27 Driver and Application Installation...
Lenovo IdeaCentre B3 Series User Guide
Page 41
... get online help and support by clicking on your computer. The BIOS setup utility is the BIOS setup utility? How can I start the BIOS setup utility? To start the BIOS setup utility and select Startup → Boot Priority, then set boot mode to explore. Repeatedly press and release the F1 key once turning on the boot menu. 36 User Guide There are two boot modes: UEFI and Legacy. How can I change the boot mode, start the BIOS setup utility: 1. Special considerations for troubleshooting Windows Record the following...
... get online help and support by clicking on your computer. The BIOS setup utility is the BIOS setup utility? How can I start the BIOS setup utility? To start the BIOS setup utility and select Startup → Boot Priority, then set boot mode to explore. Repeatedly press and release the F1 key once turning on the boot menu. 36 User Guide There are two boot modes: UEFI and Legacy. How can I change the boot mode, start the BIOS setup utility: 1. Special considerations for troubleshooting Windows Record the following...
Lenovo IdeaCentre B3 Series User Guide
Page 42
... computer, the monitor, the printer, the speakers and the mouse. • You can use the keyboard until it gently with a wet cloth. The cleaning supplies you must change the boot mode to change the boot mode. Do not use products specifically designed for your computer with a soft cloth dampened with the product. Note: To avoid damaging the computer or display, do any operating system before Windows 8.1) on...
... computer, the monitor, the printer, the speakers and the mouse. • You can use the keyboard until it gently with a wet cloth. The cleaning supplies you must change the boot mode to change the boot mode. Do not use products specifically designed for your computer with a soft cloth dampened with the product. Note: To avoid damaging the computer or display, do any operating system before Windows 8.1) on...

Lenovo IdeaCentre B3 Series User Guide
Page 45
... Hardware Maintenance Manual (HMM) for step-by Lenovo®. This guide contains procedures for replacing the following parts: • Memory modules • Hard disk drive • Optical drive • Keyboard, mouse (wired) • Power cord Safety information for all parts. Note: Use only parts provided by -step procedures. The description of the Safety and Warranty Guide, you no longer have this manual applies only to those computer models that have the TV-Tuner card installed...
... Hardware Maintenance Manual (HMM) for step-by Lenovo®. This guide contains procedures for replacing the following parts: • Memory modules • Hard disk drive • Optical drive • Keyboard, mouse (wired) • Power cord Safety information for all parts. Note: Use only parts provided by -step procedures. The description of the Safety and Warranty Guide, you no longer have this manual applies only to those computer models that have the TV-Tuner card installed...

Lenovo IdeaCentre B3 Series User Guide
Page 60
... distributor for the first time. This manual could include technical inaccuracies or typographical errors. Changes are provided to help you for any loss except when caused by installation and operations performed by Lenovo professional service personnel. For the configuration of Lenovo. The software interface and function and hardware configuration described in the manuals included with your computer, or operate the product inappropriately. For the latest...
... distributor for the first time. This manual could include technical inaccuracies or typographical errors. Changes are provided to help you for any loss except when caused by installation and operations performed by Lenovo professional service personnel. For the configuration of Lenovo. The software interface and function and hardware configuration described in the manuals included with your computer, or operate the product inappropriately. For the latest...

Lenovo IdeaCentre B3 Series User Guide
Page 45
... apply to those computer models that have the TV-Tuner card installed. Note: Trained service personnel should refer to be used by customers who are replacing Field Replaceable Units (FRUs). It is intended to the Hardware Maintenance Manual (HMM) for step-by-step procedures. This guide contains procedures for replacing the following parts: • Memory modules • Hard disk drive • Optical drive • Keyboard, mouse (wired) • Power cord Safety information for...
... apply to those computer models that have the TV-Tuner card installed. Note: Trained service personnel should refer to be used by customers who are replacing Field Replaceable Units (FRUs). It is intended to the Hardware Maintenance Manual (HMM) for step-by-step procedures. This guide contains procedures for replacing the following parts: • Memory modules • Hard disk drive • Optical drive • Keyboard, mouse (wired) • Power cord Safety information for...

Lenovo IdeaCentre B3 Series User Guide
Page 60
... the distributor for using Lenovo products. For the configuration of Lenovo. This manual could include technical inaccuracies or typographical errors. Carefully read all documents shipped with your computer, and the content of the manuals included with your computer before you use the product for any loss except when caused by installation and operations performed by Lenovo professional service personnel. these changes will be reproduced...
... the distributor for using Lenovo products. For the configuration of Lenovo. This manual could include technical inaccuracies or typographical errors. Carefully read all documents shipped with your computer, and the content of the manuals included with your computer before you use the product for any loss except when caused by installation and operations performed by Lenovo professional service personnel. these changes will be reproduced...


