

User Manual
Page 2
... Systems Inc. • SD and SDHC Logos are trademarks of SD-3C, LLC. • PictBridge is a trademark. • All other trade names mentioned in this manual or the other documentation provided with your Nikon product are trademarks or registered trademarks of their respective holders.
... Systems Inc. • SD and SDHC Logos are trademarks of SD-3C, LLC. • PictBridge is a trademark. • All other trade names mentioned in this manual or the other documentation provided with your Nikon product are trademarks or registered trademarks of their respective holders.
User Manual
Page 9
Table of Contents For Your Safety...ii WARNINGS...ii Notices ...v Introduction ...1 About This Manual ...1 Information and Precautions...2 Parts of the Camera...4 The Camera Body ...4 The Monitor...6 Main Features of the Operation Controls 8 Common Menu Operations...10 Switching Between Tabs......
Table of Contents For Your Safety...ii WARNINGS...ii Notices ...v Introduction ...1 About This Manual ...1 Information and Precautions...2 Parts of the Camera...4 The Camera Body ...4 The Monitor...6 Main Features of the Operation Controls 8 Common Menu Operations...10 Switching Between Tabs......
User Manual
Page 13
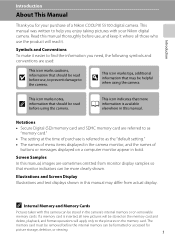
...read before use , to prevent damage to the pictures on a computer monitor appear in the camera monitor, and the names of a Nikon COOLPIX S5100 digital camera. This icon marks notes, C information that more clearly shown. Notations • Secure Digital (SD) memory card and SDHC memory ...card are sometimes omitted from actual display. If a memory card is referred to help you enjoy taking pictures with this manual. Illustrations and Screen Display Illustrations and text displays shown in this camera can be removed before using the camera. The memory card must...
...read before use , to prevent damage to the pictures on a computer monitor appear in the camera monitor, and the names of a Nikon COOLPIX S5100 digital camera. This icon marks notes, C information that more clearly shown. Notations • Secure Digital (SD) memory card and SDHC memory ...card are sometimes omitted from actual display. If a memory card is referred to help you enjoy taking pictures with this manual. Illustrations and Screen Display Illustrations and text displays shown in this camera can be removed before using the camera. The memory card must...
User Manual
Page 14
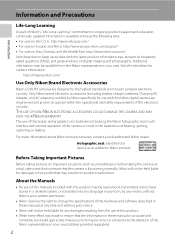
...means, without Nikon's prior written permission. • Nikon reserves the right to change the specifications of the hardware and software described in these manuals at any time and without prior notice. • Nikon will not be held liable for any errors or omissions to the attention of the ... representative in your area. Holographic seal: Identifies this product. • While every effort was made to ensure that the information in these manuals is accurate and complete, we would appreciate it were you to bring any damages resulting from the use of third-party rechargeable Li-ion ...
...means, without Nikon's prior written permission. • Nikon reserves the right to change the specifications of the hardware and software described in these manuals at any time and without prior notice. • Nikon will not be held liable for any errors or omissions to the attention of the ... representative in your area. Holographic seal: Identifies this product. • While every effort was made to ensure that the information in these manuals is accurate and complete, we would appreciate it were you to bring any damages resulting from the use of third-party rechargeable Li-ion ...

User Manual
Page 18
... mode 22, 51, 64, 67 17 Aperture 26 2 Macro mode 33 18 Focus area (auto 26, 45 3 Zoom indicator 25, 33 19 Focus area (for manual or center) ..... 45 4 Focus indicator 26 20 Focus area (face detection 45, 64 5 AE/AF-L indicator 63 6 Flash mode 30 7 Battery level indicator 22 8 Vibration...
... mode 22, 51, 64, 67 17 Aperture 26 2 Macro mode 33 18 Focus area (auto 26, 45 3 Zoom indicator 25, 33 19 Focus area (for manual or center) ..... 45 4 Focus indicator 26 20 Focus area (face detection 45, 64 5 AE/AF-L indicator 63 6 Flash mode 30 7 Battery level indicator 22 8 Vibration...
User Manual
Page 51
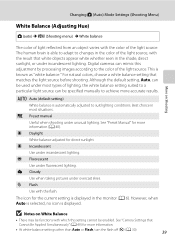
... This is automatically adjusted to achieve more accurate results. a Auto (default setting) White balance is known as "white balance." b Preset manual Useful when shooting under fluorescent lighting. c Daylight White balance adjusted for more information (A 40). The icon for more information. • ...At white-balance settings other than Auto or Flash, turn the flash off (W) (A 30). 39 See "Preset Manual" for the current setting is displayed. g Flash Use with the flash. See "Camera Settings that Cannot Be Applied Simultaneously" (A 49) for...
... This is automatically adjusted to achieve more accurate results. a Auto (default setting) White balance is known as "white balance." b Preset manual Useful when shooting under fluorescent lighting. c Daylight White balance adjusted for more information (A 40). The icon for more information. • ...At white-balance settings other than Auto or Flash, turn the flash off (W) (A 30). 39 See "Preset Manual" for the current setting is displayed. g Flash Use with the flash. See "Camera Settings that Cannot Be Applied Simultaneously" (A 49) for...
User Manual
Page 52
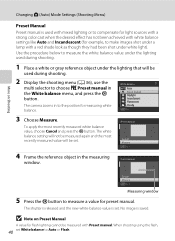
...reference object under the lighting that will be set. B Note on Shooting Changing A (Auto) Mode Settings (Shooting Menu) Preset Manual Preset manual is saved. Preset manual Cancel Measure Exit Measuring window 5 Press the k button to the position for measuring white balance. The white balance setting will be...look as though they had been shot under white light). Use the procedure below to make images shot under a lamp with Preset manual. Preset manual Cancel Measure Exit 4 Frame the reference object in the White balance menu, and press the k button. When shooting using the ...
...reference object under the lighting that will be set. B Note on Shooting Changing A (Auto) Mode Settings (Shooting Menu) Preset Manual Preset manual is saved. Preset manual Cancel Measure Exit Measuring window 5 Press the k button to the position for measuring white balance. The white balance setting will be...look as though they had been shot under white light). Use the procedure below to make images shot under a lamp with Preset manual. Preset manual Cancel Measure Exit 4 Frame the reference object in the White balance menu, and press the k button. When shooting using the ...
User Manual
Page 57
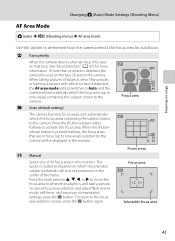
... focus area to where the subject is detected, the AF area mode setting switches to Auto, and the 9 camera will be displayed in the monitor. 9 x Manual Select one face is detected, the camera focuses on Shooting Changing A (Auto) Mode Settings (Shooting Menu) AF Area Mode A (auto) M d (Shooting menu) M AF area mode...
... focus area to where the subject is detected, the AF area mode setting switches to Auto, and the 9 camera will be displayed in the monitor. 9 x Manual Select one face is detected, the camera focuses on Shooting Changing A (Auto) Mode Settings (Shooting Menu) AF Area Mode A (auto) M d (Shooting menu) M AF area mode...

User Manual
Page 60
... factors, including the direction in which this occur, switch to A (auto) mode and set independently for movie recording can be set AF area mode to Manual or Center, refocus on another subject positioned at the center of the frame. • The camera's ability to detect faces depends on a variety of the...
... factors, including the direction in which this occur, switch to A (auto) mode and set independently for movie recording can be set AF area mode to Manual or Center, refocus on another subject positioned at the center of the frame. • The camera's ability to detect faces depends on a variety of the...
User Manual
Page 65
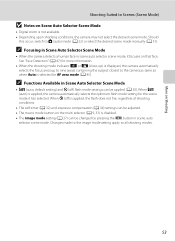
... occur, switch to all shooting modes. 53 Changes made to the image mode setting apply to A (auto) mode (A 22) or select the desired scene mode manually (A 51). See "Face Detection" (A 47) for more information. • When the shooting mode indicator d or i (close-up) is displayed, the camera automatically selects the focus...
... occur, switch to all shooting modes. 53 Changes made to the image mode setting apply to A (auto) mode (A 22) or select the desired scene mode manually (A 51). See "Face Detection" (A 47) for more information. • When the shooting mode indicator d or i (close-up) is displayed, the camera automatically selects the focus...

User Manual
Page 70
More on subjects as close as 4 cm (1.6 in.) from the lens. • AF area mode is set to Manual (A 45). Note that Vibration reduction (A 129) is enabled and hold the camera steadily. Press the k button again to where the subject is. When the zoom ... zoom is fully zoomed out, the camera can focus on the zoom position. Press the k button and then press H, I, J, or K to move the focus area manually to lock the selected focus area. Flash mode and exposure compensation settings can be adjusted and the self-timer can be enabled while the focus...
More on subjects as close as 4 cm (1.6 in.) from the lens. • AF area mode is set to Manual (A 45). Note that Vibration reduction (A 129) is enabled and hold the camera steadily. Press the k button again to where the subject is. When the zoom ... zoom is fully zoomed out, the camera can focus on the zoom position. Press the k button and then press H, I, J, or K to move the focus area manually to lock the selected focus area. Flash mode and exposure compensation settings can be adjusted and the self-timer can be enabled while the focus...
User Manual
Page 71
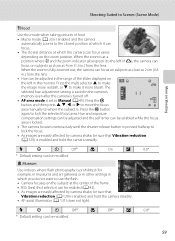
... the camera steadily. • AF-assist illuminator (A 131) does not light. X W n Off* p On o 0.0* * Default setting can be sure that Vibration reduction (A 129) is set to Manual (A 45). Hue and exposure compensation settings can be adjusted and the self-timer can be enabled while the focus area is locked. • The camera... subjects as close as 2 cm (0.8 in.) from the lens. When the zoom is at which it more reddish, or I , J, or K to move the focus 9 area manually to where the subject is enabled and hold the camera steadily.
... the camera steadily. • AF-assist illuminator (A 131) does not light. X W n Off* p On o 0.0* * Default setting can be sure that Vibration reduction (A 129) is set to Manual (A 45). Hue and exposure compensation settings can be adjusted and the self-timer can be enabled while the focus area is locked. • The camera... subjects as close as 2 cm (0.8 in.) from the lens. When the zoom is at which it more reddish, or I , J, or K to move the focus 9 area manually to where the subject is enabled and hold the camera steadily.
User Manual
Page 77
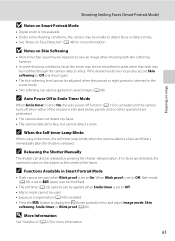
... parts other operations are performed. • The camera does not detect any faces. • The camera detected a face, but cannot detect a smile. C Releasing the Shutter Manually The shutter can also be used when Blink proof is enabled. • Press the d button to detect faces or detect smiles. • See "Notes on...
... parts other operations are performed. • The camera does not detect any faces. • The camera detected a face, but cannot detect a smile. C Releasing the Shutter Manually The shutter can also be used when Blink proof is enabled. • Press the d button to detect faces or detect smiles. • See "Notes on...
User Manual
Page 80
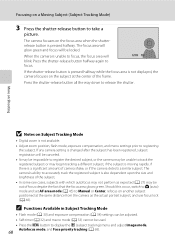
..., and Face priority tracking (A 69). The focus area will glow green and focus will blink. Press the shutter-release button all the way down to Manual or Center, refocus on another subject positioned at the center of the subject. • In some rare cases, subjects with which autofocus may be used...
..., and Face priority tracking (A 69). The focus area will glow green and focus will blink. Press the shutter-release button all the way down to Manual or Center, refocus on another subject positioned at the center of the subject. • In some rare cases, subjects with which autofocus may be used...
User Manual
Page 124
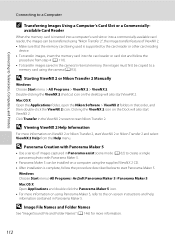
... with Panorama Maker 5 • Use a series of ViewNX 2. • Make sure that order, and then double-click the ViewNX 2 icon. D Starting ViewNX 2 or Nikon Transfer 2 Manually Windows Choose Start menu > All Programs > ViewNX 2 > ViewNX 2. Mac OS X Open the Applications folder, open the Nikon Software > ViewNX 2 folders in Panorama Maker 5. Windows Choose...
... with Panorama Maker 5 • Use a series of ViewNX 2. • Make sure that order, and then double-click the ViewNX 2 icon. D Starting ViewNX 2 or Nikon Transfer 2 Manually Windows Choose Start menu > All Programs > ViewNX 2 > ViewNX 2. Mac OS X Open the Applications folder, open the Nikon Software > ViewNX 2 folders in Panorama Maker 5. Windows Choose...
User Manual
Page 153
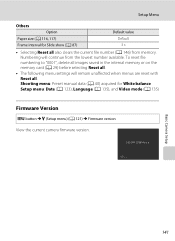
... camera firmware version. x Back Basic Camera Setup 141 Numbering will remain unaffected when menus are reset with Reset all. CO O L P I X S 5100 Ve r. Shooting menu: Preset manual data (A 40) acquired for Slide show (A 87) 3 s • Selecting Reset all . • The following menu settings will continue from memory. To reset file numbering to...
... camera firmware version. x Back Basic Camera Setup 141 Numbering will remain unaffected when menus are reset with Reset all. CO O L P I X S 5100 Ve r. Shooting menu: Preset manual data (A 40) acquired for Slide show (A 87) 3 s • Selecting Reset all . • The following menu settings will continue from memory. To reset file numbering to...
User Manual
Page 170
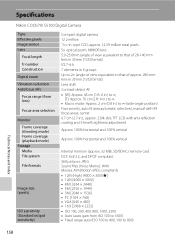
... to ∞ • Macro mode: Approx. 2 cm (0.8 in.) to ∞ (wide-angle position) Face priority, auto (9-area automatic selection), manual with anti-reflection coating and 5-level brightness adjustment Approx. 100% horizontal and 100% vertical Approx. 100% horizontal and 100% vertical Internal memory (approx. 32...Fixed range auto (ISO 100 to 400, 100 to 800) Technical Notes and Index 158 type CCD; Specifications Nikon COOLPIX S5100 Digital Camera Type Effective pixels Image sensor Lens Focal length f/-number Construction Digital zoom Vibration reduction Autofocus (AF) Focus range ...
... to ∞ • Macro mode: Approx. 2 cm (0.8 in.) to ∞ (wide-angle position) Face priority, auto (9-area automatic selection), manual with anti-reflection coating and 5-level brightness adjustment Approx. 100% horizontal and 100% vertical Approx. 100% horizontal and 100% vertical Internal memory (approx. 32...Fixed range auto (ISO 100 to 400, 100 to 800) Technical Notes and Index 158 type CCD; Specifications Nikon COOLPIX S5100 Digital Camera Type Effective pixels Image sensor Lens Focal length f/-number Construction Digital zoom Vibration reduction Autofocus (AF) Focus range ...
User Manual
Page 172
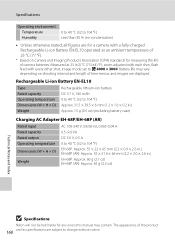
... Notes and Index B Specifications Nikon will not be held liable for any errors this product 160 and its specifications are displayed. The appearance of this manual may vary depending on Camera and Imaging Products Association (CIPA) standards for a camera with every other shot, image mode set to change without notice...
... Notes and Index B Specifications Nikon will not be held liable for any errors this product 160 and its specifications are displayed. The appearance of this manual may vary depending on Camera and Imaging Products Association (CIPA) standards for a camera with every other shot, image mode set to change without notice...

User Manual
Page 176
... 83 Playback mode 28 Playback zoom 75 Portrait b 54 Power 17, 18, 22 Power switch 8, 17, 18, 22 Power-on lamp 8, 17, 18, 22 Preset manual 40 Print 84, 116, 117 Print set 84 Print set date option 85, 86 Printer 114 Protect 88 Q Quick retouch 96 QVGA 104 R Rechargeable battery...
... 83 Playback mode 28 Playback zoom 75 Portrait b 54 Power 17, 18, 22 Power switch 8, 17, 18, 22 Power-on lamp 8, 17, 18, 22 Preset manual 40 Print 84, 116, 117 Print set 84 Print set date option 85, 86 Printer 114 Protect 88 Q Quick retouch 96 QVGA 104 R Rechargeable battery...
User Manual
Page 180
CT0G02(11) 6MM83811-02 No reproduction in any form of this manual, in whole or in part (except for brief quotation in critical articles or reviews), may be made without written authorization from NIKON CORPORATION.
CT0G02(11) 6MM83811-02 No reproduction in any form of this manual, in whole or in part (except for brief quotation in critical articles or reviews), may be made without written authorization from NIKON CORPORATION.


