
User Manual
Page 6
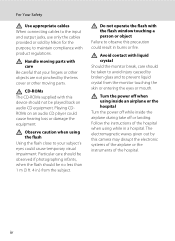
...or other moving parts with product regulations. Handle moving parts. Playing CDROMs on audio CD equipment. Particular care should be observed if photographing infants, when the flash should not be no less than 1 m (3 ft. 4 in a hospital. Do not operate the flash with the flash window touching a person ... glass and to your fingers or other objects are not pinched by this device should be played back on an audio CD player could cause temporary visual impairment. Turn the power off when using while in .) from the monitor touching the skin or entering the eyes or mouth.
...or other moving parts with product regulations. Handle moving parts. Playing CDROMs on audio CD equipment. Particular care should be observed if photographing infants, when the flash should not be no less than 1 m (3 ft. 4 in a hospital. Do not operate the flash with the flash window touching a person ... glass and to your fingers or other objects are not pinched by this device should be played back on an audio CD player could cause temporary visual impairment. Turn the power off when using while in .) from the monitor touching the skin or entering the eyes or mouth.
User Manual
Page 9
... Charging the Battery ...14 Turning On and Off the Camera...17 Setting Display Language, Date, and Time 18 Inserting Memory Cards ...20 Removing Memory Cards...20 Basic Photography and Playback: A (Auto) Mode 22 Step 1 Turn the Camera On and Select A (Auto) Mode 22 Indicators Displayed in A (Auto) Mode 23 Step 2 Frame a Picture ...24 Using the Zoom...25 Step 3 Focus and Shoot ...26 Step 4 Playing Back and Deleting Images 28 Playing Back Images (Playback Mode)...28 Deleting Unwanted Images...29 Using the Flash...
... Charging the Battery ...14 Turning On and Off the Camera...17 Setting Display Language, Date, and Time 18 Inserting Memory Cards ...20 Removing Memory Cards...20 Basic Photography and Playback: A (Auto) Mode 22 Step 1 Turn the Camera On and Select A (Auto) Mode 22 Indicators Displayed in A (Auto) Mode 23 Step 2 Frame a Picture ...24 Using the Zoom...25 Step 3 Focus and Shoot ...26 Step 4 Playing Back and Deleting Images 28 Playing Back Images (Playback Mode)...28 Deleting Unwanted Images...29 Using the Flash...
User Manual
Page 11
... Memory and Memory Card 93 Editing Images...94 Editing Functions ...94 Image Editing ...96 k Quick Retouch: Enhancing Contrast and Saturation 96 I D-Lighting: Enhancing Brightness and Contrast 97 e Skin Softening: Softening Skin Tones 98 g Small Picture: (Reducing Image Size 99 a Crop: Creating a Cropped Copy...100 Movie Recording and Playback 101 Recording Movies ...101 Changing Movie Recording Settings 103 Movie Options ...104 Autofocus Mode...105 Movie Playback ...106 Deleting...
... Memory and Memory Card 93 Editing Images...94 Editing Functions ...94 Image Editing ...96 k Quick Retouch: Enhancing Contrast and Saturation 96 I D-Lighting: Enhancing Brightness and Contrast 97 e Skin Softening: Softening Skin Tones 98 g Small Picture: (Reducing Image Size 99 a Crop: Creating a Cropped Copy...100 Movie Recording and Playback 101 Recording Movies ...101 Changing Movie Recording Settings 103 Movie Options ...104 Autofocus Mode...105 Movie Playback ...106 Deleting...
User Manual
Page 13
... buttons or messages displayed on the memory card. Illustrations and Screen Display Illustrations and text displays shown in the camera's internal memory or on the memory card and delete, playback, and format operations will read before the internal memory can be stored in this camera can be formatted or accessed for your Nikon digital camera. Read this manual. Introduction Introduction About This Manual Thank you enjoy taking pictures with this manual may be helpful when using...
... buttons or messages displayed on the memory card. Illustrations and Screen Display Illustrations and text displays shown in the camera's internal memory or on the memory card and delete, playback, and format operations will read before the internal memory can be stored in this camera can be formatted or accessed for your Nikon digital camera. Read this manual. Introduction Introduction About This Manual Thank you enjoy taking pictures with this manual may be helpful when using...
User Manual
Page 15
... issued cautions on copies or reproductions of securities issued by law from discarded storage devices using commercial deletion software, or format the device and then completely refill it with copyright notices The copying or reproduction of copyrighted creative works such as memory cards or built-in a foreign country is prohibited. Before discarding a data storage device or transferring ownership to another person, erase all data using commercially available software, potentially resulting in...
... issued cautions on copies or reproductions of securities issued by law from discarded storage devices using commercial deletion software, or format the device and then completely refill it with copyright notices The copying or reproduction of copyrighted creative works such as memory cards or built-in a foreign country is prohibited. Before discarding a data storage device or transferring ownership to another person, erase all data using commercially available software, potentially resulting in...

User Manual
Page 32
... power-on the memory card and data saved to turn off and open the batterychamber/memory card slot cover. Removing Memory Cards Turn the camera off and be sure that the memory card is inserted in the correct orientation. 3 Close the battery-chamber/memory card slot cover. Slide the memory card in the internal memory, or play back, delete, or transfer data from the internal memory. 1 Be sure that the battery and memory card may become hot during use; A 145). First Steps 2 Insert...
... power-on the memory card and data saved to turn off and open the batterychamber/memory card slot cover. Removing Memory Cards Turn the camera off and be sure that the memory card is inserted in the correct orientation. 3 Close the battery-chamber/memory card slot cover. Slide the memory card in the internal memory, or play back, delete, or transfer data from the internal memory. 1 Be sure that the battery and memory card may become hot during use; A 145). First Steps 2 Insert...
User Manual
Page 33
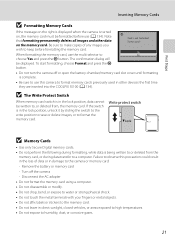
... save or delete images, or to a computer. To start formatting, choose Format and press the k button. Remove the battery or memory card - Note that formatting permanently deletes all images and other devices the first time they are inserted into the COOLPIX S5100 (A 134). Write protect switch B Memory Cards • Use only Secure Digital memory cards. • Do not perform the following during data transfer to format the memory card. Turn off or open the battery-chamber/memory card slot cover until formatting is not formatted...
... save or delete images, or to a computer. To start formatting, choose Format and press the k button. Remove the battery or memory card - Note that formatting permanently deletes all images and other devices the first time they are inserted into the COOLPIX S5100 (A 134). Write protect switch B Memory Cards • Use only Secure Digital memory cards. • Do not perform the following during data transfer to format the memory card. Turn off or open the battery-chamber/memory card slot cover until formatting is not formatted...
User Manual
Page 45
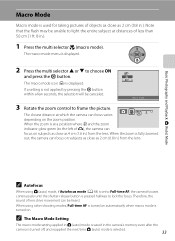
... (to frame the picture. When the zoom is selected. 33 C The Macro Mode Setting The macro mode setting applied in A (auto) mode is saved in the camera's memory even after the camera is turned off, and reapplied the next time A (auto) mode is fully zoomed out, the camera can focus on subjects as close as 2 cm (0.8 in .). 1 Press the multi selector p (macro mode). The macro mode icon (F) is not...
... (to frame the picture. When the zoom is selected. 33 C The Macro Mode Setting The macro mode setting applied in A (auto) mode is saved in the camera's memory even after the camera is turned off, and reapplied the next time A (auto) mode is fully zoomed out, the camera can focus on subjects as close as 2 cm (0.8 in .). 1 Press the multi selector p (macro mode). The macro mode icon (F) is not...

User Manual
Page 49
... using shooting modes other shooting modes. • This function cannot be used and the capacity of the internal memory or memory card. The higher the image mode setting, the larger the size at which images are saved. Smaller size than A (auto) mode, this setting can be changed by e-mail. See "Camera Settings that can be saved. More on Shooting Changing A (Auto) Mode Settings (Shooting Menu) Image Mode (Image Quality/Image Size) A (auto) M d (Shooting menu) M Image mode Image mode...
... using shooting modes other shooting modes. • This function cannot be used and the capacity of the internal memory or memory card. The higher the image mode setting, the larger the size at which images are saved. Smaller size than A (auto) mode, this setting can be changed by e-mail. See "Camera Settings that can be saved. More on Shooting Changing A (Auto) Mode Settings (Shooting Menu) Image Mode (Image Quality/Image Size) A (auto) M d (Shooting menu) M Image mode Image mode...
User Manual
Page 54
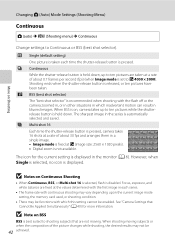
..., flash is disabled. B Notes on Shooting Changing A (Auto) Mode Settings (Shooting Menu) Continuous A (auto) M d (Shooting menu) M Continuous Change settings to shooting subjects that Cannot Be Applied Simultaneously" (A 49) for the current setting is displayed in each time the shutter-release button is pressed. U Single (default setting) One picture is taken each series. • The frame rate with continuous shooting may vary depending upon the current image mode setting, the memory card used, or...
..., flash is disabled. B Notes on Shooting Changing A (Auto) Mode Settings (Shooting Menu) Continuous A (auto) M d (Shooting menu) M Continuous Change settings to shooting subjects that Cannot Be Applied Simultaneously" (A 49) for the current setting is displayed in each time the shutter-release button is pressed. U Single (default setting) One picture is taken each series. • The frame rate with continuous shooting may vary depending upon the current image mode setting, the memory card used, or...
User Manual
Page 106
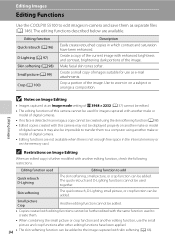
... editing functions of digital camera. Editing function used together. Skin softening The quick retouch, D-Lighting, small picture, or crop function can be used to create them as e-mail attachments. The editing functions described below are not available when there is not enough free space in the internal memory or on another make or model of digital camera. • Editing functions are available. Make facial skin tones softer. Editing...
... editing functions of digital camera. Editing function used together. Skin softening The quick retouch, D-Lighting, small picture, or crop function can be used to create them as e-mail attachments. The editing functions described below are not available when there is not enough free space in the internal memory or on another make or model of digital camera. • Editing functions are available. Make facial skin tones softer. Editing...
User Manual
Page 111
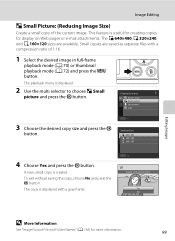
... sizes are saved as separate files with a gray frame. This feature is created. A new, small copy is useful for creating copies for more information. 99 Yes No Editing Images D More Information See "Image/Sound File and Folder Names" (A 146) for display on Web pages or e-mail attachments. Exit Create small picture file? Playback menu Rotate image Small picture Voice memo Copy 3 Choose the desired copy size and press the k button.
... sizes are saved as separate files with a gray frame. This feature is created. A new, small copy is useful for creating copies for more information. 99 Yes No Editing Images D More Information See "Image/Sound File and Folder Names" (A 146) for display on Web pages or e-mail attachments. Exit Create small picture file? Playback menu Rotate image Small picture Voice memo Copy 3 Choose the desired copy size and press the k button.
User Manual
Page 113
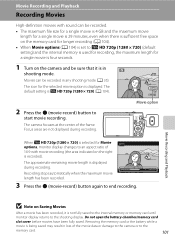
... is set to the memory card. 101 Removing the memory card or the battery while a movie is being saved may result in loss of the movie data or damage to the camera or to x HD 720p (1280 × 720) (default setting) and the internal memory is used for recording, the maximum length for a single movie is four seconds. 1 Turn on the camera and be recorded. • The maximum file...
... is set to the memory card. 101 Removing the memory card or the battery while a movie is being saved may result in loss of the movie data or damage to the camera or to x HD 720p (1280 × 720) (default setting) and the internal memory is used for recording, the maximum length for a single movie is four seconds. 1 Turn on the camera and be recorded. • The maximum file...
User Manual
Page 125
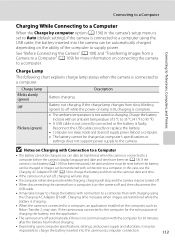
... to supply power. If the charge lamp changes from a computer, turn the camera off automatically if there is in the camera's setup menu is set to Auto (default setting), if the camera is connected to a computer before the battery can be charged or images can be automatically charged depending on Charging with Connection to a Computer • The battery cannot be charged, nor can data be transferred, when the camera is connected to a computer using the Charging AC...
... to supply power. If the charge lamp changes from a computer, turn the camera off automatically if there is in the camera's setup menu is set to Auto (default setting), if the camera is connected to a computer before the battery can be charged or images can be automatically charged depending on Charging with Connection to a Computer • The battery cannot be charged, nor can data be transferred, when the camera is connected to a computer using the Charging AC...
User Manual
Page 126
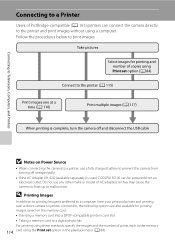
... USB cable B Notes on the memory card: • Inserting a memory card into a DPOF-compatible printer's card slot • Taking a memory card to a digital photo lab For printing using these methods, specify the images and the number of AC adapters as they may cause the camera to print images. Take pictures Select images for printing images saved on Power Source • When connecting the camera to a printer, use any other make...
... USB cable B Notes on the memory card: • Inserting a memory card into a DPOF-compatible printer's card slot • Taking a memory card to a digital photo lab For printing using these methods, specify the images and the number of AC adapters as they may cause the camera to print images. Take pictures Select images for printing images saved on Power Source • When connecting the camera to a printer, use any other make...
User Manual
Page 142
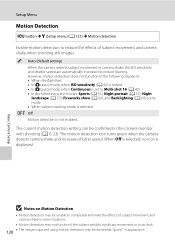
...), and Backlighting (A 60) scene mode • When subject tracking mode is selected k Off Motion detection is displayed. When Off is selected, no icon is not enabled. U Auto (default setting) When the camera detects subject movement or camera shake, the ISO sensitivity and shutter speed are automatically increased to reduce blurring. Basic Camera Setup Setup Menu Motion Detection d button M z (Setup menu) (A 121) M Motion detection Enable motion detection to reduce the...
...), and Backlighting (A 60) scene mode • When subject tracking mode is selected k Off Motion detection is displayed. When Off is selected, no icon is not enabled. U Auto (default setting) When the camera detects subject movement or camera shake, the ISO sensitivity and shutter speed are automatically increased to reduce blurring. Basic Camera Setup Setup Menu Motion Detection d button M z (Setup menu) (A 121) M Motion detection Enable motion detection to reduce the...

User Manual
Page 148
... the camera to a computer. Auto (default setting) When the camera is connected to a computer via the USB cable (A 113). B Notes on , turn the camera off and disconnect the USB cable. Basic Camera Setup Setup Menu Charge by Computer d button M z (Setup menu) (A 121) M Charge by computer Choose whether or not the battery inserted into the camera is charged when the camera is connected to a computer that is running, the battery inserted into the camera is not charged when the camera is connected...
... the camera to a computer. Auto (default setting) When the camera is connected to a computer via the USB cable (A 113). B Notes on , turn the camera off and disconnect the USB cable. Basic Camera Setup Setup Menu Charge by Computer d button M z (Setup menu) (A 121) M Charge by computer Choose whether or not the battery inserted into the camera is charged when the camera is connected to a computer that is running, the battery inserted into the camera is not charged when the camera is connected...
User Manual
Page 163
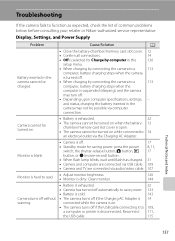
... setup menu. • When charging by connecting the camera to a 113 computer, battery charging stops when the camera is turned off. • When charging by computer in the camera may turn off if the USB cable connecting it to function as expected, check the list of common problems below before consulting your retailer or Nikon-authorized service representative. Troubleshooting If the camera fails to 109, a computer or printer is disconnected. Display, Settings, and Power...
... setup menu. • When charging by connecting the camera to a 113 computer, battery charging stops when the camera is turned off. • When charging by computer in the camera may turn off if the USB cable connecting it to function as expected, check the list of common problems below before consulting your retailer or Nikon-authorized service representative. Troubleshooting If the camera fails to 109, a computer or printer is disconnected. Display, Settings, and Power...
User Manual
Page 166
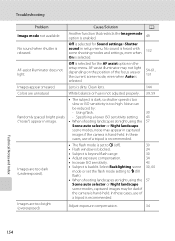
...: - Using flash. - Troubleshooting Problem Cause/Solution A Image mode not available. Off is selected for Sound settings>Shutter sound in the setup menu. Noise can be dark if the camera is recommended. 30 43 57 30 24 30 34 43 30, 60 57 Images are too bright (overexposed). In these cases, use of the focus area or the current scene mode, even when Auto is...
...: - Using flash. - Troubleshooting Problem Cause/Solution A Image mode not available. Off is selected for Sound settings>Shutter sound in the setup menu. Noise can be dark if the camera is recommended. 30 43 57 30 24 30 34 43 30, 60 57 Images are too bright (overexposed). In these cases, use of the focus area or the current scene mode, even when Auto is...
User Manual
Page 167
... images using another make of camera. • The COOLPIX S5100 is applied while shooting 31 31 54, 55, 66 Playback Problem File cannot be attached to images captured with red-eye reduction) • When the skin softening function is not able to play back voice memos. Use any scene mode other than Night portrait, and change the flash mode to any setting other than V (auto...
... images using another make of camera. • The COOLPIX S5100 is applied while shooting 31 31 54, 55, 66 Playback Problem File cannot be attached to images captured with red-eye reduction) • When the skin softening function is not able to play back voice memos. Use any scene mode other than Night portrait, and change the flash mode to any setting other than V (auto...


