
Owner's Manual
Page 7
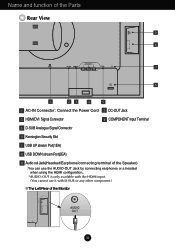
Name and function of the Parts Rear View 9 8 OUT AUDIO 2 1 COMPONENT AC-IN DC-OUT HDMI/DVI Y PB PR D-SUB 7 6 1 23 4 5 1 AC-IN Connector : Connect the Power Cord 2 DC-OUT Jack 3 HDMI/DVI Signal Connector 4 COMPONENT Input Terminal 5 D-SUB Analogue Signal Connector 6 Kensington Security Slot 7 USB UP ...terminal of the Speaker) : You can use the AUDIO-OUT Jack by connecting earphones or a headset when using the HDMI configuration.. *AUDIO-OUT is only available with the HDMI input. (You cannot use it with D-SUB or any other component.) The Left Rear of the Monitor OUT AUDIO...
Name and function of the Parts Rear View 9 8 OUT AUDIO 2 1 COMPONENT AC-IN DC-OUT HDMI/DVI Y PB PR D-SUB 7 6 1 23 4 5 1 AC-IN Connector : Connect the Power Cord 2 DC-OUT Jack 3 HDMI/DVI Signal Connector 4 COMPONENT Input Terminal 5 D-SUB Analogue Signal Connector 6 Kensington Security Slot 7 USB UP ...terminal of the Speaker) : You can use the AUDIO-OUT Jack by connecting earphones or a headset when using the HDMI configuration.. *AUDIO-OUT is only available with the HDMI input. (You cannot use it with D-SUB or any other component.) The Left Rear of the Monitor OUT AUDIO...
Owner's Manual
Page 8
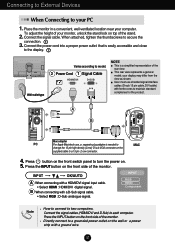
... monitor. Press button on the front switch panel to turn the power on top of the monitor. B When connecting with a HDMI/DVI signal input cable. • Select HDMI : HDMI/DVI digital signal. Directly connect to a grounded power outlet on the supplied cable to a 15 pin 2 row connector. 4.... This rear view represents a general model; INPUT RGB HDMI Component Note How to connect to each computer. Connect the 1 power cord into a proper power outlet that is easily accessible and close to the...
... monitor. Press button on the front switch panel to turn the power on top of the monitor. B When connecting with a HDMI/DVI signal input cable. • Select HDMI : HDMI/DVI digital signal. Directly connect to a grounded power outlet on the supplied cable to a 15 pin 2 row connector. 4.... This rear view represents a general model; INPUT RGB HDMI Component Note How to connect to each computer. Connect the 1 power cord into a proper power outlet that is easily accessible and close to the...
Owner's Manual
Page 9
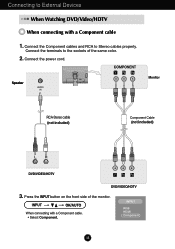
INPUT OK/AUTO When connecting with a Component cable 1. Speaker AUDIO IN DC-OUT HDMI/DVI COMPONENT Y PB PR D-SUB 1 2 AUDIO OUT PB PR PB PR Monitor RCA-Stereo cable (not included) Component Cable (not included) DVD/VIDEO/HDTV PB ... front side of the same color. 2. Connecting to External Devices When Watching DVD/Video/HDTV When connecting with a Component cable. • Select Component. INPUT RGB HDMI Component A8 Connect the Component cables and RCA to the sockets of the monitor.
INPUT OK/AUTO When connecting with a Component cable 1. Speaker AUDIO IN DC-OUT HDMI/DVI COMPONENT Y PB PR D-SUB 1 2 AUDIO OUT PB PR PB PR Monitor RCA-Stereo cable (not included) Component Cable (not included) DVD/VIDEO/HDTV PB ... front side of the same color. 2. Connecting to External Devices When Watching DVD/Video/HDTV When connecting with a Component cable. • Select Component. INPUT RGB HDMI Component A8 Connect the Component cables and RCA to the sockets of the monitor.
Owner's Manual
Page 10
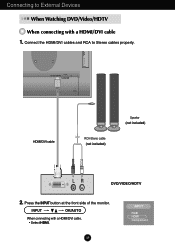
COMPONENT DC-OUT HDMI/DVI Y PB PR D-SUB OUT AUDIO 2 1 HDMI/DVI cable RCA-Stereo cable (not included) Speaker (not included) DVD/VIDEO/HDTV 2. Connecting to Stereo cables properly. INPUT OK/AUTO When connecting with a HDMI/DVI cable 1. Press the INPUT button at the front side of the monitor. A9 INPUT RGB HDMI Component Connect the HDMI/DVI cables and RCA to External Devices When Watching DVD/Video/HDTV When connecting with a HDMI/DVI cable. • Select HDMI.
COMPONENT DC-OUT HDMI/DVI Y PB PR D-SUB OUT AUDIO 2 1 HDMI/DVI cable RCA-Stereo cable (not included) Speaker (not included) DVD/VIDEO/HDTV 2. Connecting to Stereo cables properly. INPUT OK/AUTO When connecting with a HDMI/DVI cable 1. Press the INPUT button at the front side of the monitor. A9 INPUT RGB HDMI Component Connect the HDMI/DVI cables and RCA to External Devices When Watching DVD/Video/HDTV When connecting with a HDMI/DVI cable. • Select HDMI.
Owner's Manual
Page 12
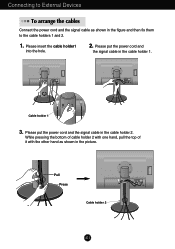
.... Connecting to the cable holders 1 and 2. 1. OUT AUDIO OUT AUDIO 2 2 1 1 DC-OUT HDMI/DVI COMPONENT Y PB PR D-SUB DC-OUT HDMI/DVI COMPONENT Y PB PR D-SUB C DC-OUT HDMI/DVI Y Cable holder 1 3. OUT AUDIO 2 1 Pull Press Cable holder 2 DC-OUT HDMI/DVI COMPONENT Y PB PR D-SUB A11 Please put the power cord and the...
.... Connecting to the cable holders 1 and 2. 1. OUT AUDIO OUT AUDIO 2 2 1 1 DC-OUT HDMI/DVI COMPONENT Y PB PR D-SUB DC-OUT HDMI/DVI COMPONENT Y PB PR D-SUB C DC-OUT HDMI/DVI Y Cable holder 1 3. OUT AUDIO 2 1 Pull Press Cable holder 2 DC-OUT HDMI/DVI COMPONENT Y PB PR D-SUB A11 Please put the power cord and the...
Owner's Manual
Page 13
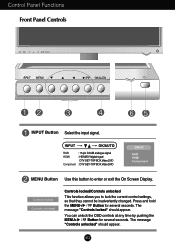
... digital signal DTV SET-TOP BOX,Video,DVD : DTV SET-TOP BOX,Video,DVD INPUT RGB HDMI Component MENU Button Use this button to lock the current control settings, so that they cannot be inadvertently changed. Controls locked Controls unlocked Controls locked/...
... digital signal DTV SET-TOP BOX,Video,DVD : DTV SET-TOP BOX,Video,DVD INPUT RGB HDMI Component MENU Button Use this button to lock the current control settings, so that they cannot be inadvertently changed. Controls locked Controls unlocked Controls locked/...
Owner's Manual
Page 14
...) Button The sub-screen is in the OSD screen. Button • Use this button to directly control brightness and contrast of the PC signal (RGB, HDMI/DVI).
...) Button The sub-screen is in the OSD screen. Button • Use this button to directly control brightness and contrast of the PC signal (RGB, HDMI/DVI).
Owner's Manual
Page 17
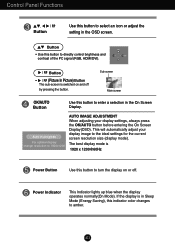
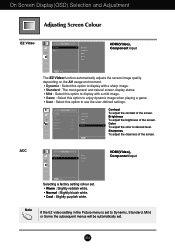
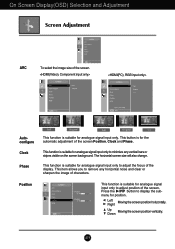
Sharpness To adjust the clearness of the screen. A16 On Screen Display(OSD) Selection and Adjustment Adjusting Screen Colour EZ Video HDMI(Video), Component input ACC The EZ Video function automatically adjusts the screen image quality depending on the AV usage environment. • Dynamic : Select this option ..., Mild or Game the subsequent menus will be automatically set . • Warm : Slightly reddish white. • Normal : Slightly bluish white. • Cool : Slightly purplish white. HDMI(Video), Component input Selecting a factory setting colour set .
Sharpness To adjust the clearness of the screen. A16 On Screen Display(OSD) Selection and Adjustment Adjusting Screen Colour EZ Video HDMI(Video), Component input ACC The EZ Video function automatically adjusts the screen image quality depending on the AV usage environment. • Dynamic : Select this option ..., Mild or Game the subsequent menus will be automatically set . • Warm : Slightly reddish white. • Normal : Slightly bluish white. • Cool : Slightly purplish white. HDMI(Video), Component input Selecting a factory setting colour set .
Owner's Manual
Page 20
Autoconfigure Clock Phase Full Original Full Original 1:1 This function is suitable for position. This function is for analogue signal input only to remove any vertical bars or stripes visible on the screen background. Right Up Moving the screen position vertically. The horizontal screen size will also change. Press the /PIP button to adjust the focus of the screen. This button is suitable for analogue signal input only to minimize any horizontal noise and clear or sharpen the image of characters. Down A19 Left Moving the screen position horizontally. ...
Autoconfigure Clock Phase Full Original Full Original 1:1 This function is suitable for position. This function is for analogue signal input only to remove any vertical bars or stripes visible on the screen background. Right Up Moving the screen position vertically. The horizontal screen size will also change. Press the /PIP button to adjust the focus of the screen. This button is suitable for analogue signal input only to minimize any horizontal noise and clear or sharpen the image of characters. Down A19 Left Moving the screen position horizontally. ...
Owner's Manual
Page 21
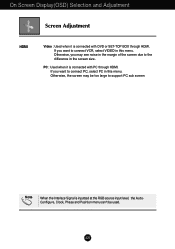
... screen due to support PC sub screen Note When the Interlace Signal is connected with DVD or SET-TOP BOX through HDMI. PC : Used when it is connected with PC through HDMI. If you may be used. Otherwise, the screen may see noise in this menu. On Screen Display(OSD) Selection and... Adjustment Screen Adjustment HDMI Video : Used when it is inputted at the RGB source input level, the AutoConfigure, Clock, Phase and Position menu can't be too large to the ...
... screen due to support PC sub screen Note When the Interlace Signal is connected with DVD or SET-TOP BOX through HDMI. PC : Used when it is connected with PC through HDMI. If you may be used. Otherwise, the screen may see noise in this menu. On Screen Display(OSD) Selection and... Adjustment Screen Adjustment HDMI Video : Used when it is inputted at the RGB source input level, the AutoConfigure, Clock, Phase and Position menu can't be too large to the ...
Owner's Manual
Page 22
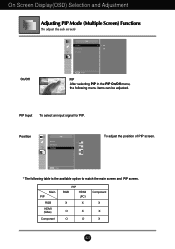
Main PIP RGB HDMI (Video) Component PIP RGB HDMI (PC) X X Component X O X X O O X A21 On Screen Display(OSD) Selection and Adjustment Adjusting PIP Mode (Multiple Screen) Functions (To adjust the sub screen) On/Off Off PIP Input PIP Position On/Off PIP After selecting PIP in the PIP On/Off menu, the following table is the available option to match the main screen and PIP screen. Position On/Off PIP Input Position To adjust the position of PIP screen. * The following menu items can be adjusted. PIP Input To select an input signal for PIP.
Main PIP RGB HDMI (Video) Component PIP RGB HDMI (PC) X X Component X O X X O O X A21 On Screen Display(OSD) Selection and Adjustment Adjusting PIP Mode (Multiple Screen) Functions (To adjust the sub screen) On/Off Off PIP Input PIP Position On/Off PIP After selecting PIP in the PIP On/Off menu, the following table is the available option to match the main screen and PIP screen. Position On/Off PIP Input Position To adjust the position of PIP screen. * The following menu items can be adjusted. PIP Input To select an input signal for PIP.

Owner's Manual
Page 26
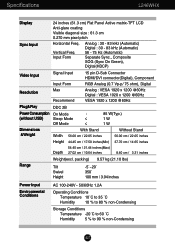
... kHz (Automatic) 56 - 75 Hz (Automatic) Separate Sync., Composite SOG (Sync On Green), Digital(HDCP) Video Input Signal Input Input Form 15 pin D-Sub Connector HDMI/DVI connector(Digital), Component RGB Analog (0.7 Vp-p/ 75 ohm), Digital Resolution Max Recommend Analog : VESA 1920 x 1200 @60Hz Digital : VESA 1920 x 1200 @60Hz VESA 1920...
... kHz (Automatic) 56 - 75 Hz (Automatic) Separate Sync., Composite SOG (Sync On Green), Digital(HDCP) Video Input Signal Input Input Form 15 pin D-Sub Connector HDMI/DVI connector(Digital), Component RGB Analog (0.7 Vp-p/ 75 ohm), Digital Resolution Max Recommend Analog : VESA 1920 x 1200 @60Hz Digital : VESA 1920 x 1200 @60Hz VESA 1920...
Owner's Manual
Page 28
... (Automatic) 56 - 75 Hz (Automatic) Separate Sync., Composite SOG (Sync On Green), Digital(HDCP) Video Input Signal Input Input Form 15 pin D-Sub Connector HDMI/DVI connector(Digital), Component RGB Analog (0.7 Vp-p/ 75 ohm), Digital Resolution Max Recommend Analog : VESA 1920 x 1200 @60Hz Digital : VESA 1920 x 1200 ...65 inches 54.45 cm / 21.44 inches(Max) Depth 27.02 cm / 10.64 inches 8.40 cm / 3.31 inches Weight(excl. Specifications L246WHX Display Sync Input 24 inches (61.3 cm) Flat Panel Active matrix-TFT LCD Anti-glare coating Visible diagonal size : 61.3 cm 0.270 mm pixel ...
... (Automatic) 56 - 75 Hz (Automatic) Separate Sync., Composite SOG (Sync On Green), Digital(HDCP) Video Input Signal Input Input Form 15 pin D-Sub Connector HDMI/DVI connector(Digital), Component RGB Analog (0.7 Vp-p/ 75 ohm), Digital Resolution Max Recommend Analog : VESA 1920 x 1200 @60Hz Digital : VESA 1920 x 1200 ...65 inches 54.45 cm / 21.44 inches(Max) Depth 27.02 cm / 10.64 inches 8.40 cm / 3.31 inches Weight(excl. Specifications L246WHX Display Sync Input 24 inches (61.3 cm) Flat Panel Active matrix-TFT LCD Anti-glare coating Visible diagonal size : 61.3 cm 0.270 mm pixel ...
Owner's Manual
Page 30
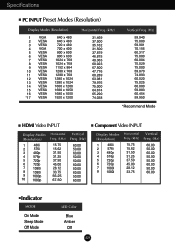
....000 60.004 75.029 75.000 59.870 74.893 60.020 75.025 60.000 59.883 60.454 59.950 *Recommend Mode HDMI Video INPUT Display Modes (Resolution) 1 480i 2 576i 3 480p 4 576p 5 720p 6 720p 7 1080i 8 1080i 9 1080p 10 1080p Horizontal Freq. (kHz) 15.75 15.62 31.50...
....000 60.004 75.029 75.000 59.870 74.893 60.020 75.025 60.000 59.883 60.454 59.950 *Recommend Mode HDMI Video INPUT Display Modes (Resolution) 1 480i 2 576i 3 480p 4 576p 5 720p 6 720p 7 1080i 8 1080i 9 1080p 10 1080p Horizontal Freq. (kHz) 15.75 15.62 31.50...

