

Owners Manual
Page 1
Model Number : Serial Number : Internet Home Page : http://www.lg.ca Retain this information to your TV. See the label attached on the back cover and relate this manual for future reference. PLASMA TV OWNER'S MANUAL MODELS: 50PX4D/50PX5D 50PX4D-UB/50PX5D-UB R TruSurround XT TM Please read this manual carefully and completely before operating your dealer if you require service. Record model number and serial number of the TV in the spaces provided below.
Model Number : Serial Number : Internet Home Page : http://www.lg.ca Retain this information to your TV. See the label attached on the back cover and relate this manual for future reference. PLASMA TV OWNER'S MANUAL MODELS: 50PX4D/50PX5D 50PX4D-UB/50PX5D-UB R TruSurround XT TM Please read this manual carefully and completely before operating your dealer if you require service. Record model number and serial number of the TV in the spaces provided below.
Owners Manual
Page 3
... television is a trademark of the CableCARDTM TradeMark. Cable operator enhanced program (For example, electronic program guide provided by the cable operator), and data enhanced television service may require the use of receiving basic analog, digital basic and digital premium cable television programming by your local cable operator. Trademark Notice In the... marks of its affiliates. and/or one of Gemstar-TV Guide International, Inc. A security card provided by direct connection to view encrypted digital programming. Owner's Manual 3
... television is a trademark of the CableCARDTM TradeMark. Cable operator enhanced program (For example, electronic program guide provided by the cable operator), and data enhanced television service may require the use of receiving basic analog, digital basic and digital premium cable television programming by your local cable operator. Trademark Notice In the... marks of its affiliates. and/or one of Gemstar-TV Guide International, Inc. A security card provided by direct connection to view encrypted digital programming. Owner's Manual 3
Owners Manual
Page 5
... is, a single outlet circuit which powers only that appliance and has no objects filled with an exact replacement part by an authorized servicer. Any of this apparatus during lightning storms or when unused for long periods of the appliance, and have fallen into the apparatus, ...outlets, and the point where the cord exits the appliance. 16. Owner's Manual 5 Overloaded wall outlets, loose or damaged wall outlets, extension cords, frayed power cords, or damaged or cracked wire insulation are dangerous. Servicing is damaged, liquid has been spilled or objects have the cord replaced with...
... is, a single outlet circuit which powers only that appliance and has no objects filled with an exact replacement part by an authorized servicer. Any of this apparatus during lightning storms or when unused for long periods of the appliance, and have fallen into the apparatus, ...outlets, and the point where the cord exits the appliance. 16. Owner's Manual 5 Overloaded wall outlets, loose or damaged wall outlets, extension cords, frayed power cords, or damaged or cracked wire insulation are dangerous. Servicing is damaged, liquid has been spilled or objects have the cord replaced with...
Owners Manual
Page 9
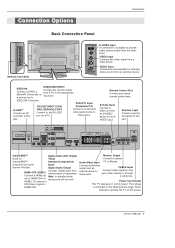
...DC power. jack. jack, either directly or through a cable box. Owner's Manual 9 AUDIO Input Connections are available for Visual CableCARD™ Interface/Component2) received from Cable Input/ Service Provider. Remote Control Port Connect your wired remote control here. S-Video Input ... Connect the monitor output Connect a DVHS, a from an external device. Cable IEEE-1394 HDMI 2 HDMI1/DVI RS-232C INPUT (CONTROL/SERVICE) OUTPUT COMPONENT2 INPUT DVI INPUT DIGITAL AUDIO (OPTICAL) RGB INPUT AUDIO INPUT DVD /DTV INPUT VIDEO AUDIO L R COMPONENT INPUT 2 VIDEO...
...DC power. jack. jack, either directly or through a cable box. Owner's Manual 9 AUDIO Input Connections are available for Visual CableCARD™ Interface/Component2) received from Cable Input/ Service Provider. Remote Control Port Connect your wired remote control here. S-Video Input ... Connect the monitor output Connect a DVHS, a from an external device. Cable IEEE-1394 HDMI 2 HDMI1/DVI RS-232C INPUT (CONTROL/SERVICE) OUTPUT COMPONENT2 INPUT DVI INPUT DIGITAL AUDIO (OPTICAL) RGB INPUT AUDIO INPUT DVD /DTV INPUT VIDEO AUDIO L R COMPONENT INPUT 2 VIDEO...
Owners Manual
Page 16
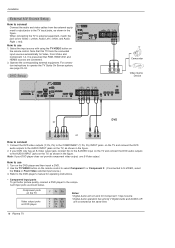
... TV and connect the DVD audio outputs to the component input ports as shown in the figure. Refer to the DVD player's manual for Component 1 input source. • Digital Audio operation has priority if Digital Audio and AUDIO L/R are connected. 2. How ... TR E E O O L AC INPUT CABLE ANTENNA Camcorder R AUDIO L VIDEO Video Game Device Cable HDMI 2 IEEE-1394 HDMI1 /DVI RS-232C INPUT (CONTROL/SERVICE) OUTPUT COMPONENT2 INPUT DVI INPUT DIGITAL AUDIO (OPTICAL) RGB INPUT AUDIO INPUT DVD /DTV INPUT VIDEO AUDIO L R COMPONENT INPUT 2 VIDEO AUDIO L R MONITOR OUTPUT...
... TV and connect the DVD audio outputs to the component input ports as shown in the figure. Refer to the DVD player's manual for Component 1 input source. • Digital Audio operation has priority if Digital Audio and AUDIO L/R are connected. 2. How ... TR E E O O L AC INPUT CABLE ANTENNA Camcorder R AUDIO L VIDEO Video Game Device Cable HDMI 2 IEEE-1394 HDMI1 /DVI RS-232C INPUT (CONTROL/SERVICE) OUTPUT COMPONENT2 INPUT DVI INPUT DIGITAL AUDIO (OPTICAL) RGB INPUT AUDIO INPUT DVD /DTV INPUT VIDEO AUDIO L R COMPONENT INPUT 2 VIDEO AUDIO L R MONITOR OUTPUT...

Owners Manual
Page 17
...DVI,HDMI2 No Yes Yes Yes Owner's Manual 17 Caution: When removing the CableCARDTTMM, do receive Digital signals from the cable service provider to the owner's manual for video connections, depending on the screen, contact with the cable service provider. Cable IEEE-1394 HDMI 2 ...HDMI1 /DVI RS-232C INPUT (CONTROL/SERVICE) OUTPUT COMPONENT2 INPUT DVI INPUT DIGITAL AUDIO ...
...DVI,HDMI2 No Yes Yes Yes Owner's Manual 17 Caution: When removing the CableCARDTTMM, do receive Digital signals from the cable service provider to the owner's manual for video connections, depending on the screen, contact with the cable service provider. Cable IEEE-1394 HDMI 2 ...HDMI1 /DVI RS-232C INPUT (CONTROL/SERVICE) OUTPUT COMPONENT2 INPUT DVI INPUT DIGITAL AUDIO ...
Owners Manual
Page 19
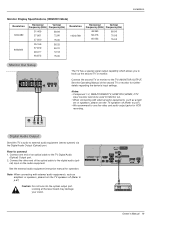
...; We recommend to external audio equipment (stereo system) via the Digital Audio Output (Optical) port. Cable 2. See the Operating Manual of the optical cable to the TV's MONITOR OUTPUT. Installation Monitor Display Specifications (HDMI/DVI Mode) Resolution 640x480 800x600 Horizontal Vertical Frequency... optical output port. IEEE-1394 HDMI 2 HDMI1 /DVI RS-232C INPUT (CONTROL/SERVICE) OUTPUT COMPONENT2 DIGITAL AUDIO (OPTICAL) INPUT DVD /DTV RGB INPUT AUDIO INPUT INPU DVI INPUT Owner's Manual 19 Connect the second TV or monitor to the digital audio (opti- Notes: ...
...; We recommend to external audio equipment (stereo system) via the Digital Audio Output (Optical) port. Cable 2. See the Operating Manual of the optical cable to the TV's MONITOR OUTPUT. Installation Monitor Display Specifications (HDMI/DVI Mode) Resolution 640x480 800x600 Horizontal Vertical Frequency... optical output port. IEEE-1394 HDMI 2 HDMI1 /DVI RS-232C INPUT (CONTROL/SERVICE) OUTPUT COMPONENT2 DIGITAL AUDIO (OPTICAL) INPUT DVD /DTV RGB INPUT AUDIO INPUT INPU DVI INPUT Owner's Manual 19 Connect the second TV or monitor to the digital audio (opti- Notes: ...
Owners Manual
Page 22
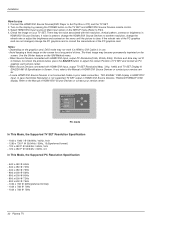
...1. Use the Orbiter feature on the TV SET and HDMI1/DVI Source Devices remote control. 3. If not, refer to the Manual of TV SET and contact an PC graphics card service center. - Turn on the display by pressing the POWER button on the ISM Method menu. - If the refresh rate of...Screen. As shown the picture below, press the ADJUST button to adjust the screen Position of HDMI1/DVI Source Devices or contact your service center. Refer to the Manual of time. Select HDMI1/DVI Input source in HDMI1/DVI Source Devices, "INVALID FORMAT" OSD display. When Source Devices connected with HDMI1...
...1. Use the Orbiter feature on the TV SET and HDMI1/DVI Source Devices remote control. 3. If not, refer to the Manual of TV SET and contact an PC graphics card service center. - Turn on the display by pressing the POWER button on the ISM Method menu. - If the refresh rate of...Screen. As shown the picture below, press the ADJUST button to adjust the screen Position of HDMI1/DVI Source Devices or contact your service center. Refer to the Manual of time. Select HDMI1/DVI Input source in HDMI1/DVI Source Devices, "INVALID FORMAT" OSD display. When Source Devices connected with HDMI1...
Owners Manual
Page 23
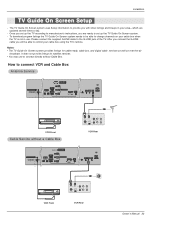
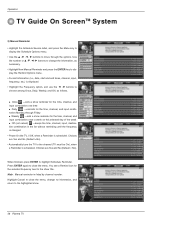
...IN OUT S-VIDEO OUTPUT (R) AUDIO (L) SWITCH 3 4 IN VIDEO VCR Rear Cable IEEE-1394 HDMI 2 HDMI /DVI RS-232C INPUT (CONTROL/SERVICE) OUTPUT COMPONENT2 INPUT DVI INPUT DIGITAL AUDIO (OPTICAL) RGB INPUT AUDIO INPUT REMOTE CABLE CONTROL ANTENNA S-VIDEO AC INPUT VCR Front ANT OUT ANT IN... OUT OUTPUT (R) AUDIO (L) SWITCH 3 4 IN S-VIDEO VIDEO VCR Rear Owner's Manual 23 Notes: • The TV Guide On Screen system provides listings for satellite services. • You may use . How to the G-LINK jack of the TV. Installation TV Guide On Screen ...
...IN OUT S-VIDEO OUTPUT (R) AUDIO (L) SWITCH 3 4 IN VIDEO VCR Rear Cable IEEE-1394 HDMI 2 HDMI /DVI RS-232C INPUT (CONTROL/SERVICE) OUTPUT COMPONENT2 INPUT DVI INPUT DIGITAL AUDIO (OPTICAL) RGB INPUT AUDIO INPUT REMOTE CABLE CONTROL ANTENNA S-VIDEO AC INPUT VCR Front ANT OUT ANT IN... OUT OUTPUT (R) AUDIO (L) SWITCH 3 4 IN S-VIDEO VIDEO VCR Rear Owner's Manual 23 Notes: • The TV Guide On Screen system provides listings for satellite services. • You may use . How to the G-LINK jack of the TV. Installation TV Guide On Screen ...
Owners Manual
Page 49
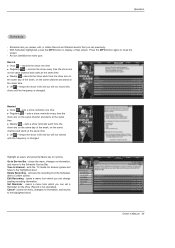
...recording information. Cancel - removes the recording from which you set a Reminder for options. With Schedule highlighted, press the INFO button to Service Bar - closes the menu, changes no information, and returns to the highlighted show (Record is not cancelled). An icon identifies the ... the show . Set Reminder - exits the TV Guide On Screen system and tunes to the Schedule Service Bar. opens a menu from the Schedule, after a Confirm screen. Owner's Manual 49 Schedule lets you review, edit, or delete Record and Remind events that you can set previously....
...recording information. Cancel - removes the recording from which you set a Reminder for options. With Schedule highlighted, press the INFO button to Service Bar - closes the menu, changes no information, and returns to the highlighted show (Record is not cancelled). An icon identifies the ... the show . Set Reminder - exits the TV Guide On Screen system and tunes to the Schedule Service Bar. opens a menu from the Schedule, after a Confirm screen. Owner's Manual 49 Schedule lets you review, edit, or delete Record and Remind events that you can set previously....
Owners Manual
Page 51
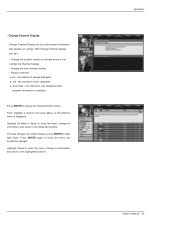
...menu and accept the changes. Then, highlight a channel and press Menu. A Grid Options menu is always displayed W Off - Operation Owner's Manual 51 the channel is available. • Change Channel Display Change Channel Display lets you can : • Change the position number to highlight Done.... Highlight Go Back to Setup to close the menu, change no information, and return to the Setup Service Bar. the channel is only displayed when program information is never displayed W Auto-Hide - Press ENTER again to display the Channel Editor...
...menu and accept the changes. Then, highlight a channel and press Menu. A Grid Options menu is always displayed W Off - Operation Owner's Manual 51 the channel is available. • Change Channel Display Change Channel Display lets you can : • Change the position number to highlight Done.... Highlight Go Back to Setup to close the menu, change no information, and return to the Setup Service Bar. the channel is only displayed when program information is never displayed W Auto-Hide - Press ENTER again to display the Channel Editor...
Owners Manual
Page 53
...the menu and accept the changes. Press ENTER again to close the menu, change no information, and return to the highlighted option. Operation Owner's Manual 53 Choices are 120 minutes early to 120 minutes late, to On time. (Default = On time) • When to end the record ... Default Options menu. Highlight Record Defaults, and press the Menu key to highlight Done. Highlight Go to Service Bar to close the menu, change no information, and return to the Setup Service Bar. < Remind Defaults> Remind Default Options lets you set defaults for the following : • Power...
...the menu and accept the changes. Press ENTER again to close the menu, change no information, and return to the highlighted option. Operation Owner's Manual 53 Choices are 120 minutes early to 120 minutes late, to On time. (Default = On time) • When to end the record ... Default Options menu. Highlight Record Defaults, and press the Menu key to highlight Done. Highlight Go to Service Bar to close the menu, change no information, and return to the Setup Service Bar. < Remind Defaults> Remind Default Options lets you set defaults for the following : • Power...
Owners Manual
Page 55
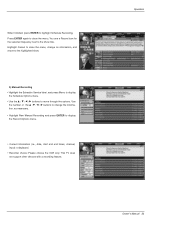
...a recording feature. When finished, press ENTER to close the menu. Operation Owner's Manual 55 Press ENTER again to close the menu, change the information, as necessary. • Highlight New Manual Recording and press ENTER to move through the options. You see a Record icon for... the selected frequency next to the show . 3) Manual Recording • Highlight the Schedule Service label, and press Menu to display the Schedule Options menu. • Use the D / E / F / G buttons to display the Record Options ...
...a recording feature. When finished, press ENTER to close the menu. Operation Owner's Manual 55 Press ENTER again to close the menu, change the information, as necessary. • Highlight New Manual Recording and press ENTER to move through the options. You see a Record icon for... the selected frequency next to the show . 3) Manual Recording • Highlight the Schedule Service label, and press Menu to display the Schedule Options menu. • Use the D / E / F / G buttons to display the Record Options ...
Owners Manual
Page 58
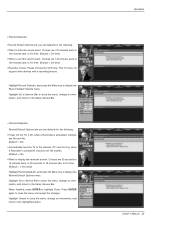
... a week on this selected day of the week W Off (not cancel) -keeps the time, channel, input, destina- Operation TV Guide On ScreenTTMM System 2) Manual Reminder • Highlight the Schedule Service label, and press the Menu key to display the Schedule Options menu. • Use the D / E / F / G buttons to highlight Schedule Reminder. When finished...
... a week on this selected day of the week W Off (not cancel) -keeps the time, channel, input, destina- Operation TV Guide On ScreenTTMM System 2) Manual Reminder • Highlight the Schedule Service label, and press the Menu key to display the Schedule Options menu. • Use the D / E / F / G buttons to highlight Schedule Reminder. When finished...
Owners Manual
Page 78
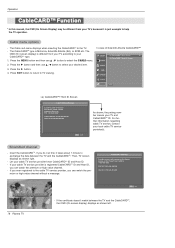
...displays as shown left. 78 Plasma TV mium or high value channel without a message. Press the G button. 4. For further information regarding cable TV service, contact your cable TV service provider know CableCARDTM ID and Host ID. - Press the MENU button and then use D / E button to select your desired item. 3. Press... data between the TV and the CableCARDTM, the OSD (On screen display) displays as shown right. - Operation CableCARD™ Function * In this manual, the OSD (On Screen Display) may be different from your TV according to your CableCARDTM type. 1.
...displays as shown left. 78 Plasma TV mium or high value channel without a message. Press the G button. 4. For further information regarding cable TV service, contact your cable TV service provider know CableCARDTM ID and Host ID. - Press the MENU button and then use D / E button to select your desired item. 3. Press... data between the TV and the CableCARDTM, the OSD (On screen display) displays as shown right. - Operation CableCARD™ Function * In this manual, the OSD (On Screen Display) may be different from your TV according to your CableCARDTM type. 1.
Owners Manual
Page 79
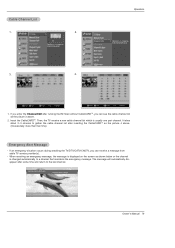
...4 above . 2. Insert the CableCARDTM. If an emergency situation occurs during watching the TV/DTV/CATV/CADTV, you can receive a message from cable TV service provider(s). - Operation 3. 4. 1. Emergency Action Notification Hurricane will automatically disappear after some time and return to gather the cable channel list after running the ...emergency message, the message is displayed on the screen as the picture 3 above . (Occasionally more than that maintains the emergency message. Owner's Manual 79 Cable Channel List 1. 2. It takes about 2~3 minutes to the last channel.
...4 above . 2. Insert the CableCARDTM. If an emergency situation occurs during watching the TV/DTV/CATV/CADTV, you can receive a message from cable TV service provider(s). - Operation 3. 4. 1. Emergency Action Notification Hurricane will automatically disappear after some time and return to gather the cable channel list after running the ...emergency message, the message is displayed on the screen as the picture 3 above . (Occasionally more than that maintains the emergency message. Owner's Manual 79 Cable Channel List 1. 2. It takes about 2~3 minutes to the last channel.
Owners Manual
Page 89
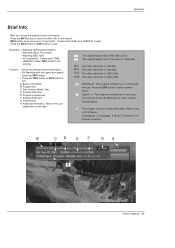
...to select wanted Closed caption. D (Dialogue), L (Language), S (Sex), V (Violence), FV (Fantasy Violence) B CD E F GA H Owner's Manual 89 INFO button does not work in Component1, Component2, RGB, and HDMI/DVI modes. - Press the CC button to select wanted Audio. Press the INFO... signal, press the INFO button. • Press the INFO button or EXIT button to exit. CC Caption: => The program contains one or more audio services. Refer to the icon explanation on the screen. - Refer to the . The program contains V-Chip information. Operation Brief Info. - Operation: •...
...to select wanted Closed caption. D (Dialogue), L (Language), S (Sex), V (Violence), FV (Fantasy Violence) B CD E F GA H Owner's Manual 89 INFO button does not work in Component1, Component2, RGB, and HDMI/DVI modes. - Press the CC button to select wanted Audio. Press the INFO... signal, press the INFO button. • Press the INFO button or EXIT button to exit. CC Caption: => The program contains one or more audio services. Refer to the icon explanation on the screen. - Refer to the . The program contains V-Chip information. Operation Brief Info. - Operation: •...
Owners Manual
Page 103
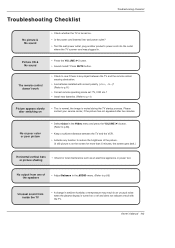
...• Correct remote operating mode set: TV, VCR etc.? • Install new batteries. (Refer to p.11) Picture appears slowly after five minutes. Owner's Manual 103 No or poor color or poor picture • Select Color in the Video menu and press the VOLUME (G) button. (Refer to p.65) • .... • Activate any object between the TV and the remote control causing obstruction. • Are batteries installed with the TV. Please contact your service center, if the picture has not appeared after switching on • This is normal, the image is on the screen for more than 5 minutes...
...• Correct remote operating mode set: TV, VCR etc.? • Install new batteries. (Refer to p.11) Picture appears slowly after five minutes. Owner's Manual 103 No or poor color or poor picture • Select Color in the Video menu and press the VOLUME (G) button. (Refer to p.65) • .... • Activate any object between the TV and the remote control causing obstruction. • Are batteries installed with the TV. Please contact your service center, if the picture has not appeared after switching on • This is normal, the image is on the screen for more than 5 minutes...


