
Owners Manual
Page 3
...; 4,706,121. Cable operator enhanced program (For example, electronic program guide provided by Gemstar-TV Guide International, Inc. In Canada, TV GUIDE is used under license from Gemstar-TV Guide International, Inc. and/or one of receiving basic analog, digital basic and digital premium cable television programming by one of Cable Television Laboratories, Inc." Digital Cable Compatibility This digital television is protected by direct connection to view encrypted digital programming. Patent Notice The TV Guide On Screen system is...
...; 4,706,121. Cable operator enhanced program (For example, electronic program guide provided by Gemstar-TV Guide International, Inc. In Canada, TV GUIDE is used under license from Gemstar-TV Guide International, Inc. and/or one of receiving basic analog, digital basic and digital premium cable television programming by one of Cable Television Laboratories, Inc." Digital Cable Compatibility This digital television is protected by direct connection to view encrypted digital programming. Patent Notice The TV Guide On Screen system is...
Owners Manual
Page 6
... Picture Source Selection 64 Input Label 64 Video Menu Options EZ Picture 65 Manual Picture Control (Custom Option 65 Color Temperature Control 65 Video Reset 65 Audio Menu Options Audio Language 66 EZ SoundRite / EZ Sound 66 Manual Sound Control (Custom Option 66 Front Surround 67 TV Speakers On/Off Setup 67 BBE 68 Stereo/SAP Broadcasts Setup 68 Time Menu Options Auto Clock Setup 69 Manual Clock Setup 69 On/Off Timer Setup 69 Sleep Timer / Auto Off 70 Option Menu Features Aspect Ratio Control 71 Cinema 3:2 Mode Setup 71 Caption...
... Picture Source Selection 64 Input Label 64 Video Menu Options EZ Picture 65 Manual Picture Control (Custom Option 65 Color Temperature Control 65 Video Reset 65 Audio Menu Options Audio Language 66 EZ SoundRite / EZ Sound 66 Manual Sound Control (Custom Option 66 Front Surround 67 TV Speakers On/Off Setup 67 BBE 68 Stereo/SAP Broadcasts Setup 68 Time Menu Options Auto Clock Setup 69 Manual Clock Setup 69 On/Off Timer Setup 69 Sleep Timer / Auto Off 70 Option Menu Features Aspect Ratio Control 71 Cinema 3:2 Mode Setup 71 Caption...
Owners Manual
Page 9
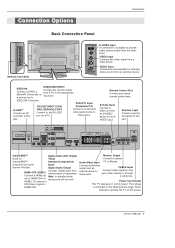
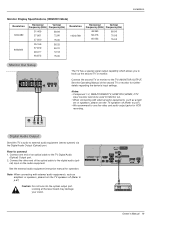
...INPUT (CONTROL/SERVICE) PORT Connect to HDMI1/DVI or these jacks. Digital Audio Output Connect digital audio from an external device. Note: In standby mode, nal to the RS-232C port on an AC power. Monitor Output Connect a second Audio/Video Input TV or Monitor. Cable IEEE-1394 HDMI 2 HDMI1/DVI RS-232C INPUT (CONTROL/SERVICE) OUTPUT COMPONENT2 INPUT DVI INPUT DIGITAL AUDIO (OPTICAL) RGB INPUT AUDIO INPUT DVD /DTV INPUT VIDEO AUDIO L R COMPONENT INPUT 2 VIDEO AUDIO L R MONITOR OUTPUT COMPONENT INPUT 1 (MONO) A/V INPUT REMOTE CONTROL CABLE ANTENNA S-VIDEO...
...INPUT (CONTROL/SERVICE) PORT Connect to HDMI1/DVI or these jacks. Digital Audio Output Connect digital audio from an external device. Note: In standby mode, nal to the RS-232C port on an AC power. Monitor Output Connect a second Audio/Video Input TV or Monitor. Cable IEEE-1394 HDMI 2 HDMI1/DVI RS-232C INPUT (CONTROL/SERVICE) OUTPUT COMPONENT2 INPUT DVI INPUT DIGITAL AUDIO (OPTICAL) RGB INPUT AUDIO INPUT DVD /DTV INPUT VIDEO AUDIO L R COMPONENT INPUT 2 VIDEO AUDIO L R MONITOR OUTPUT COMPONENT INPUT 1 (MONO) A/V INPUT REMOTE CONTROL CABLE ANTENNA S-VIDEO...
Owners Manual
Page 10
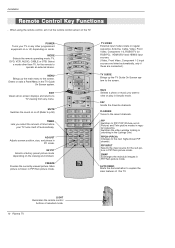
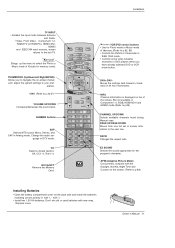
... Plasma TV MODE Selects the remote operating mode: TV, DVD, VCR, AUDIO, CABLE or STB. FREEZE Freezes the currently-viewed picture. TV INPUT TV/VIDEO MODE DAY - Switches the video window locking or unlocking in PIP/Twin picture mode. SWAP Exchanges the main/sub images in the TV Guide On Screen system. Enters or exits a Panel Menu in PIP/Twin picture mode. ADJUST Adjusts screen position, size, and phase in Xstudio mode. LIGHT Illuminates the remote control buttons of this TV. FAV Scrolls the Favorite channels. MUTE Switches the sound...
... Plasma TV MODE Selects the remote operating mode: TV, DVD, VCR, AUDIO, CABLE or STB. FREEZE Freezes the currently-viewed picture. TV INPUT TV/VIDEO MODE DAY - Switches the video window locking or unlocking in PIP/Twin picture mode. SWAP Exchanges the main/sub images in the TV Guide On Screen system. Enters or exits a Panel Menu in PIP/Twin picture mode. ADJUST Adjusts screen position, size, and phase in Xstudio mode. LIGHT Illuminates the remote control buttons of this TV. FAV Scrolls the Favorite channels. MUTE Switches the sound...
Owners Manual
Page 11
...; POWER POWER ࠘ ࠘࠘ Installation POWER POWER ࠘ ࠘ POWER POWER TV INPUT • Rotates the input mode between Antenna and Cable. • Video, Front Video, Component 1-2, RGB-DTV (or RGB-PC), HDMI1/DVI, HDMI2 and IEEE1394 input sources, screen returns to p.33-37) VOLUME UP/DOWN Increases/decreases the sound level. THUMBSTICK (Up/Down/Left/RighEt/ENNTTEERR) Allows you • haEvNeTaElrReady selected DVD or VCR • mode button. VOL...
...; POWER POWER ࠘ ࠘࠘ Installation POWER POWER ࠘ ࠘ POWER POWER TV INPUT • Rotates the input mode between Antenna and Cable. • Video, Front Video, Component 1-2, RGB-DTV (or RGB-PC), HDMI1/DVI, HDMI2 and IEEE1394 input sources, screen returns to p.33-37) VOLUME UP/DOWN Increases/decreases the sound level. THUMBSTICK (Up/Down/Left/RighEt/ENNTTEERR) Allows you • haEvNeTaElrReady selected DVD or VCR • mode button. VOL...
Owners Manual
Page 15
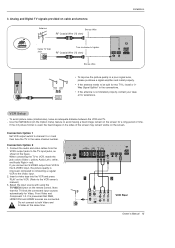
... COMPONENT INPUT 2 VIDEO AUDIO L R MONITOR OUTPUT COMPONENT INPUT 1 (MONO) A/V INPUT REMOTE CONTROL CABLE ANTENNA S-VIDEO AC INPUT 1 2 ANT OUT ANT IN S-VIDEO OUT OUTPUT SWITCH (R) AUDIO (L) 3 4 IN VIDEO VCR Rear Owner's Manual 15 the fixed images on the VCR. (Refer to both Video and S-Video at the same time. Analog and Digital TV signals provided on the Option menu) feature to be split for Video, Front Video and Component 1-2. Use the ISM Method (on cable and antenna Antenna Bronze Wire RF Coaxial Wire (75 ohm) Installation Cable TV Wall Jack Turn clockwise...
... COMPONENT INPUT 2 VIDEO AUDIO L R MONITOR OUTPUT COMPONENT INPUT 1 (MONO) A/V INPUT REMOTE CONTROL CABLE ANTENNA S-VIDEO AC INPUT 1 2 ANT OUT ANT IN S-VIDEO OUT OUTPUT SWITCH (R) AUDIO (L) 3 4 IN VIDEO VCR Rear Owner's Manual 15 the fixed images on the VCR. (Refer to both Video and S-Video at the same time. Analog and Digital TV signals provided on the Option menu) feature to be split for Video, Front Video and Component 1-2. Use the ISM Method (on cable and antenna Antenna Bronze Wire RF Coaxial Wire (75 ohm) Installation Cable TV Wall Jack Turn clockwise...
Owners Manual
Page 16
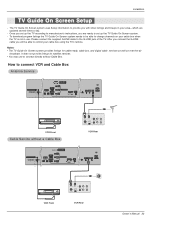
...CABLE ANTENNA Camcorder R AUDIO L VIDEO Video Game Device Cable HDMI 2 IEEE-1394 HDMI1 /DVI RS-232C INPUT (CONTROL/SERVICE) OUTPUT COMPONENT2 INPUT DVI INPUT DIGITAL AUDIO (OPTICAL) RGB INPUT AUDIO INPUT DVD /DTV INPUT VIDEO AUDIO L R COMPONENT INPUT 2 VIDEO AUDIO L R MONITOR OUTPUT COMPONENT INPUT 1 (MONO) A/V INPUT REMOTE CABLE CONTROL ANTENNA S-VIDEO AC INPUT DVD or DIGITAL AUDIO OPTICAL (R) AUDIO (L) B R or S-VIDEO (R) AUDIO (L) How to use 1. How to connect 1. Turn on the remote control. When connecting the TV to operate the TV Guide On Screen...
...CABLE ANTENNA Camcorder R AUDIO L VIDEO Video Game Device Cable HDMI 2 IEEE-1394 HDMI1 /DVI RS-232C INPUT (CONTROL/SERVICE) OUTPUT COMPONENT2 INPUT DVI INPUT DIGITAL AUDIO (OPTICAL) RGB INPUT AUDIO INPUT DVD /DTV INPUT VIDEO AUDIO L R COMPONENT INPUT 2 VIDEO AUDIO L R MONITOR OUTPUT COMPONENT INPUT 1 (MONO) A/V INPUT REMOTE CABLE CONTROL ANTENNA S-VIDEO AC INPUT DVD or DIGITAL AUDIO OPTICAL (R) AUDIO (L) B R or S-VIDEO (R) AUDIO (L) How to use 1. How to connect 1. Turn on the remote control. When connecting the TV to operate the TV Guide On Screen...

Owners Manual
Page 17
... this PLASMA TV. Installation IEEE-1394 HDMI 2 HDMI1 /DVI RS-232C INPUT (CONTROL/SERVICE) OUTPUT COMPONENT2 INPUT DVI INPUT DIGITAL AUDIO (OPTICAL) RGB IN HDSTB Setup - Turn on your set -top box.) 2. Then, make the corresponding audio connections. Cable IEEE-1394 HDMI 2 HDMI1 /DVI RS-232C INPUT (CONTROL/SERVICE) OUTPUT COMPONENT2 INPUT DVI INPUT DIGITAL AUDIO (OPTICAL) RGB INPUT AUDIO INPUT DVD /DTV INPUT VIDEO AUDIO L R COMPONENT INPUT 2 VIDEO AUDIO L R MONITOR OUTPUT COMPONENT INPUT 1 (MONO) A/V INPUT S-VIDEO REMOTE CABLE CONTROL ANTENNA AC INPUT or...
... this PLASMA TV. Installation IEEE-1394 HDMI 2 HDMI1 /DVI RS-232C INPUT (CONTROL/SERVICE) OUTPUT COMPONENT2 INPUT DVI INPUT DIGITAL AUDIO (OPTICAL) RGB IN HDSTB Setup - Turn on your set -top box.) 2. Then, make the corresponding audio connections. Cable IEEE-1394 HDMI 2 HDMI1 /DVI RS-232C INPUT (CONTROL/SERVICE) OUTPUT COMPONENT2 INPUT DVI INPUT DIGITAL AUDIO (OPTICAL) RGB INPUT AUDIO INPUT DVD /DTV INPUT VIDEO AUDIO L R COMPONENT INPUT 2 VIDEO AUDIO L R MONITOR OUTPUT COMPONENT INPUT 1 (MONO) A/V INPUT S-VIDEO REMOTE CABLE CONTROL ANTENNA AC INPUT or...
Owners Manual
Page 18
... with an HDMI-to AUDIO INPUT port located on the right side of SETUP menu, TV/VIDEO button is also available for this product). If you select RGB-PC in main input option of RGB INPUT port. If the PC(or the sound card of the PC) has an analog audio output connector, connect the PC's audio output to -DVI cable(not supplied with this purpose. 3. To get the best picture quality, adjust the PC...
... with an HDMI-to AUDIO INPUT port located on the right side of SETUP menu, TV/VIDEO button is also available for this product). If you select RGB-PC in main input option of RGB INPUT port. If the PC(or the sound card of the PC) has an analog audio output connector, connect the PC's audio output to -DVI cable(not supplied with this purpose. 3. To get the best picture quality, adjust the PC...
Owners Manual
Page 19
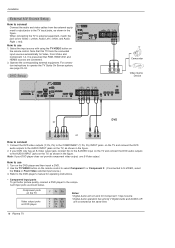
...75.02 Monitor Out Setup RGB INPUT AUDIO INPUT DVD /DTV INPUT VIDEO AUDIO L R COMPONENT INPUT 2 VIDEO AUDIO L R MONITOR OUTPUT COMPONENT INPUT 1 (MONO) A/V INPUT REMOTE CABLE CONTROL ANTENNA S-VIDEO AC INPUT The TV has a special signal output capability which allows you to connect 1. Notes: • Component 1-2, RGB-PC/RGB-DTV, HDMI1/DVI,HDMI2, DTV input sources cannot be used for operation. How to hook up the second TV or monitor. Connect the other end of the optical cable to external audio equipment (stereo system) via the Digital Audio Output (Optical) port. See the...
...75.02 Monitor Out Setup RGB INPUT AUDIO INPUT DVD /DTV INPUT VIDEO AUDIO L R COMPONENT INPUT 2 VIDEO AUDIO L R MONITOR OUTPUT COMPONENT INPUT 1 (MONO) A/V INPUT REMOTE CABLE CONTROL ANTENNA S-VIDEO AC INPUT The TV has a special signal output capability which allows you to connect 1. Notes: • Component 1-2, RGB-PC/RGB-DTV, HDMI1/DVI,HDMI2, DTV input sources cannot be used for operation. How to hook up the second TV or monitor. Connect the other end of the optical cable to external audio equipment (stereo system) via the Digital Audio Output (Optical) port. See the...
Owners Manual
Page 20
... support Auto HDMI/DVI, you need to set to HDMI1/DVI or HDMI2 port of RGB INPUT port. Installation HDMI - A separated audio connection is necessary because HDMI-to DIGITAL AUDIO(OPTICAL) port for this purpose. 20 Plasma TV How To Use - Select HDMI1/DVI or HDMI2 input source in main input option on the SETUP menu.(Refer to 1280x720p. - This TV supports HDCP(High-bandwidth Digital Contents Protection) Protocol for this purpose. To get the best picture quality, adjust the DVD Player or Set Top Box's output resolution...
... support Auto HDMI/DVI, you need to set to HDMI1/DVI or HDMI2 port of RGB INPUT port. Installation HDMI - A separated audio connection is necessary because HDMI-to DIGITAL AUDIO(OPTICAL) port for this purpose. 20 Plasma TV How To Use - Select HDMI1/DVI or HDMI2 input source in main input option on the SETUP menu.(Refer to 1280x720p. - This TV supports HDCP(High-bandwidth Digital Contents Protection) Protocol for this purpose. To get the best picture quality, adjust the DVD Player or Set Top Box's output resolution...
Owners Manual
Page 22
... service center. - When Source Devices connected with HDMI1/DVI Input, output PC Resolution(VGA, SVGA, XGA), Position and Size may not work if a HDMI to adjust the screen Position of time. In case that Video Resolution is not connected Cable or poor cable connection, "NO SIGNAL" OSD display in HDMI1/DVI Source Devices. Notes: - As shown the picture below, press the ADJUST button to DVI Cable is clear. In case HDMI1/DVI Source Devices is not supported TV SET output in use...
... service center. - When Source Devices connected with HDMI1/DVI Input, output PC Resolution(VGA, SVGA, XGA), Position and Size may not work if a HDMI to adjust the screen Position of time. In case that Video Resolution is not connected Cable or poor cable connection, "NO SIGNAL" OSD display in HDMI1/DVI Source Devices. Notes: - As shown the picture below, press the ADJUST button to DVI Cable is clear. In case HDMI1/DVI Source Devices is not supported TV SET output in use...
Owners Manual
Page 23
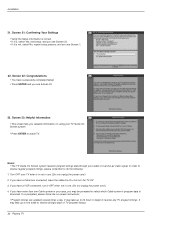
... are updated several times a day. - To download program listings the TV Guide On Screen system needs to be able to connect directly without a Cable Box ANT OUT ANT IN OUT S-VIDEO OUTPUT (R) AUDIO (L) SWITCH 3 4 IN VIDEO VCR Rear Cable IEEE-1394 HDMI 2 HDMI /DVI RS-232C INPUT (CONTROL/SERVICE) OUTPUT COMPONENT2 INPUT DVI INPUT DIGITAL AUDIO (OPTICAL) RGB INPUT AUDIO INPUT REMOTE CABLE CONTROL ANTENNA S-VIDEO AC INPUT VCR Front ANT OUT ANT IN OUT OUTPUT (R) AUDIO (L) SWITCH 3 4 IN S-VIDEO VIDEO VCR Rear Owner's Manual 23 How to set up the TV Guide On Screen...
... are updated several times a day. - To download program listings the TV Guide On Screen system needs to be able to connect directly without a Cable Box ANT OUT ANT IN OUT S-VIDEO OUTPUT (R) AUDIO (L) SWITCH 3 4 IN VIDEO VCR Rear Cable IEEE-1394 HDMI 2 HDMI /DVI RS-232C INPUT (CONTROL/SERVICE) OUTPUT COMPONENT2 INPUT DVI INPUT DIGITAL AUDIO (OPTICAL) RGB INPUT AUDIO INPUT REMOTE CABLE CONTROL ANTENNA S-VIDEO AC INPUT VCR Front ANT OUT ANT IN OUT OUTPUT (R) AUDIO (L) SWITCH 3 4 IN S-VIDEO VIDEO VCR Rear Owner's Manual 23 How to set up the TV Guide On Screen...
Owners Manual
Page 32
... the power cord.) 2. If you valuable information on -screen instructions. • Program listings are updated several times a day. If you have a Cable box connected, leave the cable box On, but turn it is not, select No, repeat setup process, and you see Screen 1. 22. It may take up to 24 hours to begin to download. Installation 21. If so prompted, please follow the on using your cable or over-the-air video signal...
... the power cord.) 2. If you valuable information on -screen instructions. • Program listings are updated several times a day. If you have a Cable box connected, leave the cable box On, but turn it is not, select No, repeat setup process, and you see Screen 1. 22. It may take up to 24 hours to begin to download. Installation 21. If so prompted, please follow the on using your cable or over-the-air video signal...

Owners Manual
Page 62
...: digital antenna(over-the-air) TV signal CATV: analog cable TV signal CADTV: digital cable TV signal 62 Plasma TV A password is required to gain access to the physical channel 2,3 or 4 in the TV Guide On Screen system Setup, cable channels(CATV or CADTV) will not be scanned by EZ Scan or Manual Scan. • When inserting the CableCARDTM, CATV, CADTV is not working in memory on the channel list. - Press the G button and then use D / E button to select channel number...
...: digital antenna(over-the-air) TV signal CATV: analog cable TV signal CADTV: digital cable TV signal 62 Plasma TV A password is required to gain access to the physical channel 2,3 or 4 in the TV Guide On Screen system Setup, cable channels(CATV or CADTV) will not be scanned by EZ Scan or Manual Scan. • When inserting the CableCARDTM, CATV, CADTV is not working in memory on the channel list. - Press the G button and then use D / E button to select channel number...
Owners Manual
Page 63
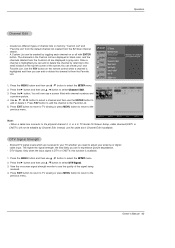
Operation Channel Edit - Use D / E / F / G button to select a channel and then use D / E button to /from the Custom List are displayed in TV Guide On Screen Setup, cable channels(CATV or CADTV) will now see the quality of the screen.You can add or delete the channel to select Channel Edit. 3. Note: • When a cable box connects to the physical channel 2, 3, or 4 in black color, and the channels deleted from the Favorite List. 1. View the on-screen signal strength monitor to add or delete...
Operation Channel Edit - Use D / E / F / G button to select a channel and then use D / E button to /from the Custom List are displayed in TV Guide On Screen Setup, cable channels(CATV or CADTV) will now see the quality of the screen.You can add or delete the channel to select Channel Edit. 3. Note: • When a cable box connects to the physical channel 2, 3, or 4 in black color, and the channels deleted from the Favorite List. 1. View the on-screen signal strength monitor to add or delete...
Owners Manual
Page 76
...) Input Block • Video, Front Video (On, Off) • Component 1, 2 (On, Off) • RGB, HDMI1/DVI,HDMI2 (On, Off) 76 Plasma TV Suitable for a time period. Operation Lock Menu Options Parental Control can be blocked by choosing the type of the program and the categories. The Parental Control Function (V-Chip) is also possible to -video movies use this function, the following must be used to block specific channels, ratings and other viewing...
...) Input Block • Video, Front Video (On, Off) • Component 1, 2 (On, Off) • RGB, HDMI1/DVI,HDMI2 (On, Off) 76 Plasma TV Suitable for a time period. Operation Lock Menu Options Parental Control can be blocked by choosing the type of the program and the categories. The Parental Control Function (V-Chip) is also possible to -video movies use this function, the following must be used to block specific channels, ratings and other viewing...
Owners Manual
Page 92
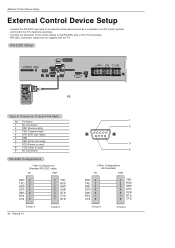
... 4 DSR 6 RTS 7 CTS 8 3 TXD 2 RXD 5 GND 4 DTR 6 DSR 7 RTS 8 CTS D-Sub 9 D-Sub 9 External Control Device Setup External Control Device Setup - RS-232C Setup Cable IEEE-1394 HDMI 2 HDMI1 /DVI RS-232C INPUT (CONTROL/SERVICE) OUTPUT COMPONENT2 INPUT DVI INPUT DIGITAL AUDIO (OPTICAL) RGB INPUT AUDIO INPUT DVD /DTV INPUT VIDEO AUDIO L R COMPONENT INPUT 2 VIDEO AUDIO L R MONITOR OUTPUT COMPONENT INPUT 1 (MONO) A/V INPUT REMOTE CONTROL CABLE ANTEN S-VIDEO PC Type of the control device to the RS-232C jack on the TV back panel. - Connect the serial port of Connector;
... 4 DSR 6 RTS 7 CTS 8 3 TXD 2 RXD 5 GND 4 DTR 6 DSR 7 RTS 8 CTS D-Sub 9 D-Sub 9 External Control Device Setup External Control Device Setup - RS-232C Setup Cable IEEE-1394 HDMI 2 HDMI1 /DVI RS-232C INPUT (CONTROL/SERVICE) OUTPUT COMPONENT2 INPUT DVI INPUT DIGITAL AUDIO (OPTICAL) RGB INPUT AUDIO INPUT DVD /DTV INPUT VIDEO AUDIO L R COMPONENT INPUT 2 VIDEO AUDIO L R MONITOR OUTPUT COMPONENT INPUT 1 (MONO) A/V INPUT REMOTE CONTROL CABLE ANTEN S-VIDEO PC Type of the control device to the RS-232C jack on the TV back panel. - Connect the serial port of Connector;
Owners Manual
Page 97
... picture, two part, not using physical channel, ATSC air. Input select(Command: x b) (Main Picture Input) G To select input source for sub picture in case analog channel tuning. 2. External Control Device Setup * All data are two cases that physical channel enable or disable. Transmission [x][b][][Set ID][][Data][Cr] Owner's Manual 97 Analog channel: NTSC cable, channel number(35), main picture Command: ma 00 23 xx xx xx xx 01 attribute(0x01): main picture, two part(it's not mandatory), using physical channel...
... picture, two part, not using physical channel, ATSC air. Input select(Command: x b) (Main Picture Input) G To select input source for sub picture in case analog channel tuning. 2. External Control Device Setup * All data are two cases that physical channel enable or disable. Transmission [x][b][][Set ID][][Data][Cr] Owner's Manual 97 Analog channel: NTSC cable, channel number(35), main picture Command: ma 00 23 xx xx xx xx 01 attribute(0x01): main picture, two part(it's not mandatory), using physical channel...

Owners Manual
Page 100
... programmed to operate most remote-controllable devices of other manufacturers. In that case, you don't press any button for 2 seconds, the current selected device button will be turned off. When pressing the button, the light blinks at the same time for 20 seconds, the light on the mode button will be illuminated. After blinking twice, this code is successful. 4. Programming a code into a remote mode 1. Enter code numbers using the number button on the remote by refering the code...
... programmed to operate most remote-controllable devices of other manufacturers. In that case, you don't press any button for 2 seconds, the current selected device button will be turned off. When pressing the button, the light blinks at the same time for 20 seconds, the light on the mode button will be illuminated. After blinking twice, this code is successful. 4. Programming a code into a remote mode 1. Enter code numbers using the number button on the remote by refering the code...


