Owners Manual
Page 6
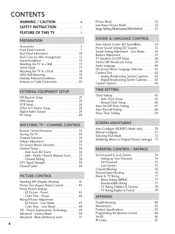
...Programming the Remote Control 84 Set ID 86 IR Codes 87 User Mode 48 XD - Black (Darkness) Level 51 4 Picture Reset 52 Low-Power Picture Mode 52 ImageStickingMinimization(ISM) Method 53 Auto Volume Leveler (EZ SoundRite 54 Preset Sound Setting (EZ Sound... 55 Sound Setting Adjustment - EZ Picture - Analog Broadcasting System Captions ....... 62 - TV Rating Children & General 78 - Auto Scan (EZ Scan 36 - User Mode 47 - Digital Broadcasting System Captions ........ 63 Caption Options 64 Clock ...
...Programming the Remote Control 84 Set ID 86 IR Codes 87 User Mode 48 XD - Black (Darkness) Level 51 4 Picture Reset 52 Low-Power Picture Mode 52 ImageStickingMinimization(ISM) Method 53 Auto Volume Leveler (EZ SoundRite 54 Preset Sound Setting (EZ Sound... 55 Sound Setting Adjustment - EZ Picture - Analog Broadcasting System Captions ....... 62 - TV Rating Children & General 78 - Auto Scan (EZ Scan 36 - User Mode 47 - Digital Broadcasting System Captions ........ 63 Caption Options 64 Clock ...
Owners Manual
Page 13
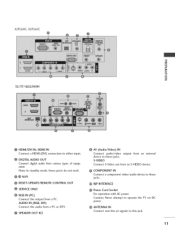
...© Z 32/37/42 LG500H HDMI/DVI IN, HDMI IN Connect a HDMI (DVI) connection to either input. @ DIGITAL AUDIO OUT Connect digital audio from an S-VIDEO device. S-VIDEO output from an external Connect S-Video out from various types of equipment. Caution: Never attempt to operate the TV on DC power. 0 ...DVI) Connect the audio from a PC. video/audio device to these jacks. Note: In standby mode, these ports do not work. @ _ M.RI O RESET/UPDATE/REMOTE CONTROL OUT SERVICEONLY RGB IN (PC) Connect the output from a PC or DTV. @ SPEAKEROUT 80 O AV (Audio/Video) IN Connect audio/video ...
...© Z 32/37/42 LG500H HDMI/DVI IN, HDMI IN Connect a HDMI (DVI) connection to either input. @ DIGITAL AUDIO OUT Connect digital audio from an S-VIDEO device. S-VIDEO output from an external Connect S-Video out from various types of equipment. Caution: Never attempt to operate the TV on DC power. 0 ...DVI) Connect the audio from a PC. video/audio device to these jacks. Note: In standby mode, these ports do not work. @ _ M.RI O RESET/UPDATE/REMOTE CONTROL OUT SERVICEONLY RGB IN (PC) Connect the output from a PC or DTV. @ SPEAKEROUT 80 O AV (Audio/Video) IN Connect audio/video ...
Owners Manual
Page 54
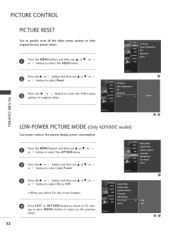
...and then use • or• or ^ or v button to the previous menu. 52 @ @0 @ @@ PICTURE CONTROL PICTURERESET Use to quickly reset all the Video menu options to reset the Video menu N C m N © Z © LOW-POWER PICTURE MODE (Only42PXSDC model) Low power reduces the plasma display power consumption.... Press the• or > button and then use• or• or v button to select Reset or ^ "O O Popretisosnstheto •origionral >valubeustt.on to their original factory preset values. Press EXIT or RETURN button to return to...
...and then use • or• or ^ or v button to the previous menu. 52 @ @0 @ @@ PICTURE CONTROL PICTURERESET Use to quickly reset all the Video menu options to reset the Video menu N C m N © Z © LOW-POWER PICTURE MODE (Only42PXSDC model) Low power reduces the plasma display power consumption.... Press the• or > button and then use• or• or v button to select Reset or ^ "O O Popretisosnstheto •origionral >valubeustt.on to their original factory preset values. Press EXIT or RETURN button to return to...
Owners Manual
Page 68
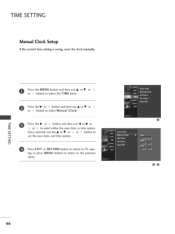
... • or > button and then use • or • or ^ or v button to select the TIME menu. z Press EXIT or RETURN button to return to TV viewing or press MENU button to return to select either the year_ date, or time option. Press the• or > button and then use_l or...• or m < or > to the previous menu. 66 @ @0 TIME SETTING Manual Clock Setup If the current time setting is wrong, reset the clock manually. Press the MENU button and then use • or • or ^ or v button to m set the year_ date, and time option.
... • or > button and then use • or • or ^ or v button to select the TIME menu. z Press EXIT or RETURN button to return to TV viewing or press MENU button to return to select either the year_ date, or time option. Press the• or > button and then use_l or...• or m < or > to the previous menu. 66 @ @0 TIME SETTING Manual Clock Setup If the current time setting is wrong, reset the clock manually. Press the MENU button and then use • or • or ^ or v button to m set the year_ date, and time option.

Owners Manual
Page 75
N m m z c m @0 z 73 Press the MENU button and then use • or • or ^ or v button to select the SCREEN menu. Press the • or > button and then use • or • or ^ or v button to select Reset. To initialize the adjusted value. INITIALIZING (RESETTO ORIGINAL FACTORYSETTINGS) This function operates in current mode. O Press the • or > button.
N m m z c m @0 z 73 Press the MENU button and then use • or • or ^ or v button to select the SCREEN menu. Press the • or > button and then use • or • or ^ or v button to select Reset. To initialize the adjusted value. INITIALIZING (RESETTO ORIGINAL FACTORYSETTINGS) This function operates in current mode. O Press the • or > button.


