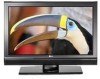
Owners Manual
Page 6
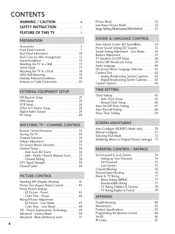
...Cover for Wire Arrangement 12 Stand Installation 15 Attaching the TV to a Wall 17 Swivel Stand 17 Attaching the TV to Original Factory Settings) .73 Set Password & Lock System 74 - Color Tone - Black (Darkness) Level 51 4 Picture Reset 52 Low-Power Picture Mode 52 ImageStickingMinimization(ISM) Method 53...off Setting 68 Sleep Timer Setting 69 Auto Configure (RGB(PC) Mode only 70 Manual Configure 71 Selecting XGA Mode 72 Initializing (Reset to a Desk 18 VESA Wall Mounting 19 Desktop Pedestal Installation 19 Antenna or Cable Connection 20 HD Receiver Setup 21 DVD Setup ...
...Cover for Wire Arrangement 12 Stand Installation 15 Attaching the TV to a Wall 17 Swivel Stand 17 Attaching the TV to Original Factory Settings) .73 Set Password & Lock System 74 - Color Tone - Black (Darkness) Level 51 4 Picture Reset 52 Low-Power Picture Mode 52 ImageStickingMinimization(ISM) Method 53...off Setting 68 Sleep Timer Setting 69 Auto Configure (RGB(PC) Mode only 70 Manual Configure 71 Selecting XGA Mode 72 Initializing (Reset to a Desk 18 VESA Wall Mounting 19 Desktop Pedestal Installation 19 Antenna or Cable Connection 20 HD Receiver Setup 21 DVD Setup ...
Owners Manual
Page 13
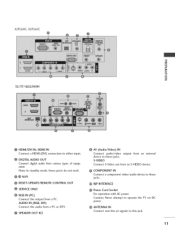
...Video out from an S-VIDEO device. COMPONENT IN Connect a component jacks. Note: In standby mode, these jacks. Caution: Never attempt to operate the TV on DC power. 0 ANTENNA IN Connect over-the air signals to these @ RJP INTERFACE Power Cord Socket For operation with AC power. video/audio... device to this jack. 11 42PG60C, 42PG65C O "O r'rl ....-t © Z 32/37/42 LG500H HDMI/DVI IN, HDMI IN Connect a HDMI (DVI) connection to these ports do not work. @ _ M.RI O RESET/UPDATE/REMOTE CONTROL OUT SERVICEONLY RGB IN (PC) Connect the output from a PC.
...Video out from an S-VIDEO device. COMPONENT IN Connect a component jacks. Note: In standby mode, these jacks. Caution: Never attempt to operate the TV on DC power. 0 ANTENNA IN Connect over-the air signals to these @ RJP INTERFACE Power Cord Socket For operation with AC power. video/audio... device to this jack. 11 42PG60C, 42PG65C O "O r'rl ....-t © Z 32/37/42 LG500H HDMI/DVI IN, HDMI IN Connect a HDMI (DVI) connection to these ports do not work. @ _ M.RI O RESET/UPDATE/REMOTE CONTROL OUT SERVICEONLY RGB IN (PC) Connect the output from a PC.
Owners Manual
Page 54
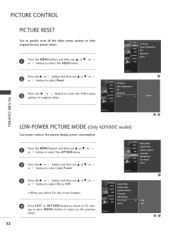
...or > button and then use • or • or ^ or v button to select the OPTION menu. Press EXIT or RETURN button to return to TV viewing or press MENU button to return to their original factory preset values. Press the MENU button and then use • or • or or... or• or ^ or v button to select Low Power. Press the• or > button and then use • or • or ^ or v button to reset the Video menu N C m N © Z © LOW-POWER PICTURE MODE (Only42PXSDC model) Low power reduces the plasma display power consumption. PICTURE CONTROL PICTURERESET Use to ...
...or > button and then use • or • or ^ or v button to select the OPTION menu. Press EXIT or RETURN button to return to TV viewing or press MENU button to return to their original factory preset values. Press the MENU button and then use • or • or or... or• or ^ or v button to select Low Power. Press the• or > button and then use • or • or ^ or v button to reset the Video menu N C m N © Z © LOW-POWER PICTURE MODE (Only42PXSDC model) Low power reduces the plasma display power consumption. PICTURE CONTROL PICTURERESET Use to ...
Owners Manual
Page 68
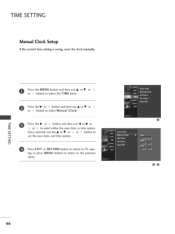
... and then use • or • or ^ or v button to select Manual Clock. TIME SETTING Manual Clock Setup If the current time setting is wrong, reset the clock manually. Press the • or > button and then use • or • or ^ or v button to select either the year_ date, or time... option. z Press EXIT or RETURN button to return to TV viewing or press MENU button to return to m set the year_ date, and time option. Once selected, use the • or • or ^ or v button...
... and then use • or • or ^ or v button to select Manual Clock. TIME SETTING Manual Clock Setup If the current time setting is wrong, reset the clock manually. Press the • or > button and then use • or • or ^ or v button to select either the year_ date, or time... option. z Press EXIT or RETURN button to return to TV viewing or press MENU button to return to m set the year_ date, and time option. Once selected, use the • or • or ^ or v button...

Owners Manual
Page 75
O Press the • or > button. Press the MENU button and then use • or • or ^ or v button to select the SCREEN menu. To initialize the adjusted value. Press the • or > button and then use • or • or ^ or v button to select Reset. N m m z c m @0 z 73 INITIALIZING (RESETTO ORIGINAL FACTORYSETTINGS) This function operates in current mode.
O Press the • or > button. Press the MENU button and then use • or • or ^ or v button to select the SCREEN menu. To initialize the adjusted value. Press the • or > button and then use • or • or ^ or v button to select Reset. N m m z c m @0 z 73 INITIALIZING (RESETTO ORIGINAL FACTORYSETTINGS) This function operates in current mode.


