
Owners Manual
Page 1
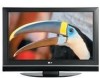
ENERGY STAR is a set of the set . before operating Record model number and serial number of power-saving guidelines issued by the U.S. A.,Inc. Environmental Protection Agency(EPA). Retain it for energy efficiency. As an ENERGY STAR Partner LGE U. S. has determined that this product meets the ENERGY STAR guidelines for future reference. See the label attached on the back cover and quote this manual carefully your dealer when you require service. PLASMA TV OWNER'S MANUAL 32PCSDVC Please read this information to your set .
ENERGY STAR is a set of the set . before operating Record model number and serial number of power-saving guidelines issued by the U.S. A.,Inc. Environmental Protection Agency(EPA). Retain it for energy efficiency. As an ENERGY STAR Partner LGE U. S. has determined that this product meets the ENERGY STAR guidelines for future reference. See the label attached on the back cover and quote this manual carefully your dealer when you require service. PLASMA TV OWNER'S MANUAL 32PCSDVC Please read this information to your set .
Owners Manual
Page 2
...close to Part 15 of the National Electric Code (U.S.A.). If this product However, there is connected. -Consult the dealer or an experienced radio/TV technician for a Class B digital device, pursuant to the point of the following measures: - Connect the equipment to an outlet on ,...or relocate the receiving antenna. - Any changes or modifications not expressly approved by turning the equipment off and on a circuit different from LG Electronics. EiiiiRiliiEi_Uii _Tiii!iiiP_ UIREiiiiiii! / WARNING / CAUTION To prevent fire or shock hazards, do not expose this product in any way...
...close to Part 15 of the National Electric Code (U.S.A.). If this product However, there is connected. -Consult the dealer or an experienced radio/TV technician for a Class B digital device, pursuant to the point of the following measures: - Connect the equipment to an outlet on ,...or relocate the receiving antenna. - Any changes or modifications not expressly approved by turning the equipment off and on a circuit different from LG Electronics. EiiiiRiliiEi_Uii _Tiii!iiiP_ UIREiiiiiii! / WARNING / CAUTION To prevent fire or shock hazards, do not expose this product in any way...
Owners Manual
Page 3
...Do not defeat the safety purpose of a specific safety instruction may be included by hanging power and signal cables on the back of the TV. 2 Unplug this apparatus near any heat sources such as follows. Do not install near water. At the manufacturer's option, a picture...apparatus. Clean only with one wider than the other apparatus (including amplifiers)that safety instruction: Read these instructions. specified by When mounting a TV it on or pinched particularly at plugs, convenience receptacles, and the point where they exit from the apparatus. shall be given in a...
...Do not defeat the safety purpose of a specific safety instruction may be included by hanging power and signal cables on the back of the TV. 2 Unplug this apparatus near any heat sources such as follows. Do not install near water. At the manufacturer's option, a picture...apparatus. Clean only with one wider than the other apparatus (including amplifiers)that safety instruction: Read these instructions. specified by When mounting a TV it on or pinched particularly at plugs, convenience receptacles, and the point where they exit from the apparatus. shall be given in a...
Owners Manual
Page 5
...46 Audio Language 47 On-Screen Menus Language Selection 48 Caption Mode 49 - Channel Editing 30 Key Lock 31 Picture Size (Aspect Ratio) Control 32 Preset Picture Settings - Digital Broadcasting System Captions ........ 51 - Caption Option 52 4 Auto Scan (Auto Tuning 28 - Preset 34 - Black (...Connection 13 HD Receiver Setup 14 DVD Setup 17 VCR Setup 19 Headphone Setup 20 PC Setup 21 Remote Control Functions 24 Turning On TV 26 Channel Selection 26 Volume Adjustment 26 On-Screen Menus Selection 27 Channel Search - Color Tone - User Mode 36 - Analog ...
...46 Audio Language 47 On-Screen Menus Language Selection 48 Caption Mode 49 - Channel Editing 30 Key Lock 31 Picture Size (Aspect Ratio) Control 32 Preset Picture Settings - Digital Broadcasting System Captions ........ 51 - Caption Option 52 4 Auto Scan (Auto Tuning 28 - Preset 34 - Black (...Connection 13 HD Receiver Setup 14 DVD Setup 17 VCR Setup 19 Headphone Setup 20 PC Setup 21 Remote Control Functions 24 Turning On TV 26 Channel Selection 26 Volume Adjustment 26 On-Screen Menus Selection 27 Channel Search - Color Tone - User Mode 36 - Analog ...
Owners Manual
Page 6
Manual Clock Setup 54 Auto On/Off Time Setting 55 Sleep Time Setting 56 Auto Shut-off Setting 57 Set Password & Lock System 58 Movie & TV Rating 60 Downloadable Rating 62 Troubleshooting 63 Maintenance 65 Product Specifications 66 External Control Through RS-232C 67 5 Auto Clock Setup 53 - Clock Setting -
Manual Clock Setup 54 Auto On/Off Time Setting 55 Sleep Time Setting 56 Auto Shut-off Setting 57 Set Password & Lock System 58 Movie & TV Rating 60 Downloadable Rating 62 Troubleshooting 63 Maintenance 65 Product Specifications 66 External Control Through RS-232C 67 5 Auto Clock Setup 53 - Clock Setting -

Owners Manual
Page 7
[ DU FEATUREOF THIS TV TM oLfGa's fuolwl ndisgpiteacl iaiml adgigeitapl roicmeasgseor,gesniexradtioffre,rencot nsmisatiinng E N G I -li:::lml HDMI TM,the HDMI logo and High-Definition Multimedia Interface are trademarks or registered trademarks of HDMI Licensing," 6 I N E picture quality factors.
[ DU FEATUREOF THIS TV TM oLfGa's fuolwl ndisgpiteacl iaiml adgigeitapl roicmeasgseor,gesniexradtioffre,rencot nsmisatiinng E N G I -li:::lml HDMI TM,the HDMI logo and High-Definition Multimedia Interface are trademarks or registered trademarks of HDMI Licensing," 6 I N E picture quality factors.
Owners Manual
Page 9
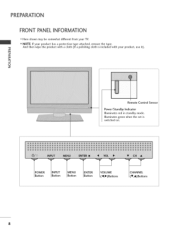
""_NOTE: If your TV. IOWER I Button _INPUT IButton I Button "_NTE R I Button I (_I,I_) Buttons I (_,&)Buttons 8 And then wipe the product with your product, use it). m © z Power/Standby Indicator Illuminates red in standby mode. Illuminates green when the set is included with a cloth (If a polishing cloth is switched on. PREPARATION FRONT PANELINFORMATION _ Here shown may be somewhat different from your product has a protection tape attached, remove the tape.
""_NOTE: If your TV. IOWER I Button _INPUT IButton I Button "_NTE R I Button I (_I,I_) Buttons I (_,&)Buttons 8 And then wipe the product with your product, use it). m © z Power/Standby Indicator Illuminates red in standby mode. Illuminates green when the set is included with a cloth (If a polishing cloth is switched on. PREPARATION FRONT PANELINFORMATION _ Here shown may be somewhat different from your product has a protection tape attached, remove the tape.
Owners Manual
Page 10
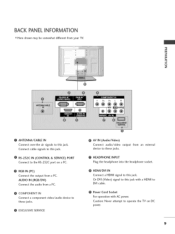
... a HDMI to this jack. Caution: Never attempt to the RS-232C port on DC power. 9 O RS-232C IN (CONTROL & SERVICE) PORT Connect to operate the TV on a PC. output from a PC. O RGB IN (PC) Connect the output from an external O HEADPHONE INPUT Plug the headphone into the headphone socket. video/audio... Connect a HDMI signal to these jacks. AUDIO IN (RGB/DVI) Connect the audio from a PC. BACK PANELINFORMATION ,,,IHere shown may be somewhat different from your TV. -O m © z @ ANTENNA/CABLE IN Connect over-the air signals to this jack.
... a HDMI to this jack. Caution: Never attempt to the RS-232C port on DC power. 9 O RS-232C IN (CONTROL & SERVICE) PORT Connect to operate the TV on a PC. output from a PC. O RGB IN (PC) Connect the output from an external O HEADPHONE INPUT Plug the headphone into the headphone socket. video/audio... Connect a HDMI signal to these jacks. AUDIO IN (RGB/DVI) Connect the audio from a PC. BACK PANELINFORMATION ,,,IHere shown may be somewhat different from your TV. -O m © z @ ANTENNA/CABLE IN Connect over-the air signals to this jack.
Owners Manual
Page 11
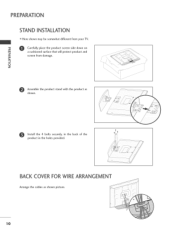
PREPARATION STAND INSTALLATION ,,,iHere shown may be somewhat different from damage. 0 z _o o ( \\ Assemble the product stand with the product as shown picture. 10 BACK COVER FOR WIRE ARRANGEMENT Arrange the cables as shown. Carefully place the product screen side down on m a cushioned surface that will protect product and screen from your TV. Install the 4 bolts securely, in the back of the product in the holes provided.
PREPARATION STAND INSTALLATION ,,,iHere shown may be somewhat different from damage. 0 z _o o ( \\ Assemble the product stand with the product as shown picture. 10 BACK COVER FOR WIRE ARRANGEMENT Arrange the cables as shown. Carefully place the product screen side down on m a cushioned surface that will protect product and screen from your TV. Install the 4 bolts securely, in the back of the product in the holes provided.
Owners Manual
Page 12
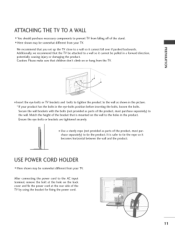
.... It is mounted on the wall to the AC input terminal, remove the bolt at the hole on or hang from the TV. © z Insert the eye-bolts or TV brackets and bolts to tighten the product to a wall so it cannot be attached to the wall as shown in a forward direction..., potentially causing injury or damaging the product. ATTACHINGTHE TV TO A WALL ""_You should purchase necessary components to tie the rope so it becomes horizontal between the wall and the product. Secure the wall brackets...
.... It is mounted on the wall to the AC input terminal, remove the bolt at the hole on or hang from the TV. © z Insert the eye-bolts or TV brackets and bolts to tighten the product to a wall so it cannot be attached to the wall as shown in a forward direction..., potentially causing injury or damaging the product. ATTACHINGTHE TV TO A WALL ""_You should purchase necessary components to tie the rope so it becomes horizontal between the wall and the product. Secure the wall brackets...
Owners Manual
Page 14
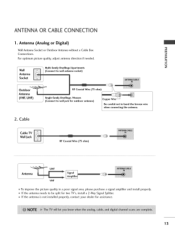
CabJe Cable TV Wall Jack _ -_ xial Wire (TS ohm) }i_i_Ni_!i!!__i:}_i z_!i!i_ iiiiiiii iiiiiiiiiiiiiiiii UHF VHF 01T_o improve the picture quality in a poor signal area, please ... _o m Connections. _o For optimum picture quality, adjust antenna direction if needed. i © Multi-family Dwellings/Apartments z Wall Antenna (Connect to be split for two TV's, install a 2-Way Signal Splitter. 01_If the antenna is not installed properly, contact your dealer for assistance. 13 ANTENNA OR CABLE CONNECTION 1.
CabJe Cable TV Wall Jack _ -_ xial Wire (TS ohm) }i_i_Ni_!i!!__i:}_i z_!i!i_ iiiiiiii iiiiiiiiiiiiiiiii UHF VHF 01T_o improve the picture quality in a poor signal area, please ... _o m Connections. _o For optimum picture quality, adjust antenna direction if needed. i © Multi-family Dwellings/Apartments z Wall Antenna (Connect to be split for two TV's, install a 2-Way Signal Splitter. 01_If the antenna is not installed properly, contact your dealer for assistance. 13 ANTENNA OR CABLE CONNECTION 1.

Owners Manual
Page 15
... box. How to use Turn on the remote control. Y, CB/PB, CR/PR Yes No Yes Yes Yes Yes Yes Yes 14 HD RECEIVERSETUP This TV can receive Digital Over-the-air/Cable do receive digital signals from a digital set -top box. However, if you have finished connecting all equipment. operation...
... box. How to use Turn on the remote control. Y, CB/PB, CR/PR Yes No Yes Yes Yes Yes Yes Yes 14 HD RECEIVERSETUP This TV can receive Digital Over-the-air/Cable do receive digital signals from a digital set -top box. However, if you have finished connecting all equipment. operation...
Owners Manual
Page 18
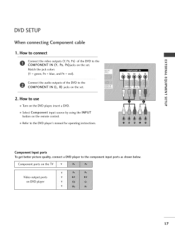
... to use m c 01_Turn on the DVD player, insert a DVD. 0_Select Component input source by using the INPUT button on the set . Component ports on the TV Video output ports on the set . DVD SETUP When connecting Component cable 1.
... to use m c 01_Turn on the DVD player, insert a DVD. 0_Select Component input source by using the INPUT button on the set . Component ports on the TV Video output ports on the set . DVD SETUP When connecting Component cable 1.

Owners Manual
Page 20
IN socket on the screen. How to use Set VCR output switch to 3 or 4 and then tune TV to the VCR owner's manual.) 19 If the 4:5 picture format is common to the RF antenna in consequence the manufactures warranty does not cover the ... socket of the screen may remain visible on the set. 2. VCR SETUP To avoid picture noise (interference), leave an adequate distance between the VCR and TV.
IN socket on the screen. How to use Set VCR output switch to 3 or 4 and then tune TV to the VCR owner's manual.) 19 If the 4:5 picture format is common to the RF antenna in consequence the manufactures warranty does not cover the ... socket of the screen may remain visible on the set. 2. VCR SETUP To avoid picture noise (interference), leave an adequate distance between the VCR and TV.
Owners Manual
Page 21
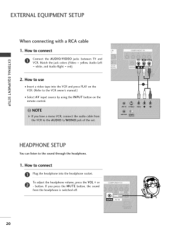
... headphone into the VCR and press PLAY on the m remote control. button. c -0 HEADPHONE SETUP You can listen to connect S} m Connect the AUDIO/VIDEO jacks between TV and x VCR. EXTERNALEQUIPMENT SETUP When connecting with a RCA cable 1. If you press the MUTE button, the sound from the headphone is switched off. 2O How...
... headphone into the VCR and press PLAY on the m remote control. button. c -0 HEADPHONE SETUP You can listen to connect S} m Connect the AUDIO/VIDEO jacks between TV and x VCR. EXTERNALEQUIPMENT SETUP When connecting with a RCA cable 1. If you press the MUTE button, the sound from the headphone is switched off. 2O How...

Owners Manual
Page 22
.... 21 When connecting HDMI to the AUDIO IN (RGB/DVI) jack on the set . Connect the PC audio output to DVI cable I . PC SETUP This TV provides Plug and Play capability, meaning that the PC adjusts automatically to the AUDIO IN m (RGB/DVI) jack on the set . 2. X:) c 2. How to connect m x Connect... the RGB output of the PC to use m z 01_Turn on the set. How to the HDMI/DVI I N jack on the PC and the TV. m c 01_Select RGB-PC input source by using the INPUT button on the set. _D z Connect the PC audio output to the...
.... 21 When connecting HDMI to the AUDIO IN (RGB/DVI) jack on the set . Connect the PC audio output to DVI cable I . PC SETUP This TV provides Plug and Play capability, meaning that the PC adjusts automatically to the AUDIO IN m (RGB/DVI) jack on the set . 2. X:) c 2. How to connect m x Connect... the RGB output of the PC to use m z 01_Turn on the set. How to the HDMI/DVI I N jack on the PC and the TV. m c 01_Select RGB-PC input source by using the INPUT button on the set. _D z Connect the PC audio output to the...
Owners Manual
Page 25
... off . _ p.26 © CC Select a closed caption. _ p.49 CHANNEL Select available channels. THUMBSTICK (Up/Down/Left Right/ENTER) Navigate the on the TV. PICTURE Selects the factory preset picture depend on or off auto- < matically. _ p.56 N I VOLUME UP Increase/decrease the sound level. > z /DOWN ...type of program. Return to the last channel viewed. UP/DOWN MENU Displays the main menu. BACK Tune to the previous menu. HING TV / CHANNEL CONTROL REMOTE CONTROL FUNCTIONS When using the remote control, aim it at the remote control sensor on -screen menus and adjust the...
... off . _ p.26 © CC Select a closed caption. _ p.49 CHANNEL Select available channels. THUMBSTICK (Up/Down/Left Right/ENTER) Navigate the on the TV. PICTURE Selects the factory preset picture depend on or off auto- < matically. _ p.56 N I VOLUME UP Increase/decrease the sound level. > z /DOWN ...type of program. Return to the last channel viewed. UP/DOWN MENU Displays the main menu. BACK Tune to the previous menu. HING TV / CHANNEL CONTROL REMOTE CONTROL FUNCTIONS When using the remote control, aim it at the remote control sensor on -screen menus and adjust the...

Owners Manual
Page 26
iNPUT External input modes rotate in regular sequence: TV, AV, Component, RGB-PC, and HDMI. (AV, Component, RGB-PC, and HDMI input sources are linked automatically, only if a device is connected.) NUMBER button N z -- (DASH) Used to the last TV channel. TV In AV, Component, RGB-PC, and HDMI input sources, screen returns to enter a program number for multiple program channels such as 2-1,2-2, etc. < FAV Scroll through the programmed Favorite channels. _ p.30 N I > z z fT1 N O Z O 2S POWER Turns your TV on or off.
iNPUT External input modes rotate in regular sequence: TV, AV, Component, RGB-PC, and HDMI. (AV, Component, RGB-PC, and HDMI input sources are linked automatically, only if a device is connected.) NUMBER button N z -- (DASH) Used to the last TV channel. TV In AV, Component, RGB-PC, and HDMI input sources, screen returns to enter a program number for multiple program channels such as 2-1,2-2, etc. < FAV Scroll through the programmed Favorite channels. _ p.30 N I > z z fT1 N O Z O 2S POWER Turns your TV on or off.
Owners Manual
Page 27
...if the power cord is programmed to remember which power state it was last set -r" to switch the sound off, press the MUTE button. The TV reverts to suit your personal preference. Select the viewing source by pressing the MUTE or VOL (+ or -) button. 26 i z When finished using... mode. Press the VOL (+ or -) button to select a channel number. At this moment, the TV switches to standby mode. 01I_n standby mode to turn TV on the remote control. WATCHING TV / CHANNEL CONTROL TURNING ON TV First, connect power cord correctly. You can cancel the Mute function by using the...
...if the power cord is programmed to remember which power state it was last set -r" to switch the sound off, press the MUTE button. The TV reverts to suit your personal preference. Select the viewing source by pressing the MUTE or VOL (+ or -) button. 26 i z When finished using... mode. Press the VOL (+ or -) button to select a channel number. At this moment, the TV switches to standby mode. 01I_n standby mode to turn TV on the remote control. WATCHING TV / CHANNEL CONTROL TURNING ON TV First, connect power cord correctly. You can cancel the Mute function by using the...
Owners Manual
Page 28
ON-SCREEN MENUS SELECTION Your TV's OSD (On Screen Display) may differ slightly from what is shown in this manual. Press the MENU button and then use • • _1 • button to select the each menu. Press the • button and then use • or • button to display the available menus. SETUP LOCK _h PICTURE -r" Z < N I > z z fT1 N © Z © AUDIO OPTION TIME _m 27
ON-SCREEN MENUS SELECTION Your TV's OSD (On Screen Display) may differ slightly from what is shown in this manual. Press the MENU button and then use • • _1 • button to select the each menu. Press the • button and then use • or • button to display the available menus. SETUP LOCK _h PICTURE -r" Z < N I > z z fT1 N © Z © AUDIO OPTION TIME _m 27


