Owners Manual
Page 2
... user is provided to call the CATV system installer's attention to Article 820-40 of the National Electric Code (U.S.A.). However, there is connected. -Consult the dealer or an experienced radio/TV technician for help. Increase the separation between the equipment and receiver. - This equipment generates, uses and can be connected to the grounding system of the building, as close...
... user is provided to call the CATV system installer's attention to Article 820-40 of the National Electric Code (U.S.A.). However, there is connected. -Consult the dealer or an experienced radio/TV technician for help. Increase the separation between the equipment and receiver. - This equipment generates, uses and can be connected to the grounding system of the building, as close...
Owners Manual
Page 4
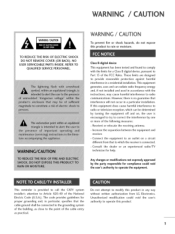
..., pinched, closed in electric shock or fire. Check the specification page of these conditions could result in a door, or walked upon a dedicated circuit; Overloaded wall outlets, loose or damaged wall outlets, extension cords, frayed power cords, or damaged or cracked wire insulation are not possible, have fallen into the product, and do not expose this owner's manual to plugs, wall outlets, and...
..., pinched, closed in electric shock or fire. Check the specification page of these conditions could result in a door, or walked upon a dedicated circuit; Overloaded wall outlets, loose or damaged wall outlets, extension cords, frayed power cords, or damaged or cracked wire insulation are not possible, have fallen into the product, and do not expose this owner's manual to plugs, wall outlets, and...
Owners Manual
Page 5
... the TV to a Wall 11 Use Power Cord Holder 11 Desktop Pedestal Installation 12 Production Cover 12 Antenna or Cable Connection 13 HD Receiver Setup 14 DVD Setup 17 VCR Setup 19 Headphone Setup 20 PC Setup 21 Remote Control Functions 24 Turning On TV 26 Channel Selection 26 Volume Adjustment 26 On-Screen Menus Selection 27 Channel Search - Black (Darkness) Level 39 Image Sticking Minimization (ISM) Method ...... 40 Low-Power Picture Mode 41 Picture Reset 42 Preset Sound Setting (Sound Mode 43 Sound Setting Adjustment - Picture Mode - User Mode 37 XD (Picture Improvement...
... the TV to a Wall 11 Use Power Cord Holder 11 Desktop Pedestal Installation 12 Production Cover 12 Antenna or Cable Connection 13 HD Receiver Setup 14 DVD Setup 17 VCR Setup 19 Headphone Setup 20 PC Setup 21 Remote Control Functions 24 Turning On TV 26 Channel Selection 26 Volume Adjustment 26 On-Screen Menus Selection 27 Channel Search - Black (Darkness) Level 39 Image Sticking Minimization (ISM) Method ...... 40 Low-Power Picture Mode 41 Picture Reset 42 Preset Sound Setting (Sound Mode 43 Sound Setting Adjustment - Picture Mode - User Mode 37 XD (Picture Improvement...
Owners Manual
Page 12
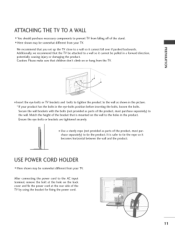
... between the wall and the product. It is mounted on the wall to the AC input terminal, remove the bolt at the hole on or hang from the TV. © z Insert the eye-bolts or TV brackets and bolts to tighten the product to a wall so it...rear side of the TV by using the bracket for fixing the power cord. 11 USE POWERCORD HOLDER Here shown may be somewhat different from your TV. Caution: Please make sure that the TV be pulled in the picture. Match the height of the bracket that you set up the TV close to tie the product. After connecting the power cord to the holes in the eye-bolts...
... between the wall and the product. It is mounted on the wall to the AC input terminal, remove the bolt at the hole on or hang from the TV. © z Insert the eye-bolts or TV brackets and bolts to tighten the product to a wall so it...rear side of the TV by using the bracket for fixing the power cord. 11 USE POWERCORD HOLDER Here shown may be somewhat different from your TV. Caution: Please make sure that the TV be pulled in the picture. Match the height of the bracket that you set up the TV close to tie the product. After connecting the power cord to the holes in the eye-bolts...

Owners Manual
Page 15
... power cords until you device, refer to the owner's manual for the digital set-top box. signals without an external box or other digital external digital set -top below. Match the jack colors z (Y = green, PB = blue, and PR = red). HD RECEIVERSETUP This TV can receive Digital Over-the-air/Cable do receive digital signals from a digital set -top box. m c Connect the audio output of the digital set top box to -0 the COMPONENT IN (L, R) jacks on the set . 2. How to connect m _D c Connect the video outputs (Y, PB, PR) of the digital set...
... power cords until you device, refer to the owner's manual for the digital set-top box. signals without an external box or other digital external digital set -top below. Match the jack colors z (Y = green, PB = blue, and PR = red). HD RECEIVERSETUP This TV can receive Digital Over-the-air/Cable do receive digital signals from a digital set -top box. m c Connect the audio output of the digital set top box to -0 the COMPONENT IN (L, R) jacks on the set . 2. How to connect m _D c Connect the video outputs (Y, PB, PR) of the digital set...
Owners Manual
Page 16
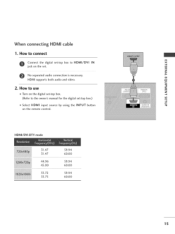
XZ) c i "0 2. HDMI/DVI-DTV mode 31.47 31.47 44.96 45.00 33.72 33.75 59.94 60.00 59.94 60.00 59.94 60.00 15 How to HDMI/DVI IN >< jack on the remote control. When connecting HDMI cable 1. m HDMI supports both audio and video. How to use m z Turn on the digital set-top box. (Refer to the owner's manual for the digital set-top box.) m --4 C Select HDMI input source by using the INPUT button "0 on the set -top box to connect m Connect the digital set . m _o z No separated audio connection is necessary.
XZ) c i "0 2. HDMI/DVI-DTV mode 31.47 31.47 44.96 45.00 33.72 33.75 59.94 60.00 59.94 60.00 59.94 60.00 15 How to HDMI/DVI IN >< jack on the remote control. When connecting HDMI cable 1. m HDMI supports both audio and video. How to use m z Turn on the digital set-top box. (Refer to the owner's manual for the digital set-top box.) m --4 C Select HDMI input source by using the INPUT button "0 on the set -top box to connect m Connect the digital set . m _o z No separated audio connection is necessary.
Owners Manual
Page 17
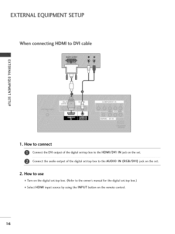
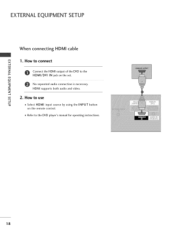
EXTERNALEQUIPMENT SETUP When connecting HDM[ to the owner's manual for the digital set-top box.) 01S_elect HDMI input source by using the INPUT button on the remote control. 16 How to connect Connect the DVI output of the digital set-top box to the HDMI/DVI IN jack on the set. How to use 01T_urn on the set -top box. (Refer to DVI cable m x m _o z m _D c m z m c -0 1. Connect the audio output of the digital set-top box to the AUDIO IN (RGB/DVI) jack on the digital set . 2.
EXTERNALEQUIPMENT SETUP When connecting HDM[ to the owner's manual for the digital set-top box.) 01S_elect HDMI input source by using the INPUT button on the remote control. 16 How to connect Connect the DVI output of the digital set-top box to the HDMI/DVI IN jack on the set. How to use 01T_urn on the set -top box. (Refer to DVI cable m x m _o z m _D c m z m c -0 1. Connect the audio output of the digital set-top box to the AUDIO IN (RGB/DVI) jack on the digital set . 2.
Owners Manual
Page 18
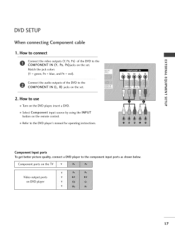
... better picture quality, connect a DVD player to the DVD player's manual for operating instructions. Component ports on the TV Video output ports on the set . How to use m c 01_Turn on the DVD player, insert a DVD. 0_Select Component input source by using the INPUT button on the set . How to connect Connect the video outputs (Y, PB, PR) of the DVD to the m x COMPONENT IN (Y, PB, PR)jacks on the remote control. 01_Refer to the component input ports as shown below. m z 2. m Match the jack colors z (Y = green, PB = blue...
... better picture quality, connect a DVD player to the DVD player's manual for operating instructions. Component ports on the TV Video output ports on the set . How to use m c 01_Turn on the DVD player, insert a DVD. 0_Select Component input source by using the INPUT button on the set . How to connect Connect the video outputs (Y, PB, PR) of the DVD to the m x COMPONENT IN (Y, PB, PR)jacks on the remote control. 01_Refer to the component input ports as shown below. m z 2. m Match the jack colors z (Y = green, PB = blue...
Owners Manual
Page 19
m _D c No separated audio connection is necessary. How to the DVD player's manual for operating instructions. 18 z 2. m HDMI supports both audio and video. How to connect m _o z Connect the HDMI output of the DVD to the HDMI/DVI IN jack on the remote control. 01_Refer to use m c -O 01_Select HDMI input source by using the INPUT button on the set. EXTERNALEQUIPMENT SETUP When connecting HDM[ cable m x 1.
m _D c No separated audio connection is necessary. How to the DVD player's manual for operating instructions. 18 z 2. m HDMI supports both audio and video. How to connect m _o z Connect the HDMI output of the DVD to the HDMI/DVI IN jack on the remote control. 01_Refer to use m c -O 01_Select HDMI input source by using the INPUT button on the set. EXTERNALEQUIPMENT SETUP When connecting HDM[ cable m x 1.

Owners Manual
Page 20
... VCR to the ANTENNA/CABLE O Connect the antenna cable to the same channel number. Insert a video tape into the VCR and press PLAY on the screen. IN socket on the set. 2. How to use Set VCR output switch to 3 or 4 and then tune TV to the RF antenna in consequence the manufactures warranty does not cover the product bearing this phenomenon. VCR SETUP To avoid picture noise (interference), leave...
... VCR to the ANTENNA/CABLE O Connect the antenna cable to the same channel number. Insert a video tape into the VCR and press PLAY on the screen. IN socket on the set. 2. How to use Set VCR output switch to 3 or 4 and then tune TV to the RF antenna in consequence the manufactures warranty does not cover the product bearing this phenomenon. VCR SETUP To avoid picture noise (interference), leave...

Owners Manual
Page 22
... using the INPUT button on the set . _D z Connect the PC audio output to DVI cable I . When connecting HDMI to the AUDIO IN m (RGB/DVI) jack on the remote control. How to use 01_Turn on the PC and the TV. 01_Select HDMI input source by using the INPUT button on the PC and the TV. How to use m z 01_Turn on the remote control. 21 How to connect Connect the DVI output of the PC to the HDMI/DVI I N jack on the set . How to connect m x Connect...
... using the INPUT button on the set . _D z Connect the PC audio output to DVI cable I . When connecting HDMI to the AUDIO IN m (RGB/DVI) jack on the remote control. How to use 01_Turn on the PC and the TV. 01_Select HDMI input source by using the INPUT button on the PC and the TV. How to use m z 01_Turn on the remote control. 21 How to connect Connect the DVI output of the PC to the HDMI/DVI I N jack on the set . How to connect m x Connect...

Owners Manual
Page 24
... Auto. Position Size This function is -30 ~ +30. Auto Configuration and Initializing (Reset to original factory values) Press the ADJUST button and then use _I or • button to select Yes. ity. This function is connected to a PC output, select the RGB-PC as the main input mode. x sent input to PC output and checking the screen qual- m When you change . After connecting RGB-PC to see the best picture...
... Auto. Position Size This function is -30 ~ +30. Auto Configuration and Initializing (Reset to original factory values) Press the ADJUST button and then use _I or • button to select Yes. ity. This function is connected to a PC output, select the RGB-PC as the main input mode. x sent input to PC output and checking the screen qual- m When you change . After connecting RGB-PC to see the best picture...
Owners Manual
Page 25
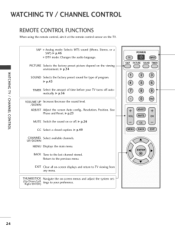
... menu. PICTURE Selects the factory preset picture depend on or off. _ p.26 © CC Select a closed caption. _ p.49 CHANNEL Select available channels. EXIT Clear all on-screen displays and return to the previous menu. UP/DOWN MENU Displays the main menu. BACK Tune to your TV turns off auto- < matically. _ p.56 N I VOLUME UP Increase/decrease the sound level. > z /DOWN z fT1 ADJUST Adjust the screen Auto config., Resolution, Position, Size Phase and Reset. _ p.23 N © Z MUTE Switch the sound...
... menu. PICTURE Selects the factory preset picture depend on or off. _ p.26 © CC Select a closed caption. _ p.49 CHANNEL Select available channels. EXIT Clear all on-screen displays and return to the previous menu. UP/DOWN MENU Displays the main menu. BACK Tune to your TV turns off auto- < matically. _ p.56 N I VOLUME UP Increase/decrease the sound level. > z /DOWN z fT1 ADJUST Adjust the screen Auto config., Resolution, Position, Size Phase and Reset. _ p.23 N © Z MUTE Switch the sound...
Owners Manual
Page 27
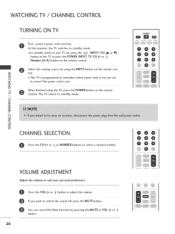
... NUMBER buttons to select a channel number. At this moment, the TV switches to standby mode. 01I_n standby mode to standby mode. z When finished using the INPUT button on the remote control. Press the VOL (+ or -) button to suit your personal preference. If you want to , even if the power cord is out. N I , INPUT, CH (A or V) button on the TV or press the POWER, INPUT, TV, CH (+ or -), Number (0~9) button on the remote control. WATCHING TV / CHANNEL CONTROL TURNING ON TV First, connect power cord correctly. Select the viewing source by...
... NUMBER buttons to select a channel number. At this moment, the TV switches to standby mode. 01I_n standby mode to standby mode. z When finished using the INPUT button on the remote control. Press the VOL (+ or -) button to suit your personal preference. If you want to , even if the power cord is out. N I , INPUT, CH (A or V) button on the TV or press the POWER, INPUT, TV, CH (+ or -), Number (0~9) button on the remote control. WATCHING TV / CHANNEL CONTROL TURNING ON TV First, connect power cord correctly. Select the viewing source by...
Owners Manual
Page 29
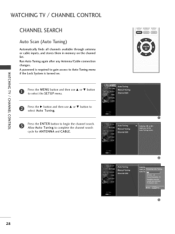
... TV / CHANNEL CONTROL CHANNELSEARCH Auto Scan (Auto Tuning) Automatically finds all channels available through antenna or cable inputs, and stores them in memory on . N z Press the MENU button and then use • or • button to select the SETUP menu. N -r" > Z Press the • button and then use • or • button < to Z fT1 select Auto Tuning. Run Auto Tuning again after any Antenna/Cable changes. N © @ Z Press the ENTER button to begin the channel search. © Allow Auto...
... TV / CHANNEL CONTROL CHANNELSEARCH Auto Scan (Auto Tuning) Automatically finds all channels available through antenna or cable inputs, and stores them in memory on . N z Press the MENU button and then use • or • button to select the SETUP menu. N -r" > Z Press the • button and then use • or • button < to Z fT1 select Auto Tuning. Run Auto Tuning again after any Antenna/Cable changes. N © @ Z Press the ENTER button to begin the channel search. © Allow Auto...

Owners Manual
Page 44
... sound setup as below : Standard, Music, Movie, Sports, and User (your own O settings). N 0 Z .-I 0 43 Standard, Music, Movie, and Sports are preset for good sound quality at the factory and are not adjustable. SOUND Press the SOUND button repeatedly to TV viewing. S/x: l" / 8_; z c l'rl 0,_Youcan also adjust Sound Mode in the AUDIO menu. S CONTROL PRESETSOUND SETTINGS (SOUND MODE) Sound Mode lets you enjoy the best sound without any special adjustment because the TV sets the appropriate sound options based on the program...
... sound setup as below : Standard, Music, Movie, Sports, and User (your own O settings). N 0 Z .-I 0 43 Standard, Music, Movie, and Sports are preset for good sound quality at the factory and are not adjustable. SOUND Press the SOUND button repeatedly to TV viewing. S/x: l" / 8_; z c l'rl 0,_Youcan also adjust Sound Mode in the AUDIO menu. S CONTROL PRESETSOUND SETTINGS (SOUND MODE) Sound Mode lets you enjoy the best sound without any special adjustment because the TV sets the appropriate sound options based on the program...
Owners Manual
Page 54
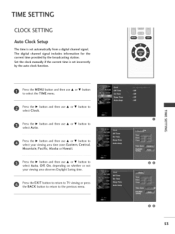
... then use • or • button to the previous menu. The digital channel signal includes information for the current time provided by the auto clock function. Press the MENU button and then use • or • select your viewing area observes Daylight Saving time. Press the • button and then use • or • button to select Auto. m @ rT1 z C_ @0 @@ 53 TiME SETTING CLOCK SETTING Auto Clock Setup The time is set automatically from a digital channel signal.
... then use • or • button to the previous menu. The digital channel signal includes information for the current time provided by the auto clock function. Press the MENU button and then use • or • select your viewing area observes Daylight Saving time. Press the • button and then use • or • button to select Auto. m @ rT1 z C_ @0 @@ 53 TiME SETTING CLOCK SETTING Auto Clock Setup The time is set automatically from a digital channel signal.
Owners Manual
Page 59
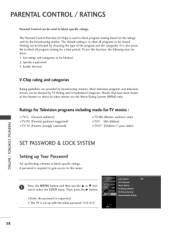
...; SET PASSWORD& LOCK SYSTEM z _D © Setting up Your Password _D Set up with the initial password "0-0-0-0". 58 Viewing can be blocked by TV Rating and/or Individual Categories. Ratings for Television programs including made-for a time period. z A password is used to block specific ratings. Movies that have been shown at the theaters or direct-to-video movies use the • or • button to select the LOCK menu. Most television programs...
...; SET PASSWORD& LOCK SYSTEM z _D © Setting up Your Password _D Set up with the initial password "0-0-0-0". 58 Viewing can be blocked by TV Rating and/or Individual Categories. Ratings for Television programs including made-for a time period. z A password is used to block specific ratings. Movies that have been shown at the theaters or direct-to-video movies use the • or • button to select the LOCK menu. Most television programs...
Owners Manual
Page 64
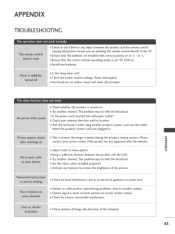
... remote operating mode is turned on station tuned with the broadcast. i,i,Ci heck your service center, if the picture has not appeared after five minutes. i,i,Ti his is normal, the image is weak, reorient antenna to see if there is any function to -). i,l,S, tation signal is muted during the product startup process. i,i,Iis the sleep timer set : TV, VCR etc. The problem...
... remote operating mode is turned on station tuned with the broadcast. i,i,Ci heck your service center, if the picture has not appeared after five minutes. i,i,Ti his is normal, the image is weak, reorient antenna to see if there is any function to -). i,l,S, tation signal is muted during the product startup process. i,i,Iis the sleep timer set : TV, VCR etc. The problem...
Owners Manual
Page 72
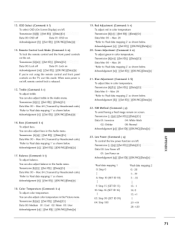
...: User Acknowledgement [u][] [Set ID][] [OK/NG] [Data] [x] F: Step 15 (SET ID 15) 10: Step 16 (SET ID 16) 63: Step 99 (SET ID 99) 64: Step 100 13:-1 14:0 15:+1 27:+19 28:+20 71 Balance (Command: k t) To adjust balance. 01 : Low Power on the TV, use this mode. Red Adjustment (Command: k v) To adjust red in the Audio menu. Remote Control Lock Mode (Command: k m) To lock the remote control and the front panel controls on...
...: User Acknowledgement [u][] [Set ID][] [OK/NG] [Data] [x] F: Step 15 (SET ID 15) 10: Step 16 (SET ID 16) 63: Step 99 (SET ID 99) 64: Step 100 13:-1 14:0 15:+1 27:+19 28:+20 71 Balance (Command: k t) To adjust balance. 01 : Low Power on the TV, use this mode. Red Adjustment (Command: k v) To adjust red in the Audio menu. Remote Control Lock Mode (Command: k m) To lock the remote control and the front panel controls on...


