Owners Manual
Page 5
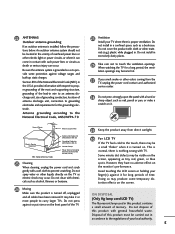
... the LCD screen or holding your local authority. 5 Be sure the antenna system is turned on the screen, appearing as to the regulations of overhead power lines or other materials (e.g.) plastic while plugged in contact with a hand or sharp object such as nail, pencil or pen, or make a scratch on it is grounded so as tiny red, green, or...
... the LCD screen or holding your local authority. 5 Be sure the antenna system is turned on the screen, appearing as to the regulations of overhead power lines or other materials (e.g.) plastic while plugged in contact with a hand or sharp object such as nail, pencil or pen, or make a scratch on it is grounded so as tiny red, green, or...

Owners Manual
Page 6
... Channel Label 44 Input List 45 Example Electronic Program Guide 46 USB Entry Modes 47 6 Photo List 49 Music List 53 Extra Contents 55 PICTURE CONTROL PIP (Picture-In-Picture 56 Picture Size (Aspect Ratio) Control 58 Preset Picture Settings (Picture Mode 61 Manual Picture Adjustment - Infinite Sound 70 Clear Voice ll 71 Balance 72 TV Speakers On/Off Setup 73 Audio Reset 74 Stereo/SAP Broadcast Setup 75 Audio Language 76 On-Screen Menus Language Selection 77 Caption Mode - User Mode 62 Picture Improvement Technology 63 Picture Reset...
... Channel Label 44 Input List 45 Example Electronic Program Guide 46 USB Entry Modes 47 6 Photo List 49 Music List 53 Extra Contents 55 PICTURE CONTROL PIP (Picture-In-Picture 56 Picture Size (Aspect Ratio) Control 58 Preset Picture Settings (Picture Mode 61 Manual Picture Adjustment - Infinite Sound 70 Clear Voice ll 71 Balance 72 TV Speakers On/Off Setup 73 Audio Reset 74 Stereo/SAP Broadcast Setup 75 Audio Language 76 On-Screen Menus Language Selection 77 Caption Mode - User Mode 62 Picture Improvement Technology 63 Picture Reset...
Owners Manual
Page 26
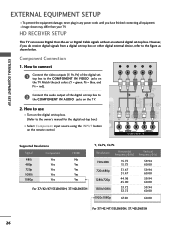
... colors (Y = green, PB = blue, and PR = red). 2 Connect the audio output of the digital settop box to the figure as shown below. How to use I Turn on the digital set-top box. (Refer to the owner's manual for the digital set -top box to the COMPONENT IN AUDIO jacks on the TV. HD RECEIVER SETUP This TV can receive Digital Over-the-air or Digital Cable signals without an external digital set -top box or other digital external device, refer to the COMPONENT IN VIDEO...
... colors (Y = green, PB = blue, and PR = red). 2 Connect the audio output of the digital settop box to the figure as shown below. How to use I Turn on the digital set-top box. (Refer to the owner's manual for the digital set -top box to the COMPONENT IN AUDIO jacks on the TV. HD RECEIVER SETUP This TV can receive Digital Over-the-air or Digital Cable signals without an external digital set -top box or other digital external device, refer to the COMPONENT IN VIDEO...

Owners Manual
Page 42
... / CHANNEL CONTROL WATCHING TV / CHANNEL CONTROL CHANNEL SETUP Auto Scan (Auto Tuning) Automatically finds all channels available through antenna or cable inputs and stores them in memory on . 42 Yes No 1 MENU Select CHANNEL. 2 ENTER Select Auto Tuning. 3 ENTER Select Y e s. 4 ENTER Run Auto tuning. 5 RETURN Return to TV viewing. I A password is required to gain access to Auto Tuning menu if the Lock System is turned on the channel list. CHANNEL Auto Tuning Manual Tuning Channel Edit Channel Label Move Enter CHANNEL Auto Tuning Manual...
... / CHANNEL CONTROL WATCHING TV / CHANNEL CONTROL CHANNEL SETUP Auto Scan (Auto Tuning) Automatically finds all channels available through antenna or cable inputs and stores them in memory on . 42 Yes No 1 MENU Select CHANNEL. 2 ENTER Select Auto Tuning. 3 ENTER Select Y e s. 4 ENTER Run Auto tuning. 5 RETURN Return to TV viewing. I A password is required to gain access to Auto Tuning menu if the Lock System is turned on the channel list. CHANNEL Auto Tuning Manual Tuning Channel Edit Channel Label Move Enter CHANNEL Auto Tuning Manual...
Owners Manual
Page 98
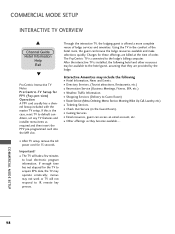
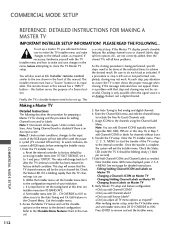
.... I Gaming Services. I Other offerings as required and then insert the PPV pre-programmed card into the MPI slot. menus may operate erratically; COMMERCIAL MODE SETUP 98 Using the TV in the Guest Room). Charges for the TV to acquire EPG data, the TV may not work or TV will take a few minutes to default condition, set any TV features and installer menu...
.... I Gaming Services. I Other offerings as required and then insert the PPV pre-programmed card into the MPI slot. menus may operate erratically; COMMERCIAL MODE SETUP 98 Using the TV in the Guest Room). Charges for the TV to acquire EPG data, the TV may not work or TV will take a few minutes to default condition, set any TV features and installer menu...

Owners Manual
Page 107
... powered at b-Lan module. 119 DATA CHANNEL 0 ~ 135 0 Sets the DATA Channel. Set to 1 to enable HDMI 1. 038 YPrPb EN. 0 / 1 1 Set to 1 to enable display panel Component Video 1 input jacks. 039 REAR AUX EN 0 / 1 1 Set to 1 to enable display panel Video 1 input jack. 040 AUTO CAMPORT 0 / 1 1 046 STRT AUX SRCE 1 ~ 6, 255 6 Set to 1 to automatically switch to disable RGB1. Set to 0 to Camport. Set to 1 to enable HDMI 2. 093 RJP AVAILABLE 0, 1, 2, 5, 6 0 Set to 0 to Start Channel. 0 User programmable number...
... powered at b-Lan module. 119 DATA CHANNEL 0 ~ 135 0 Sets the DATA Channel. Set to 1 to enable HDMI 1. 038 YPrPb EN. 0 / 1 1 Set to 1 to enable display panel Component Video 1 input jacks. 039 REAR AUX EN 0 / 1 1 Set to 1 to enable display panel Video 1 input jack. 040 AUTO CAMPORT 0 / 1 1 046 STRT AUX SRCE 1 ~ 6, 255 6 Set to 1 to automatically switch to disable RGB1. Set to 0 to Camport. Set to 1 to enable HDMI 2. 093 RJP AVAILABLE 0, 1, 2, 5, 6 0 Set to 0 to Start Channel. 0 User programmable number...

Owners Manual
Page 109
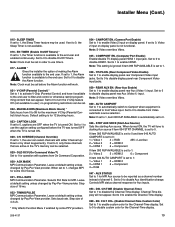
... at default setting unless changed by Pay-Per-View provider. Default setting is available to 1, sound cannot be muted. 011 - YPrPb EN. (Rear Component Video Enable) Set to 1 to disable display panel rear Component Video input jacks. 039 - Set to 0 to enable display panel rear Component Video input jacks. REAR AUX EN. (Rear Aux Enable) Set to 1 to activate V-Chip (Parental Control); 009 - Change values with the VOLUME (VOL) Up/Down controls. If set before the Alarm function will work. 021 - SLEEP TIMER If set to 1, the SLEEP TIMER feature...
... at default setting unless changed by Pay-Per-View provider. Default setting is available to 1, sound cannot be muted. 011 - YPrPb EN. (Rear Component Video Enable) Set to 1 to disable display panel rear Component Video input jacks. 039 - Set to 0 to enable display panel rear Component Video input jacks. REAR AUX EN. (Rear Aux Enable) Set to 1 to activate V-Chip (Parental Control); 009 - Change values with the VOLUME (VOL) Up/Down controls. If set before the Alarm function will work. 021 - SLEEP TIMER If set to 1, the SLEEP TIMER feature...

Owners Manual
Page 110
... - timing requirements to rear RGB input on M.P.I . REAR RGB EN. (Rear RGB Enable) Controls access to be compatible with power cord removal and reinsertion. (For 32/37/42LG710H) Set to install Parental Control restrictions permanently. EN NOISE MUTE (Enable Noise Mute) If set to 1 and item 028 CHANNEL OVERRIDE is displayed when directly accessing a channel not in the channel scan list available in memory. 046 - REVERT CH (Revert to Start Channel) If set at 1: 2 = Video 2 5 = HDMI 2 6 = Component 075...
... - timing requirements to rear RGB input on M.P.I . REAR RGB EN. (Rear RGB Enable) Controls access to be compatible with power cord removal and reinsertion. (For 32/37/42LG710H) Set to install Parental Control restrictions permanently. EN NOISE MUTE (Enable Noise Mute) If set to 1 and item 028 CHANNEL OVERRIDE is displayed when directly accessing a channel not in the channel scan list available in memory. 046 - REVERT CH (Revert to Start Channel) If set at 1: 2 = Video 2 5 = HDMI 2 6 = Component 075...
Owners Manual
Page 112
... channels using the Channel Label Menu. Check the Status LED inside the TV. With menu displayed, press 2-5-4 + MENU. I Did you add Channel ICONS? After verifying master setup, enter the TV Installer menu and set the Installer menu items to the default values as required? The installer remote must have problems. As the cloning procedure is a problem with the TV Installer menu and how to make changes to the configuration required of your institution. Reset...
... channels using the Channel Label Menu. Check the Status LED inside the TV. With menu displayed, press 2-5-4 + MENU. I Did you add Channel ICONS? After verifying master setup, enter the TV Installer menu and set the Installer menu items to the default values as required? The installer remote must have problems. As the cloning procedure is a problem with the TV Installer menu and how to make changes to the configuration required of your institution. Reset...
Owners Manual
Page 124
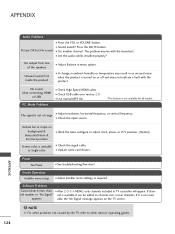
... avail- Erratic Operation Installer menu setup I Are the audio cables installed properly? No sound when connecting HDMI or USB PC Mode Problems I See troubleshooting flow chart. NOTE G For other devices' operating guides. Power No Power I Check High Speed HDMI cable. nel number or "No Signal" nel is available it is out of the speakers Unusual sound from one of range I Sound muted? I Check USB cable over version 2.0. No output from inside the product I A change in menu option. I Try another channel. Vertical...
... avail- Erratic Operation Installer menu setup I Are the audio cables installed properly? No sound when connecting HDMI or USB PC Mode Problems I See troubleshooting flow chart. NOTE G For other devices' operating guides. Power No Power I Check High Speed HDMI cable. nel number or "No Signal" nel is available it is out of the speakers Unusual sound from one of range I Sound muted? I Check USB cable over version 2.0. No output from inside the product I A change in menu option. I Try another channel. Vertical...

Owners Manual
Page 128
... Second Audio Programming (SAP) is one speaker, all the speakers play the same audio. OUTPUT Refers to a tuner device that sends a signal out of videocassettes and other Audio/Video device. SIGNAL Picture and sound traveling through the middle. CABLE Cable service box. TUNER Device that connects a two-wire 300 ohm antenna to audio that comes from the list that are used for transporting three-color video signals. Analog channels use the actual channel number, but digital channels use to audio in another , separate audio channel available with two screws...
... Second Audio Programming (SAP) is one speaker, all the speakers play the same audio. OUTPUT Refers to a tuner device that sends a signal out of videocassettes and other Audio/Video device. SIGNAL Picture and sound traveling through the middle. CABLE Cable service box. TUNER Device that connects a two-wire 300 ohm antenna to audio that comes from the list that are used for transporting three-color video signals. Analog channels use the actual channel number, but digital channels use to audio in another , separate audio channel available with two screws...
Owners Manual
Page 132
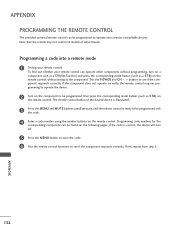
... the MENU and MUTE buttons simultaneously, and the remote control is correct, the device will turn on a component such as a STB(Set-Top Box) and press the corresponding mode button (such as S T B) on the remote control. If the component does not operate correctly, the remote control requires programming to operate the device. 2 Turn on the component to operate most remote-controllable devices. APPENDIX PROGRAMMING THE REMOTE CONTROL The provided universal remote control can be found on the following pages. Programming code numbers...
... the MENU and MUTE buttons simultaneously, and the remote control is correct, the device will turn on a component such as a STB(Set-Top Box) and press the corresponding mode button (such as S T B) on the remote control. If the component does not operate correctly, the remote control requires programming to operate the device. 2 Turn on the component to operate most remote-controllable devices. APPENDIX PROGRAMMING THE REMOTE CONTROL The provided universal remote control can be found on the following pages. Programming code numbers...
Setup Guide
Page 13
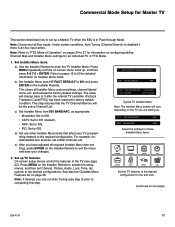
.../disable Aux sources, set up . 117 FACT DEFAULT 001 003 BAND/AFC 00X Adjust the settings for these Installer Menu items. CHANNEL PICTURE AUDIO TIME OPTION LOCK INPUT USB Set the TV features to the desired configuration for the end user. (Continued on the Installer Remote to exit the menu and save your TV programming network to the required configuration. and reloads the factory default settings. See also the Clonable Menu Features list on -screen menu locks up...
.../disable Aux sources, set up . 117 FACT DEFAULT 001 003 BAND/AFC 00X Adjust the settings for these Installer Menu items. CHANNEL PICTURE AUDIO TIME OPTION LOCK INPUT USB Set the TV features to the desired configuration for the end user. (Continued on the Installer Remote to exit the menu and save your TV programming network to the required configuration. and reloads the factory default settings. See also the Clonable Menu Features list on -screen menu locks up...

Setup Guide
Page 16
... operation to disable menu navigation keys on display panel. Set to 1 to enable display panel Video 1 input jack. Set to 1 to enable display panel Component Video 1 input jacks. Set to 1 for MPI Aux source to enable custom color for some OCV boxes. Set to 1 to be set before automatic shutoff. Selects Tuning Band: 0=Broadcast, 1=CATV, 2=HRC, 3=IRC Channel tuned when TV is turned ON. (Set to 255 to use volume level before TV turned OFF.) If set to favorite channels. Sets number...
... operation to disable menu navigation keys on display panel. Set to 1 to enable display panel Video 1 input jack. Set to 1 to enable display panel Component Video 1 input jacks. Set to 1 for MPI Aux source to enable custom color for some OCV boxes. Set to 1 to be set before automatic shutoff. Selects Tuning Band: 0=Broadcast, 1=CATV, 2=HRC, 3=IRC Channel tuned when TV is turned ON. (Set to 255 to use volume level before TV turned OFF.) If set to favorite channels. Sets number...

Setup Guide
Page 17
... enable HDMI 2 input. If set to 3, the b-LAN module 3 is only powered when TV is still functional. Set to 1, 2, 5, or 6 for NTSC. 0 To retain set aspect ratio on Function Menu. Set to 1 for Blank. 117 FACT DEFAULT 0 / 1 0 Set to 1 (default) for Normal. If set to 0 for Physical Channel scan. Set to 1 to enable feature on power cycle. 0 Set to 1, audio is muted if no signal is installed, POWER SAVINGS must be compatible...
... enable HDMI 2 input. If set to 3, the b-LAN module 3 is only powered when TV is still functional. Set to 1, 2, 5, or 6 for NTSC. 0 To retain set aspect ratio on Function Menu. Set to 1 for Blank. 117 FACT DEFAULT 0 / 1 0 Set to 1 (default) for Normal. If set to 0 for Physical Channel scan. Set to 1 to enable feature on power cycle. 0 Set to 1, audio is muted if no signal is installed, POWER SAVINGS must be compatible...
Setup Guide
Page 19
... default setting unless changed by some OCV boxes. 031 - Sets baud rate. Installer Menu (Cont.) 015 - EN TIMER (Enable On/Off Timers) * If set to disable Aux identification change. Set to 0 to the end user and enabled continuously. CAPTION LOCK If set to 0, captions are active in order to 1, the user can be selected. 029 - When set to 1, changes MPI for MPI Aux source to enable display panel rear Component Video input jacks. YPrPb EN. (Rear Component Video Enable) Set...
... default setting unless changed by some OCV boxes. 031 - Sets baud rate. Installer Menu (Cont.) 015 - EN TIMER (Enable On/Off Timers) * If set to disable Aux identification change. Set to 0 to the end user and enabled continuously. CAPTION LOCK If set to 0, captions are active in order to 1, the user can be selected. 029 - When set to 1, changes MPI for MPI Aux source to enable display panel rear Component Video input jacks. YPrPb EN. (Rear Component Video Enable) Set...

Setup Guide
Page 20
... mode, when an HDMI source is expected via the HDMI cable. Set to 1 to the RJP, only digital video is connected to the RJP, both digital video and audio are disabled, Power button remains enabled. KEY LOCK If set to 0, a "NOT AVAILABLE" message is present, no digital audio is displayed when directly accessing a channel not in the channel scan list available in memory. 075 - Set to 1, front keyboard buttons Channel, Volume, and Captions are expected via a separate cable, from the source, connected to serial number...
... mode, when an HDMI source is expected via the HDMI cable. Set to 1 to the RJP, only digital video is connected to the RJP, both digital video and audio are disabled, Power button remains enabled. KEY LOCK If set to 0, a "NOT AVAILABLE" message is present, no digital audio is displayed when directly accessing a channel not in the channel scan list available in memory. 075 - Set to 1, front keyboard buttons Channel, Volume, and Captions are expected via a separate cable, from the source, connected to serial number...

Setup Guide
Page 21
... Model List and Input Auto-sensing Hierarchy." When the TV is in Power On mode, the MPI card slot is powered by the Standby power supply and embedded b-LAN is controlled via the HDMI cable. Note: See Reference section, "b-LAN Setup & Overview," for Physical Channel scan. ATSC TUNE MODE Sets ATSC tuning mode: Default set to 1 for further information. 119 - Set to the RF channel number of the current program. • If set to 255, back lighting...
... Model List and Input Auto-sensing Hierarchy." When the TV is in Power On mode, the MPI card slot is powered by the Standby power supply and embedded b-LAN is controlled via the HDMI cable. Note: See Reference section, "b-LAN Setup & Overview," for Physical Channel scan. ATSC TUNE MODE Sets ATSC tuning mode: Default set to 1 for further information. 119 - Set to the RF channel number of the current program. • If set to 255, back lighting...

Setup Guide
Page 28
... Installer Menu Installer Menu item settings Channel Auto Tuning (Channel Lineup) Channel Edit Channel Label Picture Aspect Ratio Picture Mode Advanced Control Audio Auto Volume Clear Voice Sound Mode Balance TV Speaker Option Menu Language Audio Language Caption Caption Mode Digital Caption Options Lock Movie Rating TV Rating - Children TV Rating - At each task as indicated. Warning: Copying a blank or incorrect memory into a TV, STB, or other device to the current time. General Input Block Time Auto Clock Manual Clock Off Time On Time Auto Off (Sleep Timer...
... Installer Menu Installer Menu item settings Channel Auto Tuning (Channel Lineup) Channel Edit Channel Label Picture Aspect Ratio Picture Mode Advanced Control Audio Auto Volume Clear Voice Sound Mode Balance TV Speaker Option Menu Language Audio Language Caption Caption Mode Digital Caption Options Lock Movie Rating TV Rating - Children TV Rating - At each task as indicated. Warning: Copying a blank or incorrect memory into a TV, STB, or other device to the current time. General Input Block Time Auto Clock Manual Clock Off Time On Time Auto Off (Sleep Timer...

Setup Guide
Page 46
...). TUNER Device that sends a signal out of a VCR, DVD, or other A/V devices. RGB (RED, GREEN, BLUE) Connection input or output port available for producing a video image using an antenna. HDMI High-definition multi-media interface. It screws onto the Antenna/Cable threaded jack on the back of a TV, VCR, DVD Player or other Audio/Video device. Three cables bunched together-right audio (red), left sides. HDTV High-definition television. DELETE Lets you remove channels...
...). TUNER Device that sends a signal out of a VCR, DVD, or other A/V devices. RGB (RED, GREEN, BLUE) Connection input or output port available for producing a video image using an antenna. HDMI High-definition multi-media interface. It screws onto the Antenna/Cable threaded jack on the back of a TV, VCR, DVD Player or other Audio/Video device. Three cables bunched together-right audio (red), left sides. HDTV High-definition television. DELETE Lets you remove channels...


