
Owners Manual
Page 6
... Electronic Program Guide 46 USB Entry Modes 47 6 Photo List 49 Music List 53 Extra Contents 55 PICTURE CONTROL PIP (Picture-In-Picture 56 Picture Size (Aspect Ratio) Control 58 Preset Picture Settings (Picture Mode 61 Manual Picture Adjustment - CONTENTS WARNING / CAUTION 2 SAFETY INSTRUCTIONS 3...26 DVD Setup 29 VCR Setup 30 Other A/V Source Setup 31 Audio Out Connection 31 PC Setup 32 WATCHING TV / CHANNEL CONTROL Remote Control Functions 38 Turning On The TV 40 Channel Selection 40 Volume Adjustment 40 On-Screen Menus Selection 41 Channel Setup - SRS TruSurround...
... Electronic Program Guide 46 USB Entry Modes 47 6 Photo List 49 Music List 53 Extra Contents 55 PICTURE CONTROL PIP (Picture-In-Picture 56 Picture Size (Aspect Ratio) Control 58 Preset Picture Settings (Picture Mode 61 Manual Picture Adjustment - CONTENTS WARNING / CAUTION 2 SAFETY INSTRUCTIONS 3...26 DVD Setup 29 VCR Setup 30 Other A/V Source Setup 31 Audio Out Connection 31 PC Setup 32 WATCHING TV / CHANNEL CONTROL Remote Control Functions 38 Turning On The TV 40 Channel Selection 40 Volume Adjustment 40 On-Screen Menus Selection 41 Channel Setup - SRS TruSurround...

Owners Manual
Page 7
TIME SETTING Clock Setting - Auto Clock Setup 81 Manual Clock Setup 82 Auto On/Off Time Setting 83 Sleep Timer Setting 84 PARENTAL CONTROL / RATINGS Set Password & Lock System 85 Channel Blocking 88 Movie & TV Rating 89 Downloadable Rating 94 External Input Blocking 95 COMMERCIAL MODE SETUP Interactive TV ... Chart 126 Commercial Mode Check 127 Reference: RJP model list and input hierarchy . . 127 Glossary of Terms 128 Maintenance 129 Product Specifications 130 Programming the Remote Control 132 IR Codes 135 Open Source License 137 7
TIME SETTING Clock Setting - Auto Clock Setup 81 Manual Clock Setup 82 Auto On/Off Time Setting 83 Sleep Timer Setting 84 PARENTAL CONTROL / RATINGS Set Password & Lock System 85 Channel Blocking 88 Movie & TV Rating 89 Downloadable Rating 94 External Input Blocking 95 COMMERCIAL MODE SETUP Interactive TV ... Chart 126 Commercial Mode Check 127 Reference: RJP model list and input hierarchy . . 127 Glossary of Terms 128 Maintenance 129 Product Specifications 130 Programming the Remote Control 132 IR Codes 135 Open Source License 137 7

Owners Manual
Page 9
... below. PREPERATION ACCESSORIES Ensure that the following accessories are included with the polishing cloth. * Do not wipe roughly when removing stains. For 32/37/42LG710H Remote Control, Batteries Power Cord Optional Extras D-sub 15 pin Cable When using the VGA (D-sub 15 pin cable) PC connection, the user must use shielded signal...
... below. PREPERATION ACCESSORIES Ensure that the following accessories are included with the polishing cloth. * Do not wipe roughly when removing stains. For 32/37/42LG710H Remote Control, Batteries Power Cord Optional Extras D-sub 15 pin Cable When using the VGA (D-sub 15 pin cable) PC connection, the user must use shielded signal...
Owners Manual
Page 10
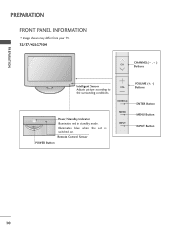
Illuminates blue when the set is switched on. Remote Control Sensor POWER Button MENU INPUT VOLUME (+, -) Buttons ENTER Button MENU Button INPUT Button 10 VOL ENTER Power/Standby Indicator Illuminates red in standby mode. PREPARATION PREPARATION FRONT PANEL INFORMATION I Image shown may differ from your TV. 32/37/42LG710H CHANNEL( , ) CH Buttons Intelligent Sensor Adjusts picture according to the surrounding conditions.
Illuminates blue when the set is switched on. Remote Control Sensor POWER Button MENU INPUT VOLUME (+, -) Buttons ENTER Button MENU Button INPUT Button 10 VOL ENTER Power/Standby Indicator Illuminates red in standby mode. PREPARATION PREPARATION FRONT PANEL INFORMATION I Image shown may differ from your TV. 32/37/42LG710H CHANNEL( , ) CH Buttons Intelligent Sensor Adjusts picture according to the surrounding conditions.

Owners Manual
Page 11
VOL ENTER MENU INPUT VOLUME (+, -) Buttons ENTER Button MENU Button INPUT Button POWER Button 11 Illuminates blue when the set is switched on. Remote Control Sensor Intelligent Sensor Adjusts picture according to the surrounding conditions. PREPARATION 32/37/42/47/55LD650H, 32/37/42LD655H CHANNEL( , ) CH Buttons SPEAKER Power/Standby Indicator Illuminates red in standby mode.
VOL ENTER MENU INPUT VOLUME (+, -) Buttons ENTER Button MENU Button INPUT Button POWER Button 11 Illuminates blue when the set is switched on. Remote Control Sensor Intelligent Sensor Adjusts picture according to the surrounding conditions. PREPARATION 32/37/42/47/55LD650H, 32/37/42LD655H CHANNEL( , ) CH Buttons SPEAKER Power/Standby Indicator Illuminates red in standby mode.
Owners Manual
Page 14
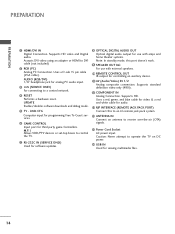
... port for use with amps and home theater systems. Note: In standby mode, this to an LG remote jack pack system. 14 ANTENNA IN Connect an antenna to a control network. 4 RESET Performs a hardware reset. I. PREPARATION PREPARATION 1 HDMI/DVI IN Digital Connection. Uses a red, green, and ...video & a red and white cable for audio. 13 RJP INTERFACE (REMOTE JACK PACK PORT) Connect this port doesn't work. 9 SPEAKER OUT 8Ω For use with external speakers. 10 REMOTE CONTROL OUT IR output for controlling an auxiliary device. 11 AV (Audio/Video) IN 1/2 Analog composite connection...
... port for use with amps and home theater systems. Note: In standby mode, this to an LG remote jack pack system. 14 ANTENNA IN Connect an antenna to a control network. 4 RESET Performs a hardware reset. I. PREPARATION PREPARATION 1 HDMI/DVI IN Digital Connection. Uses a red, green, and ...video & a red and white cable for audio. 13 RJP INTERFACE (REMOTE JACK PACK PORT) Connect this port doesn't work. 9 SPEAKER OUT 8Ω For use with external speakers. 10 REMOTE CONTROL OUT IR output for controlling an auxiliary device. 11 AV (Audio/Video) IN 1/2 Analog composite connection...
Owners Manual
Page 26
...'s manual for the digital set-top box.) I Image shown may differ from a digital set -top box. (Refer to the COMPONENT IN VIDEO jacks on the remote control. HD RECEIVER SETUP This TV can receive Digital Over-the-air or Digital Cable signals without an external digital set -top box to the figure...
...'s manual for the digital set-top box.) I Image shown may differ from a digital set -top box. (Refer to the COMPONENT IN VIDEO jacks on the remote control. HD RECEIVER SETUP This TV can receive Digital Over-the-air or Digital Cable signals without an external digital set -top box to the figure...
Owners Manual
Page 27
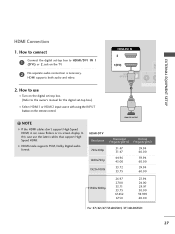
... using the INPUT button on the TV. G HDMI mode supports PCM, Dolby Digital audio format. How to HDMI/DVI IN 1 (DVI) or 2 jack on the remote control.
... using the INPUT button on the TV. G HDMI mode supports PCM, Dolby Digital audio format. How to HDMI/DVI IN 1 (DVI) or 2 jack on the remote control.
Owners Manual
Page 28
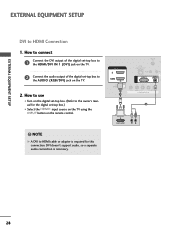
EXTERNAL EQUIPMENT SETUP EXTERNAL EQUIPMENT SETUP DVI to the AUDIO (RGB/DVI) jack on the remote control. How to use I Select the HDMI1 input source on the TV using the INPUT button on the TV. 2. NOTE G A DVI to the owner's manual for ...
EXTERNAL EQUIPMENT SETUP EXTERNAL EQUIPMENT SETUP DVI to the AUDIO (RGB/DVI) jack on the remote control. How to use I Select the HDMI1 input source on the TV using the INPUT button on the TV. 2. NOTE G A DVI to the owner's manual for ...

Owners Manual
Page 29
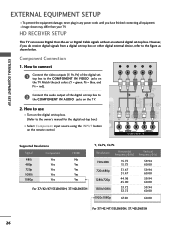
... (S VIDEO COM 2. HDMI supports both audio and video. I Turn on the DVD player, insert a DVD. How to the COMPONENT IN AUDIO jacks on the remote control. How to connect Y PB PR L R EXTERNAL EQUIPMENT SETUP 1 Connect the video outputs (Y, PB, PR) of the DVD to use TV-LINK CFG 1 LAN... of the DVD to the component input ports as shown below. How to use I Refer to the COMPONENT IN VIDEO jacks on the remote control. I Select the HDMI1 or HDMI2 input source on the TV using the INPUT button on the TV. DVD SETUP Component Connection 1. CCOOMMPPOONNEENNTTININ...
... (S VIDEO COM 2. HDMI supports both audio and video. I Turn on the DVD player, insert a DVD. How to the COMPONENT IN AUDIO jacks on the remote control. How to connect Y PB PR L R EXTERNAL EQUIPMENT SETUP 1 Connect the video outputs (Y, PB, PR) of the DVD to use TV-LINK CFG 1 LAN... of the DVD to the component input ports as shown below. How to use I Refer to the COMPONENT IN VIDEO jacks on the remote control. I Select the HDMI1 or HDMI2 input source on the TV using the INPUT button on the TV. DVD SETUP Component Connection 1. CCOOMMPPOONNEENNTTININ...

Owners Manual
Page 30
... source on the TV using the INPUT button on the ANTENNA IN M.P.I. Antenna Connection 1. GAME CONTROL 1 OPTICAL SPEAKER DIGITAL OUT AUDIO OUT 8 UPDATE RS-232C IN (SERVICE ONLY) REMOTE CONTROL OUT ! How to the ANTENNA IN socket on the remote control. NOTE G If you have a mono VCR, connect the audio cable from the VCR to...
... source on the TV using the INPUT button on the ANTENNA IN M.P.I. Antenna Connection 1. GAME CONTROL 1 OPTICAL SPEAKER DIGITAL OUT AUDIO OUT 8 UPDATE RS-232C IN (SERVICE ONLY) REMOTE CONTROL OUT ! How to the ANTENNA IN socket on the remote control. NOTE G If you have a mono VCR, connect the audio cable from the VCR to...

Owners Manual
Page 31
I If connected to use I Select the AV2 input source on the TV using the INPUT button on the remote control. 1 I Operate the corresponding external equipment. Set the "TV Speaker option - G Audio with external audio equipment, such as amplifiers or speakers, you ...to the TV's OPTI- How to AV IN 1 input, select the A V 1 input source on the audio equipment. GAME CONTROL UPDATE OPTICAL DIGITAL AUDIO OUT SPEAKER OUT 8 RS-232C IN (SERVICE ONLY) 1 REMOTE CONTROL OUT AV IN 1 ! C A L DIGITAL AUDIO OUT. 2 Connect the other end of the optical cable to external audio ...
I If connected to use I Select the AV2 input source on the TV using the INPUT button on the remote control. 1 I Operate the corresponding external equipment. Set the "TV Speaker option - G Audio with external audio equipment, such as amplifiers or speakers, you ...to the TV's OPTI- How to AV IN 1 input, select the A V 1 input source on the audio equipment. GAME CONTROL UPDATE OPTICAL DIGITAL AUDIO OUT SPEAKER OUT 8 RS-232C IN (SERVICE ONLY) 1 REMOTE CONTROL OUT AV IN 1 ! C A L DIGITAL AUDIO OUT. 2 Connect the other end of the optical cable to external audio ...
Owners Manual
Page 32
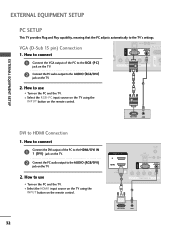
... IN TV-LINK CFG LAN (SERVICE ONLY) RESET UP RGB(PC) (S AUDIO (RGB/DVI) RJP INTERFACE 2. How to the AUDIO (RGB/DVI) jack on the remote control. 32 DVI-PC OUTPUT AUDIO I Turn on the PC and the TV. EXTERNAL EQUIPMENT SETUP EXTERNAL EQUIPMENT SETUP PC SETUP This TV provides Plug and... the TV using the INPUT button on the TV. How to connect 1 Connect the DVI output of the PC to the RGB (P C) jack on the remote control. 1 2 RGB OUTPUT AUDIO DVI to the TV's settings. ( ) RESET UPDATE VGA (D-Sub 15 pin) Connection RGB(PC) RS-232C IN (SERVICE ONLY AUDIO (RGB/DVI...
... IN TV-LINK CFG LAN (SERVICE ONLY) RESET UP RGB(PC) (S AUDIO (RGB/DVI) RJP INTERFACE 2. How to the AUDIO (RGB/DVI) jack on the remote control. 32 DVI-PC OUTPUT AUDIO I Turn on the PC and the TV. EXTERNAL EQUIPMENT SETUP EXTERNAL EQUIPMENT SETUP PC SETUP This TV provides Plug and... the TV using the INPUT button on the TV. How to connect 1 Connect the DVI output of the PC to the RGB (P C) jack on the remote control. 1 2 RGB OUTPUT AUDIO DVI to the TV's settings. ( ) RESET UPDATE VGA (D-Sub 15 pin) Connection RGB(PC) RS-232C IN (SERVICE ONLY AUDIO (RGB/DVI...

Owners Manual
Page 38
... 2 ABC 3 DEF 4GHI 5JKL 6MNO 7PQRS 8TUV 9WXYZ 0&@ FLASHBK PIP RATIO TIMER SAP PIP CH- GUIDE Displays and removes the electronic channel guide. control buttons PIP Toggles through picture-in a set amount o f time. G p.58 TIMER Turns the TV off , depending on the TV. PIP SWAP ...Stereo, or a SAP) G p.75 DTV mode: Changes the audio language. WATCHING TV / CHANNEL CONTROL WATCHING TV / CHANNEL CONTROL REMOTE CONTROL FUNCTIONS When using the remote control, aim it at the remote control sensor on mode. FLASHBK Tunes to the last channel or input viewed. TV POWER DVD STB VCR GUIDE...
... 2 ABC 3 DEF 4GHI 5JKL 6MNO 7PQRS 8TUV 9WXYZ 0&@ FLASHBK PIP RATIO TIMER SAP PIP CH- GUIDE Displays and removes the electronic channel guide. control buttons PIP Toggles through picture-in a set amount o f time. G p.58 TIMER Turns the TV off , depending on the TV. PIP SWAP ...Stereo, or a SAP) G p.75 DTV mode: Changes the audio language. WATCHING TV / CHANNEL CONTROL WATCHING TV / CHANNEL CONTROL REMOTE CONTROL FUNCTIONS When using the remote control, aim it at the remote control sensor on mode. FLASHBK Tunes to the last channel or input viewed. TV POWER DVD STB VCR GUIDE...

Owners Manual
Page 40
... to switch the sound off, press the MUTE button. 3 You can cancel the Mute function by using the TV, press the POWER button on the remote control. 3 The TV reverts to select a channel number. VOLUME ADJUSTMENT Adjust the volume to suit your personal preference. 1 Press the VOL (+ or -) button to adjust the... volume. 2 If you intend to turn TV on, press the button on the TV or press the POWER button on the remote control. 2 Select the viewing source by pressing the MUTE or VOL (+ or -) button. 40 NOTE G If you want to standby mode. When finished using the ...
... to switch the sound off, press the MUTE button. 3 You can cancel the Mute function by using the TV, press the POWER button on the remote control. 3 The TV reverts to select a channel number. VOLUME ADJUSTMENT Adjust the volume to suit your personal preference. 1 Press the VOL (+ or -) button to adjust the... volume. 2 If you intend to turn TV on, press the button on the TV or press the POWER button on the remote control. 2 Select the viewing source by pressing the MUTE or VOL (+ or -) button. 40 NOTE G If you want to standby mode. When finished using the ...

Owners Manual
Page 49
... supports picture in the selected folder 2 3 Current page/Total pages 4 Total number of the photo in JPEG(.jpg) format. The On-Screen Display on 1 the remote control 3 4 Photo List Drive1 JMJ001 1366x768, 125KB Up Folder Page 2/3 No Marked Up Folder KY101 06/10/2008 KY102 04/03/2008 JMJ001 01/01/2000...
... supports picture in the selected folder 2 3 Current page/Total pages 4 Total number of the photo in JPEG(.jpg) format. The On-Screen Display on 1 the remote control 3 4 Photo List Drive1 JMJ001 1366x768, 125KB Up Folder Page 2/3 No Marked Up Folder KY101 06/10/2008 KY102 04/03/2008 JMJ001 01/01/2000...

Owners Manual
Page 53
... kHz, 12 kHz Screen Components 1 MENU Select U S B. 2 ENTER ENTER Select Music List. 1 Moves to play back copy-protected files. The On-Screen Display on 1 the remote control Music List Drive1 3 4 Page 2/3 No Marked Title Up Folder A 00:00 / 04:16 Up Folder Navigation Popup Menu 5 Duration Exit 53 This TV cannot play...
... kHz, 12 kHz Screen Components 1 MENU Select U S B. 2 ENTER ENTER Select Music List. 1 Moves to play back copy-protected files. The On-Screen Display on 1 the remote control Music List Drive1 3 4 Page 2/3 No Marked Title Up Folder A 00:00 / 04:16 Up Folder Navigation Popup Menu 5 Duration Exit 53 This TV cannot play...
Owners Manual
Page 97
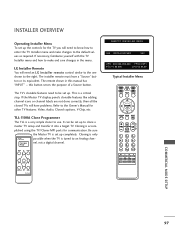
.../Cloner MPI ports for other TV features: Video, Audio, Closed captions, V-Chip, etc. The installer remote must have problems. Refer to be set up completely. This is set up the controls for the TV you will need to know how to enter the TV Installer menu and make changes...set up to an Analog channel, not a digital channel. Cloning is accom- PIP CH+ PIPSWAP PIPINPUT COMMERCIAL MODE SETUP 97 LG Installer Remote You will need an LG Installer remote control similar to the one shown to use. If necessary, familiarize yourself with the TV Installer menu and how to the default values...
.../Cloner MPI ports for other TV features: Video, Audio, Closed captions, V-Chip, etc. The installer remote must have problems. Refer to be set up completely. This is set up the controls for the TV you will need to know how to enter the TV Installer menu and make changes...set up to an Analog channel, not a digital channel. Cloning is accom- PIP CH+ PIPSWAP PIPINPUT COMMERCIAL MODE SETUP 97 LG Installer Remote You will need an LG Installer remote control similar to the one shown to use. If necessary, familiarize yourself with the TV Installer menu and how to the default values...

Owners Manual
Page 102
... = 00:00 THE CLONE IS VERSION V2.2.2 -To change menu items, Press channel keys or digits. -To execute item, Press ENTER. With the Installer remote control select item 2, to begin teaching. 4. NOTE G It is assumed that the correct CBank(X) is connected to transfer the Master setup into the TV's MPI ... the Mode button to a signal source, the TV source selected is Antenna (RF) In, the signal is displayed on TLL menu. 6. With the Installer remote control, select item 1 on the TV screen, see above. Press Enter, to power and turned on and the TLL Cloner main menu is from Master TV...
... = 00:00 THE CLONE IS VERSION V2.2.2 -To change menu items, Press channel keys or digits. -To execute item, Press ENTER. With the Installer remote control select item 2, to begin teaching. 4. NOTE G It is assumed that the correct CBank(X) is connected to transfer the Master setup into the TV's MPI ... the Mode button to a signal source, the TV source selected is Antenna (RF) In, the signal is displayed on TLL menu. 6. With the Installer remote control, select item 1 on the TV screen, see above. Press Enter, to power and turned on and the TLL Cloner main menu is from Master TV...
Owners Manual
Page 106
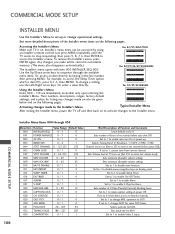
... change operational settings. COMMERCIAL MODE SETUP 106 Installer Menu Items 000 through the available menu items. Or, access an item directly by using an installer's remote control. Sets minimum allowable volume setting. If set to 1, changes M.P.I . Installer's menu items can be stored in last channel before auto shut Off. To remove the... the Installer menu items on display panel. If set to disable menu navigation keys on the following pages. See more detailed descriptions of V-Chip (Parental Control) blocking hours.
... change operational settings. COMMERCIAL MODE SETUP 106 Installer Menu Items 000 through the available menu items. Or, access an item directly by using an installer's remote control. Sets minimum allowable volume setting. If set to 1, changes M.P.I . Installer's menu items can be stored in last channel before auto shut Off. To remove the... the Installer menu items on display panel. If set to disable menu navigation keys on the following pages. See more detailed descriptions of V-Chip (Parental Control) blocking hours.

