Specification (English)
Page 1
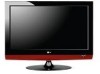
...the front cabinet and use minute vibrations to near 720p resolution and features LG "Super-Multi" technology which plays back almost any recordable disc based media. INVISIBLE SPEAKER SYSTEM LG's 2008 line of TVs include a unique invisible speaker system, tuned by increasing the "sweet ...26LG40 LCD HDTV WITH BUILT-IN DVD PLAYER 26" Class (26.0" diagonal) • 720p HD Resolution • 5,000:1 Dynamic Contrast Ratio • Side-loading Progressive Scan DVD Player • Super Multi-Format • 3x HDMI™ V.1.3 • AV Mode (Cinema, Sports, Game) • Clear Voice • LG...
...the front cabinet and use minute vibrations to near 720p resolution and features LG "Super-Multi" technology which plays back almost any recordable disc based media. INVISIBLE SPEAKER SYSTEM LG's 2008 line of TVs include a unique invisible speaker system, tuned by increasing the "sweet ...26LG40 LCD HDTV WITH BUILT-IN DVD PLAYER 26" Class (26.0" diagonal) • 720p HD Resolution • 5,000:1 Dynamic Contrast Ratio • Side-loading Progressive Scan DVD Player • Super Multi-Format • 3x HDMI™ V.1.3 • AV Mode (Cinema, Sports, Game) • Clear Voice • LG...

Owner's Manual (English)
Page 1
CLASS 1M VISIBLE AND INVISIBLE LASER RADIATION WHEN OPEN DO NOT VIEW DIRECTLY WITH OPTICAL INSTRUMENTS P/NO : SAC31712401 (0810-REV06) www.lgusa.com / www.lg.ca CAUTION - LCD TV / DVD Combo OWNER'S MANUAL 26LG40 32LG40 Please read this manual. Write the model number and serial number from the label on the back cabinet on the front or back of this manual carefully before operating your set and retain it for future reference.
CLASS 1M VISIBLE AND INVISIBLE LASER RADIATION WHEN OPEN DO NOT VIEW DIRECTLY WITH OPTICAL INSTRUMENTS P/NO : SAC31712401 (0810-REV06) www.lgusa.com / www.lg.ca CAUTION - LCD TV / DVD Combo OWNER'S MANUAL 26LG40 32LG40 Please read this manual. Write the model number and serial number from the label on the back cabinet on the front or back of this manual carefully before operating your set and retain it for future reference.
Owner's Manual (English)
Page 2
... in the literature accompanying the appliance. Consult the dealer or an experienced radio/TV technician for a Class B digital device, pursuant to Article 820-40 of the FCC Rules. NOTE TO CABLE/TV INSTALLER This reminder is intended to alert the user to operate the equipment. ... and receiver. - The lightning flash with the instructions, may be determined by turning the equipment off and on a circuit different from LG Electronics. Reorient or relocate the receiving antenna. - Any changes or modifications not expressly approved by one or more of electric shock to ...
... in the literature accompanying the appliance. Consult the dealer or an experienced radio/TV technician for a Class B digital device, pursuant to Article 820-40 of the FCC Rules. NOTE TO CABLE/TV INSTALLER This reminder is intended to alert the user to operate the equipment. ... and receiver. - The lightning flash with the instructions, may be determined by turning the equipment off and on a circuit different from LG Electronics. Reorient or relocate the receiving antenna. - Any changes or modifications not expressly approved by one or more of electric shock to ...

Owner's Manual (English)
Page 4
...sure do not drop onto the screen with liquids, such as being twisted, kinked, pinched, closed in electric shock or fire. Do not touch the TV with a three-prong grounded AC plug must remain readily operable. 19 Keep the product away from physical or mechanical abuse, such as vases, cups, ... with the power cord plugged in. Do not use of your appliance, and if its appearance indicates damage or deterioration, unplug it to install the TV by the hanging power and signal cables on or over the apparatus (e.g. Do not try to a three-prong grounded AC outlet). The plug must ...
...sure do not drop onto the screen with liquids, such as being twisted, kinked, pinched, closed in electric shock or fire. Do not touch the TV with a three-prong grounded AC plug must remain readily operable. 19 Keep the product away from physical or mechanical abuse, such as vases, cups, ... with the power cord plugged in. Do not use of your appliance, and if its appearance indicates damage or deterioration, unplug it to install the TV by the hanging power and signal cables on or over the apparatus (e.g. Do not try to a three-prong grounded AC outlet). The plug must ...
Owner's Manual (English)
Page 5
... death or serious injury can come in contact with cloth or other materials (e.g.) plastic while plugged in. Section 810 of the TV. 23 Ventilation Install your TV where there is installed, follow the precautions below. Do not press against voltage surges and built-up static charges. Do not ... antenna discharge unit, connection to an antenna discharge unit, size of grounding conductors, location of overhead power lines or other liquids directly on the TV as nail, pencil or pen, or make a scratch on the front panel of the National Electrical Code (NEC) in a confined space such...
... death or serious injury can come in contact with cloth or other materials (e.g.) plastic while plugged in. Section 810 of the TV. 23 Ventilation Install your TV where there is installed, follow the precautions below. Do not press against voltage surges and built-up static charges. Do not ... antenna discharge unit, connection to an antenna discharge unit, size of grounding conductors, location of overhead power lines or other liquids directly on the TV as nail, pencil or pen, or make a scratch on the front panel of the National Electrical Code (NEC) in a confined space such...
Owner's Manual (English)
Page 6
... 16 DVD Setup 19 VCR Setup 21 Other A/V Source Setup 23 Audio out Connection 24 PC Setup 25 WATCHING TV / CHANNEL CONTROL Remote Control Functions 32 Turning On TV 34 Channel Selection 34 Volume Adjustment 34 Quick Menu / Favorite Channel Setup 35 Initial Setting 36 On-Screen Menus ...9 Stand Instruction 10 Cable Management 11 Desktop Pedestal Installation 12 Swivel Stand 12 Attaching the TV to a Desk 12 VESA Wall Mounting 13 Securing the TV to the wall to prevent falling when the TV is used on Discs 46 Selecting Language - Changing the password 52 Picture Size Control 53...
... 16 DVD Setup 19 VCR Setup 21 Other A/V Source Setup 23 Audio out Connection 24 PC Setup 25 WATCHING TV / CHANNEL CONTROL Remote Control Functions 32 Turning On TV 34 Channel Selection 34 Volume Adjustment 34 Quick Menu / Favorite Channel Setup 35 Initial Setting 36 On-Screen Menus ...9 Stand Instruction 10 Cable Management 11 Desktop Pedestal Installation 12 Swivel Stand 12 Attaching the TV to a Desk 12 VESA Wall Mounting 13 Securing the TV to the wall to prevent falling when the TV is used on Discs 46 Selecting Language - Changing the password 52 Picture Size Control 53...
Owner's Manual (English)
Page 7
...Timer Setting 90 Auto Shut-off Setting 91 PARENTAL CONTROL / RATINGS Set Password & Lock System 92 Channel Blocking 95 Movie & TV Rating 96 Downloadable Rating 101 External Input Blocking 102 Key Lock 103 APPENDIX Troubleshooting 104 Maintenance 106 Product Specifications 107 Programing the ... Source License 120 5 Caption Option 86 TIME SETTING Clock Setting - Analog Broadcasting System Captions 84 - User Mode 77 Balance 78 TV Speakers On/Off Setup 79 Audio Reset 80 Stereo/SAP Broadcasts Setup 81 Audio Language 82 On-Screen Menus Language Selection 83 Caption...
...Timer Setting 90 Auto Shut-off Setting 91 PARENTAL CONTROL / RATINGS Set Password & Lock System 92 Channel Blocking 95 Movie & TV Rating 96 Downloadable Rating 101 External Input Blocking 102 Key Lock 103 APPENDIX Troubleshooting 104 Maintenance 106 Product Specifications 107 Programing the ... Source License 120 5 Caption Option 86 TIME SETTING Clock Setting - Analog Broadcasting System Captions 84 - User Mode 77 Balance 78 TV Speakers On/Off Setup 79 Audio Reset 80 Stereo/SAP Broadcasts Setup 81 Audio Language 82 On-Screen Menus Language Selection 83 Caption...
Owner's Manual (English)
Page 8
.../Logo Licensing Corporation. Manufactured under license from Dolby Laboratories. TruSurround XT technology is nothing wrong with general household waste. I Avoid touching the LCD screen or holding your local authority. 6 "Dolby "and the double-D symbol are trademarks of time. I Some minute dot defects may...be carried out in accordance to the touch, there may produce some temporary distortion effects on . On Disposal (Only Hg lamp used LCD TV) The fluorescent lamp used in this product must be a small "flicker" when it for long periods of Dolby Laboratories. This product...
.../Logo Licensing Corporation. Manufactured under license from Dolby Laboratories. TruSurround XT technology is nothing wrong with general household waste. I Avoid touching the LCD screen or holding your local authority. 6 "Dolby "and the double-D symbol are trademarks of time. I Some minute dot defects may...be carried out in accordance to the touch, there may produce some temporary distortion effects on . On Disposal (Only Hg lamp used LCD TV) The fluorescent lamp used in this product must be a small "flicker" when it for long periods of Dolby Laboratories. This product...
Owner's Manual (English)
Page 9
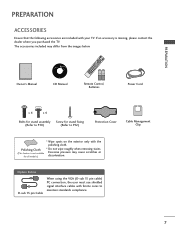
... ZOOM 7 4 5 2 3 SUBTITLE A-B ANGLE 8 6 AUDIO TITLE MENU CH P A G E AV MODE 0 9 FLASHRBEKTURN RETURN ROTAT TV E- Polishing Cloth (This feature is missing, please contact the dealer where you purchased the TV. SLOW + EJECT 0 9 FLASHRBEKTURN SKIP + DISC MENU 1.5V 1.5V Owner's Manual CD Manual Remote Control, Batteries Power Cord x 4 x... to P.12) Protection Cover Cable Management Clip * Wipe spots on the exterior only with your TV. PREPARATION ROTA ROTA PREPARATION ACCESSORIES Ensure that the following accessories are included with the polishing cloth.
... ZOOM 7 4 5 2 3 SUBTITLE A-B ANGLE 8 6 AUDIO TITLE MENU CH P A G E AV MODE 0 9 FLASHRBEKTURN RETURN ROTAT TV E- Polishing Cloth (This feature is missing, please contact the dealer where you purchased the TV. SLOW + EJECT 0 9 FLASHRBEKTURN SKIP + DISC MENU 1.5V 1.5V Owner's Manual CD Manual Remote Control, Batteries Power Cord x 4 x... to P.12) Protection Cover Cable Management Clip * Wipe spots on the exterior only with your TV. PREPARATION ROTA ROTA PREPARATION ACCESSORIES Ensure that the following accessories are included with the polishing cloth.
Owner's Manual (English)
Page 10
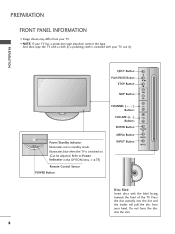
...Do not force the disc into the slot and the loader will pull the disc from your hand. I Image shown may differ from your TV. Refer to Power Indicator in standby mode. PREPARATION EJECT Button PLAY/PAUSE Button / STOP Button SKIP Button Power/Standby Indicator Illuminates red in... the OPTION menu. And then wipe the TV with the label facing towards the front of the TV. G p.73) Remote Control Sensor POWER Button CHANNEL ( , ) Buttons VOLUME (+, -) Buttons ENTER Button MENU Button INPUT...
...Do not force the disc into the slot and the loader will pull the disc from your hand. I Image shown may differ from your TV. Refer to Power Indicator in standby mode. PREPARATION EJECT Button PLAY/PAUSE Button / STOP Button SKIP Button Power/Standby Indicator Illuminates red in... the OPTION menu. And then wipe the TV with the label facing towards the front of the TV. G p.73) Remote Control Sensor POWER Button CHANNEL ( , ) Buttons VOLUME (+, -) Buttons ENTER Button MENU Button INPUT...
Owner's Manual (English)
Page 11
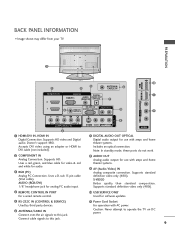
BACK PANEL INFORMATION I Image shown may differ from your TV. Accepts DVI video using an adapter or HDMI to DVI cable (not included). 7 DIGITAL AUDIO OUT OPTICAL Digital audio output for software updates. 5 RS-232C ... Connection. Caution: Never attempt to this jack. S-VIDEO Better quality than standard composition. Supports HD video and Digital audio. Connect cable signals to operate the TV on DC power. 9 Supports HD.
BACK PANEL INFORMATION I Image shown may differ from your TV. Accepts DVI video using an adapter or HDMI to DVI cable (not included). 7 DIGITAL AUDIO OUT OPTICAL Digital audio output for software updates. 5 RS-232C ... Connection. Caution: Never attempt to this jack. S-VIDEO Better quality than standard composition. Supports HD video and Digital audio. Connect cable signals to operate the TV on DC power. 9 Supports HD.
Owner's Manual (English)
Page 12
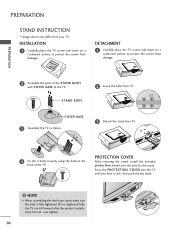
... aside. ! STAND BODY 2 Loose the bolts from your TV. Press the PROTECTION COVER into the TV until you hear it click. INSTALLATION 1 Carefully place the TV screen side down on a cushioned surface to protect the screen from TV. 4 Fix the 4 bolts securely using the holes in the... back of the TV. DETACHMENT 1 Carefully place the TV screen side down on a cushioned surface to protect the screen from damage. PREPARATION PREPARATION STAND INSTRUCTION I Image shown may differ from TV. PROTECTION COVER After removing the stand, install the included ...
... aside. ! STAND BODY 2 Loose the bolts from your TV. Press the PROTECTION COVER into the TV until you hear it click. INSTALLATION 1 Carefully place the TV screen side down on a cushioned surface to protect the screen from TV. 4 Fix the 4 bolts securely using the holes in the... back of the TV. DETACHMENT 1 Carefully place the TV screen side down on a cushioned surface to protect the screen from damage. PREPARATION PREPARATION STAND INSTRUCTION I Image shown may differ from TV. PROTECTION COVER After removing the stand, install the included ...

Owner's Manual (English)
Page 13
Turn the CABLE MANAGEMENT CLIP as necessary. To connect additional equipment, see the EXTERNAL EQUIPMENT SETUP section. 11 PREPARATION CABLE MANAGEMENT I Image shown may differ from your TV. 1 Align the hole with the tab on the CABLE MANAGEMENT CLIP. Note: This cable management clip can be bro- ken by excessive pressure. 2 Connect the cables as shown.
Turn the CABLE MANAGEMENT CLIP as necessary. To connect additional equipment, see the EXTERNAL EQUIPMENT SETUP section. 11 PREPARATION CABLE MANAGEMENT I Image shown may differ from your TV. 1 Align the hole with the tab on the CABLE MANAGEMENT CLIP. Note: This cable management clip can be bro- ken by excessive pressure. 2 Connect the cables as shown.
Owner's Manual (English)
Page 14
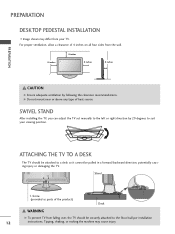
... be attached to a desk so it cannot be securely attached to suit your TV. ATTACHING THE TV TO A DESK The TV should be pulled in a forward/backward direction, potentially causing injury or damaging the TV. Tipping, shaking, or rocking the machine may differ from your viewing position. ...Stand 1-Screw (provided as parts of the product) Desk WARNING G To prevent TV from the wall. 4 inches 4 inches 4 inches 4 inches CAUTION G Ensure adequate ventilation by 20 degrees to the floor/wall per installation ...
... be attached to a desk so it cannot be securely attached to suit your TV. ATTACHING THE TV TO A DESK The TV should be pulled in a forward/backward direction, potentially causing injury or damaging the TV. Tipping, shaking, or rocking the machine may differ from your viewing position. ...Stand 1-Screw (provided as parts of the product) Desk WARNING G To prevent TV from the wall. 4 inches 4 inches 4 inches 4 inches CAUTION G Ensure adequate ventilation by 20 degrees to the floor/wall per installation ...
Owner's Manual (English)
Page 15
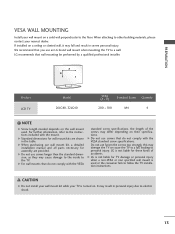
...the mount. PREPARATION VESA WALL MOUNTING Install your nearest dealer. We recommend that wall mounting be performed by a qualified professional installer. A B Product LCD TV Model 26LG40, 32LG40 VESA (A * B) Standard Screw Quantity 200 * 100 M4 4 ! G When purchasing our wall mount kit, a detailed installation manual...for assembly are shown in personal injury due to follow the TV installation instructions. G For wall mounts that do not comply with the VESA standard screw specifications, the length of accidents. G LG is turned on the wall mount used or the consumer fails...
...the mount. PREPARATION VESA WALL MOUNTING Install your nearest dealer. We recommend that wall mounting be performed by a qualified professional installer. A B Product LCD TV Model 26LG40, 32LG40 VESA (A * B) Standard Screw Quantity 200 * 100 M4 4 ! G When purchasing our wall mount kit, a detailed installation manual...for assembly are shown in personal injury due to follow the TV installation instructions. G For wall mounts that do not comply with the VESA standard screw specifications, the length of accidents. G LG is turned on the wall mount used or the consumer fails...
Owner's Manual (English)
Page 16
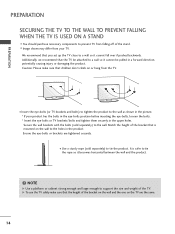
...a forward direction, potentially causing injury or damaging the product. I Use a sturdy rope (sold separately) to the wall as shown in the picture. * If your TV. G To use the TV safely make sure that is safer to a wall so it cannot be attached to tie the product. I Image shown may differ from the... TV. Secure the wall brackets with the bolts (sold separately) to a wall so it cannot fall over if pushed backwards. Ensure the eye-bolts or ...
...a forward direction, potentially causing injury or damaging the product. I Use a sturdy rope (sold separately) to the wall as shown in the picture. * If your TV. G To use the TV safely make sure that is safer to a wall so it cannot be attached to tie the product. I Image shown may differ from the... TV. Secure the wall brackets with the bolts (sold separately) to a wall so it cannot fall over if pushed backwards. Ensure the eye-bolts or ...
Owner's Manual (English)
Page 17
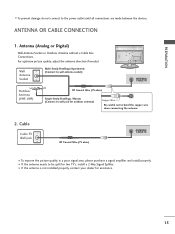
... signal area, please purchase a signal amplifier and install properly. ANTENNA OR CABLE CONNECTION 1. For optimum picture quality, adjust the antenna direction if needed. Cable Cable TV Wall Jack RF Coaxial Wire (75 ohm) Single-family Dwellings /Houses (Connect to wall jack for outdoor antenna) ( ) Copper Wire Be careful not to bend... to the power outlet until all connections are made between the devices. R PREPARATION R I If the antenna is not installed properly, contact your dealer for two TV's, install a 2-Way Signal Splitter.
... signal area, please purchase a signal amplifier and install properly. ANTENNA OR CABLE CONNECTION 1. For optimum picture quality, adjust the antenna direction if needed. Cable Cable TV Wall Jack RF Coaxial Wire (75 ohm) Single-family Dwellings /Houses (Connect to wall jack for outdoor antenna) ( ) Copper Wire Be careful not to bend... to the power outlet until all connections are made between the devices. R PREPARATION R I If the antenna is not installed properly, contact your dealer for two TV's, install a 2-Way Signal Splitter.
Owner's Manual (English)
Page 18
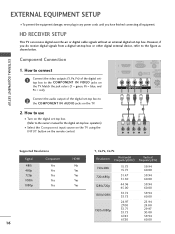
... set-top box. (Refer to the owner's manual for the digital set-top box. operation) I Select the Component input source on the TV using the INPUT button on the TV. Component Connection 1. RGB(PC) AUDIO A (RGB/DVI) 2 RS-232C 1 REMOTE (CONTROL & S CONTROL IN VIDEO AUDIO COMPONENT IN S-VIDEO ( ) 2 Connect the audio output... 31.50 59.94 60.00 1280x720p 44.96 45.00 59.94 60.00 1920x1080i 33.72 33.75 59.94 60.00 ( ) 1920x1080p 26.97 27.00 33.71 33.75 67.43 67.50 23.94 24.00 29.97 30.00 59.94 60.00
... set-top box. (Refer to the owner's manual for the digital set-top box. operation) I Select the Component input source on the TV using the INPUT button on the TV. Component Connection 1. RGB(PC) AUDIO A (RGB/DVI) 2 RS-232C 1 REMOTE (CONTROL & S CONTROL IN VIDEO AUDIO COMPONENT IN S-VIDEO ( ) 2 Connect the audio output... 31.50 59.94 60.00 1280x720p 44.96 45.00 59.94 60.00 1920x1080i 33.72 33.75 59.94 60.00 ( ) 1920x1080p 26.97 27.00 33.71 33.75 67.43 67.50 23.94 24.00 29.97 30.00 59.94 60.00
Owner's Manual (English)
Page 19
....47 31.50 59.94 60.00 1280x720p 44.96 45.00 59.94 60.00 1920x1080i 33.72 33.75 59.94 60.00 26.97 23.976 27.00 24.00 ( ) 1920x1080p 33.71 33.75 29.97 30.00 67.432 59.939 67.50 60.00 17... HDMI supports both audio and video. 2. How to use ( ) I Select the HDMI1, HDMI2, or HDMI3 input source on the TV using the INPUT button on the TV. 2 No separate audio connection is necessary. HDMI Connection 1.
....47 31.50 59.94 60.00 1280x720p 44.96 45.00 59.94 60.00 1920x1080i 33.72 33.75 59.94 60.00 26.97 23.976 27.00 24.00 ( ) 1920x1080p 33.71 33.75 29.97 30.00 67.432 59.939 67.50 60.00 17... HDMI supports both audio and video. 2. How to use ( ) I Select the HDMI1, HDMI2, or HDMI3 input source on the TV using the INPUT button on the TV. 2 No separate audio connection is necessary. HDMI Connection 1.
Owner's Manual (English)
Page 20
... is necessary. 18 How to connect 1 Connect the DVI output of the digital set-top box to the HDMI/DVI IN1, 2, or 3 jack on the TV. 2 Connect the PC audio output to use I Turn on the digital set -top box.) I Select the HDMI 1, HDMI 2 or HDMI 3 input source on the... TV using the INPUT button on the TV. 2. EXTERNAL EQUIPMENT SETUP DVI to the owner's manual for this connection. How to the AUDIO (RGB/DVI) jack on the remote control...
... is necessary. 18 How to connect 1 Connect the DVI output of the digital set-top box to the HDMI/DVI IN1, 2, or 3 jack on the TV. 2 Connect the PC audio output to use I Turn on the digital set -top box.) I Select the HDMI 1, HDMI 2 or HDMI 3 input source on the... TV using the INPUT button on the TV. 2. EXTERNAL EQUIPMENT SETUP DVI to the owner's manual for this connection. How to the AUDIO (RGB/DVI) jack on the remote control...


