
Owners Manual
Page 2
... not installed and used in accordance with the limits for a Class B digital device, pursuant to provide reasonable protection against harmful interference in a residential installation. The code provides guidelines for help. Any changes or modifications not expressly approved by one or more of the cable entry as practical. However, there is connected. -Consult the dealer or an experienced radio/TV technician...
... not installed and used in accordance with the limits for a Class B digital device, pursuant to provide reasonable protection against harmful interference in a residential installation. The code provides guidelines for help. Any changes or modifications not expressly approved by one or more of the cable entry as practical. However, there is connected. -Consult the dealer or an experienced radio/TV technician...

Owners Manual
Page 4
... wall, make the TV with wet hands. Check the specification page of your appliance, and if its appearance indicates damage or deterioration, unplug it to dripping or splashing and do not drop onto the screen with a three-prong grounded AC plug must remain readily operable. Do not connect too many appliances to install the TV by the hanging power and signal cables...
... wall, make the TV with wet hands. Check the specification page of your appliance, and if its appearance indicates damage or deterioration, unplug it to dripping or splashing and do not drop onto the screen with a three-prong grounded AC plug must remain readily operable. Do not connect too many appliances to install the TV by the hanging power and signal cables...

Owners Manual
Page 5
... of the TV. Do not install in . Ventilation Install your TV where there is turned off, unplugged and all cables have been removed. Ground Clamp NEC: National Electrical Code Antenna Lead in Wire Antenna Discharge Unit (NEC Section 810-20) Grounding Conductor (NEC Section 810-21) Ground Clamps Power Service Grounding Electrode System (NEC Art 250, Part H) O Cleaning When cleaning, unplug the power cord and...
... of the TV. Do not install in . Ventilation Install your TV where there is turned off, unplugged and all cables have been removed. Ground Clamp NEC: National Electrical Code Antenna Lead in Wire Antenna Discharge Unit (NEC Section 810-20) Grounding Conductor (NEC Section 810-21) Ground Clamps Power Service Grounding Electrode System (NEC Art 250, Part H) O Cleaning When cleaning, unplug the power cord and...

Owners Manual
Page 6
... Panel Information 8 Back Panel Information 10 Stand Instruction 12 Cable Management 14 Desktop Pedestal Installation 15 Swivel Stand 15 VESA Wall Mounting 15 Attaching the TV to a Desk 16 Positioning your Display 16 Kensington Security System 16 Antenna or Cable Connection 17 HD Receiver Setup 18 DVD Setup 23 VCR Setup 26 Headphone Setup 29 Other A/V Source Setup 29 Audio out Connection 30 PC Setup 31 Remote Control Functions 38 Turning On TV 40 Channel Selection 40 Volume Adjustment 40 Quick Menu 41 Initial Setting 42 On-Screen...
... Panel Information 8 Back Panel Information 10 Stand Instruction 12 Cable Management 14 Desktop Pedestal Installation 15 Swivel Stand 15 VESA Wall Mounting 15 Attaching the TV to a Desk 16 Positioning your Display 16 Kensington Security System 16 Antenna or Cable Connection 17 HD Receiver Setup 18 DVD Setup 23 VCR Setup 26 Headphone Setup 29 Other A/V Source Setup 29 Audio out Connection 30 PC Setup 31 Remote Control Functions 38 Turning On TV 40 Channel Selection 40 Volume Adjustment 40 Quick Menu 41 Initial Setting 42 On-Screen...

Owners Manual
Page 7
Auto Clock Setup 73 - Manual Clock Setup 74 Auto On/Off Time Setting 75 Sleep Timer Setting 76 Auto Shut-off Setting 77 Set Password & Lock System 78 Channel Blocking 81 Movie & TV Rating 82 Downloadable Rating 87 External Input Blocking 88 Key Lock 89 Troubleshooting 90 Maintenance 92 Product Specifications 93 External Control Through RS-232C 94 Open Source License 100 S Clock Setting -
Auto Clock Setup 73 - Manual Clock Setup 74 Auto On/Off Time Setting 75 Sleep Timer Setting 76 Auto Shut-off Setting 77 Set Password & Lock System 78 Channel Blocking 81 Movie & TV Rating 82 Downloadable Rating 87 External Input Blocking 88 Key Lock 89 Troubleshooting 90 Maintenance 92 Product Specifications 93 External Control Through RS-232C 94 Open Source License 100 S Clock Setting -

Owners Manual
Page 13
.... Doesn't support 480i. Accepts DVl video using an adapter or HDMI to operate the TV on DC power. @ DIGITAL AUDIO OUT OPTICAL Digital audio output for use with amps and home theater systems. Includes an optical connection. O Headphone INPUT Plug the headphone into the headphone socket. @ Power Cord Socket For operation with amps and home theater systems. @ AV (Audio/Video) IN Analog composite connection. O REMOTE CONTROL PORT For a wired remote control. AUDIO OUT Analog audio output for use with AC power. ANTENNA/CABLE IN Connect over-the air signals to this...
.... Doesn't support 480i. Accepts DVl video using an adapter or HDMI to operate the TV on DC power. @ DIGITAL AUDIO OUT OPTICAL Digital audio output for use with amps and home theater systems. Includes an optical connection. O Headphone INPUT Plug the headphone into the headphone socket. @ Power Cord Socket For operation with amps and home theater systems. @ AV (Audio/Video) IN Analog composite connection. O REMOTE CONTROL PORT For a wired remote control. AUDIO OUT Analog audio output for use with AC power. ANTENNA/CABLE IN Connect over-the air signals to this...

Owners Manual
Page 17
... your viewing position. ....../. -- 100 • 100 M4 200,100 u4 4 Install your nearest dealer. DESKTOPPEDESTAL VESAWALL MOUNTING INSTALLATION ,,,IImage shown may fall and result in severe personal injury. _e m We recommend that you use an LG brand wall mount when mounting the TV to a wall. _e LG recommends that wall mounting be performed by a qualified professional installer. 0 z 4 inches SWIVEL STAND (Only 26LG3'*) After installing the TV, you can adjust the TV set manually...
... your viewing position. ....../. -- 100 • 100 M4 200,100 u4 4 Install your nearest dealer. DESKTOPPEDESTAL VESAWALL MOUNTING INSTALLATION ,,,IImage shown may fall and result in severe personal injury. _e m We recommend that you use an LG brand wall mount when mounting the TV to a wall. _e LG recommends that wall mounting be performed by a qualified professional installer. 0 z 4 inches SWIVEL STAND (Only 26LG3'*) After installing the TV, you can adjust the TV set manually...

Owners Manual
Page 20
... TV can receive Digital Over-the-air/Cable signals without an external digital set -top box. Match the jack colors (Y = green, PB = blue, and m z PR = red). How to use Turn on the TV. 2. EXTERNAL EQUIPMENT SETUP 01T_o prevent the equipment damage, never plug in any power cords until you do receive digital signals from a digital set -top box to the COMPONENT IN AUDIO jacks on the digital set-top box. (Refer to the figure as shown below. m --4 C O onnect the audio output of the digital set- Supported Resolutions...
... TV can receive Digital Over-the-air/Cable signals without an external digital set -top box. Match the jack colors (Y = green, PB = blue, and m z PR = red). How to use Turn on the TV. 2. EXTERNAL EQUIPMENT SETUP 01T_o prevent the equipment damage, never plug in any power cords until you do receive digital signals from a digital set -top box to the COMPONENT IN AUDIO jacks on the digital set-top box. (Refer to the figure as shown below. m --4 C O onnect the audio output of the digital set- Supported Resolutions...

Owners Manual
Page 21
... = red). How to connect z O Connect the video outputs (Y, PB, PR) of the digital set -top box.operation) Select the Component 1 input source on theTVusing the INPUT button on the TV. How to use Turn on the digital set-top box. (Referto the owner'smanualfor the digital set -top box to the COMPONENT IN AUDIO 1 jacks on C the TV. m _D top box to COMPONENT IN2 input, select the Component 2 input source on the remote control. If connected to the COMPONENT IN VIDEO 1 jacks on the TV. m z m O onnect the audio output of the digital set- Supported Resolutions...
... = red). How to connect z O Connect the video outputs (Y, PB, PR) of the digital set -top box.operation) Select the Component 1 input source on theTVusing the INPUT button on the TV. How to use Turn on the digital set-top box. (Referto the owner'smanualfor the digital set -top box to the COMPONENT IN AUDIO 1 jacks on C the TV. m _D top box to COMPONENT IN2 input, select the Component 2 input source on the remote control. If connected to the COMPONENT IN VIDEO 1 jacks on the TV. m z m O onnect the audio output of the digital set- Supported Resolutions...

Owners Manual
Page 22
How to the owner's manual for the digital set-top box.) 01S_elect the HDMI input source on the TV using the INPUT button on the TV. "0 (Refer to use m c 01T_urn on the digital set -top box to HDMI/DVI IN O jack on the remote control. m X:) c "0 O No separate audio connection is necessary. HDMI supports both audio and video. EXTERNALEQUIPMENT SETUP HDMI Connection 19/22LG3'* m x 1. m z 2. HDMI/DVINI iiiiiiii_)iiiiiiiiii/iiiiiiiiii/_ili_ HDMI-DTV 31.47 31.50 59.94 60.00 [[[ 44.96 45...
How to the owner's manual for the digital set-top box.) 01S_elect the HDMI input source on the TV using the INPUT button on the TV. "0 (Refer to use m c 01T_urn on the digital set -top box to HDMI/DVI IN O jack on the remote control. m X:) c "0 O No separate audio connection is necessary. HDMI supports both audio and video. EXTERNALEQUIPMENT SETUP HDMI Connection 19/22LG3'* m x 1. m z 2. HDMI/DVINI iiiiiiii_)iiiiiiiiii/iiiiiiiiii/_ili_ HDMI-DTV 31.47 31.50 59.94 60.00 [[[ 44.96 45...

Owners Manual
Page 23
m HDMI supports both audio and video. _D C 2. HDMI-DTV 31.47 31.50 44.96 45.00 53.72 35.75 26.97 2ZOO 33.71 33.75 6Z432 6Z50 59.94 60.00 59.94 60.00 59.94 60.00 23.976 24...29.97 30.00 59.939 60.00 21 How to connect m X O 2,ononr e3ct jatchke odnigtithael TsVe.t-top box to the owner's manual for the digital set-top box.) m 0i_Select the HDMI1, HDMI2, or HDMI3 input source on the C TV using the INPUT button on the digital set-top box. (Refer to HDMI/DVI IN1, m z O No separate audio connection is necessary. How to use m z 0i_Turn on the remote control. 26LG3'* 1.
m HDMI supports both audio and video. _D C 2. HDMI-DTV 31.47 31.50 44.96 45.00 53.72 35.75 26.97 2ZOO 33.71 33.75 6Z432 6Z50 59.94 60.00 59.94 60.00 59.94 60.00 23.976 24...29.97 30.00 59.939 60.00 21 How to connect m X O 2,ononr e3ct jatchke odnigtithael TsVe.t-top box to the owner's manual for the digital set-top box.) m 0i_Select the HDMI1, HDMI2, or HDMI3 input source on the C TV using the INPUT button on the digital set-top box. (Refer to HDMI/DVI IN1, m z O No separate audio connection is necessary. How to use m z 0i_Turn on the remote control. 26LG3'* 1.

Owners Manual
Page 24
How to connect O Connect the DVl output ofthe digital set-top box to the owner's manual for the digital set -top box. (Refer to the HDMI/DVI IN or HDMI/DVI IN 1/2/3 jack on the TV. How to use Turn on the digital set -top box.) Select the HDMI or HDMI1/2/3 input source on the TV using the INPUT button on the remote control. 22 EXTERNALEQUIPMENT SETUP DVI to the AUDIO IN (RGB/DVI) or AUDIO (RGB/DVI) jack on the TV. 2. O Connect the PC audio output to HDMI Connection 19/22LG3'* m x .-t I'I"1 z m c I'I"1 z .-t m .-t c "0 26LG3'* 1.
How to connect O Connect the DVl output ofthe digital set-top box to the owner's manual for the digital set -top box. (Refer to the HDMI/DVI IN or HDMI/DVI IN 1/2/3 jack on the TV. How to use Turn on the digital set -top box.) Select the HDMI or HDMI1/2/3 input source on the TV using the INPUT button on the remote control. 22 EXTERNALEQUIPMENT SETUP DVI to the AUDIO IN (RGB/DVI) or AUDIO (RGB/DVI) jack on the TV. 2. O Connect the PC audio output to HDMI Connection 19/22LG3'* m x .-t I'I"1 z m c I'I"1 z .-t m .-t c "0 26LG3'* 1.

Owners Manual
Page 25
... the Component remote control. Component ports on the TV Video output ports on the TV. 01_Refer to the DVD player's manual for operating instructions. Match the jack colors (Y = green, PB = blue, and PR = red). How to connect O onnect the video outputs (Y, PB, PR) of the DVD to the component input ports as shown below. DVD SETUP Component Connection 19/22LG3'* 26LG3'* x r_l _o z r_l X:) c "0 r_l z r_l c "0 1. or Component 1 input source on the TV using the INPUT button on the 0_If connected to COMPONENT IN 2 input, select the Component 2 input source on DVD player 23...
... the Component remote control. Component ports on the TV Video output ports on the TV. 01_Refer to the DVD player's manual for operating instructions. Match the jack colors (Y = green, PB = blue, and PR = red). How to connect O onnect the video outputs (Y, PB, PR) of the DVD to the component input ports as shown below. DVD SETUP Component Connection 19/22LG3'* 26LG3'* x r_l _o z r_l X:) c "0 r_l z r_l c "0 1. or Component 1 input source on the TV using the INPUT button on the 0_If connected to COMPONENT IN 2 input, select the Component 2 input source on DVD player 23...
Owners Manual
Page 31
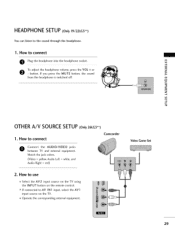
... TV. ,l_Operate the corresponding external equipment. Video Game Set 29 If you press the MUTE button, the sound from the headphone is switched off. r_l _D c r_l z r_l c OTHER A/V SOURCE SETUP (Only 26LG3'*) 1. Match the jack colors. (Video = yellow, Audio Left = white, and Audio Right = red) 2. r_l x r_l To adjust the headphone volume, press the VOL + or z - How to AV IN 1 input, select the AV 1 input source on the remote control. ,l_If connected to connect Plug...
... TV. ,l_Operate the corresponding external equipment. Video Game Set 29 If you press the MUTE button, the sound from the headphone is switched off. r_l _D c r_l z r_l c OTHER A/V SOURCE SETUP (Only 26LG3'*) 1. Match the jack colors. (Video = yellow, Audio Left = white, and Audio Right = red) 2. r_l x r_l To adjust the headphone volume, press the VOL + or z - How to AV IN 1 input, select the AV 1 input source on the remote control. ,l_If connected to connect Plug...
Owners Manual
Page 60
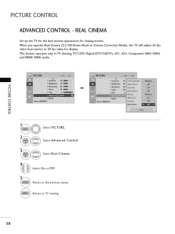
Select Real Cinema. Return to the previous menu. This feature operates only in TV (Analog TV/CATV, Digital DTV/CADTV), AVl, AV2, Component 480i/1080i, and HDMI 1080i mode. Select On or Off. Select Advanced Control. Return to TV viewing. 58 REALCINEMA Set up the TV for the best picture appearance for display. "O N C m N O Z O Select PICTURE. When you operate Real Cinema (2;:2 Pull-Down Mode or Cinema Correction Mode), the TV will adjust 24 fps video from movies to 50 fps video for viewing movies. PICTURE CONTROL ADVANCED CONTROL-
Select Real Cinema. Return to the previous menu. This feature operates only in TV (Analog TV/CATV, Digital DTV/CADTV), AVl, AV2, Component 480i/1080i, and HDMI 1080i mode. Select On or Off. Select Advanced Control. Return to TV viewing. 58 REALCINEMA Set up the TV for the best picture appearance for display. "O N C m N O Z O Select PICTURE. When you operate Real Cinema (2;:2 Pull-Down Mode or Cinema Correction Mode), the TV will adjust 24 fps video from movies to 50 fps video for viewing movies. PICTURE CONTROL ADVANCED CONTROL-

Owners Manual
Page 80
... provided by the broadcasting station. Most television programs and television movies can be blocked. 2. It is required to gain access to block all programs to block specific channels, ratings and other viewing sources. Specify a password 3. O For USA For Canada _o z c_ Select LOCK. The Parental Control Function (V-Chip) is set up blocking schemes to block specific channels, ratings, and external viewing sources. _o A password is also possible to this function...
... provided by the broadcasting station. Most television programs and television movies can be blocked. 2. It is required to gain access to block all programs to block specific channels, ratings and other viewing sources. Specify a password 3. O For USA For Canada _o z c_ Select LOCK. The Parental Control Function (V-Chip) is set up blocking schemes to block specific channels, ratings, and external viewing sources. _o A password is also possible to this function...
Owners Manual
Page 92
...'s power cord was plugged in menu option. i,l,Cllheck for local interference such as an electrical appliance or power tool. In this case use the latest cables that the batteries are pointing the remote control directly at the TV. i,l,C_heck the power control settings. uuTf_est the wall power outlet, plug another station. i,i,Tiry another channel. i,i,Si tation signal is turned on. i,i,Ci heck HDMI cable over version 1.3. i,i,Ifsf the sleep timer set : TV, VCR etc. The problem...
...'s power cord was plugged in menu option. i,l,Cllheck for local interference such as an electrical appliance or power tool. In this case use the latest cables that the batteries are pointing the remote control directly at the TV. i,l,C_heck the power control settings. uuTf_est the wall power outlet, plug another station. i,i,Tiry another channel. i,i,Si tation signal is turned on. i,i,Ci heck HDMI cable over version 1.3. i,i,Ifsf the sleep timer set : TV, VCR etc. The problem...

Owners Manual
Page 93
... turned on or off and does not indicate a fault with the broadcast. i,i,iSound muted? i,i,Ai djust Balance in an unusual noise when the product is not available for all models. Check the input source. i,i,Ai re the audio cables installed properly? mmPr_ess the VOL or VOLUME button. miTniry another channel. m z Work the Auto configure or adjust clock, phase, or H/V position. (Option) x Check the signal cable...
... turned on or off and does not indicate a fault with the broadcast. i,i,iSound muted? i,i,Ai djust Balance in an unusual noise when the product is not available for all models. Check the input source. i,i,Ai re the audio cables installed properly? mmPr_ess the VOL or VOLUME button. miTniry another channel. m z Work the Auto configure or adjust clock, phase, or H/V position. (Option) x Check the signal cable...
Owners Manual
Page 99
... MUTE button on remote control. See page 98. Tint (Command: k j) To adjust screen tint. Transmission[k] [j][] [Set ID] [ ] [Data] [Cr] Data Red: 00 _ Green: 64 (*transmit by Hexadecimal code) _Refer to 'Real data mapping'. Power (Command: k a) To control Power On/Off of the TV. Transmission[k] [d][] [set ID][ ][OK/NG] [Data] [x] 09. You can also adjust volume with the volume buttons on remote control. You can also adjust sharpness in the PICTURE menu. Color (Command: k i) To adjust screen color...
... MUTE button on remote control. See page 98. Tint (Command: k j) To adjust screen tint. Transmission[k] [j][] [Set ID] [ ] [Data] [Cr] Data Red: 00 _ Green: 64 (*transmit by Hexadecimal code) _Refer to 'Real data mapping'. Power (Command: k a) To control Power On/Off of the TV. Transmission[k] [d][] [set ID][ ][OK/NG] [Data] [x] 09. You can also adjust volume with the volume buttons on remote control. You can also adjust sharpness in the PICTURE menu. Color (Command: k i) To adjust screen color...

Owners Manual
Page 101
... Hexadecimal before sending. Backlight (Command: m g) PICTURE RETURN SAP FLASHBK Ackno_ledg_rnen![a][ ] [Set !D][] [O K.] [DataO0] [DataO] ] [Data02] [DataOS] [Data04] [x] [a][] [Set !D NG] [DataO0] [x] To adjust screen backlight. See page 98. Data 5: The table above lists the binary code which source do you want to change the channel. 6th bit: Use a two part or one part channel. For example: The binary code to tune the sub source to 'Real data mapping'. TransmissiOn...
... Hexadecimal before sending. Backlight (Command: m g) PICTURE RETURN SAP FLASHBK Ackno_ledg_rnen![a][ ] [Set !D][] [O K.] [DataO0] [DataO] ] [Data02] [DataOS] [Data04] [x] [a][] [Set !D NG] [DataO0] [x] To adjust screen backlight. See page 98. Data 5: The table above lists the binary code which source do you want to change the channel. 6th bit: Use a two part or one part channel. For example: The binary code to tune the sub source to 'Real data mapping'. TransmissiOn...


