Owners Manual
Page 1
LCD TV OWNER'S MANUAL LCD TV MODELS 26LC7D 26LC7DC 32LC4D 42LC4D Please read this product meets the ENERGY STAR guidelines for future Record model reference. when you require ENERGY guidelines STAR is a set of the set . Retain it for energy efficiency. S. Agency(EPA). Protection Environmental As an ENERGY STAR Partner LGE U. and serial number of power-saving issued by the U.S. has determined that this manual carefully your dealer service. A.,[nc. number before operating See the [abel attached this information on the back cover and quote to your set .
LCD TV OWNER'S MANUAL LCD TV MODELS 26LC7D 26LC7DC 32LC4D 42LC4D Please read this product meets the ENERGY STAR guidelines for future Record model reference. when you require ENERGY guidelines STAR is a set of the set . Retain it for energy efficiency. S. Agency(EPA). Protection Environmental As an ENERGY STAR Partner LGE U. and serial number of power-saving issued by the U.S. has determined that this manual carefully your dealer service. A.,[nc. number before operating See the [abel attached this information on the back cover and quote to your set .

Owners Manual
Page 4
... apparatus liquid has been damaged in any objects fall into the apparatus, the apparatus has exposed to be placed appliances recommend upon . Check the specification manual to rain or moisture, does not operate normally, or has been dropped. Do not overload cords, frayed page of fire or electo rain Do not...
... apparatus liquid has been damaged in any objects fall into the apparatus, the apparatus has exposed to be placed appliances recommend upon . Check the specification manual to rain or moisture, does not operate normally, or has been dropped. Do not overload cords, frayed page of fire or electo rain Do not...
Owners Manual
Page 5
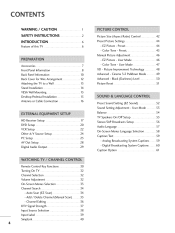
...Information ...Back Panel Information ...7 8 10 Back Cover for Wire Arrangement ...12 Attaching the TV to a Wall ...Stand Installation ...VESA Wall Mounting ...13 14 15 Manual Picture Adjustment ...- User Mode ... - Digital Broadcasting System Captions ...60 Caption Option ...61... Remote Control Key Functions ...Turning On TV ...Channel Selection ...Volume Adjustment ...On-Screen Menus Selection ...Channel Search ...
...Information ...Back Panel Information ...7 8 10 Back Cover for Wire Arrangement ...12 Attaching the TV to a Wall ...Stand Installation ...VESA Wall Mounting ...13 14 15 Manual Picture Adjustment ...- User Mode ... - Digital Broadcasting System Captions ...60 Caption Option ...61... Remote Control Key Functions ...Turning On TV ...Channel Selection ...Volume Adjustment ...On-Screen Menus Selection ...Channel Search ...
Owners Manual
Page 6
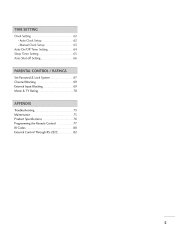
Clock Setting ...62 - Manual Clock Setup ...Auto On/Off Timer Setting ...Sleep Timer Setting ...Auto Shut-off Setting ...62 63 64 65 66 Set Password & Lock System ...Channel Blocking ...External Input Blocking ...Movie & TV Rating ... 67 69 69 70 !!Ii i iiiiiiiiiiiiii i i i i i i ii i i i i i i i i i i i i i i i i i i i i i i i i i i i i i i i i i i i i i i 73 75 76 Troubleshooting ...Maintenance ...Product Specifications ... Programming the Remote Control ...77 IR Codes ...80 External Control Through RS-232C ...82 5 Auto Clock Setup ...-
Clock Setting ...62 - Manual Clock Setup ...Auto On/Off Timer Setting ...Sleep Timer Setting ...Auto Shut-off Setting ...62 63 64 65 66 Set Password & Lock System ...Channel Blocking ...External Input Blocking ...Movie & TV Rating ... 67 69 69 70 !!Ii i iiiiiiiiiiiiii i i i i i i ii i i i i i i i i i i i i i i i i i i i i i i i i i i i i i i i i i i i i i i 73 75 76 Troubleshooting ...Maintenance ...Product Specifications ... Programming the Remote Control ...77 IR Codes ...80 External Control Through RS-232C ...82 5 Auto Clock Setup ...-
Owners Manual
Page 8
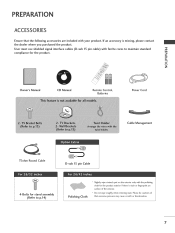
... of Polishing Cloth that the following accessories are included with the polishing cloth for the product. on the exterior only with your product. O Z Owner's Manual CD Manual Remote Control, Batteries Power Cord Cable Management 75ohm Round Cable D-sub 15 pin Cable * Slightly wipe stained spot on 4-Bolts for stand assembly (Refer to...
... of Polishing Cloth that the following accessories are included with the polishing cloth for the product. on the exterior only with your product. O Z Owner's Manual CD Manual Remote Control, Batteries Power Cord Cable Management 75ohm Round Cable D-sub 15 pin Cable * Slightly wipe stained spot on 4-Bolts for stand assembly (Refer to...
Owners Manual
Page 18
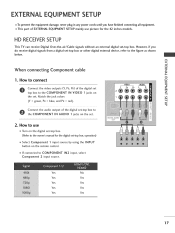
... the COMPONENT the set -top box. all equipment. IN2 input, select Yes Yes Yes Yes Yes No Yes Yes Yes Yes 17 HD RECEIVERSETUP This TV can receive Digital do receive digital below. How to connect Connect Component cable _D z m XD c (Y, PB, PR) of the digital IN VIDEO... set the video outputs m top box to the owner's manual for the 42 inches models. How to COMPONENT 2 input source. However, if you have finished connecting EQUIPMENT SETUP mainly use Turn on the remote control...
... the COMPONENT the set -top box. all equipment. IN2 input, select Yes Yes Yes Yes Yes No Yes Yes Yes Yes 17 HD RECEIVERSETUP This TV can receive Digital do receive digital below. How to connect Connect Component cable _D z m XD c (Y, PB, PR) of the digital IN VIDEO... set the video outputs m top box to the owner's manual for the 42 inches models. How to COMPONENT 2 input source. However, if you have finished connecting EQUIPMENT SETUP mainly use Turn on the remote control...
Owners Manual
Page 19
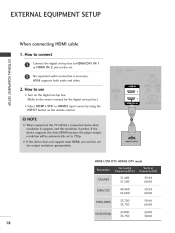
m z m 2. How to use Turn on the digital set . How to connect m HDM[ cable x m Connect or HDMI the digital set-top box to the owner's manual for the digital c -O Select HDMI 1/DVI or HDMI2 input source by using the INPUT button on the set -top box. HDMI1/DVI-DTV, HDMI2-DTV ...
m z m 2. How to use Turn on the digital set . How to connect m HDM[ cable x m Connect or HDMI the digital set-top box to the owner's manual for the digital c -O Select HDMI 1/DVI or HDMI2 input source by using the INPUT button on the set -top box. HDMI1/DVI-DTV, HDMI2-DTV ...
Owners Manual
Page 20
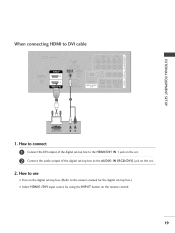
Connect the audio output of the digital set-top box to the AUDIO IN (RGB/DVI) jack on the set. How to connect Connect the DVI output of the digital set-top box to the HDMI/DVI IN 1 jack on the set -top box.) input source by using the INPUT on the remote control. 19 How to use 01_ Turn on the digital 01_ Select HDMI 1/DVI set-top box. (Refer to DVi cable m x m z m c m z m c 1. When connecting HDMI to the owner's manual for the digital button set . 2.
Connect the audio output of the digital set-top box to the AUDIO IN (RGB/DVI) jack on the set. How to connect Connect the DVI output of the digital set-top box to the HDMI/DVI IN 1 jack on the set -top box.) input source by using the INPUT on the remote control. 19 How to use 01_ Turn on the digital 01_ Select HDMI 1/DVI set-top box. (Refer to DVi cable m x m z m c m z m c 1. When connecting HDMI to the owner's manual for the digital button set . 2.
Owners Manual
Page 21
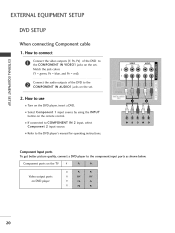
... audio outputs IN of the DVD jacks on the set . to the jacks on the set . IN 2 inpuL select c -0 01_ Refer to the DVD player's manual for operating Component Input ports To get better picture quality, connect a DVD player to COMPONENT 2 input source. instructions. How to use 01_ Turn on the... (Y, PB, PR) of the DVD to the COMPONENT Match the jack colors IN VIDE01 _o z m (Y = green_ PB = blue_ and PR = red). Component ports on the TV Video output ports on the remote control. 01_ If connected Component to the component input ports as shown below.
... audio outputs IN of the DVD jacks on the set . to the jacks on the set . IN 2 inpuL select c -0 01_ Refer to the DVD player's manual for operating Component Input ports To get better picture quality, connect a DVD player to COMPONENT 2 input source. instructions. How to use 01_ Turn on the... (Y, PB, PR) of the DVD to the COMPONENT Match the jack colors IN VIDE01 _o z m (Y = green_ PB = blue_ and PR = red). Component ports on the TV Video output ports on the remote control. 01_ If connected Component to the component input ports as shown below.
Owners Manual
Page 22
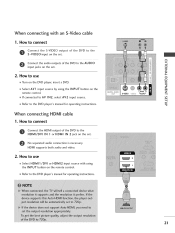
...01_ Select HDMI1/DVI the INPUT button or HDMI2 input source with an S-Video cable the S-VIDEO output of the DVD to the DVD player's manual for operating c "O When connecting 1. No separated HDMI supports audio connection is necessary. both audio and video. 2. instructions. z _> 2. ...When connecting 1. How to connect Connect HDMI/DVI HDMI cable the HDMI output IN 1 or HDMI of the DVD to the DVD player's manual for operating 21 instructions. 01_ Refer to the AUDIO input jacks on the set . x _o Connect the audio outputs of the DVD to...
...01_ Select HDMI1/DVI the INPUT button or HDMI2 input source with an S-Video cable the S-VIDEO output of the DVD to the DVD player's manual for operating c "O When connecting 1. No separated HDMI supports audio connection is necessary. both audio and video. 2. instructions. z _> 2. ...When connecting 1. How to connect Connect HDMI/DVI HDMI cable the HDMI output IN 1 or HDMI of the DVD to the DVD player's manual for operating 21 instructions. 01_ Refer to the AUDIO input jacks on the set . x _o Connect the audio outputs of the DVD to...

Owners Manual
Page 23
... To avoid picture If the 4:5 picture noise (interference), format leave an adequate distance between the VCR and TV. and in socket of the screen may remain visible on the set. cable to the VCR owner's manual.) 22 the fixed images on the VCR. (Refer to the RF antenna 2. IN socket on the... is used; How to use 01_ Set VCR output switch to 3 or 4 and then tune TV to the same channel number. 01_ Insert a video tape...
... To avoid picture If the 4:5 picture noise (interference), format leave an adequate distance between the VCR and TV. and in socket of the screen may remain visible on the set. cable to the VCR owner's manual.) 22 the fixed images on the VCR. (Refer to the RF antenna 2. IN socket on the... is used; How to use 01_ Set VCR output switch to 3 or 4 and then tune TV to the same channel number. 01_ Insert a video tape...
Owners Manual
Page 24
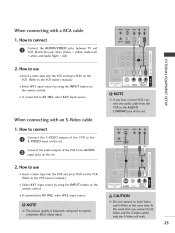
... VCR and press PLAY on the VCR. (Refer to the VCR owner's manual.) 01_ Select AV1 input source by using the INPUT the remote control. 01_ If connected to connect Connect S-VIDEO with a RCA cable the AUDIO/VIDEO jacks between TV and Left m VCR. When connecting 1. Match the jack colors (Video = yellow... the input source. 23 How to use 01_ Insert a video tape into the VCR and press PLAY on the VCR. (Refer to the VCR owner's manual.) 01_ Select AV1 input source by using the INPUT remote control. 01_ If connected to AV IN2, select AV2 button on z m XD c m z m input ...
... VCR and press PLAY on the VCR. (Refer to the VCR owner's manual.) 01_ Select AV1 input source by using the INPUT the remote control. 01_ If connected to connect Connect S-VIDEO with a RCA cable the AUDIO/VIDEO jacks between TV and Left m VCR. When connecting 1. Match the jack colors (Video = yellow... the input source. 23 How to use 01_ Insert a video tape into the VCR and press PLAY on the VCR. (Refer to the VCR owner's manual.) 01_ Select AV1 input source by using the INPUT remote control. 01_ If connected to AV IN2, select AV2 button on z m XD c m z m input ...
Owners Manual
Page 29
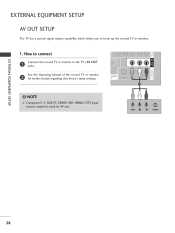
EXTERNALEQUIPMENT SETUP AV OUT SETUP The TV has a speda[ signal output capability which allows you to connect m x m Connect jacks. How to hook up the second TV or monitor. 1. the second TV or monitor to the TV's AV OUT z See the Operating m Manual of the second TV or monitor _D c for further details regarding that device's input settings. m z m c 28
EXTERNALEQUIPMENT SETUP AV OUT SETUP The TV has a speda[ signal output capability which allows you to connect m x m Connect jacks. How to hook up the second TV or monitor. 1. the second TV or monitor to the TV's AV OUT z See the Operating m Manual of the second TV or monitor _D c for further details regarding that device's input settings. m z m c 28
Owners Manual
Page 30
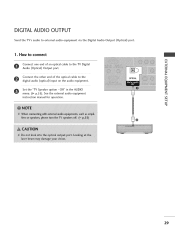
Off" in the AUDIO rT1 z rT1 menu. (_ p.55). I. See the external audio equipment instruction manual for operation. XD c Set the "TV Speaker option - rT1 Audio (Optical) _D z cable to the rT1 Connect digital the other end of an optical cable to the TV Digital Output port. How to external audio equipment via the Digital Audio Output (Optical) port. c @ 29 DiGiTAL AUDIO OUTPUT Send the TV's audio to connect x Connect one end of the optical audio (optical) input on the audio equipment.
Off" in the AUDIO rT1 z rT1 menu. (_ p.55). I. See the external audio equipment instruction manual for operation. XD c Set the "TV Speaker option - rT1 Audio (Optical) _D z cable to the rT1 Connect digital the other end of an optical cable to the TV Digital Output port. How to external audio equipment via the Digital Audio Output (Optical) port. c @ 29 DiGiTAL AUDIO OUTPUT Send the TV's audio to connect x Connect one end of the optical audio (optical) input on the audio equipment.

Owners Manual
Page 34
Press the • button and then use • or • button to display the available menus. Press the MENU button and then use • • _1 • button to select the each menu. SETUP VIDEO N -r" z < N I > z z fT1 N © Z © LOCK For USA For Canada AUDIO OPTION TIME 33 ON-SCREEN MENUS SELECTION Your TV's OSD (On Screen Display) may differ slightly from what is shown in this manual.
Press the • button and then use • or • button to display the available menus. Press the MENU button and then use • • _1 • button to select the each menu. SETUP VIDEO N -r" z < N I > z z fT1 N © Z © LOCK For USA For Canada AUDIO OPTION TIME 33 ON-SCREEN MENUS SELECTION Your TV's OSD (On Screen Display) may differ slightly from what is shown in this manual.
Owners Manual
Page 36
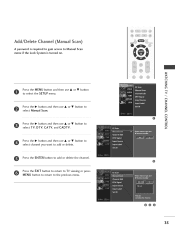
... and then use • or • button < N I > z z fT1 to add or delete. button to @ Press the • button and then use • or • select Manual Scan. Press the ENTER button to add or delete the channel. @ Press the EXIT button to return to...
... and then use • or • button < N I > z z fT1 to add or delete. button to @ Press the • button and then use • or • select Manual Scan. Press the ENTER button to add or delete the channel. @ Press the EXIT button to return to...

Owners Manual
Page 47
... @ Press the • button and then use _1 or • button to make appropriate adjustments. @ Press EXIT MENU button to return to TV viewing or press button to return to the previous menu. 46 @ To control brightness the brightness of the screen, adjust the Press the •...use • select User 1 or User 2. or • button to select Brightness, (Contrast, Light). Sharpness, @0 Back Light-This is the function for some LCD TV models. appearance to select the VIDEO N © Z _D © Press the • button and then use • menu. or • button to suit...
... @ Press the • button and then use _1 or • button to make appropriate adjustments. @ Press EXIT MENU button to return to TV viewing or press button to return to the previous menu. 46 @ To control brightness the brightness of the screen, adjust the Press the •...use • select User 1 or User 2. or • button to select Brightness, (Contrast, Light). Sharpness, @0 Back Light-This is the function for some LCD TV models. appearance to select the VIDEO N © Z _D © Press the • button and then use • menu. or • button to suit...

Owners Manual
Page 49
PICTURECONTROL XD - can choose the Auto / Manual. (User I and User 2), you When selecting the Manual, you Contrast, XD color and XD Noise. or • button to the previous menu. 48 EZ Picture options (Daylight, Normal and XD is LG Electronic's to Auto. button and then use • or • ... options can adjust the XD -O N C _o m Press the MENU button and then use • or • button to or Manual. @@ Press EXIT MENU button to return to TV viewing or press button to return to select the VIDEO N © Z _o © Press the • select X D. PICTURE...
PICTURECONTROL XD - can choose the Auto / Manual. (User I and User 2), you When selecting the Manual, you Contrast, XD color and XD Noise. or • button to the previous menu. 48 EZ Picture options (Daylight, Normal and XD is LG Electronic's to Auto. button and then use • or • ... options can adjust the XD -O N C _o m Press the MENU button and then use • or • button to or Manual. @@ Press EXIT MENU button to return to TV viewing or press button to return to select the VIDEO N © Z _o © Press the • select X D. PICTURE...
Owners Manual
Page 63
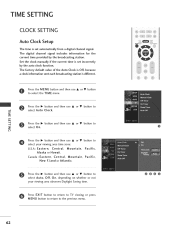
... provided by the auto clock function. or • button to Pacific, Pacific, select your viewing area observes Daylight Press EXIT MENU button to return to TV viewing or press button to return to @@@@ depending on whether Saving time. or • button Press the • button and then use • menu. button... incorrectly Clock is Off, because is set automatically The digital channel signal from a digital channel signal. by the broadcasting if the current Set the clock manually The factory default time is different.
... provided by the auto clock function. or • button to Pacific, Pacific, select your viewing area observes Daylight Press EXIT MENU button to return to TV viewing or press button to return to @@@@ depending on whether Saving time. or • button Press the • button and then use • menu. button... incorrectly Clock is Off, because is set automatically The digital channel signal from a digital channel signal. by the broadcasting if the current Set the clock manually The factory default time is different.

Owners Manual
Page 64
... year, date, z c_ Press EXIT MENU button to return to TV viewing or press button to return to select the TIME button menu. Manual Clock Setup If the current time setting is wrong, reset the clock manually. Once r_ selected, use • select Manual Clock. Press the MENU to the previous menu. @0 63 or...
... year, date, z c_ Press EXIT MENU button to return to TV viewing or press button to return to select the TIME button menu. Manual Clock Setup If the current time setting is wrong, reset the clock manually. Once r_ selected, use • select Manual Clock. Press the MENU to the previous menu. @0 63 or...


