
Owners Manual
Page 9
""_ NOTE: If your TV. And then wipe the product with a cloth (If a polishing cloth is turned then illuminates on, the indicator green before the picture 8 PREPARATION FRONT PANELINFORMATION Here shown may be somewhat different from your product has a protection tape attached, remove the tape. When the TV is included with your product, _D m _D Front Panel Controls (26 inches) © z (A,¥)Bu_ons (41,I_) Buttons Bu_on Bu_on Remote Control Sensor Power/Sta Illuminates nd by Indicator red in standby mode. blinks green and is displayed. use it).
""_ NOTE: If your TV. And then wipe the product with a cloth (If a polishing cloth is turned then illuminates on, the indicator green before the picture 8 PREPARATION FRONT PANELINFORMATION Here shown may be somewhat different from your product has a protection tape attached, remove the tape. When the TV is included with your product, _D m _D Front Panel Controls (26 inches) © z (A,¥)Bu_ons (41,I_) Buttons Bu_on Bu_on Remote Control Sensor Power/Sta Illuminates nd by Indicator red in standby mode. blinks green and is displayed. use it).
Owners Manual
Page 11
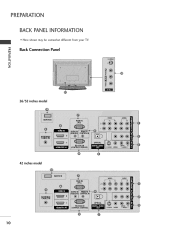
PREPARATION BACK PANELINFORMATION ,,,iHere shown may be somewhat different from your TV. -O m Back Connection Panel © z _@ _I 26/32 inches model 42 inches model 10
PREPARATION BACK PANELINFORMATION ,,,iHere shown may be somewhat different from your TV. -O m Back Connection Panel © z _@ _I 26/32 inches model 42 inches model 10

Owners Manual
Page 15
stand with the product as Securely install the 4 bolts provided. 14 PREPARATION STAND INSTALLATION (onmy 26/32 _nchos LCD Tvmodems) Carefully place the product screen side down on product and a cushioned surface that will protect screen from damage. I"1'1 .-t © z Assemble the product shown.
stand with the product as Securely install the 4 bolts provided. 14 PREPARATION STAND INSTALLATION (onmy 26/32 _nchos LCD Tvmodems) Carefully place the product screen side down on product and a cushioned surface that will protect screen from damage. I"1'1 .-t © z Assemble the product shown.
Owners Manual
Page 16
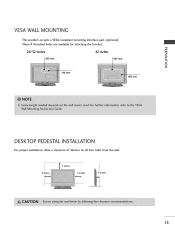
VESA WALL MOUNTING This product There accepts a VESA-compliant mounting for attaching interface pad. (optional) -0 4 threaded inches holes are available the bracket. _o 26/32 42 inches 200 mm 600 mm m _o © z 100 mm 400 mm DESKTOP PEDESTALINSTALLATION For proper ventilation, allow a clearance of 4inches on all four sides from the wall. I 4 inches 4 inches 4 inches 4 inches 1S
VESA WALL MOUNTING This product There accepts a VESA-compliant mounting for attaching interface pad. (optional) -0 4 threaded inches holes are available the bracket. _o 26/32 42 inches 200 mm 600 mm m _o © z 100 mm 400 mm DESKTOP PEDESTALINSTALLATION For proper ventilation, allow a clearance of 4inches on all four sides from the wall. I 4 inches 4 inches 4 inches 4 inches 1S

Owners Manual
Page 77
....9x 8.7 inches 676.5 x 531.0 x 221.0mm 26.6 x 18.8 x 3.3 inches 676.5 x 478.7 x 84.0 mm 31.8 x 23.8x 9.8 inches 806.8 x 605.6 x 249.0mm 31.8 x 21.6 x 3.1 inches 806.8 x 548.6 x 79.0 mm 40.7 x 29.5 x 11.3 inches ...
....9x 8.7 inches 676.5 x 531.0 x 221.0mm 26.6 x 18.8 x 3.3 inches 676.5 x 478.7 x 84.0 mm 31.8 x 23.8x 9.8 inches 806.8 x 605.6 x 249.0mm 31.8 x 21.6 x 3.1 inches 806.8 x 548.6 x 79.0 mm 40.7 x 29.5 x 11.3 inches ...
