IB-51 WEB Browser Management Guide
Page 2
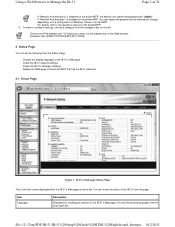
... page Status Page This is the first screen displayed after the IB-51's Web page is enabled on the printer/MFP, the user name and password to Manage the IB-51 Page 2 of the printer/MFP. 4. Example: http://[FE80:0:0:0:2C0:EEFF:FE11:2233]/ 2. Status Page You can check... the status of the IB-51 from the navigation bar on the printer/MFP, the default user name and password are "Admin". - Choose the desired language from the Status Page. - To view or configure settings, choose a category from this page. Item Language Description Displayed...
... page Status Page This is the first screen displayed after the IB-51's Web page is enabled on the printer/MFP, the user name and password to Manage the IB-51 Page 2 of the printer/MFP. 4. Example: http://[FE80:0:0:0:2C0:EEFF:FE11:2233]/ 2. Status Page You can check... the status of the IB-51 from the navigation bar on the printer/MFP, the default user name and password are "Admin". - Choose the desired language from the Status Page. - To view or configure settings, choose a category from this page. Item Language Description Displayed...

IB-51 WEB Browser Management Guide
Page 6
.... - Using a Web Browser to Manage the IB-51 Page 6 of 22 Import PAC Password Select and import the PAC file, when EAP-FAST is selected for the authentication, and automatic PAC file is "Admin". NetWare: Obtain the time from the IB-51 via e-mail. For designating the server to... the network. The time is used in case you forget. Part of the client certificate can be referenced. Click Submit at the bottom of the password in various reports sent from a NetWare server. Note: - Make a note of the page. 3-5. Item Current Local Time Time Zone Time Protocol ...
.... - Using a Web Browser to Manage the IB-51 Page 6 of 22 Import PAC Password Select and import the PAC file, when EAP-FAST is selected for the authentication, and automatic PAC file is "Admin". NetWare: Obtain the time from the IB-51 via e-mail. For designating the server to... the network. The time is used in case you forget. Part of the client certificate can be referenced. Click Submit at the bottom of the password in various reports sent from a NetWare server. Note: - Make a note of the page. 3-5. Item Current Local Time Time Zone Time Protocol ...

IB-51 WEB Browser Management Guide
Page 11
...print server in remote printer mode that the password here match the print server password set by the print system. Shows the print server name. Protocols > NetWare > Bindery Services You can be designated as creating the queue require admin, supervisor, or equivalent rights. file:///C:/Tom/PDF...Item NetWare Protocol Bindery Mode Frame Type NDS Tree NDS Context Print Server Mode Print Server Name Queue Polling Interval Banner Page Requests Password (Optional) Remote Printer Mode Printer Name Job Timeout Description Choose whether NetWare protocol is enabled (On) or disabled (Off). Choose...
...print server in remote printer mode that the password here match the print server password set by the print system. Shows the print server name. Protocols > NetWare > Bindery Services You can be designated as creating the queue require admin, supervisor, or equivalent rights. file:///C:/Tom/PDF...Item NetWare Protocol Bindery Mode Frame Type NDS Tree NDS Context Print Server Mode Print Server Name Queue Polling Interval Banner Page Requests Password (Optional) Remote Printer Mode Printer Name Job Timeout Description Choose whether NetWare protocol is enabled (On) or disabled (Off). Choose...
Kyocera NET ADMIN Operation Guide for Ver 3.2.2016.3
Page 3
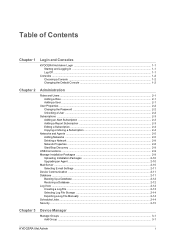
Table of Contents Chapter 1 Login and Consoles KYOCERA Net Admin Login ...1-1 Starting and Logging In ...1-1 Log Off ...1-1 Consoles ...1-2 Choosing a Console ...1-2 Changing the Default Console 1-2 Chapter 2 Administration Roles and Users ...2-1 Adding a Role ...2-1 Adding a User ...2-1 User Properties ...2-2 Changing the Password ...2-2 Unlocking a User ...2-2 Subscriptions ...2-3 Adding an Alert Subscription 2-3 Adding a Report ... a Log File Manually 2-14 Scheduled Jobs ...2-14 Security ...2-15 Chapter 3 Device Manager Manage Groups ...3-1 Add Group ...3-1 KYOCERA Net Admin i
Table of Contents Chapter 1 Login and Consoles KYOCERA Net Admin Login ...1-1 Starting and Logging In ...1-1 Log Off ...1-1 Consoles ...1-2 Choosing a Console ...1-2 Changing the Default Console 1-2 Chapter 2 Administration Roles and Users ...2-1 Adding a Role ...2-1 Adding a User ...2-1 User Properties ...2-2 Changing the Password ...2-2 Unlocking a User ...2-2 Subscriptions ...2-3 Adding an Alert Subscription 2-3 Adding a Report ... a Log File Manually 2-14 Scheduled Jobs ...2-14 Security ...2-15 Chapter 3 Device Manager Manage Groups ...3-1 Add Group ...3-1 KYOCERA Net Admin i
Kyocera NET ADMIN Operation Guide for Ver 3.2.2016.3
Page 6
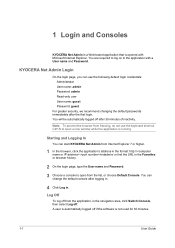
...the URL in . Log Off To log off . You are required to log on to the application with Microsoft Internet Explorer. KYOCERA Net Admin Login On the login page, you can change the default console after the first login. A user is automatically logged off after ... Log off from freezing, do not use the following default login credentials: Administrator User name: admin Password: admin Read-only user User name: guest Password: guest For greater security, we recommend changing the default passwords immediately after logging in. 4 Click Log in the Favorites or browser history. 2 On the...
...the URL in . Log Off To log off . You are required to log on to the application with Microsoft Internet Explorer. KYOCERA Net Admin Login On the login page, you can change the default console after the first login. A user is automatically logged off after ... Log off from freezing, do not use the following default login credentials: Administrator User name: admin Password: admin Read-only user User name: guest Password: guest For greater security, we recommend changing the default passwords immediately after logging in. 4 Click Log in the Favorites or browser history. 2 On the...

Kyocera NET ADMIN Operation Guide for Ver 3.2.2016.3
Page 9
... for receiving alerts and reports only). User Properties User Properties displays and sets details about the user. KYOCERA Net Admin 2-2 You can change a password, unlock a user, and delete or disable an account. Do not use invisible Unicode or extended ASCII characters. 5 Under .... 1 Select an administrator or user in the navigation area. 2 Select User properties. 3 Click Change password. 4 Type the new password, and type again to confirm. 5 Click OK. Changing the Password An administrator or a user with Login users / Full Control privilege can set in Security expires. 1...
... for receiving alerts and reports only). User Properties User Properties displays and sets details about the user. KYOCERA Net Admin 2-2 You can change a password, unlock a user, and delete or disable an account. Do not use invisible Unicode or extended ASCII characters. 5 Under .... 1 Select an administrator or user in the navigation area. 2 Select User properties. 3 Click Change password. 4 Type the new password, and type again to confirm. 5 Click OK. Changing the Password An administrator or a user with Login users / Full Control privilege can set in Security expires. 1...

Kyocera NET ADMIN Operation Guide for Ver 3.2.2016.3
Page 17
... each agent. Click Next. 8 On the Confirmation page, click Upgrade. If Manually enter the same user login, password and domain for all agents. Mail Server KYOCERA Net Admin communicates with an extension of .ZIP or .KNALU. 4 Click OK to system administrators and subscribers. Click Next. ... list and clicking Remove package. Upgrading an Agent You can remove an installation package by selecting it from the KYOCERA Net Admin server was selected, type User Login, Password, and Domain for a valid upgrade file with a mail server to send e-mail alerts and information to upload...
... each agent. Click Next. 8 On the Confirmation page, click Upgrade. If Manually enter the same user login, password and domain for all agents. Mail Server KYOCERA Net Admin communicates with an extension of .ZIP or .KNALU. 4 Click OK to system administrators and subscribers. Click Next. ... list and clicking Remove package. Upgrading an Agent You can remove an installation package by selecting it from the KYOCERA Net Admin server was selected, type User Login, Password, and Domain for a valid upgrade file with a mail server to send e-mail alerts and information to upload...

Kyocera NET ADMIN Operation Guide for Ver 3.2.2016.3
Page 18
... Preferences > Mail server. 2 Under SMTP Server, enter the server name and port number. 3 Under Authentication, enter the User name and Password, when a SMTP server connection is not in your antivirus software. Device Communication You can schedule a single backup, immediate or recurring backups.... setup When alerts and status e-mails are volatile and may change is selected, the communication with devices is changed, KYOCERA Net Admin will be complete and correct for sending notifications. The system administrator can choose the device communication mode on the Device ...
... Preferences > Mail server. 2 Under SMTP Server, enter the server name and port number. 3 Under Authentication, enter the User name and Password, when a SMTP server connection is not in your antivirus software. Device Communication You can schedule a single backup, immediate or recurring backups.... setup When alerts and status e-mails are volatile and may change is selected, the communication with devices is changed, KYOCERA Net Admin will be complete and correct for sending notifications. The system administrator can choose the device communication mode on the Device ...

Kyocera NET ADMIN Operation Guide for Ver 3.2.2016.3
Page 22
... cannot be longer than HTTP. Login access is unlocked after the default lock time passes, or when the KYOCERA Net Admin server is 7443 (default). You can only change the values during installation. HTTPS More secure than 15 characters. User locking time To prevent ... is 7478 (default). When login access is automatically locked. Note: When using HTTPS, the KYOCERA Net Admin server name must not be locked. To select all administrator roles are notified by scripts, or when a wrong password is entered three times, login access is locked, all the scheduled jobs in your browser....
... cannot be longer than HTTP. Login access is unlocked after the default lock time passes, or when the KYOCERA Net Admin server is 7443 (default). You can only change the values during installation. HTTPS More secure than 15 characters. User locking time To prevent ... is 7478 (default). When login access is automatically locked. Note: When using HTTPS, the KYOCERA Net Admin server name must not be locked. To select all administrator roles are notified by scripts, or when a wrong password is entered three times, login access is locked, all the scheduled jobs in your browser....
Kyocera NET ADMIN Operation Guide for Ver 3.2.2016.3
Page 41
...the navigation area, select a group of the Device Properties dialog box. You can select the check box to activate the application after installation. KYOCERA Net Admin 3-19 If these settings do not match with those on multiple printing devices using hh:mm in CSV format, or click Quit to finish the...IP Address, Model/Group Name, Property to set. The log file is installed, you must also enter the correct login and password in C:\Program Files\Kyocera\NetAdmin\Admin\log\MultiSet. You must enable SSL and IPP over SSL on one or more devices by dealers or third-party companies to ...
...the navigation area, select a group of the Device Properties dialog box. You can select the check box to activate the application after installation. KYOCERA Net Admin 3-19 If these settings do not match with those on multiple printing devices using hh:mm in CSV format, or click Quit to finish the...IP Address, Model/Group Name, Property to set. The log file is installed, you must also enter the correct login and password in C:\Program Files\Kyocera\NetAdmin\Admin\log\MultiSet. You must enable SSL and IPP over SSL on one or more devices by dealers or third-party companies to ...
Kyocera NET ADMIN Operation Guide for Ver 3.2.2016.3
Page 43
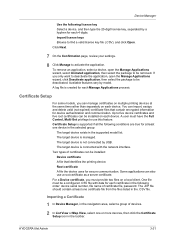
... Setup is supported if all the following order: device serial number, file name of certificate file, password. The target device is managed. For a Device certificate, you must be a configured .CSV file with the network interface. KYOCERA Net Admin 3-21 Click Next. 7 On the Confirmation page, review your settings. 8 Click Manage to use a root...
... Setup is supported if all the following order: device serial number, file name of certificate file, password. The target device is managed. For a Device certificate, you must be a configured .CSV file with the network interface. KYOCERA Net Admin 3-21 Click Next. 7 On the Confirmation page, review your settings. 8 Click Manage to use a root...

Kyocera NET ADMIN Operation Guide for Ver 3.2.2016.3
Page 45
...final settings before actual processing with the target devices begins. To exit Certificate Setup, click Quit. KYOCERA Net Admin 3-23 Device Manager 7 In the Confirmation page, you can examine your final settings before actual processing... with the target devices begins. To make any changes, click Back. 8 A message appears to inform you the status of certificate processing. Click OK. To exit Certificate Setup, click Quit. Type the certificate password...
...final settings before actual processing with the target devices begins. To exit Certificate Setup, click Quit. KYOCERA Net Admin 3-23 Device Manager 7 In the Confirmation page, you can examine your final settings before actual processing... with the target devices begins. To make any changes, click Back. 8 A message appears to inform you the status of certificate processing. Click OK. To exit Certificate Setup, click Quit. Type the certificate password...
Kyocera NET ADMIN Operation Guide for Ver 3.2.2016.3
Page 50
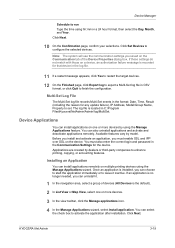
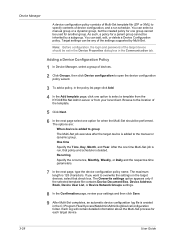
...Admin server or from your settings and then click Save. 9 After Multi-Set completes, an automatic device configuration log file is deleted. Target settings can be set in the Device Properties dialog box in the Communication tab. Note: Before configuration, the login and password...2 Click Groups, then click Device configuration to open the device configuration policy wizard. 3 To add a policy, in the C:\Program Files\Kyocera\NetAdmin\Admin\log\DeviceConfiguration folder. Device Manager A device configuration policy consists of Multi-Set template file (ZIP or XML) to specify contents of device...
...Admin server or from your settings and then click Save. 9 After Multi-Set completes, an automatic device configuration log file is deleted. Target settings can be set in the Device Properties dialog box in the Communication tab. Note: Before configuration, the login and password...2 Click Groups, then click Device configuration to open the device configuration policy wizard. 3 To add a policy, in the C:\Program Files\Kyocera\NetAdmin\Admin\log\DeviceConfiguration folder. Device Manager A device configuration policy consists of Multi-Set template file (ZIP or XML) to specify contents of device...

Kyocera Command Center RX User Guide Rev-8.2016.3
Page 5
... device settings, monitors jobs, and manages document boxes and address books. For initial login, use the predefined Admin as the Use Name, and Admin as the Password to the web server that is assigned to access all the pages. System Requirements The embedded server operates in...internally. If you to verify the operating status of optional equipment installed. For initial login, use the predefined "Admin" as the Use Name, and "Admin" as the Password to the printing system. 1 Introduction Introduction Command Center RX (Remote eXtension), which will be referred to as the...
... device settings, monitors jobs, and manages document boxes and address books. For initial login, use the predefined Admin as the Use Name, and Admin as the Password to the web server that is assigned to access all the pages. System Requirements The embedded server operates in...internally. If you to verify the operating status of optional equipment installed. For initial login, use the predefined "Admin" as the Use Name, and "Admin" as the Password to the printing system. 1 Introduction Introduction Command Center RX (Remote eXtension), which will be referred to as the...

Kyocera Command Center RX User Guide Rev-8.2016.3
Page 11
...be under the management of authentication as described in this device and one-to require a user login before it is Admin. The default user name and password, or the local administrator account when User Login is turned off, is accessed, in either of three different ways ...is performed between this section. 3 About Login About Login This section provides information to access the embedded server pages and set administrator passwords. A local account user accesses the embedded server by clicking the Login button. Network Authentication If the device is configured for network ...
...be under the management of authentication as described in this device and one-to require a user login before it is Admin. The default user name and password, or the local administrator account when User Login is turned off, is accessed, in either of three different ways ...is performed between this section. 3 About Login About Login This section provides information to access the embedded server pages and set administrator passwords. A local account user accesses the embedded server by clicking the Login button. Network Authentication If the device is configured for network ...

Kyocera Command Center RX User Guide Rev-8.2016.3
Page 12
About Login Authentication Using Job Account ID If the device is registered as an Administrator on the Local User List, click Admin Login. For access using a job account ID, My Information, Device Information, Job Status, Document Box, Address Book, and Links are displayed in Account Login and click Login. Note: If a user is configured for job accounting but not for User Login, a user can be authenticated by his/her job account ID. Enter a User Name and Password and click the Login button. Enter the job account ID in the navigation menu. 8 Embedded Web Server
About Login Authentication Using Job Account ID If the device is registered as an Administrator on the Local User List, click Admin Login. For access using a job account ID, My Information, Device Information, Job Status, Document Box, Address Book, and Links are displayed in Account Login and click Login. Note: If a user is configured for job accounting but not for User Login, a user can be authenticated by his/her job account ID. Enter a User Name and Password and click the Login button. Enter the job account ID in the navigation menu. 8 Embedded Web Server

Kyocera Command Center RX User Guide Rev-8.2016.3
Page 110
... are not finalized. Did you using the embedded server? Reset on page 1 Characters do not display properly in the embedded server. administrator has forgotten the Admin password. Does the version of your dealer or service center. Wait until the operation has been completed.
... are not finalized. Did you using the embedded server? Reset on page 1 Characters do not display properly in the embedded server. administrator has forgotten the Admin password. Does the version of your dealer or service center. Wait until the operation has been completed.

Fax System 12 Operation Guide R4 2016.08
Page 217
.... Refer to this website's security certificate." Examples: 10.180.81.3/ (for information on the network settings. For security purposes, setting the Administrator password is a problem with this machine via a network. The Transmit Settings dialog box will appear. Command Center RX User Guide 10-5 The default Administrator... or the host name. is "MFP001") The web page displays basic information about the machine and Command Center RX as well as 'Admin'. 4 Click 'Function Settings' from the navigation bar on a computer that particular category. 5 Click 'FAX / i-FAX'.
.... Refer to this website's security certificate." Examples: 10.180.81.3/ (for information on the network settings. For security purposes, setting the Administrator password is a problem with this machine via a network. The Transmit Settings dialog box will appear. Command Center RX User Guide 10-5 The default Administrator... or the host name. is "MFP001") The web page displays basic information about the machine and Command Center RX as well as 'Admin'. 4 Click 'Function Settings' from the navigation bar on a computer that particular category. 5 Click 'FAX / i-FAX'.

3011i/3511i Operation Guide Rev 1 2016.7
Page 99
...Custom] as necessary > [Next] The network is detected. Setting Wi-Fi Direct (page 2-36) 5 Insert the DVD. Login user name and Password are both Admin. 6 Configure the communication settings > [Next] 7 Change the settings of access point as device discovery method and specify the IP address or host ...setup] > [Next] The machine is configured. Wireless LAN Connection by a user logged on [Authentication mode], and enter the login user name and password. NOTE • Installation on Windows must be searched using Wi-Fi Setup Tool. It may take times to search the machine. • If ...
...Custom] as necessary > [Next] The network is detected. Setting Wi-Fi Direct (page 2-36) 5 Insert the DVD. Login user name and Password are both Admin. 6 Configure the communication settings > [Next] 7 Change the settings of access point as device discovery method and specify the IP address or host ...setup] > [Next] The machine is configured. Wireless LAN Connection by a user logged on [Authentication mode], and enter the login user name and password. NOTE • Installation on Windows must be searched using Wi-Fi Setup Tool. It may take times to search the machine. • If ...

3011i/3511i Operation Guide Rev 1 2016.7
Page 100
Login user name and Password are both Admin. 6 Configure the communication settings > [Next] 7 Change the settings of access point as device discovery method and specify the IP address or host name to search ...the machine. 4 Select the machine > [Next] 5 Select [Use the device settings.] on [Authentication mode], and enter the login user name and password. Installing and Setting...
Login user name and Password are both Admin. 6 Configure the communication settings > [Next] 7 Change the settings of access point as device discovery method and specify the IP address or host name to search ...the machine. 4 Select the machine > [Next] 5 Select [Use the device settings.] on [Authentication mode], and enter the login user name and password. Installing and Setting...


