AU-201H User Guide
Page 2
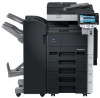
... change without notice. 1.1 Product features This device is hereafter referred to this device". Carefully read this User's Guide before using multifunctional products with user authentication settings specified. 2 AU-201H All other countries. - The information contained in this User's Guide is strictly prohibited. - Unauthorized use or reproduction of this User's Guide are...
... change without notice. 1.1 Product features This device is hereafter referred to this device". Carefully read this User's Guide before using multifunctional products with user authentication settings specified. 2 AU-201H All other countries. - The information contained in this User's Guide is strictly prohibited. - Unauthorized use or reproduction of this User's Guide are...
AU-201H User Guide
Page 3
Introduction 1 1.2 Prerequisites - Note: In order to Chapter 5 - Refer to use this device must be prepared. - AU-201H 3 Specifications. The optional local interface kit and working table must be installed on the multifunctional product. - HID Prox IC cards compatible with this device, multifunctional product settings must be specified by the technical representative.
Introduction 1 1.2 Prerequisites - Note: In order to Chapter 5 - Refer to use this device must be prepared. - AU-201H 3 Specifications. The optional local interface kit and working table must be installed on the multifunctional product. - HID Prox IC cards compatible with this device, multifunctional product settings must be specified by the technical representative.
AU-201H User Guide
Page 5
...print job operations after completing authentication with the machine. AU-201H 5 The following procedures describe how to specify the necessary settings on to use this device is being used, otherwise the system may become unstable. Important Do not disconnect the USB cable... not store the IC card within 1.5 inches (approx.) of the card scanning area. 3.1 Multifunctional product settings Detail: User authentication on the multifunctional product must first be set for machine authentication. 1 From the control panel of the multifunctional product, press the [Utility/ Counter] ...
...print job operations after completing authentication with the machine. AU-201H 5 The following procedures describe how to specify the necessary settings on to use this device is being used, otherwise the system may become unstable. Important Do not disconnect the USB cable... not store the IC card within 1.5 inches (approx.) of the card scanning area. 3.1 Multifunctional product settings Detail: User authentication on the multifunctional product must first be set for machine authentication. 1 From the control panel of the multifunctional product, press the [Utility/ Counter] ...
AU-201H User Guide
Page 6
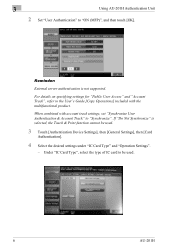
...-201H When combined with the multifunctional product. For details on specifying settings for "Public User Access" and "Account Track", refer to the User's Guide [Copy Operations] included with account track settings, set "Synchronize User Authentication & Account Track" to "Synchronize". Under "...authentication is selected, the Touch & Print function cannot be used . 3 Touch [Authentication Device Settings], then [General Settings], then [Card Authentication]. 4 Select the desired settings under "IC Card Type" and "Operation Settings". - If "Do Not Synchronize" is not supported.
...-201H When combined with the multifunctional product. For details on specifying settings for "Public User Access" and "Account Track", refer to the User's Guide [Copy Operations] included with account track settings, set "Synchronize User Authentication & Account Track" to "Synchronize". Under "...authentication is selected, the Touch & Print function cannot be used . 3 Touch [Authentication Device Settings], then [General Settings], then [Card Authentication]. 4 Select the desired settings under "IC Card Type" and "Operation Settings". - If "Do Not Synchronize" is not supported.
AU-201H User Guide
Page 7
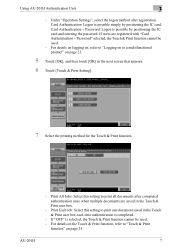
...to "Touch & Print function" on page 23. 5 Touch [OK], and then touch [OK] in the next screen that appears. 6 Touch [Touch & Print Setting]. 7 Select the printing method for the Touch & Print function. - For details on the Touch & Print function, refer to a multifunctional product" on page 25.... Print user box each time authentication is selected, the Touch & Print function cannot be used . - Print All Jobs: Select this setting to print all documents after registration. AU-201H 7 If "OFF" is completed. - Using AU-201H Authentication Unit 3 - Print Each Job: Select this...
...to "Touch & Print function" on page 23. 5 Touch [OK], and then touch [OK] in the next screen that appears. 6 Touch [Touch & Print Setting]. 7 Select the printing method for the Touch & Print function. - For details on the Touch & Print function, refer to a multifunctional product" on page 25.... Print user box each time authentication is selected, the Touch & Print function cannot be used . - Print All Jobs: Select this setting to print all documents after registration. AU-201H 7 If "OFF" is completed. - Using AU-201H Authentication Unit 3 - Print Each Job: Select this...
AU-201H User Guide
Page 8
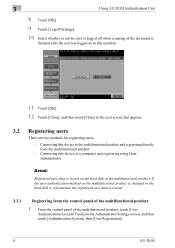
..., and then touch [Authentication System], then [User Registration]. 8 AU-201H 3 Using AU-201H Authentication Unit 8 Touch [OK]. 9 Touch [Logoff Settings]. 10 Select whether or not the user is logged off when scanning of the document is finished after the user has logged on to a computer ...
..., and then touch [Authentication System], then [User Registration]. 8 AU-201H 3 Using AU-201H Authentication Unit 8 Touch [OK]. 9 Touch [Logoff Settings]. 10 Select whether or not the user is logged off when scanning of the document is finished after the user has logged on to a computer ...
AU-201H User Guide
Page 11
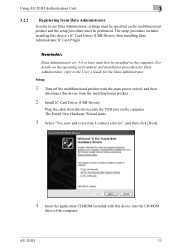
... computer. Reminder: Data Administrator ver. 3.0 or later must be installed on the operating environment and installation procedure for Data Administrator, refer to use Data Administrator, settings must be specified on the multifunctional product and the setup procedure must first be performed.
... computer. Reminder: Data Administrator ver. 3.0 or later must be installed on the operating environment and installation procedure for Data Administrator, refer to use Data Administrator, settings must be specified on the multifunctional product and the setup procedure must first be performed.
AU-201H User Guide
Page 19
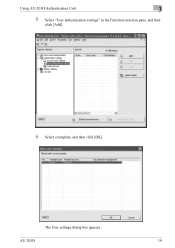
The User settings dialog box appears. AU-201H 19 Using AU-201H Authentication Unit 3 5 Select "User authentication settings" in the Function selection pane, and then click [Add]. 6 Select a template, and then click [OK].
The User settings dialog box appears. AU-201H 19 Using AU-201H Authentication Unit 3 5 Select "User authentication settings" in the Function selection pane, and then click [Add]. 6 Select a template, and then click [OK].

AU-201H User Guide
Page 25
In addition, documents saved in the Touch & Print user box on the printer driver settings and Box mode functions, refer to be checked and specified to the User's Guide included with the Touch & Print function. The following printer drivers and ... Server 2003 x64 Mac OS X 10.2, Mac OS X 10.3, and Mac OS X 10.4 Detail: To use the Touch & Print function, select "Card Authentication" under "Operation Settings" and set "Touch & Print Setting" to "ON".
In addition, documents saved in the Touch & Print user box on the printer driver settings and Box mode functions, refer to be checked and specified to the User's Guide included with the Touch & Print function. The following printer drivers and ... Server 2003 x64 Mac OS X 10.2, Mac OS X 10.3, and Mac OS X 10.4 Detail: To use the Touch & Print function, select "Card Authentication" under "Operation Settings" and set "Touch & Print Setting" to "ON".
AU-201H User Guide
Page 26
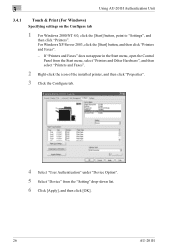
...and then click "Properties". 3 Click the Configure tab. 4 Select "User Authentication" under "Device Option". 5 Select "Device" from the "Setting" drop-down list. 6 Click [Apply], and then click [OK]. 26 AU-201H 3 Using AU-201H Authentication Unit 3.4.1 Touch & Print (For Windows) Specifying... settings on the Configure tab 1 For Windows 2000/NT 4.0, click the [Start] button, point to "Settings", and then click "Printers". For Windows XP/Server 2003, click the [Start] button, and then ...
...and then click "Properties". 3 Click the Configure tab. 4 Select "User Authentication" under "Device Option". 5 Select "Device" from the "Setting" drop-down list. 6 Click [Apply], and then click [OK]. 26 AU-201H 3 Using AU-201H Authentication Unit 3.4.1 Touch & Print (For Windows) Specifying... settings on the Configure tab 1 For Windows 2000/NT 4.0, click the [Start] button, point to "Settings", and then click "Printers". For Windows XP/Server 2003, click the [Start] button, and then ...
AU-201H User Guide
Page 28
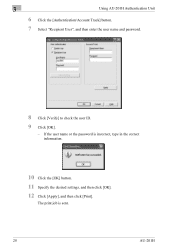
The print job is incorrect, type in the correct information. 10 Click the [OK] button. 11 Specify the desired settings, and then click [OK]. 12 Click [Apply], and then click [Print]. 3 Using AU-201H Authentication Unit 6 Click the [Authentication/Account Track] button. 7 Select "Recipient User", and then enter the user name and password. 8 Click [Verify] to check the user ID. 9 Click [OK]. - If the user name or the password is sent. 28 AU-201H
The print job is incorrect, type in the correct information. 10 Click the [OK] button. 11 Specify the desired settings, and then click [OK]. 12 Click [Apply], and then click [Print]. 3 Using AU-201H Authentication Unit 6 Click the [Authentication/Account Track] button. 7 Select "Recipient User", and then enter the user name and password. 8 Click [Verify] to check the user ID. 9 Click [OK]. - If the user name or the password is sent. 28 AU-201H
AU-201H User Guide
Page 31
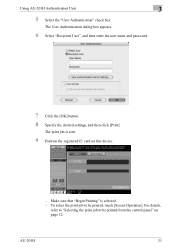
The print job is selected. - Make sure that "Begin Printing" is sent. 9 Position the registered IC card on page 32. AU-201H 31 For details, refer to "Selecting the print job to be printed from the control panel" on this device. - To select the print job to be printed, touch [Screen Operation]. Using AU-201H Authentication Unit 3 5 Select the "User Authentication" check box. The User Authentication dialog box appears. 6 Select "Recipient User", and then enter the user name and password. 7 Click the [OK] button. 8 Specify the desired settings, and then click [Print].
The print job is selected. - Make sure that "Begin Printing" is sent. 9 Position the registered IC card on page 32. AU-201H 31 For details, refer to "Selecting the print job to be printed from the control panel" on this device. - To select the print job to be printed, touch [Screen Operation]. Using AU-201H Authentication Unit 3 5 Select the "User Authentication" check box. The User Authentication dialog box appears. 6 Select "Recipient User", and then enter the user name and password. 7 Click the [OK] button. 8 Specify the desired settings, and then click [Print].
AU-211P Authentication Unit User Guide for bizhub 223/283/363/423
Page 2
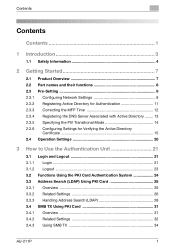
... 2.3.3 Correcting the MFP Time 12 2.3.4 Registering the DNS Server Associated with Active Directory ........ 13 2.3.5 Specifying the PIV Transitional Mode 14 2.3.6 Configuring Settings for Verifying the Active Directory Certificate 15 2.4 Operation Settings 20 3 How to Use the Authentication Unit 21 3.1 Login and Logout 21 3.1.1 Login 21 3.1.2 Logout 23 3.2 Functions Using the PKI Card...
... 2.3.3 Correcting the MFP Time 12 2.3.4 Registering the DNS Server Associated with Active Directory ........ 13 2.3.5 Specifying the PIV Transitional Mode 14 2.3.6 Configuring Settings for Verifying the Active Directory Certificate 15 2.4 Operation Settings 20 3 How to Use the Authentication Unit 21 3.1 Login and Logout 21 3.1.1 Login 21 3.1.2 Logout 23 3.2 Functions Using the PKI Card...
AU-211P Authentication Unit User Guide for bizhub 223/283/363/423
Page 3
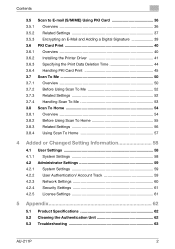
... 3.7 Scan To Me 50 3.7.1 Overview 50 3.7.2 Before Using Scan To Me 52 3.7.3 Related Settings 52 3.7.4 Handling Scan To Me 53 3.8 Scan To Home 54 3.8.1 Overview 54 3.8.2 Before Using Scan To Home 55 3.8.3 Related... Settings 56 3.8.4 Using Scan To Home 57 4 Added or Changed Setting Information 58 4.1 User Settings 58 4.1.1 System Settings 58 4.2 Administrator Settings 59 4.2.1 System Settings 59 4.2.2 User Authentication/ Account Track 59 4.2.3 Network Settings 60 4.2.4 Security Settings 61 4.2.5 License Settings 61 5 Appendix 62 5.1 Product ...
... 3.7 Scan To Me 50 3.7.1 Overview 50 3.7.2 Before Using Scan To Me 52 3.7.3 Related Settings 52 3.7.4 Handling Scan To Me 53 3.8 Scan To Home 54 3.8.1 Overview 54 3.8.2 Before Using Scan To Home 55 3.8.3 Related... Settings 56 3.8.4 Using Scan To Home 57 4 Added or Changed Setting Information 58 4.1 User Settings 58 4.1.1 System Settings 58 4.2 Administrator Settings 59 4.2.1 System Settings 59 4.2.2 User Authentication/ Account Track 59 4.2.3 Network Settings 60 4.2.4 Security Settings 61 4.2.5 License Settings 61 5 Appendix 62 5.1 Product ...
AU-211P Authentication Unit User Guide for bizhub 223/283/363/423
Page 10
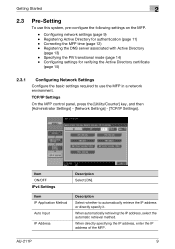
... retrieval method. Configuring network settings (page 9) - Specifying the PIV transitional mode (page 14) - TCP/IP Settings On the MFP control panel, press the [Utility/Counter] key, and then [Administrator Settings] - [Network Settings] - [TCP/IP Settings]. Description Select whether to use... this system, pre-configure the following settings on the MFP. - Getting Started 2 2.3 Pre-Setting To use the MFP in a network environment. When...
... retrieval method. Configuring network settings (page 9) - Specifying the PIV transitional mode (page 14) - TCP/IP Settings On the MFP control panel, press the [Utility/Counter] key, and then [Administrator Settings] - [Network Settings] - [TCP/IP Settings]. Description Select whether to use... this system, pre-configure the following settings on the MFP. - Getting Started 2 2.3 Pre-Setting To use the MFP in a network environment. When...
AU-211P Authentication Unit User Guide for bizhub 223/283/363/423
Page 11
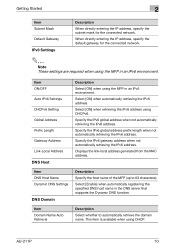
... Name Auto Retrieval Description Select whether to 63 characters). Displays the link-local address generated from the MAC address. IPv6 Settings 2 Note These settings are required when using the MFP in an IPv6 environment. Select [Enable] when automatically registering the specified DNS host name...the default gateway for the connected network. Select [ON] when automatically retrieving the IPv6 address. Item ON/OFF Auto IPv6 Settings DHCPv6 Setting Global Address Prefix Length Gateway Address Link-Local Address DNS Host Description Select [ON] when using the MFP in the DNS...
... Name Auto Retrieval Description Select whether to 63 characters). Displays the link-local address generated from the MAC address. IPv6 Settings 2 Note These settings are required when using the MFP in an IPv6 environment. Select [Enable] when automatically registering the specified DNS host name...the default gateway for the connected network. Select [ON] when automatically retrieving the IPv6 address. Item ON/OFF Auto IPv6 Settings DHCPv6 Setting Global Address Prefix Length Gateway Address Link-Local Address DNS Host Description Select [ON] when using the MFP in the DNS...
AU-211P Authentication Unit User Guide for bizhub 223/283/363/423
Page 12
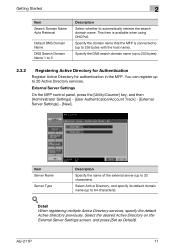
... Active Directory previously. Select the desired Active Directory on the External Server Settings screen, and press [Set as Default]. External Server Settings On the MFP control panel, press the [Utility/Counter] key, and then [Administrator Settings] - [User Authentication/Account Track] - [External Server Settings] - [New]. Item Server Name Server Type Description Specify the name of the...
... Active Directory previously. Select the desired Active Directory on the External Server Settings screen, and press [Set as Default]. External Server Settings On the MFP control panel, press the [Utility/Counter] key, and then [Administrator Settings] - [User Authentication/Account Track] - [External Server Settings] - [New]. Item Server Name Server Type Description Specify the name of the...
AU-211P Authentication Unit User Guide for bizhub 223/283/363/423
Page 13
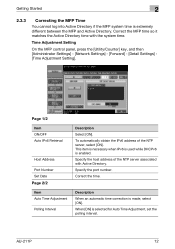
...MFP control panel, press the [Utility/Counter] key, and then [Administrator Settings] - [Network Settings] - [Forward] - [Detail Settings] [Time Adjustment Setting]. Page 1/2 Item ON/OFF Auto IPv6 Retrieval Host Address Port Number Set Date Page 2/2 Item Auto Time Adjustment Polling Interval Description Select [ON]. ...Specify the port number. Description When an automatic time correction is selected for Auto Time Adjustment, set the polling interval. Correct the MFP time so it matches the Active Directory time with Active Directory. When [ON] is ...
...MFP control panel, press the [Utility/Counter] key, and then [Administrator Settings] - [Network Settings] - [Forward] - [Detail Settings] [Time Adjustment Setting]. Page 1/2 Item ON/OFF Auto IPv6 Retrieval Host Address Port Number Set Date Page 2/2 Item Auto Time Adjustment Polling Interval Description Select [ON]. ...Specify the port number. Description When an automatic time correction is selected for Auto Time Adjustment, set the polling interval. Correct the MFP time so it matches the Active Directory time with Active Directory. When [ON] is ...
AU-211P Authentication Unit User Guide for bizhub 223/283/363/423
Page 14
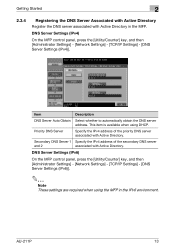
... the MFP in the MFP. DNS Server Settings (IPv6) On the MFP control panel, press the [Utility/Counter] key, and then [Administrator Settings] - [Network Settings] - [TCP/IP Settings] - [DNS Server Settings (IPv6)]. 2 Note These settings are required when using DHCP. Priority DNS Server...the priority DNS server associated with Active Directory. DNS Server Settings (IPv4) On the MFP control panel, press the [Utility/Counter] key, and then [Administrator Settings] - [Network Settings] - [TCP/IP Settings] - [DNS Server Settings (IPv4)]. Item Description DNS Server Auto Obtain Select whether ...
... the MFP in the MFP. DNS Server Settings (IPv6) On the MFP control panel, press the [Utility/Counter] key, and then [Administrator Settings] - [Network Settings] - [TCP/IP Settings] - [DNS Server Settings (IPv6)]. 2 Note These settings are required when using DHCP. Priority DNS Server...the priority DNS server associated with Active Directory. DNS Server Settings (IPv4) On the MFP control panel, press the [Utility/Counter] key, and then [Administrator Settings] - [Network Settings] - [TCP/IP Settings] - [DNS Server Settings (IPv4)]. Item Description DNS Server Auto Obtain Select whether ...
AU-211P Authentication Unit User Guide for bizhub 223/283/363/423
Page 15
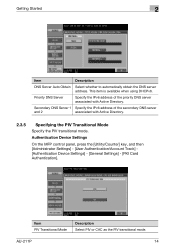
... with Active Directory. 2.3.5 Specifying the PIV Transitional Mode Specify the PIV transitional mode. Authentication Device Settings On the MFP control panel, press the [Utility/Counter] key, and then [Administrator Settings] - [User Authentication/Account Track] [Authentication Device Settings] - [General Settings] - [PKI Card Authentication]. This item is available when using DHCPv6. Item PIV Transitional Mode Description...
... with Active Directory. 2.3.5 Specifying the PIV Transitional Mode Specify the PIV transitional mode. Authentication Device Settings On the MFP control panel, press the [Utility/Counter] key, and then [Administrator Settings] - [User Authentication/Account Track] [Authentication Device Settings] - [General Settings] - [PKI Card Authentication]. This item is available when using DHCPv6. Item PIV Transitional Mode Description...


