AU-201H User Guide
Page 2
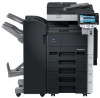
...correct functionality and efficiency of Microsoft Corporation in this User's Guide. Caution: This warns of a possibility of general importance. - Unauthorized use or reproduction of this User's Guide, whether in its entirety or in this User's Guide are either registered trademarks or trademarks of ...notice. 1.1 Product features This device is an IC card authentication system that appear may be slightly different from the screen images used in the United States and/or other company names and product names mentioned in part, is hereafter referred to this device. Restrictions...
...correct functionality and efficiency of Microsoft Corporation in this User's Guide. Caution: This warns of a possibility of general importance. - Unauthorized use or reproduction of this User's Guide, whether in its entirety or in this User's Guide are either registered trademarks or trademarks of ...notice. 1.1 Product features This device is an IC card authentication system that appear may be slightly different from the screen images used in the United States and/or other company names and product names mentioned in part, is hereafter referred to this device. Restrictions...
AU-201H User Guide
Page 3
Specifications. AU-201H 3 Introduction 1 1.2 Prerequisites - Refer to use this device must be specified by the technical representative. Note: In order to Chapter 5 - The optional local interface kit and working table must be prepared. - HID Prox IC cards compatible with this device, multifunctional product settings must be installed on the multifunctional product. -
Specifications. AU-201H 3 Introduction 1 1.2 Prerequisites - Refer to use this device must be specified by the technical representative. Note: In order to Chapter 5 - The optional local interface kit and working table must be prepared. - HID Prox IC cards compatible with this device, multifunctional product settings must be installed on the multifunctional product. -
AU-201H User Guide
Page 5
.... AU-201H 5 The following procedures describe how to a multifunctional product or print a print job after completing authentication. Using AU-201H Authentication Unit 3 3 Using AU-201H Authentication Unit In order to use this device is being used, otherwise the system may become unstable. Caution Do not store the IC card within 1.5 inches (approx.) of the...
.... AU-201H 5 The following procedures describe how to a multifunctional product or print a print job after completing authentication. Using AU-201H Authentication Unit 3 3 Using AU-201H Authentication Unit In order to use this device is being used, otherwise the system may become unstable. Caution Do not store the IC card within 1.5 inches (approx.) of the...
AU-201H User Guide
Page 6
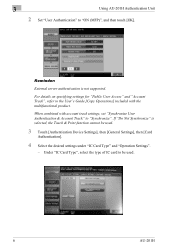
..."IC Card Type", select the type of IC card to be used . 6 AU-201H If "Do Not Synchronize" is not supported. Reminder: External server authentication is selected, the Touch & Print function cannot be used . 3 Touch [Authentication Device Settings], then [General Settings], then...Card Authentication]. 4 Select the desired settings under "IC Card Type" and "Operation Settings". - When combined with the multifunctional product. 3 Using AU-201H Authentication Unit 2 Set "User Authentication" to "Synchronize". For details on specifying settings for "Public User Access" and "Account ...
..."IC Card Type", select the type of IC card to be used . 6 AU-201H If "Do Not Synchronize" is not supported. Reminder: External server authentication is selected, the Touch & Print function cannot be used . 3 Touch [Authentication Device Settings], then [General Settings], then...Card Authentication]. 4 Select the desired settings under "IC Card Type" and "Operation Settings". - When combined with the multifunctional product. 3 Using AU-201H Authentication Unit 2 Set "User Authentication" to "Synchronize". For details on specifying settings for "Public User Access" and "Account ...
AU-201H User Guide
Page 7
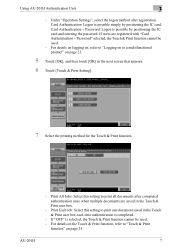
...the next screen that appears. 6 Touch [Touch & Print Setting]. 7 Select the printing method for the Touch & Print function. - Using AU-201H Authentication Unit 3 - Under "Operation Settings", select the logon method after completed authentication once when multiple documents are registered with "...Card Authentication + Password" selected, the Touch & Print function cannot be used . - Print All Jobs: Select this setting to "Touch & Print function" on page 23. 5 Touch [OK], and then touch...
...the next screen that appears. 6 Touch [Touch & Print Setting]. 7 Select the printing method for the Touch & Print function. - Using AU-201H Authentication Unit 3 - Under "Operation Settings", select the logon method after completed authentication once when multiple documents are registered with "...Card Authentication + Password" selected, the Touch & Print function cannot be used . - Print All Jobs: Select this setting to "Touch & Print function" on page 23. 5 Touch [OK], and then touch...
AU-201H User Guide
Page 8
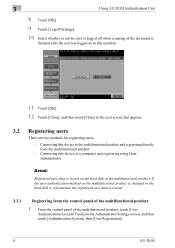
3 Using AU-201H Authentication Unit 8 Touch [OK]. 9 Touch [Logoff Settings]. 10 Select whether or not the user is logged off when scanning of the multifunctional product. ... on the Administrator Settings screen, and then touch [Authentication System], then [User Registration]. 8 AU-201H Connecting this device to this device to a computer and registering using Data Administrator Detail: Registered user data is stored on the hard disk of the document is erased. 3.2.1 Registering from the control panel of the multifunctional...
3 Using AU-201H Authentication Unit 8 Touch [OK]. 9 Touch [Logoff Settings]. 10 Select whether or not the user is logged off when scanning of the multifunctional product. ... on the Administrator Settings screen, and then touch [Authentication System], then [User Registration]. 8 AU-201H Connecting this device to this device to a computer and registering using Data Administrator Detail: Registered user data is stored on the hard disk of the document is erased. 3.2.1 Registering from the control panel of the multifunctional...
AU-201H User Guide
Page 9
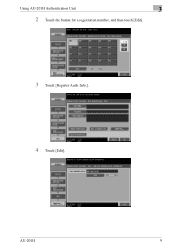
Info.]. 4 Touch [Edit]. AU-201H 9 Using AU-201H Authentication Unit 3 2 Touch the button for a registration number, and then touch [Edit]. 3 Touch [Register Auth.
Info.]. 4 Touch [Edit]. AU-201H 9 Using AU-201H Authentication Unit 3 2 Touch the button for a registration number, and then touch [Edit]. 3 Touch [Register Auth.
AU-201H User Guide
Page 10
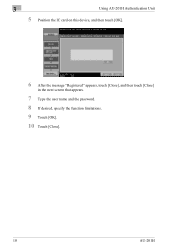
3 Using AU-201H Authentication Unit 5 Position the IC card on this device, and then touch [OK]. 6 After the message "Registered" appears, touch [Close], and then touch [Close] in the next screen that appears. 7 Type the user name and the password. 8 If desired, specify the function limitations. 9 Touch [OK]. 10 Touch [Close]. 10 AU-201H
3 Using AU-201H Authentication Unit 5 Position the IC card on this device, and then touch [OK]. 6 After the message "Registered" appears, touch [Close], and then touch [Close] in the next screen that appears. 7 Type the user name and the password. 8 If desired, specify the function limitations. 9 Touch [OK]. 10 Touch [Close]. 10 AU-201H
AU-201H User Guide
Page 11
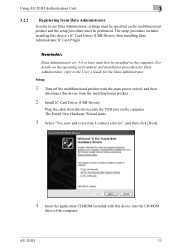
... product. 2 Install IC Card Driver (USB-Driver). Plug the cable from this device's IC Card Driver (USB-Driver), then installing Data Administrator IC Card Plugin. Using AU-201H Authentication Unit 3 3.2.2 Registering from Data Administrator In order to the User's Guide for Data Administrator, refer to...
... product. 2 Install IC Card Driver (USB-Driver). Plug the cable from this device's IC Card Driver (USB-Driver), then installing Data Administrator IC Card Plugin. Using AU-201H Authentication Unit 3 3.2.2 Registering from Data Administrator In order to the User's Guide for Data Administrator, refer to...
AU-201H User Guide
Page 12
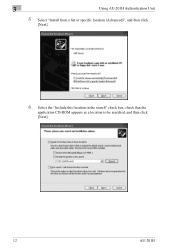
3 Using AU-201H Authentication Unit 5 Select "Install from a list or specific location (Advanced)", and then click [Next]. 6 Select the "Include this location in the search" check box, check that the application CD-ROM appears as a location to be searched, and then click [Next]. 12 AU-201H
3 Using AU-201H Authentication Unit 5 Select "Install from a list or specific location (Advanced)", and then click [Next]. 6 Select the "Include this location in the search" check box, check that the application CD-ROM appears as a location to be searched, and then click [Next]. 12 AU-201H
AU-201H User Guide
Page 13
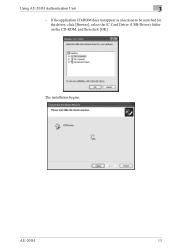
The installation begins. AU-201H 13 If the application CD-ROM does not appear as a location to be searched for the driver, click [Browse], select the IC Card Driver (USB-Driver) folder on the CD-ROM, and then click [OK]. Using AU-201H Authentication Unit 3 -
The installation begins. AU-201H 13 If the application CD-ROM does not appear as a location to be searched for the driver, click [Browse], select the IC Card Driver (USB-Driver) folder on the CD-ROM, and then click [OK]. Using AU-201H Authentication Unit 3 -
AU-201H User Guide
Page 14
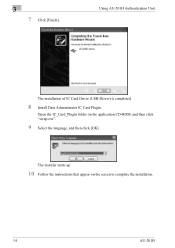
Using AU-201H Authentication Unit The installation of IC Card Driver (USB-Driver) is completed. 8 Install Data Administrator IC Card Plugin. The installer starts up. 10 Follow the instructions that appear on the application CD-ROM, and then click "setup.exe". 9 Select the language, and then click [OK]. Open the IC_Card_Plugin folder on the screen to complete the installation. 14 AU-201H 3 7 Click [Finish].
Using AU-201H Authentication Unit The installation of IC Card Driver (USB-Driver) is completed. 8 Install Data Administrator IC Card Plugin. The installer starts up. 10 Follow the instructions that appear on the application CD-ROM, and then click "setup.exe". 9 Select the language, and then click [OK]. Open the IC_Card_Plugin folder on the screen to complete the installation. 14 AU-201H 3 7 Click [Finish].
AU-201H User Guide
Page 15
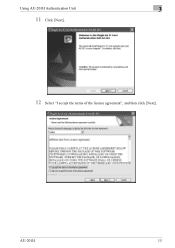
Using AU-201H Authentication Unit 3 11 Click [Next]. 12 Select "I accept the terms of the license agreement", and then click [Next]. AU-201H 15
Using AU-201H Authentication Unit 3 11 Click [Next]. 12 Select "I accept the terms of the license agreement", and then click [Next]. AU-201H 15
AU-201H User Guide
Page 16
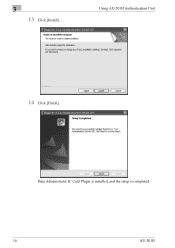
Data Administrator IC Card Plugin is installed, and the setup is completed. 16 AU-201H 3 13 Click [Install]. Using AU-201H Authentication Unit 14 Click [Finish].
Data Administrator IC Card Plugin is installed, and the setup is completed. 16 AU-201H 3 13 Click [Install]. Using AU-201H Authentication Unit 14 Click [Finish].
AU-201H User Guide
Page 17
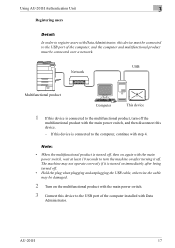
... 17 USB Network Multifunctional product Computer This device 1 If this device must be connected to the USB port of the computer installed with Data Administrator. Using AU-201H Authentication Unit 3 Registering users Detail: In order to register users with Data Administrator, this device is turned on after being turned off. •...
... 17 USB Network Multifunctional product Computer This device 1 If this device must be connected to the USB port of the computer installed with Data Administrator. Using AU-201H Authentication Unit 3 Registering users Detail: In order to register users with Data Administrator, this device is turned on after being turned off. •...
AU-201H User Guide
Page 18
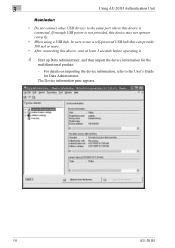
The Device information pane appears. 18 AU-201H 3 Using AU-201H Authentication Unit Reminder: • Do not connect other USB devices to the same port where this device, wait at least 5 seconds before operating ...it. 4 Start up Data Administrator, and then import the device information for Data Administrator. For details on importing the device information, refer to use a self-powered USB hub that can provide 500 mA or more. • After connecting this device is not provided, this device may not operate correctly...
The Device information pane appears. 18 AU-201H 3 Using AU-201H Authentication Unit Reminder: • Do not connect other USB devices to the same port where this device, wait at least 5 seconds before operating ...it. 4 Start up Data Administrator, and then import the device information for Data Administrator. For details on importing the device information, refer to use a self-powered USB hub that can provide 500 mA or more. • After connecting this device is not provided, this device may not operate correctly...
AU-201H User Guide
Page 19
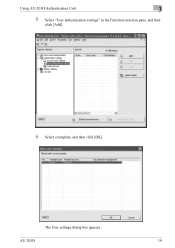
Using AU-201H Authentication Unit 3 5 Select "User authentication settings" in the Function selection pane, and then click [Add]. 6 Select a template, and then click [OK]. The User settings dialog box appears. AU-201H 19
Using AU-201H Authentication Unit 3 5 Select "User authentication settings" in the Function selection pane, and then click [Add]. 6 Select a template, and then click [OK]. The User settings dialog box appears. AU-201H 19
AU-201H User Guide
Page 20
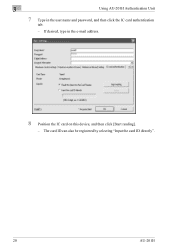
The card ID can also be registered by selecting "Input the card ID directly". 20 AU-201H If desired, type in the user name and password, and then click the IC card authentication tab. - 3 Using AU-201H Authentication Unit 7 Type in the e-mail address. 8 Position the IC card on this device, and then click [Start reading]. -
The card ID can also be registered by selecting "Input the card ID directly". 20 AU-201H If desired, type in the user name and password, and then click the IC card authentication tab. - 3 Using AU-201H Authentication Unit 7 Type in the e-mail address. 8 Position the IC card on this device, and then click [Start reading]. -
AU-201H User Guide
Page 21
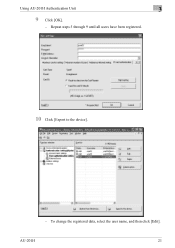
Repeat steps 5 through 9 until all users have been registered. 10 Click [Export to the device]. - AU-201H 21 Using AU-201H Authentication Unit 3 9 Click [OK]. - To change the registered data, select the user name, and then click [Edit].
Repeat steps 5 through 9 until all users have been registered. 10 Click [Export to the device]. - AU-201H 21 Using AU-201H Authentication Unit 3 9 Click [OK]. - To change the registered data, select the user name, and then click [Edit].
AU-201H User Guide
Page 22
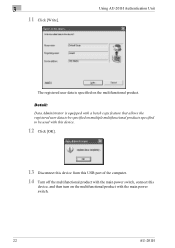
Using AU-201H Authentication Unit The registered user data is equipped with a batch copy feature that allows the registered user data to be specified on multiple multifunctional products specified to be used with this device. 12 Click [OK]. 13 Disconnect this device from this USB port of the computer. 14 Turn off the multifunctional product with the main power switch, connect this device, and then turn on the multifunctional product. Detail: Data Administrator is specified on the multifunctional product with the main power switch. 22 AU-201H 3 11 Click [Write].
Using AU-201H Authentication Unit The registered user data is equipped with a batch copy feature that allows the registered user data to be specified on multiple multifunctional products specified to be used with this device. 12 Click [OK]. 13 Disconnect this device from this USB port of the computer. 14 Turn off the multifunctional product with the main power switch, connect this device, and then turn on the multifunctional product. Detail: Data Administrator is specified on the multifunctional product with the main power switch. 22 AU-201H 3 11 Click [Write].


