User Manual
Page 1
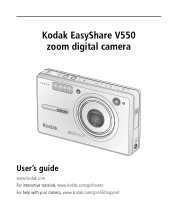
Kodak EasyShare V550 zoom digital camera User's guide www.kodak.com For interactive tutorials, www.kodak.com/go/howto For help with your camera, www.kodak.com/go/v550support
Kodak EasyShare V550 zoom digital camera User's guide www.kodak.com For interactive tutorials, www.kodak.com/go/howto For help with your camera, www.kodak.com/go/v550support
User Manual
Page 5
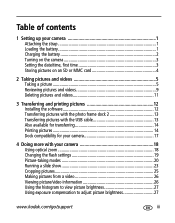
... pictures with the USB cable 13 Also available for transferring 14 Printing pictures 14 Dock compatibility for your camera 17 4 Doing more with your camera 18 Using optical zoom 18 Changing the flash settings 19 Picture-taking modes 20 Running a slide show ...23 Cropping pictures 25 Making pictures from a video 26 Viewing picture/video information 26 Using the histogram to view picture brightness 27 Using exposure compensation to adjust picture brightness 27 www.kodak...
... pictures with the USB cable 13 Also available for transferring 14 Printing pictures 14 Dock compatibility for your camera 17 4 Doing more with your camera 18 Using optical zoom 18 Changing the flash settings 19 Picture-taking modes 20 Running a slide show ...23 Cropping pictures 25 Making pictures from a video 26 Viewing picture/video information 26 Using the histogram to view picture brightness 27 Using exposure compensation to adjust picture brightness 27 www.kodak...
User Manual
Page 6
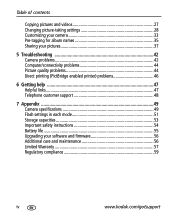
... of contents Copying pictures and videos 27 Changing picture-taking settings 28 Customizing your camera 33 Pre-tagging for album names 35 Sharing your pictures 37 5 Troubleshooting 42 Camera problems 42 Computer/connectivity problems 44 Picture quality problems 44 Direct printing (PictBridge enabled... printer) problems 46 6 Getting help 47 Helpful links 47 Telephone customer support 48 7 Appendix 49 Camera specifications 49 Flash settings in each mode 51 Storage capacities 53 Important safety instructions 54 Battery life 55 Upgrading your software ...
... of contents Copying pictures and videos 27 Changing picture-taking settings 28 Customizing your camera 33 Pre-tagging for album names 35 Sharing your pictures 37 5 Troubleshooting 42 Camera problems 42 Computer/connectivity problems 44 Picture quality problems 44 Direct printing (PictBridge enabled... printer) problems 46 6 Getting help 47 Helpful links 47 Telephone customer support 48 7 Appendix 49 Camera specifications 49 Flash settings in each mode 51 Storage capacities 53 Important safety instructions 54 Battery life 55 Upgrading your software ...
User Manual
Page 7
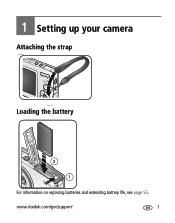
1 Setting up your camera Attaching the strap Loading the battery 2 1 For information on replacing batteries and extending battery life, see page 55. www.kodak.com/go/support 1
1 Setting up your camera Attaching the strap Loading the battery 2 1 For information on replacing batteries and extending battery life, see page 55. www.kodak.com/go/support 1
User Manual
Page 8
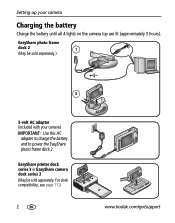
For dock compatibility, see page 17.) 2 www.kodak.com/go/support EasyShare photo frame dock 2 1 (May be sold separately.) 2 5-volt AC adapter (included with your camera Charging the battery Charge the battery until all 4 lights on the camera top are lit (approximately 3 hours). Setting up your camera) IMPORTANT: Use this AC adapter to charge the battery and to power the EasyShare photo frame dock 2. EasyShare printer dock series 3 or EasyShare camera dock series 3 (May be sold separately.
For dock compatibility, see page 17.) 2 www.kodak.com/go/support EasyShare photo frame dock 2 1 (May be sold separately.) 2 5-volt AC adapter (included with your camera Charging the battery Charge the battery until all 4 lights on the camera top are lit (approximately 3 hours). Setting up your camera) IMPORTANT: Use this AC adapter to charge the battery and to power the EasyShare photo frame dock 2. EasyShare printer dock series 3 or EasyShare camera dock series 3 (May be sold separately.
User Manual
Page 9
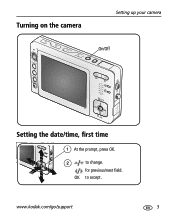
for previous/next field. OK to change. Turning on the camera Setting up your camera On/Off Setting the date/time, first time 1 At the prompt, press OK. 2 to accept. www.kodak.com/go/support 3
for previous/next field. OK to change. Turning on the camera Setting up your camera On/Off Setting the date/time, first time 1 At the prompt, press OK. 2 to accept. www.kodak.com/go/support 3
User Manual
Page 10
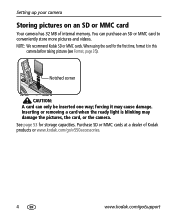
...only be inserted one way; NOTE: We recommend Kodak SD or MMC cards. When using the card for storage capacities. Notched corner CAUTION: A card can purchase an SD or MMC card to conveniently store more pictures and videos. forcing it in this camera before taking pictures (see Format, page 35).... a dealer of internal memory. See page 53 for the first time, format it may damage the pictures, the card, or the camera. Setting up your camera Storing pictures on an SD or MMC card Your camera has 32 MB of Kodak products or www.kodak.com/go/v550accessories. 4 www.kodak.com/go/support
...only be inserted one way; NOTE: We recommend Kodak SD or MMC cards. When using the card for storage capacities. Notched corner CAUTION: A card can purchase an SD or MMC card to conveniently store more pictures and videos. forcing it in this camera before taking pictures (see Format, page 35).... a dealer of internal memory. See page 53 for the first time, format it may damage the pictures, the card, or the camera. Setting up your camera Storing pictures on an SD or MMC card Your camera has 32 MB of Kodak products or www.kodak.com/go/v550accessories. 4 www.kodak.com/go/support
User Manual
Page 13
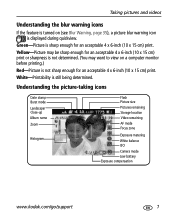
... Album name Zoom Histogram Flash Picture size Pictures remaining Storage location Video remaining AF mode Focus zone Exposure metering White balance ISO Camera mode Low battery Exposure compensation www.kodak.com/go/support 7 Yellow-Picture may be sharp enough for an acceptable 4 x 6-inch (10 x 15 cm) print or sharpness is not determined...
... Album name Zoom Histogram Flash Picture size Pictures remaining Storage location Video remaining AF mode Focus zone Exposure metering White balance ISO Camera mode Low battery Exposure compensation www.kodak.com/go/support 7 Yellow-Picture may be sharp enough for an acceptable 4 x 6-inch (10 x 15 cm) print or sharpness is not determined...
User Manual
Page 14
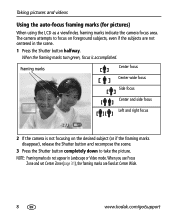
... accomplished. Taking pictures and videos Using the auto-focus framing marks (for pictures) When using the LCD as a viewfinder, framing marks indicate the camera focus area. NOTE: Framing marks do not appear in the scene. 1 Press the Shutter button halfway. When you use Focus Zone and set Center Zone (... and recompose the scene. 3 Press the Shutter button completely down to focus on foreground subjects, even if the subjects are fixed at Center Wide. 8 www.kodak.com/go/support The camera attempts to take the picture.
... accomplished. Taking pictures and videos Using the auto-focus framing marks (for pictures) When using the LCD as a viewfinder, framing marks indicate the camera focus area. NOTE: Framing marks do not appear in the scene. 1 Press the Shutter button halfway. When you use Focus Zone and set Center Zone (... and recompose the scene. 3 Press the Shutter button completely down to focus on foreground subjects, even if the subjects are fixed at Center Wide. 8 www.kodak.com/go/support The camera attempts to take the picture.
User Manual
Page 18
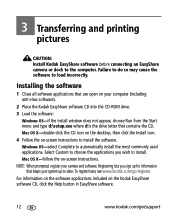
...commonly used applications. NOTE: When prompted, register your system up-to the computer. 3 Transferring and printing pictures CAUTION: Install Kodak EasyShare software before connecting an EasyShare camera or dock to -date. Failure to do so may cause the software to install the software. Mac OS X-double-click the...software). 2 Place the Kodak EasyShare software CD into the CD-ROM drive. 3 Load the software: Windows OS-if the install window does not appear, choose Run from the Start menu and type d:\setup.exe where d is the drive letter that keeps your camera and software. Windows OS-...
...commonly used applications. NOTE: When prompted, register your system up-to the computer. 3 Transferring and printing pictures CAUTION: Install Kodak EasyShare software before connecting an EasyShare camera or dock to -date. Failure to do so may cause the software to install the software. Mac OS X-double-click the...software). 2 Place the Kodak EasyShare software CD into the CD-ROM drive. 3 Load the software: Windows OS-if the install window does not appear, choose Run from the Start menu and type d:\setup.exe where d is the drive letter that keeps your camera and software. Windows OS-...
User Manual
Page 20
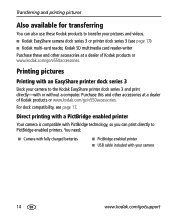
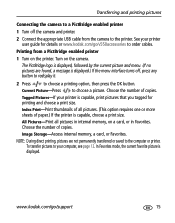
... available for transferring You can print directly to PictBridge enabled printers. Direct printing with a PictBridge enabled printer Your camera is compatible with an EasyShare printer dock series 3 Dock your camera to transfer your camera 14 www.kodak.com/go /v550accessories. Printing pictures Printing with PictBridge technology, so you can also use these and other accessories...
... available for transferring You can print directly to PictBridge enabled printers. Direct printing with a PictBridge enabled printer Your camera is compatible with an EasyShare printer dock series 3 Dock your camera to transfer your camera 14 www.kodak.com/go /v550accessories. Printing pictures Printing with PictBridge technology, so you can also use these and other accessories...
User Manual
Page 21
...more sheets of all pictures in internal memory, on the camera. NOTE: During direct printing, pictures are found, a message is capable, print pictures that you tagged for details or www.kodak.com/go /support 15 www.kodak.com/go /v550accessories to the printer. Current Picture-Press ...to the computer or printer. Tagged Pictures-If your printer is displayed.) If the menu interface turns off the camera and printer. 2 Connect the appropriate...
...more sheets of all pictures in internal memory, on the camera. NOTE: During direct printing, pictures are found, a message is capable, print pictures that you tagged for details or www.kodak.com/go /support 15 www.kodak.com/go /v550accessories to the printer. Current Picture-Press ...to the computer or printer. Tagged Pictures-If your printer is displayed.) If the menu interface turns off the camera and printer. 2 Connect the appropriate...
User Manual
Page 22
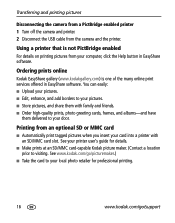
..., and albums-and have them with an SD/MMC card slot. Ordering prints online Kodak EasyShare gallery (www.kodakgallery.com) is not PictBridge enabled For details on printing pictures from the camera and the printer. Using a printer that is one of the many online print services... offered in EasyShare software. Transferring and printing pictures Disconnecting the camera from a PictBridge enabled printer 1 Turn off the camera and printer. 2 Disconnect the USB ...
..., and albums-and have them with an SD/MMC card slot. Ordering prints online Kodak EasyShare gallery (www.kodakgallery.com) is not PictBridge enabled For details on printing pictures from the camera and the printer. Using a printer that is one of the many online print services... offered in EasyShare software. Transferring and printing pictures Disconnecting the camera from a PictBridge enabled printer 1 Turn off the camera and printer. 2 Disconnect the USB ...

User Manual
Page 23
... 2 See Transferring pictures with the photo frame dock 2, page 13. ■ Kodak EasyShare printer dock series 3 and EasyShare camera dock series 3 Custom dock insert Dock Kodak EasyShare: ■ printer dock ■ printer dock plus ■ printer dock 6000 ■ camera dock 6000 Custom dock insert Kodak dock adapter D-22 Dock Other docks: Not compatible ■ printer dock 4000...
... 2 See Transferring pictures with the photo frame dock 2, page 13. ■ Kodak EasyShare printer dock series 3 and EasyShare camera dock series 3 Custom dock insert Dock Kodak EasyShare: ■ printer dock ■ printer dock plus ■ printer dock 6000 ■ camera dock 6000 Custom dock insert Kodak dock adapter D-22 Dock Other docks: Not compatible ■ printer dock 4000...
User Manual
Page 24
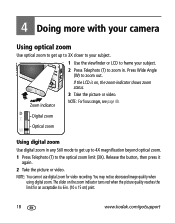
...video recording. Release the button, then press it again. 2 Take the picture or video. NOTE: You cannot use digital zoom for an acceptable 4 x 6-in. (10 x 15 cm) print. 18 www.kodak.com/go/support The slider on , the zoom indicator shows zoom status. 3 Take the picture or video. Press ...to the optical zoom limit (3X). 4 Doing more with your camera Using optical zoom Use optical zoom to get up to 3X closer to your subject. 2 Press Telephoto (T) to zoom in. You may notice decreased image quality when using digital zoom. Zoom indicator 1 Use the viewfinder or LCD to frame ...
...video recording. Release the button, then press it again. 2 Take the picture or video. NOTE: You cannot use digital zoom for an acceptable 4 x 6-in. (10 x 15 cm) print. 18 www.kodak.com/go/support The slider on , the zoom indicator shows zoom status. 3 Take the picture or video. Press ...to the optical zoom limit (3X). 4 Doing more with your camera Using optical zoom Use optical zoom to get up to 3X closer to your subject. 2 Press Telephoto (T) to zoom in. You may notice decreased image quality when using digital zoom. Zoom indicator 1 Use the viewfinder or LCD to frame ...
User Manual
Page 25
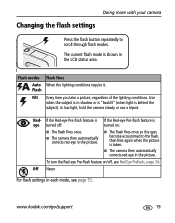
... automatically corrects red-eye in the picture. ■ The flash fires once so the eyes become accustomed to scroll through flash modes. www.kodak.com/go/support 19 The current flash mode is shown in shadow or is "backlit" (when light is turned off: turned on /off, see page ... it. Never For flash settings in the picture. Flash Fill Every time you take a picture, regardless of the lighting conditions. In low light, hold the camera steady or use a tripod. Redeye Off If the Red-eye Pre-flash feature is If the Red-eye Pre-flash feature is behind the subject).
... automatically corrects red-eye in the picture. ■ The flash fires once so the eyes become accustomed to scroll through flash modes. www.kodak.com/go/support 19 The current flash mode is shown in shadow or is "backlit" (when light is turned off: turned on /off, see page ... it. Never For flash settings in the picture. Flash Fill Every time you take a picture, regardless of the lighting conditions. In low light, hold the camera steady or use a tripod. Redeye Off If the Red-eye Pre-flash feature is If the Red-eye Pre-flash feature is behind the subject).
User Manual
Page 26
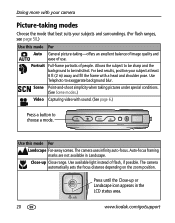
.... (For flash ranges, see page 50.) Use this mode For Landscape Far-away scenes. The camera automatically sets the focus distance depending on the zoom position. Close-up or Landscape icon appears in Landscape. Doing more with...pose. Use available light instead of use. Use Telephoto to be sharp and the background to exaggerate background blur. The camera uses infinity auto-focus. Press until the Close-up Close range. Portrait Full-frame portraits of people. Scene Point-and-... Auto-focus framing marks are not available in the LCD status area. 20 www.kodak.com/go/support
.... (For flash ranges, see page 50.) Use this mode For Landscape Far-away scenes. The camera automatically sets the focus distance depending on the zoom position. Close-up or Landscape icon appears in Landscape. Doing more with...pose. Use available light instead of use. Use Telephoto to be sharp and the background to exaggerate background blur. The camera uses infinity auto-focus. Press until the Close-up Close range. Portrait Full-frame portraits of people. Scene Point-and-... Auto-focus framing marks are not available in the LCD status area. 20 www.kodak.com/go/support
User Manual
Page 27
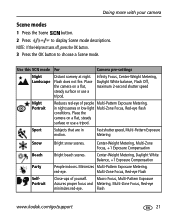
...-eye flash conditions. Minimizes Multi-Pattern Exposure Metering, red-eye. Flash www.kodak.com/go/support 21 Fast shutter speed, Multi-Pattern Exposure Metering Snow Beach Party SelfPortrait Bright snow scenes. Place the camera on a flat, steady surface or use a tripod. Multi-Zone Focus, Red... Help text turns off, press the OK button. 3 Press the OK button to display Scene mode descriptions. Use this SCN mode For Camera pre-settings Night Landscape Distant scenery at night. Flash does not fire. Infinity Focus, Center-Weight Metering, Daylight White balance, Flash Off,...
...-eye flash conditions. Minimizes Multi-Pattern Exposure Metering, red-eye. Flash www.kodak.com/go/support 21 Fast shutter speed, Multi-Pattern Exposure Metering Snow Beach Party SelfPortrait Bright snow scenes. Place the camera on a flat, steady surface or use a tripod. Multi-Zone Focus, Red... Help text turns off, press the OK button. 3 Press the OK button to display Scene mode descriptions. Use this SCN mode For Camera pre-settings Night Landscape Distant scenery at night. Flash does not fire. Infinity Focus, Center-Weight Metering, Daylight White balance, Flash Off,...
User Manual
Page 28
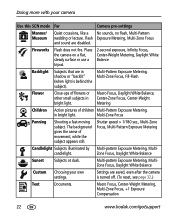
...Multi-Zone Focus and sound are saved, even after the camera is behind the subject). Multi-Pattern Exposure Metering, Multi-Zone... by Multi-pattern Exposure Metering, Multi- Zone Focus, Daylight White Balance Sunset Subjects at dusk. Place the camera on a flat, steady surface or use a tripod. 2-second exposure, Infinity Focus, Center-Weight Metering, ... appears still. Multi-pattern Exposure Metering, MultiZone Focus, Daylight White Balance Custom Choosing your camera Use this SCN mode For Camera pre-settings Manner/ Museum Quiet occasions, like a No sounds, no flash, Multi-Pattern...
...Multi-Zone Focus and sound are saved, even after the camera is behind the subject). Multi-Pattern Exposure Metering, Multi-Zone... by Multi-pattern Exposure Metering, Multi- Zone Focus, Daylight White Balance Sunset Subjects at dusk. Place the camera on a flat, steady surface or use a tripod. 2-second exposure, Infinity Focus, Center-Weight Metering, ... appears still. Multi-pattern Exposure Metering, MultiZone Focus, Daylight White Balance Custom Choosing your camera Use this SCN mode For Camera pre-settings Manner/ Museum Quiet occasions, like a No sounds, no flash, Multi-Pattern...
User Manual
Page 29
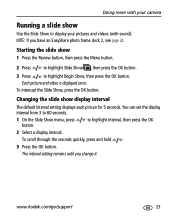
...then press the OK 2 Select a display interval. The interval setting remains until you have an EasyShare photo frame dock 2, see page 24. Changing the slide show Use the Slide Show to ...press and hold . 3 Press the OK button. Each picture and video is displayed once. www.kodak.com/go/support 23 NOTE: If you change it. Starting the slide show 1 Press the Review...Press to highlight Slide Show , then press the OK button. 3 Press to display your camera Running a slide show display interval The default interval setting displays each picture for 5 seconds. Doing more...
...then press the OK 2 Select a display interval. The interval setting remains until you have an EasyShare photo frame dock 2, see page 24. Changing the slide show Use the Slide Show to ...press and hold . 3 Press the OK button. Each picture and video is displayed once. www.kodak.com/go/support 23 NOTE: If you change it. Starting the slide show 1 Press the Review...Press to highlight Slide Show , then press the OK button. 3 Press to display your camera Running a slide show display interval The default interval setting displays each picture for 5 seconds. Doing more...


