
User Manual
Page 8
Setting up your camera Charging the battery 1 Turn OFF the camera. 2 Connect the cable or Battery Charging light: • blinks while charging • stays on when battery is fully charged Information on replacing batteries See page 61 and extending battery life 2 www.kodak.com/go/support
Setting up your camera Charging the battery 1 Turn OFF the camera. 2 Connect the cable or Battery Charging light: • blinks while charging • stays on when battery is fully charged Information on replacing batteries See page 61 and extending battery life 2 www.kodak.com/go/support

User Manual
Page 9
Charge until the Battery Charging light stays on (not in sleep mode). www.kodak.com/go /v1073accessories, v1273accessories. For accessories, see page 45. Kodak USB cable and a USB computer port Ensure that the USB cable is connected to a powered USB port and the computer is turned on . See www.kodak.com/go/USBcharging. Kodak 5V AC adapter (May be sold separately.) Kodak EasyShare camera, printer, or HDTV dock (May be sold separately.) For dock compatibility, see www.kodak.com/go /support or 3 Setting up your camera Charging using other accessories First, turn OFF the camera.
Charge until the Battery Charging light stays on (not in sleep mode). www.kodak.com/go /v1073accessories, v1273accessories. For accessories, see page 45. Kodak USB cable and a USB computer port Ensure that the USB cable is connected to a powered USB port and the computer is turned on . See www.kodak.com/go/USBcharging. Kodak 5V AC adapter (May be sold separately.) Kodak EasyShare camera, printer, or HDTV dock (May be sold separately.) For dock compatibility, see www.kodak.com/go /support or 3 Setting up your camera Charging using other accessories First, turn OFF the camera.
User Manual
Page 10
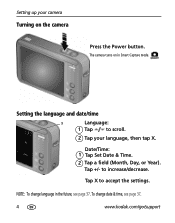
NOTE: To change date & time, see page 37. Setting up your language, then tap X. to accept the settings. To change language in Smart Capture mode. Setting the language and date/time X Language: 1 Tap to scroll. 2 Tap your camera Turning on in the future, see page 37. 4 www.kodak.com/go/support Tap +/- Tap X to increase/decrease. Date/Time: 1 Tap Set Date & Time. 2 Tap a field (Month, Day, or Year). The camera turns on the camera Press the Power button.
NOTE: To change date & time, see page 37. Setting up your language, then tap X. to accept the settings. To change language in Smart Capture mode. Setting the language and date/time X Language: 1 Tap to scroll. 2 Tap your camera Turning on in the future, see page 37. 4 www.kodak.com/go/support Tap +/- Tap X to increase/decrease. Date/Time: 1 Tap Set Date & Time. 2 Tap a field (Month, Day, or Year). The camera turns on the camera Press the Power button.

User Manual
Page 12
... SD/SDHC card deletes all (including protected) pictures/videos. 1 Turn off the camera. 2 Insert or remove the optional card. 3 Turn on -screen prompts. optional card IMPORTANT: For best performance, format the card in the camera before taking pictures. 1 Press the Menu button, then tap the...Memory Card, then follow the on the camera. forcing it may damage the pictures, the card, or the camera. Purchase accessories www.kodak.com/go/v1073accessories www.kodak.com/go/v1273accessories 6 www.kodak.com/go/support Setting up your camera Storing pictures on may cause damage. You...
... SD/SDHC card deletes all (including protected) pictures/videos. 1 Turn off the camera. 2 Insert or remove the optional card. 3 Turn on -screen prompts. optional card IMPORTANT: For best performance, format the card in the camera before taking pictures. 1 Press the Menu button, then tap the...Memory Card, then follow the on the camera. forcing it may damage the pictures, the card, or the camera. Purchase accessories www.kodak.com/go/v1073accessories www.kodak.com/go/v1273accessories 6 www.kodak.com/go/support Setting up your camera Storing pictures on may cause damage. You...

User Manual
Page 13
...1 Press the Power button to turn on/off controls and status icons. The camera turns on in -focus object, even if you move the camera. For more about bookmarks, see page 9. www.kodak.com/go/support 7 Framing marks NOTE: You can repeatedly press Info to turn on the face or the in... the quickview sooner, press the Shutter button halfway.) To delete, tap Delete. When the framing marks turn green, press the Shutter button completely down , the framing marks remain locked on the camera. To use other capture modes, see page 24. During playback, tap anywhere to play a video....
...1 Press the Power button to turn on/off controls and status icons. The camera turns on in -focus object, even if you move the camera. For more about bookmarks, see page 9. www.kodak.com/go/support 7 Framing marks NOTE: You can repeatedly press Info to turn on the face or the in... the quickview sooner, press the Shutter button halfway.) To delete, tap Delete. When the framing marks turn green, press the Shutter button completely down , the framing marks remain locked on the camera. To use other capture modes, see page 24. During playback, tap anywhere to play a video....

User Manual
Page 14
Framing marks do not appear in Smart Capture or video mode. 8 www.kodak.com/go/support Release Telephoto (T), then press it again. Taking pictures/videos Using the framing marks to frame your subject. 2 To zoom in, press Telephoto (T). ... out, press Wide Angle (W). 3 Take the picture or video. Using digital zoom Use digital zoom in any picture-taking mode to get up to take pictures Framing marks indicate the camera focus area. When the framing marks turn green, focus is accomplished. 2 If the camera is at the top of the optical zoom range. In...
Framing marks do not appear in Smart Capture or video mode. 8 www.kodak.com/go/support Release Telephoto (T), then press it again. Taking pictures/videos Using the framing marks to frame your subject. 2 To zoom in, press Telephoto (T). ... out, press Wide Angle (W). 3 Take the picture or video. Using digital zoom Use digital zoom in any picture-taking mode to get up to take pictures Framing marks indicate the camera focus area. When the framing marks turn green, focus is accomplished. 2 If the camera is at the top of the optical zoom range. In...

User Manual
Page 18
Every time you turn off (see page 37), the flash fires once and the camera firmware helps remove red eye. NOTE: Fill flash is behind the Fill subject). Off Never Your camera saves the flash setting, even after you take a picture, regardless of the lighting conditions. To make the camera return to its default settings... or use a tripod. In Red Eye flash: Red Eye ■ If Red Eye Preflash is on (see page 38. 12 www.kodak.com/go/support Press the Shutter button halfway, then completely down. Use when the subject is in shadow or is "backlit" (when light is not ...
Every time you turn off (see page 37), the flash fires once and the camera firmware helps remove red eye. NOTE: Fill flash is behind the Fill subject). Off Never Your camera saves the flash setting, even after you take a picture, regardless of the lighting conditions. To make the camera return to its default settings... or use a tripod. In Red Eye flash: Red Eye ■ If Red Eye Preflash is on (see page 38. 12 www.kodak.com/go/support Press the Shutter button halfway, then completely down. Use when the subject is in shadow or is "backlit" (when light is not ...

User Manual
Page 21
Taking pictures/videos Using camera Help To better understand each menu option, use camera Help. Highlight a menu choice, then press the Info button. Turn on Help Scroll up/down Exit Exit Help Understanding the picture-taking icons Settings panel (open/close) Flash Self-timer/Burst Focus Mode Exposure compensation Zoom: digital telephoto wide Tag name Picture size Flash Macro/Landscape Self timer Date stamp AF mode Long time exposure ISO White Balance AF Zone Exposure metering www.kodak.com/go/support 15
Taking pictures/videos Using camera Help To better understand each menu option, use camera Help. Highlight a menu choice, then press the Info button. Turn on Help Scroll up/down Exit Exit Help Understanding the picture-taking icons Settings panel (open/close) Flash Self-timer/Burst Focus Mode Exposure compensation Zoom: digital telephoto wide Tag name Picture size Flash Macro/Landscape Self timer Date stamp AF mode Long time exposure ISO White Balance AF Zone Exposure metering www.kodak.com/go/support 15

User Manual
Page 31
.../go/support 25 The slide show repeats until the battery is exhausted. NOTE: If you turn on the LCD. Changing the slide show loop When you have a Kodak EasyShare HDTV dock, see its Getting Started Guide. 1 Press the Review button. 2 Press the Menu button, then tap the Review tab. 3 Tap Slide Show, then...
.../go/support 25 The slide show repeats until the battery is exhausted. NOTE: If you turn on the LCD. Changing the slide show loop When you have a Kodak EasyShare HDTV dock, see its Getting Started Guide. 1 Press the Review button. 2 Press the Menu button, then tap the Review tab. 3 Tap Slide Show, then...

User Manual
Page 35
Select All or Deselect All are also available. www.kodak.com/go/support 29 Selected pictures 3 Tap Multi-Select, then tap X in the top right corner of the LCD to select/deselect a picture. A check mark ... add/remove a check mark from a picture/video. Working with pictures/videos Viewing picture/video information 1 Press the Review button. 2 Repeatedly press the Info button to turn on the picture.
Select All or Deselect All are also available. www.kodak.com/go/support 29 Selected pictures 3 Tap Multi-Select, then tap X in the top right corner of the LCD to select/deselect a picture. A check mark ... add/remove a check mark from a picture/video. Working with pictures/videos Viewing picture/video information 1 Press the Review button. 2 Repeatedly press the Info button to turn on the picture.

User Manual
Page 37
Some modes offer limited settings. 1 Press the Menu button. 2 Choose a tab. 4 Doing more with your camera Using the menu button to change settings You can change them; NOTE: Some tabs are available only in the top right corner of the LCD. ...Tap this tab Capture For the most common picture-taking settings Capture plus other picture-taking settings Video Setup video-taking settings other camera settings 3 Tap a feature. (To scroll, tap .) 4 Tap the new setting for that feature, then tap X in certain capture modes. NOTE: Some settings remain until you...
Some modes offer limited settings. 1 Press the Menu button. 2 Choose a tab. 4 Doing more with your camera Using the menu button to change settings You can change them; NOTE: Some tabs are available only in the top right corner of the LCD. ...Tap this tab Capture For the most common picture-taking settings Capture plus other picture-taking settings Video Setup video-taking settings other camera settings 3 Tap a feature. (To scroll, tap .) 4 Tap the new setting for that feature, then tap X in certain capture modes. NOTE: Some settings remain until you...

User Manual
Page 43
...dimming) Auto Power Off 10, 5, 3, 1 minutes Choose inactivity time until camera turns off . external device. Internal Memory-the camera always uses internal memory, even if a card is taken. Add Tag-create a tag. Tag 1 www.kodak.com/go/support 37 Video Out NTSC-used in North America and Japan; ... Eye Preflash On-red eye flash fires before the picture is installed. NOTE: The camera automatically corrects red eye, even if the Red Eye is set to access settings Options Digital Zoom Turn digital zoom on or off . Create and assign tags to a television or other PAL-used...
...dimming) Auto Power Off 10, 5, 3, 1 minutes Choose inactivity time until camera turns off . external device. Internal Memory-the camera always uses internal memory, even if a card is taken. Add Tag-create a tag. Tag 1 www.kodak.com/go/support 37 Video Out NTSC-used in North America and Japan; ... Eye Preflash On-red eye flash fires before the picture is installed. NOTE: The camera automatically corrects red eye, even if the Red Eye is set to access settings Options Digital Zoom Turn digital zoom on or off . Create and assign tags to a television or other PAL-used...

User Manual
Page 46
...lighter. (Exposure compensation is not available in the middle of the histogram. The flash may affect a picture's light and shadow. To turn on the LCD; Doing more with your camera Using exposure compensation to adjust picture brightness Before you take a picture, you take a picture. (The histogram is not available in ... compensation level is shown on the histogram, press the Info button until the histogram appears. Dark picture Balanced picture Bright picture 40 www.kodak.com/go/support Tap to adjust to decrease exposure compensation. the LCD gets brighter or dimmer.
...lighter. (Exposure compensation is not available in the middle of the histogram. The flash may affect a picture's light and shadow. To turn on the LCD; Doing more with your camera Using exposure compensation to adjust picture brightness Before you take a picture, you take a picture. (The histogram is not available in ... compensation level is shown on the histogram, press the Info button until the histogram appears. Dark picture Balanced picture Bright picture 40 www.kodak.com/go/support Tap to adjust to decrease exposure compensation. the LCD gets brighter or dimmer.

User Manual
Page 47
button until the grid www.kodak.com/go/support 41 Doing more with your camera Using the framing grid to balance a picture between water, earth, and sky. To turn on the framing grid in Smart Capture/SCN mode, press the Info appears. This is helpful if, for example, you want to compose a picture The framing grid divides the LCD into thirds-vertically and horizontally.
button until the grid www.kodak.com/go/support 41 Doing more with your camera Using the framing grid to balance a picture between water, earth, and sky. To turn on the framing grid in Smart Capture/SCN mode, press the Info appears. This is helpful if, for example, you want to compose a picture The framing grid divides the LCD into thirds-vertically and horizontally.

User Manual
Page 49
... /dockcompatibility. or Using other options You can also use a Kodak USB cable, model U-8 and the USB / A/V adapter. Printing pictures Printing with a Kodak EasyShare printer or printer dock Kodak EasyShare all-in -one printer-Connect your pictures/videos. Connect, then turn on the camera. For dock compatibility, visit www.kodak.com/go /support 43 Transferring, printing, tagging Transferring pictures...
... /dockcompatibility. or Using other options You can also use a Kodak USB cable, model U-8 and the USB / A/V adapter. Printing pictures Printing with a Kodak EasyShare printer or printer dock Kodak EasyShare all-in -one printer-Connect your pictures/videos. Connect, then turn on the camera. For dock compatibility, visit www.kodak.com/go /support 43 Transferring, printing, tagging Transferring pictures...

User Manual
Page 50
... is displayed.) If the menu interface turns off the camera and printer. 2 Connect the appropriate USB cable from an EasyShare all selected pictures in internal memory, or on the camera. Purchase accessories www.kodak.com/go/v1073accessories www.kodak.com/go /support Current Picture-Tap to... or more sheets of copies. Connecting the camera to an EasyShare all-in-one printer 1 Turn off , press any button to PictBridge enabled printers. Transferring, printing, tagging Direct printing with an EasyShare all-in-one printer Your camera is compatible with fully charged battery, a PictBridge...
... is displayed.) If the menu interface turns off the camera and printer. 2 Connect the appropriate USB cable from an EasyShare all selected pictures in internal memory, or on the camera. Purchase accessories www.kodak.com/go/v1073accessories www.kodak.com/go /support Current Picture-Tap to... or more sheets of copies. Connecting the camera to an EasyShare all-in-one printer 1 Turn off , press any button to PictBridge enabled printers. Transferring, printing, tagging Direct printing with an EasyShare all-in-one printer Your camera is compatible with fully charged battery, a PictBridge...

User Manual
Page 51
... Kodak picture maker/picture kiosk. (Contact a location prior to your camera, visit www.kodak.com/go /support 45 Using a printer that is one printer 1 Turn off the camera and printer. 2 Disconnect the USB cable from the camera and the printer. For details, see which EasyShare camera...See your pictures. ■ Store pictures, and share them from EasyShare software. Ordering prints online Kodak EasyShare Gallery (www.kodakgallery.com) is not PictBridge enabled After you transfer pictures from the camera to your printer user's guide for professional printing. Dock compatibility for ...
... Kodak picture maker/picture kiosk. (Contact a location prior to your camera, visit www.kodak.com/go /support 45 Using a printer that is one printer 1 Turn off the camera and printer. 2 Disconnect the USB cable from the camera and the printer. For details, see which EasyShare camera...See your pictures. ■ Store pictures, and share them from EasyShare software. Ordering prints online Kodak EasyShare Gallery (www.kodakgallery.com) is not PictBridge enabled After you transfer pictures from the camera to your printer user's guide for professional printing. Dock compatibility for ...
User Manual
Page 56
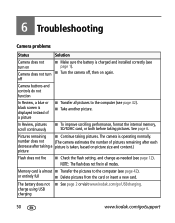
...a new card. Memory card is operating normally. See page 6. The battery does not ■ See page 2 or visit www.kodak.com/go /support Camera does not turn on ■ Make sure the battery is taken, based on again. NOTE: The flash does not fire in all pictures to the... computer (see page 1). charge using USB charging 50 www.kodak.com/go /USBcharging. In Review, pictures ■ To improve scrolling ...
...a new card. Memory card is operating normally. See page 6. The battery does not ■ See page 2 or visit www.kodak.com/go /support Camera does not turn on ■ Make sure the battery is taken, based on again. NOTE: The flash does not fire in all pictures to the... computer (see page 1). charge using USB charging 50 www.kodak.com/go /USBcharging. In Review, pictures ■ To improve scrolling ...

User Manual
Page 57
You cannot take a picture ■ Turn the camera off the camera. Memory card not ■ Card may be corrupted. www.kodak.com/go/support 51 Wipe the contacts with card ■ Use another card. Cannot find the ■ To view pictures on an external video...38). desired picture/video Computer/connectivity problems Status Pictures do not transfer to computer Slide Show does not run on a card or in EasyShare software. ■ Adjust the camera Video Out setting to the computer (see page 42), delete pictures (see page 37). ■ Make sure the external device settings ...
You cannot take a picture ■ Turn the camera off the camera. Memory card not ■ Card may be corrupted. www.kodak.com/go/support 51 Wipe the contacts with card ■ Use another card. Cannot find the ■ To view pictures on an external video...38). desired picture/video Computer/connectivity problems Status Pictures do not transfer to computer Slide Show does not run on a card or in EasyShare software. ■ Adjust the camera Video Out setting to the computer (see page 42), delete pictures (see page 37). ■ Make sure the external device settings ...

User Manual
Page 58
... in Macro mode if you and the subject is installed (see page 42). Make sure the camera is seated on the dock.) ■ Turn on the camera. ■ Make sure EasyShare software is within the effective flash range. (See camera specifications starting on a flat, steady surface or use a tripod (especially in high-zoom settings or... exposure and focus, press the Shutter button halfway. Picture quality problems Status Picture is not clear Picture is connected to take the picture. 52 www.kodak.com/go/support
... in Macro mode if you and the subject is installed (see page 42). Make sure the camera is seated on the dock.) ■ Turn on the camera. ■ Make sure EasyShare software is within the effective flash range. (See camera specifications starting on a flat, steady surface or use a tripod (especially in high-zoom settings or... exposure and focus, press the Shutter button halfway. Picture quality problems Status Picture is not clear Picture is connected to take the picture. 52 www.kodak.com/go/support


