
User Manual
Page 10
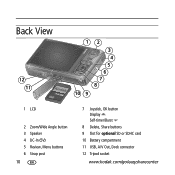
Back View 12 11 12 3 4 5 6 7 8 10 9 1 LCD 2 Zoom/Wide Angle button 3 Speaker 4 DC-In (5V) 5 Review, Menu buttons 6 Strap post 10 7 Joystick, OK button Display Self-timer/Burst 8 Delete, Share buttons 9 Slot for optional SD or SDHC card 10 Battery compartment 11 USB, A/V Out, Dock connector 12 Tripod socket www.kodak.com/go/easysharecenter
Back View 12 11 12 3 4 5 6 7 8 10 9 1 LCD 2 Zoom/Wide Angle button 3 Speaker 4 DC-In (5V) 5 Review, Menu buttons 6 Strap post 10 7 Joystick, OK button Display Self-timer/Burst 8 Delete, Share buttons 9 Slot for optional SD or SDHC card 10 Battery compartment 11 USB, A/V Out, Dock connector 12 Tripod socket www.kodak.com/go/easysharecenter
User Manual
Page 16
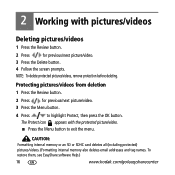
..., see EasyShare software Help.) 16 www.kodak.com/go/easysharecenter 2 Working with the protected picture/video. ■ Press the Menu button to highlight Protect, then press the OK button. NOTE: To delete protected pictures/videos, remove protection before deleting. Protecting pictures/videos from deletion 1 Press the Review button....memory also deletes email addresses and tag names. The Protect icon appears with pictures/videos Deleting pictures/videos 1 Press the Review button. 2 Press for previous/next picture/video. 3 Press the Menu button. 4 Press to exit the menu.
..., see EasyShare software Help.) 16 www.kodak.com/go/easysharecenter 2 Working with the protected picture/video. ■ Press the Menu button to highlight Protect, then press the OK button. NOTE: To delete protected pictures/videos, remove protection before deleting. Protecting pictures/videos from deletion 1 Press the Review button....memory also deletes email addresses and tag names. The Protect icon appears with pictures/videos Deleting pictures/videos 1 Press the Review button. 2 Press for previous/next picture/video. 3 Press the Menu button. 4 Press to exit the menu.
User Manual
Page 17
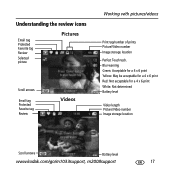
Blur warning Green: Acceptable for a 4 x 6 print Yellow: May be acceptable for a 4 x 6 print Red: Not acceptable for a 4 x 6 print White: Not determined Battery level Video length Picture/Video number Image storage location Scroll arrows Battery level www.kodak.com/go/m1033support, m2008support 17 Understanding the review icons Email tag Protected Favorite tag Review Selected picture Pictures Scroll arrows Email tag Protected Favorite tag Review Videos Working with pictures/videos Print tag/number of prints Picture/Video number Image storage location Perfect Touch tech.
Blur warning Green: Acceptable for a 4 x 6 print Yellow: May be acceptable for a 4 x 6 print Red: Not acceptable for a 4 x 6 print White: Not determined Battery level Video length Picture/Video number Image storage location Scroll arrows Battery level www.kodak.com/go/m1033support, m2008support 17 Understanding the review icons Email tag Protected Favorite tag Review Selected picture Pictures Scroll arrows Email tag Protected Favorite tag Review Videos Working with pictures/videos Print tag/number of prints Picture/Video number Image storage location Perfect Touch tech.
User Manual
Page 18
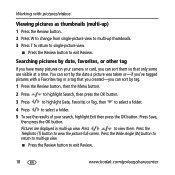
...multi-up thumbnails. 3 Press T to return to single-picture view. ■ Press the Review button to select a folder. 5 To see the results of your camera or card, you can sort by tag. 1 Press the Review button, then the Menu button. 2 Press to highlight Search, then press the OK button.... 3 Press to highlight Date, Favorite, or Tag, then to select a folder. 4 Press to exit Review. Press the Telephoto (T) button to exit Review. 18 www.kodak...
...multi-up thumbnails. 3 Press T to return to single-picture view. ■ Press the Review button to select a folder. 5 To see the results of your camera or card, you can sort by tag. 1 Press the Review button, then the Menu button. 2 Press to highlight Search, then press the OK button.... 3 Press to highlight Date, Favorite, or Tag, then to select a folder. 4 Press to exit Review. Press the Telephoto (T) button to exit Review. 18 www.kodak...
User Manual
Page 19
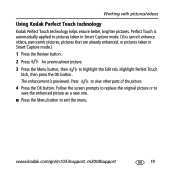
... OK button. www.kodak.com/go/m1033support, m2008support 19 The enhancement is automatically applied to pictures taken in Smart Capture mode. (You cannot enhance videos, panoramic pictures, pictures that are already enhanced, or pictures taken in Smart Capture mode.) 1 Press the Review button. 2 Press for... Press the Menu button to view other parts of the picture. 4 Press the OK button. Working with pictures/videos Using Kodak Perfect Touch technology Kodak Perfect Touch technology helps ensure better, brighter pictures. Perfect Touch is previewed. Press to exit the menu.
... OK button. www.kodak.com/go/m1033support, m2008support 19 The enhancement is automatically applied to pictures taken in Smart Capture mode. (You cannot enhance videos, panoramic pictures, pictures that are already enhanced, or pictures taken in Smart Capture mode.) 1 Press the Review button. 2 Press for... Press the Menu button to view other parts of the picture. 4 Press the OK button. Working with pictures/videos Using Kodak Perfect Touch technology Kodak Perfect Touch technology helps ensure better, brighter pictures. Perfect Touch is previewed. Press to exit the menu.
User Manual
Page 20
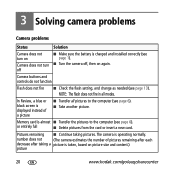
...Review, a blue or black screen is displayed instead of pictures remaining after each decrease after taking pictures. number does not (The camera estimates the number of a picture ■ Transfer all modes. Camera... the pictures to the computer (see page 6). ■ Take another picture. The camera is operating normally. or entirely full ■ Delete pictures from the card or insert... taking a picture is taken, based on again. 3 Solving camera problems Camera problems Status Solution Camera does not turn on Camera does not turn off ■ Make sure the battery is...
...Review, a blue or black screen is displayed instead of pictures remaining after each decrease after taking pictures. number does not (The camera estimates the number of a picture ■ Transfer all modes. Camera... the pictures to the computer (see page 6). ■ Take another picture. The camera is operating normally. or entirely full ■ Delete pictures from the card or insert... taking a picture is taken, based on again. 3 Solving camera problems Camera problems Status Solution Camera does not turn on Camera does not turn off ■ Make sure the battery is...


