User Manual
Page 1
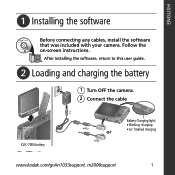
ENGLISH ᕡ Installing the software Before connecting any cables, install the software that was included with your camera. After installing the software, return to this user guide. ᕢ Loading and charging the battery 1 Turn OFF the camera. 2 Connect the cable KLIC-7004 battery Battery Charging light: • Blinking: charging or • Lit: finished charging www.kodak.com/go/m1033support, m2008support 1 Follow the on-screen instructions.
ENGLISH ᕡ Installing the software Before connecting any cables, install the software that was included with your camera. After installing the software, return to this user guide. ᕢ Loading and charging the battery 1 Turn OFF the camera. 2 Connect the cable KLIC-7004 battery Battery Charging light: • Blinking: charging or • Lit: finished charging www.kodak.com/go/m1033support, m2008support 1 Follow the on-screen instructions.
User Manual
Page 2
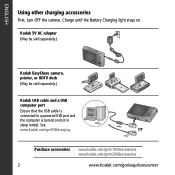
Charge until the Battery Charging light stays on (not in sleep mode). Kodak 5V AC adapter (May be sold separately.) Kodak EasyShare camera, printer, or HDTV dock (May be sold separately.) Kodak USB cable and a USB computer port Ensure that the USB cable is connected to a powered USB port and the computer is turned on . ENGLISH Using other charging accessories First, turn OFF the camera. or Purchase accessories www.kodak.com/go/m1033accessories www.kodak.com/go/m2008accessories 2 www.kodak.com/go /USBcharging. See www.kodak.com/go /easysharecenter
Charge until the Battery Charging light stays on (not in sleep mode). Kodak 5V AC adapter (May be sold separately.) Kodak EasyShare camera, printer, or HDTV dock (May be sold separately.) Kodak USB cable and a USB computer port Ensure that the USB cable is connected to a powered USB port and the computer is turned on . ENGLISH Using other charging accessories First, turn OFF the camera. or Purchase accessories www.kodak.com/go/m1033accessories www.kodak.com/go/m2008accessories 2 www.kodak.com/go /USBcharging. See www.kodak.com/go /easysharecenter
User Manual
Page 3
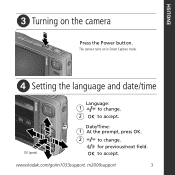
OK to accept. Date/Time: 1 At the prompt, press OK. 2 to change . 2 OK to accept. ENGLISH ᕣ Turning on in Smart Capture mode. ᕤ Setting the language and date/time OK (press) Language: 1 to change . for previous/next field. www.kodak.com/go/m1033support, m2008support 3 The camera turns on the camera Press the Power button.
OK to accept. Date/Time: 1 At the prompt, press OK. 2 to change . 2 OK to accept. ENGLISH ᕣ Turning on in Smart Capture mode. ᕤ Setting the language and date/time OK (press) Language: 1 to change . for previous/next field. www.kodak.com/go/m1033support, m2008support 3 The camera turns on the camera Press the Power button.
User Manual
Page 4
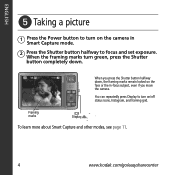
... the framing marks turn on the camera in -focus subject, even if you press the Shutter button halfway down . You can repeatedly press Display to turn on the face or the in Smart Capture mode. 2 Press the Shutter button halfway to focus and set exposure. ENGLISH ᕥ Taking a picture 1 Press the Power button to turn green, press the Shutter button completely down , the framing marks remain locked on /off status icons, histogram, and framing...
... the framing marks turn on the camera in -focus subject, even if you press the Shutter button halfway down . You can repeatedly press Display to turn on the face or the in Smart Capture mode. 2 Press the Shutter button halfway to focus and set exposure. ENGLISH ᕥ Taking a picture 1 Press the Power button to turn green, press the Shutter button completely down , the framing marks remain locked on /off status icons, histogram, and framing...

User Manual
Page 6
Kodak EasyShare printer dock, camera dock, or HDTV dock (may be sold separately) or Learn more about connecting Purchase accessories Dock compatibility 6 www.kodak.com/go/howto www.kodak.com/go/m1033accessories www.kodak.com/go/m2008accessories www.kodak.com/go/dockcompatibility www.kodak.com/go/easysharecenter ENGLISH ᕧ Transferring pictures/videos USB cable Connect, then turn on the camera.
Kodak EasyShare printer dock, camera dock, or HDTV dock (may be sold separately) or Learn more about connecting Purchase accessories Dock compatibility 6 www.kodak.com/go/howto www.kodak.com/go/m1033accessories www.kodak.com/go/m2008accessories www.kodak.com/go/dockcompatibility www.kodak.com/go/easysharecenter ENGLISH ᕧ Transferring pictures/videos USB cable Connect, then turn on the camera.
User Manual
Page 7
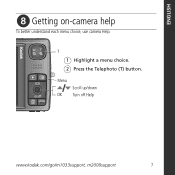
T 1 Highlight a menu choice. 2 Press the Telephoto (T) button. ENGLISH ᕨ Getting on-camera help To better understand each menu choice, use camera Help. Menu OK Scroll up/down Turn off Help www.kodak.com/go/m1033support, m2008support 7
T 1 Highlight a menu choice. 2 Press the Telephoto (T) button. ENGLISH ᕨ Getting on-camera help To better understand each menu choice, use camera Help. Menu OK Scroll up/down Turn off Help www.kodak.com/go/m1033support, m2008support 7

User Manual
Page 8
... each menu option, use camera Help-highlight a menu choice, then press the Telephoto (T) button. Visit www.kodak.com/go/m1033support or www.kodak.com/go/m2008support: • the extended user guide • interactive troubleshooting and repairs • interactive tutorials • FAQs • downloads • accessories • printing information • product registration 8 www.kodak.com/go/easysharecenter Congratulations! Finish reading this book, so you can take and share your camera! ENGLISH...
... each menu option, use camera Help-highlight a menu choice, then press the Telephoto (T) button. Visit www.kodak.com/go/m1033support or www.kodak.com/go/m2008support: • the extended user guide • interactive troubleshooting and repairs • interactive tutorials • FAQs • downloads • accessories • printing information • product registration 8 www.kodak.com/go/easysharecenter Congratulations! Finish reading this book, so you can take and share your camera! ENGLISH...
User Manual
Page 11
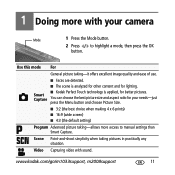
Video Capturing video with your needs-just press the Menu button and choose Picture Size. ■ 3:2 (the best choice when making 4 x 6 prints) ■ 16:9 (wide screen) ■ 4:3 (the default setting) Program Advanced picture taking-allows more with sound. 1 Doing more access to highlight a mode, then press the OK button. www.kodak.com/go/m1033support, m2008support 11 Use this mode For General picture taking pictures in practically any situation. Smart Capture You can choose the...
Video Capturing video with your needs-just press the Menu button and choose Picture Size. ■ 3:2 (the best choice when making 4 x 6 prints) ■ 16:9 (wide screen) ■ 4:3 (the default setting) Program Advanced picture taking-allows more with sound. 1 Doing more access to highlight a mode, then press the OK button. www.kodak.com/go/m1033support, m2008support 11 Use this mode For General picture taking pictures in practically any situation. Smart Capture You can choose the...
User Manual
Page 12
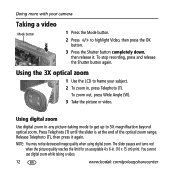
... your camera Taking a video Mode button 1 Press the Mode button. 2 Press to frame your subject. 2 To zoom in, press Telephoto (T). Using the 3X optical zoom 1 Use the LCD to highlight Video, then press the OK button. 3 Press the Shutter button completely down, then release it again. The slider pauses and turns red when the picture quality reaches the limit for an acceptable 4 x 6-in any picture-taking a video. 12 www.kodak.com/go/easysharecenter Using digital zoom Use digital zoom...
... your camera Taking a video Mode button 1 Press the Mode button. 2 Press to frame your subject. 2 To zoom in, press Telephoto (T). Using the 3X optical zoom 1 Use the LCD to highlight Video, then press the OK button. 3 Press the Shutter button completely down, then release it again. The slider pauses and turns red when the picture quality reaches the limit for an acceptable 4 x 6-in any picture-taking a video. 12 www.kodak.com/go/easysharecenter Using digital zoom Use digital zoom...
User Manual
Page 13
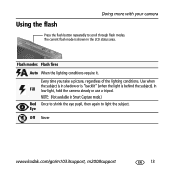
... light is shown in the LCD status area. Using the flash Doing more with your camera Press the flash button repeatedly to light the subject. Eye Off Never www.kodak.com/go/m1033support, m2008support 13 Flash modes Flash fires Auto When the lighting conditions require it. Every time you take a picture, regardless of the lighting conditions. The current flash mode is behind the subject). In Fill low light, hold the camera steady or use...
... light is shown in the LCD status area. Using the flash Doing more with your camera Press the flash button repeatedly to light the subject. Eye Off Never www.kodak.com/go/m1033support, m2008support 13 Flash modes Flash fires Auto When the lighting conditions require it. Every time you take a picture, regardless of the lighting conditions. The current flash mode is behind the subject). In Fill low light, hold the camera steady or use...
User Manual
Page 14
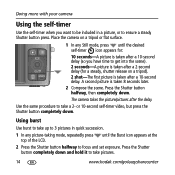
... 10-second self-timer video, but press the Shutter button completely down . Using burst Use burst to take up to 3 pictures in a picture, or to ensure a steady Shutter button press. Press the Shutter button completely down and hold it to focus and set exposure. Place the camera on a tripod or flat surface. 1 In any picture-taking mode, repeatedly press until the desired self-timer icon appears for a steady, shutter release on a tripod). 2 shot-The first picture is...
... 10-second self-timer video, but press the Shutter button completely down . Using burst Use burst to take up to 3 pictures in a picture, or to ensure a steady Shutter button press. Press the Shutter button completely down and hold it to focus and set exposure. Place the camera on a tripod or flat surface. 1 In any picture-taking mode, repeatedly press until the desired self-timer icon appears for a steady, shutter release on a tripod). 2 shot-The first picture is...
User Manual
Page 15
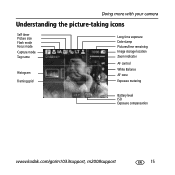
Doing more with your camera Understanding the picture-taking icons Self timer Picture size Flash mode Focus mode Capture mode Tag name Histogram Framing grid Long time exposure Date stamp Pictures/time remaining Image storage location Zoom indicator AF control White Balance AF zone Exposure metering Battery level ISO Exposure compensation www.kodak.com/go/m1033support, m2008support 15
Doing more with your camera Understanding the picture-taking icons Self timer Picture size Flash mode Focus mode Capture mode Tag name Histogram Framing grid Long time exposure Date stamp Pictures/time remaining Image storage location Zoom indicator AF control White Balance AF zone Exposure metering Battery level ISO Exposure compensation www.kodak.com/go/m1033support, m2008support 15
User Manual
Page 16
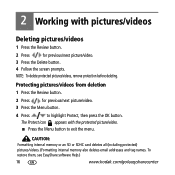
... prompts. NOTE: To delete protected pictures/videos, remove protection before deleting. To restore them, see EasyShare software Help.) 16 www.kodak.com/go/easysharecenter 2 Working with the protected picture/video. ■ Press the Menu button to highlight Protect, then press the OK button. CAUTION: Formatting internal memory or an SD or SDHC card deletes all (including protected) pictures/videos. (Formatting internal memory also deletes email addresses and tag names. The Protect icon appears with pictures/videos Deleting pictures/videos 1 Press the Review button. 2 Press for...
... prompts. NOTE: To delete protected pictures/videos, remove protection before deleting. To restore them, see EasyShare software Help.) 16 www.kodak.com/go/easysharecenter 2 Working with the protected picture/video. ■ Press the Menu button to highlight Protect, then press the OK button. CAUTION: Formatting internal memory or an SD or SDHC card deletes all (including protected) pictures/videos. (Formatting internal memory also deletes email addresses and tag names. The Protect icon appears with pictures/videos Deleting pictures/videos 1 Press the Review button. 2 Press for...
User Manual
Page 17
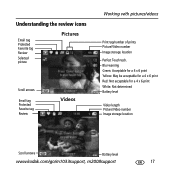
Blur warning Green: Acceptable for a 4 x 6 print Yellow: May be acceptable for a 4 x 6 print Red: Not acceptable for a 4 x 6 print White: Not determined Battery level Video length Picture/Video number Image storage location Scroll arrows Battery level www.kodak.com/go/m1033support, m2008support 17 Understanding the review icons Email tag Protected Favorite tag Review Selected picture Pictures Scroll arrows Email tag Protected Favorite tag Review Videos Working with pictures/videos Print tag/number of prints Picture/Video number Image storage location Perfect Touch tech.
Blur warning Green: Acceptable for a 4 x 6 print Yellow: May be acceptable for a 4 x 6 print Red: Not acceptable for a 4 x 6 print White: Not determined Battery level Video length Picture/Video number Image storage location Scroll arrows Battery level www.kodak.com/go/m1033support, m2008support 17 Understanding the review icons Email tag Protected Favorite tag Review Selected picture Pictures Scroll arrows Email tag Protected Favorite tag Review Videos Working with pictures/videos Print tag/number of prints Picture/Video number Image storage location Perfect Touch tech.
User Manual
Page 18
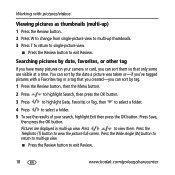
... Menu button. 2 Press to highlight Search, then press the OK button. 3 Press to highlight Date, Favorite, or Tag, then to select a folder. 4 Press to select a folder. 5 To see the results of your camera or card, you can sort by date, favorites, or other tag If you 've tagged pictures with pictures/videos Viewing pictures as thumbnails (multi-up) 1 Press the Review button. 2 Press W to change from single-picture view...
... Menu button. 2 Press to highlight Search, then press the OK button. 3 Press to highlight Date, Favorite, or Tag, then to select a folder. 4 Press to select a folder. 5 To see the results of your camera or card, you can sort by date, favorites, or other tag If you 've tagged pictures with pictures/videos Viewing pictures as thumbnails (multi-up) 1 Press the Review button. 2 Press W to change from single-picture view...
User Manual
Page 19
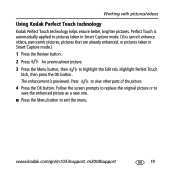
Working with pictures/videos Using Kodak Perfect Touch technology Kodak Perfect Touch technology helps ensure better, brighter pictures. Perfect Touch is previewed. Follow the screen prompts to replace the original picture or to save the enhanced picture as a new one. ■ Press the Menu button to highlight the Edit tab. The enhancement is automatically applied to pictures taken in Smart Capture mode. (You cannot enhance videos, panoramic pictures, pictures that are already...
Working with pictures/videos Using Kodak Perfect Touch technology Kodak Perfect Touch technology helps ensure better, brighter pictures. Perfect Touch is previewed. Follow the screen prompts to replace the original picture or to save the enhanced picture as a new one. ■ Press the Menu button to highlight the Edit tab. The enhancement is automatically applied to pictures taken in Smart Capture mode. (You cannot enhance videos, panoramic pictures, pictures that are already...
User Manual
Page 20
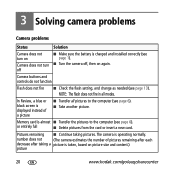
...; Continue taking a picture is charged and installed correctly (see page 6). ■ Take another picture. Camera buttons and controls do not function Flash does not fire ■ Check the flash setting, and change as needed (see page 6). NOTE: The flash does not fire in all pictures to the computer (see page 13). In Review, a blue or black screen is operating normally. number does not (The camera estimates the number of a picture ■ Transfer all modes. or entirely full ■ Delete pictures...
...; Continue taking a picture is charged and installed correctly (see page 6). ■ Take another picture. Camera buttons and controls do not function Flash does not fire ■ Check the flash setting, and change as needed (see page 6). NOTE: The flash does not fire in all pictures to the computer (see page 13). In Review, a blue or black screen is operating normally. number does not (The camera estimates the number of a picture ■ Transfer all modes. or entirely full ■ Delete pictures...

User Manual
Page 21
.... ■ Follow all instructions of an accessory that battery fluid leaks onto your computer manufacturer if you have questions. ■ If using this product in exposure to qualified service personnel. Kodak AC adapters and battery chargers are no user-serviceable parts inside the product, contact Kodak customer support. ■ In the unlikely event that is stored for this product; If the LCD breaks, do not...
.... ■ Follow all instructions of an accessory that battery fluid leaks onto your computer manufacturer if you have questions. ■ If using this product in exposure to qualified service personnel. Kodak AC adapters and battery chargers are no user-serviceable parts inside the product, contact Kodak customer support. ■ In the unlikely event that is stored for this product; If the LCD breaks, do not...
User Manual
Page 22
... you specific rights, and you . Appendix Limited Warranty Kodak warrants Kodak consumer electronic products and accessories ("Products"), excluding batteries, to be free from malfunctions and defects in making repairs, those parts may be remanufactured, or may have other express or implied warranty for this product regardless of purchase. Retain the original dated sales receipt. Proof of the date of repair, replacement, or...
... you specific rights, and you . Appendix Limited Warranty Kodak warrants Kodak consumer electronic products and accessories ("Products"), excluding batteries, to be free from malfunctions and defects in making repairs, those parts may be remanufactured, or may have other express or implied warranty for this product regardless of purchase. Retain the original dated sales receipt. Proof of the date of repair, replacement, or...
User Manual
Page 23
...user is connected; 4) consult the dealer or an experienced radio/TV technician for compliance could void the user's authority to which can radiate radio frequency energy and, if not installed or used in a particular installation. This equipment generates, uses, and can be used in a residential installation... Kodak EasyShare M1033/M2008 digital camera This equipment has been tested and found to radio communications. These limits are designed to provide reasonable protection against harmful interference in accordance with the limits for a Class B digital device, pursuant to Part 15...
...user is connected; 4) consult the dealer or an experienced radio/TV technician for compliance could void the user's authority to which can radiate radio frequency energy and, if not installed or used in a particular installation. This equipment generates, uses, and can be used in a residential installation... Kodak EasyShare M1033/M2008 digital camera This equipment has been tested and found to radio communications. These limits are designed to provide reasonable protection against harmful interference in accordance with the limits for a Class B digital device, pursuant to Part 15...


