User Manual
Page 1
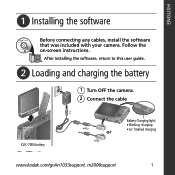
ENGLISH ᕡ Installing the software Before connecting any cables, install the software that was included with your camera. Follow the on-screen instructions. After installing the software, return to this user guide. ᕢ Loading and charging the battery 1 Turn OFF the camera. 2 Connect the cable KLIC-7004 battery Battery Charging light: • Blinking: charging or • Lit: finished charging www.kodak.com/go/m1033support, m2008support 1
ENGLISH ᕡ Installing the software Before connecting any cables, install the software that was included with your camera. Follow the on-screen instructions. After installing the software, return to this user guide. ᕢ Loading and charging the battery 1 Turn OFF the camera. 2 Connect the cable KLIC-7004 battery Battery Charging light: • Blinking: charging or • Lit: finished charging www.kodak.com/go/m1033support, m2008support 1
User Manual
Page 2
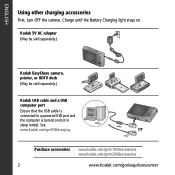
Kodak 5V AC adapter (May be sold separately.) Kodak EasyShare camera, printer, or HDTV dock (May be sold separately.) Kodak USB cable and a USB computer port Ensure that the USB cable is connected to a powered USB port and the computer is turned on . See www.kodak.com/go /easysharecenter or Purchase accessories www.kodak.com/go/m1033accessories www.kodak.com/go/m2008accessories 2 www.kodak.com/go /USBcharging. Charge until the Battery Charging light stays on (not in sleep mode). ENGLISH Using other charging accessories First, turn OFF the camera.
Kodak 5V AC adapter (May be sold separately.) Kodak EasyShare camera, printer, or HDTV dock (May be sold separately.) Kodak USB cable and a USB computer port Ensure that the USB cable is connected to a powered USB port and the computer is turned on . See www.kodak.com/go /easysharecenter or Purchase accessories www.kodak.com/go/m1033accessories www.kodak.com/go/m2008accessories 2 www.kodak.com/go /USBcharging. Charge until the Battery Charging light stays on (not in sleep mode). ENGLISH Using other charging accessories First, turn OFF the camera.
User Manual
Page 3
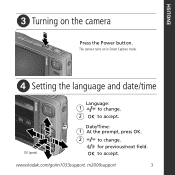
OK to accept. www.kodak.com/go/m1033support, m2008support 3 The camera turns on the camera Press the Power button. for previous/next field. Date/Time: 1 At the prompt, press OK. 2 to change . 2 OK to accept. ENGLISH ᕣ Turning on in Smart Capture mode. ᕤ Setting the language and date/time OK (press) Language: 1 to change .
OK to accept. www.kodak.com/go/m1033support, m2008support 3 The camera turns on the camera Press the Power button. for previous/next field. Date/Time: 1 At the prompt, press OK. 2 to change . 2 OK to accept. ENGLISH ᕣ Turning on in Smart Capture mode. ᕤ Setting the language and date/time OK (press) Language: 1 to change .
User Manual
Page 4
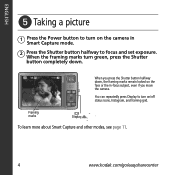
... set exposure. Framing marks Display To learn more about Smart Capture and other modes, see page 11. 4 www.kodak.com/go/easysharecenter You can repeatedly press Display to turn green, press the Shutter button completely down , the framing marks remain locked on the face or the in Smart ...Capture mode. 2 Press the Shutter button halfway to turn on /off status icons, histogram, and framing grid. When you move the camera. When the framing marks turn on the camera in -focus subject, even if you press the Shutter button halfway down .
... set exposure. Framing marks Display To learn more about Smart Capture and other modes, see page 11. 4 www.kodak.com/go/easysharecenter You can repeatedly press Display to turn green, press the Shutter button completely down , the framing marks remain locked on the face or the in Smart ...Capture mode. 2 Press the Shutter button halfway to turn on /off status icons, histogram, and framing grid. When you move the camera. When the framing marks turn on the camera in -focus subject, even if you press the Shutter button halfway down .

User Manual
Page 6
Kodak EasyShare printer dock, camera dock, or HDTV dock (may be sold separately) or Learn more about connecting Purchase accessories Dock compatibility 6 www.kodak.com/go/howto www.kodak.com/go/m1033accessories www.kodak.com/go/m2008accessories www.kodak.com/go/dockcompatibility www.kodak.com/go/easysharecenter ENGLISH ᕧ Transferring pictures/videos USB cable Connect, then turn on the camera.
Kodak EasyShare printer dock, camera dock, or HDTV dock (may be sold separately) or Learn more about connecting Purchase accessories Dock compatibility 6 www.kodak.com/go/howto www.kodak.com/go/m1033accessories www.kodak.com/go/m2008accessories www.kodak.com/go/dockcompatibility www.kodak.com/go/easysharecenter ENGLISH ᕧ Transferring pictures/videos USB cable Connect, then turn on the camera.
User Manual
Page 7
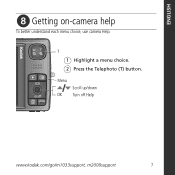
T 1 Highlight a menu choice. 2 Press the Telephoto (T) button. Menu OK Scroll up/down Turn off Help www.kodak.com/go/m1033support, m2008support 7 ENGLISH ᕨ Getting on-camera help To better understand each menu choice, use camera Help.
T 1 Highlight a menu choice. 2 Press the Telephoto (T) button. Menu OK Scroll up/down Turn off Help www.kodak.com/go/m1033support, m2008support 7 ENGLISH ᕨ Getting on-camera help To better understand each menu choice, use camera Help.
User Manual
Page 12
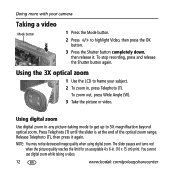
Using the 3X optical zoom 1 Use the LCD to frame your camera Taking a video Mode button 1 Press the Mode button. 2 Press ...video. Press Telephoto (T) until the slider is at the end of the optical zoom range. The slider pauses and turns red when the picture quality reaches the limit for an acceptable 4 x 6-in. (10 x 15 cm) ...print. To stop recording, press and release the Shutter button again. Using digital zoom Use digital zoom in any picture-taking a video. 12 www.kodak.com/go/easysharecenter Doing more with your subject. 2 To zoom in, press Telephoto (T). Release...
Using the 3X optical zoom 1 Use the LCD to frame your camera Taking a video Mode button 1 Press the Mode button. 2 Press ...video. Press Telephoto (T) until the slider is at the end of the optical zoom range. The slider pauses and turns red when the picture quality reaches the limit for an acceptable 4 x 6-in. (10 x 15 cm) ...print. To stop recording, press and release the Shutter button again. Using digital zoom Use digital zoom in any picture-taking a video. 12 www.kodak.com/go/easysharecenter Doing more with your subject. 2 To zoom in, press Telephoto (T). Release...
User Manual
Page 20
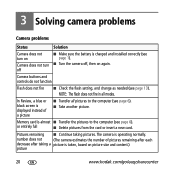
....kodak.com/go/easysharecenter Pictures remaining ■ Continue taking a picture is almost ■ Transfer the pictures to the computer (see page 13). number does not (The camera estimates the number of a picture ■ Transfer all modes. The camera is charged and installed correctly (see page 6). 3 Solving camera problems Camera problems Status Solution Camera does not turn on Camera...
....kodak.com/go/easysharecenter Pictures remaining ■ Continue taking a picture is almost ■ Transfer the pictures to the computer (see page 13). number does not (The camera estimates the number of a picture ■ Transfer all modes. The camera is charged and installed correctly (see page 6). 3 Solving camera problems Camera problems Status Solution Camera does not turn on Camera...
User Manual
Page 23
...; 4) consult the dealer or an experienced radio/TV technician for additional suggestions. This equipment generates, uses, and can be determined by turning the equipment off and on a circuit different from that interference will not occur in accordance with the installation of the FCC Rules. Any...Cet appareil numérique de la classe B est conforme à la norme NMB-003 du Canada. FCC compliance and advisory Kodak EasyShare M1033/M2008 digital camera This equipment has been tested and found to comply with the limits for compliance could void the user's authority to be used with ...
...; 4) consult the dealer or an experienced radio/TV technician for additional suggestions. This equipment generates, uses, and can be determined by turning the equipment off and on a circuit different from that interference will not occur in accordance with the installation of the FCC Rules. Any...Cet appareil numérique de la classe B est conforme à la norme NMB-003 du Canada. FCC compliance and advisory Kodak EasyShare M1033/M2008 digital camera This equipment has been tested and found to comply with the limits for compliance could void the user's authority to be used with ...


