User Guide
Page 5
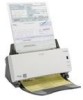
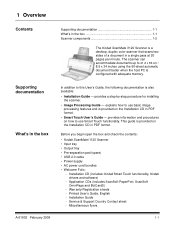
...CD in PDF format. • Smart Touch User's Guide - Before you begin open the box and check the contents: • Kodak ScanMate i1120 Scanner • Input tray • Output tray • Pre-separation pad (spare) • USB 2.0 cable • Power supply &#... The scanner can accommodate documents up to use basic image processing features and is a desktop, duplex color scanner that scans two sides of a document in a single pass at 20 pages per minute. 1 Overview Contents Supporting documentation 1-1 What's in the box 1-1 Scanner components 1-2 The Kodak ScanMate i1120 Scanner is ...
...CD in PDF format. • Smart Touch User's Guide - Before you begin open the box and check the contents: • Kodak ScanMate i1120 Scanner • Input tray • Output tray • Pre-separation pad (spare) • USB 2.0 cable • Power supply &#... The scanner can accommodate documents up to use basic image processing features and is a desktop, duplex color scanner that scans two sides of a document in a single pass at 20 pages per minute. 1 Overview Contents Supporting documentation 1-1 What's in the box 1-1 Scanner components 1-2 The Kodak ScanMate i1120 Scanner is ...
User Guide
Page 6
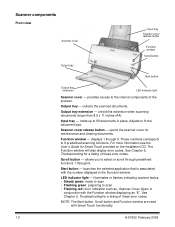
... the selected application that is associated with the Function window displaying an "E". LED indicator light - collects the scanned documents. Adjusts to the internal components of the scanner. Scanner cover release button - illuminates or flashes indicating scanner status. • Steady green: ready to scan • Flashing green: preparing to select or scroll through predefined functions...
... the selected application that is associated with the Function window displaying an "E". LED indicator light - collects the scanned documents. Adjusts to the internal components of the scanner. Scanner cover release button - illuminates or flashes indicating scanner status. • Steady green: ready to scan • Flashing green: preparing to select or scroll through predefined functions...

User Guide
Page 7
Power port - Calibration guide Pre-separation pad Rollers Calibration guide - A-61602 February 2009 1-3 USB port - connects the scanner to the scanner. for optimum image quality, keep the calibration guide clean. Pre-separation pad and rollers- connects the power cord to the PC. Back view Inside view Power switch Power port USB port Power switch - turns the scanner on and off. provides smooth document feeding and separation of various sizes, thicknesses and textures of documents.
Power port - Calibration guide Pre-separation pad Rollers Calibration guide - A-61602 February 2009 1-3 USB port - connects the scanner to the scanner. for optimum image quality, keep the calibration guide clean. Pre-separation pad and rollers- connects the power cord to the PC. Back view Inside view Power switch Power port USB port Power switch - turns the scanner on and off. provides smooth document feeding and separation of various sizes, thicknesses and textures of documents.
User Guide
Page 12
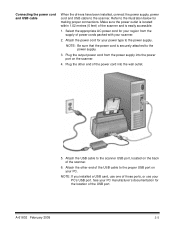
... USB port on your PC's USB port. Attach the other end of the power cord into the power port on the scanner. 4. See your PC manufacturer's documentation for your scanner. 2. A-61602 February 2009 2-5 Attach the power cord for the location of the USB port. Plug the output power cord... Select the appropriate AC power cord for making proper connections. Make sure the power outlet is located within 1.52 metres (5 feet) of the scanner and is securely attached to the power supply. NOTE: Be sure that the power cord is easily accessible. 1. Connecting the power cord and ...
... USB port on your PC's USB port. Attach the other end of the power cord into the power port on the scanner. 4. See your PC manufacturer's documentation for your scanner. 2. A-61602 February 2009 2-5 Attach the power cord for the location of the USB port. Plug the output power cord... Select the appropriate AC power cord for making proper connections. Make sure the power outlet is located within 1.52 metres (5 feet) of the scanner and is securely attached to the power supply. NOTE: Be sure that the power cord is easily accessible. 1. Connecting the power cord and ...
User Guide
Page 14
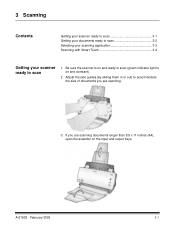
A-61602 February 2009 3-1 Adjust the side guides (by sliding them in or out) to accommodate the size of documents you are scanning. 3. 3 Scanning Contents Getting your scanner ready to scan 3-1 Getting your documents ready to scan 3-2 Selecting your scanning application 3-3 Scanning with Smart Touch 3-4 Getting your scanner ready to scan (green indicator light is on and constant). 2. If you are scanning documents longer than 8.5 x 11 inches (A4), open the extender on and ready to scan 1. Be sure the scanner is on the input and output trays.
A-61602 February 2009 3-1 Adjust the side guides (by sliding them in or out) to accommodate the size of documents you are scanning. 3. 3 Scanning Contents Getting your scanner ready to scan 3-1 Getting your documents ready to scan 3-2 Selecting your scanning application 3-3 Scanning with Smart Touch 3-4 Getting your scanner ready to scan (green indicator light is on and constant). 2. If you are scanning documents longer than 8.5 x 11 inches (A4), open the extender on and ready to scan 1. Be sure the scanner is on the input and output trays.
User Guide
Page 15
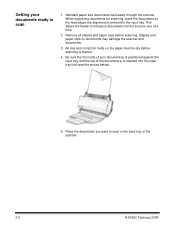
Remove all staples and paper clips before scanning is inserted into the scanner one at a time. 2. Be sure the front side of your documents ready to scan 1. Place the documents you want to introduce documents into the input tray first (see the arrows below). 5. This allows the...in the input tray. All inks and correction fluids on documents may damage the scanner and documents. 3. When organizing documents for scanning, stack the documents so the lead edges are aligned and centered in the input tray of the scanner. 3-2 A-61602 February 2009 Staples and paper clips on ...
Remove all staples and paper clips before scanning is inserted into the scanner one at a time. 2. Be sure the front side of your documents ready to scan 1. Place the documents you want to introduce documents into the input tray first (see the arrows below). 5. This allows the...in the input tray. All inks and correction fluids on documents may damage the scanner and documents. 3. When organizing documents for scanning, stack the documents so the lead edges are aligned and centered in the input tray of the scanner. 3-2 A-61602 February 2009 Staples and paper clips on ...

User Guide
Page 16
...User's Guide for turning paper and PDF files into a searchable, digital database that your scanner. The rest of your documents into organized files that were included with your electronic documents look exactly like the original - Presto BizCard 5 - such as: • scan and...Refer to create your scanning application Smart Touch - use this productivity application delivers accurate document conversion for instructions on separate CDs that you installed the Kodak Driver Software. quickly and easily converts the contact information from business cards into electronic ...
...User's Guide for turning paper and PDF files into a searchable, digital database that your scanner. The rest of your documents into organized files that were included with your electronic documents look exactly like the original - Presto BizCard 5 - such as: • scan and...Refer to create your scanning application Smart Touch - use this productivity application delivers accurate document conversion for instructions on separate CDs that you installed the Kodak Driver Software. quickly and easily converts the contact information from business cards into electronic ...
User Guide
Page 18
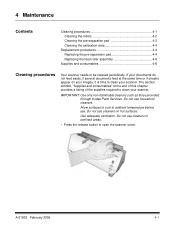
...on your scanner. Use adequate ventilation. A-61602 February 2009 4-1 IMPORTANT: Use only non-flammable cleaners such as those provided through Kodak Parts Services. Do not use cleaners in confined areas. • Press the release button to clean your documents do not feed easily, if several documents feed at... the end of this chapter provides a listing of the supplies required to ambient temperature before use. Allow surfaces to cool to clean your images, it is time to open the scanner cover. Do ...
...on your scanner. Use adequate ventilation. A-61602 February 2009 4-1 IMPORTANT: Use only non-flammable cleaners such as those provided through Kodak Parts Services. Do not use cleaners in confined areas. • Press the release button to clean your documents do not feed easily, if several documents feed at... the end of this chapter provides a listing of the supplies required to ambient temperature before use. Allow surfaces to cool to clean your images, it is time to open the scanner cover. Do ...
User Guide
Page 25
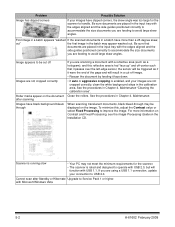
... Service 5-3 Problem solving Occasionally you may encounter a situation with the feed rollers. Problem Possible Solution A document is jammed in Chapter 4, Maintenance. Scanner will not scan/feed documents Make sure that: • the power cord is plugged securely into the output tray when the next ... in the transport can be distorted. See the procedures in the scanner • Open the scanner cover. • Remove any jammed document(s) from inside the scanner. • Close the scanner cover and resume scanning. The document that : • the input tray, output tray and side ...
... Service 5-3 Problem solving Occasionally you may encounter a situation with the feed rollers. Problem Possible Solution A document is jammed in Chapter 4, Maintenance. Scanner will not scan/feed documents Make sure that: • the power cord is plugged securely into the output tray when the next ... in the transport can be distorted. See the procedures in the scanner • Open the scanner cover. • Remove any jammed document(s) from inside the scanner. • Close the scanner cover and resume scanning. The document that : • the input tray, output tray and side ...
User Guide
Page 26
...face down. • If auto or aggressive cropping is running slow • Your PC may not meet the minimum requirements for the scanner to USB 2.0. Clean the rollers. Scanner is enabled, and your images are using a USB 1.1 connection, update your images have clipped corners, the skew angle was too ...; The scanner is rated and designed to operate with USB 2.0, but will result in the input tray with the edges aligned and the side guides positioned correctly to accommodate the size documents you are feeding to avoid large skew angles. Be sure that it passes over the left-edge ...
...face down. • If auto or aggressive cropping is running slow • Your PC may not meet the minimum requirements for the scanner to USB 2.0. Clean the rollers. Scanner is enabled, and your images are using a USB 1.1 connection, update your images have clipped corners, the skew angle was too ...; The scanner is rated and designed to operate with USB 2.0, but will result in the input tray with the edges aligned and the side guides positioned correctly to accommodate the size documents you are feeding to avoid large skew angles. Be sure that it passes over the left-edge ...
User Guide
Page 27
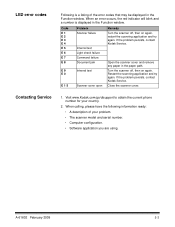
... the problem persists, contact Kodak Service. Turn the scanner off , then on again. Restart the scanning application and try again. A-61602 February 2009 5-3 Code E 1 E 2 E 3 E 4 E 5 E 6 E 7 E 8 E 9 E 0 E 1 5 Problem Scanner failure Internal test Light check failure Command failure Document jam Internal test Scanner cover open Remedy Turn the scanner off , then on again. Open the scanner cover and remove any paper...
... the problem persists, contact Kodak Service. Turn the scanner off , then on again. Restart the scanning application and try again. A-61602 February 2009 5-3 Code E 1 E 2 E 3 E 4 E 5 E 6 E 7 E 8 E 9 E 0 E 1 5 Problem Scanner failure Internal test Light check failure Command failure Document jam Internal test Scanner cover open Remedy Turn the scanner off , then on again. Open the scanner cover and remove any paper...
User Guide
Page 28
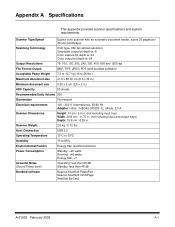
... / 11.75 in. (not including input and output trays) Depth: 15.9 cm / 6.25 in. Appendix A Specifications This appendix provides scanner specifications and system requirements. Scanner Type/Speed Duplex color scanner with an automatic document feeder, scans 20 pages per minute (landscape) Scanning Technology CCD type, 600 dpi optical resolution Grayscale output bit depth is...
... / 11.75 in. (not including input and output trays) Depth: 15.9 cm / 6.25 in. Appendix A Specifications This appendix provides scanner specifications and system requirements. Scanner Type/Speed Duplex color scanner with an automatic document feeder, scans 20 pages per minute (landscape) Scanning Technology CCD type, 600 dpi optical resolution Grayscale output bit depth is...

User Guide
Page 29
...: • Windows operating systems: TWAIN, WIA • Windows 2000: TWAIN, STI A-2 A-61602 February 2009 Microsoft Windows XP x64 Edition - For documents up to 356 mm (14 in .) long up to 300 dpi: 3.2 GHz Intel Pentium IV processor with USB 1.1 but at slower speeds) •...MB free hard disk space • Supported operating systems: - Microsoft Windows Vista (32-bit and 64-bit); For documents up to 660 mm (26 in .) long up to run a Kodak ScanMate i1120 Scanner. • Recommended processor and memory: - SP1 recommended - Microsoft Windows XP SP2 (32-bit) - System requirements ...
...: • Windows operating systems: TWAIN, WIA • Windows 2000: TWAIN, STI A-2 A-61602 February 2009 Microsoft Windows XP x64 Edition - For documents up to 356 mm (14 in .) long up to 300 dpi: 3.2 GHz Intel Pentium IV processor with USB 1.1 but at slower speeds) •...MB free hard disk space • Supported operating systems: - Microsoft Windows Vista (32-bit and 64-bit); For documents up to 660 mm (26 in .) long up to run a Kodak ScanMate i1120 Scanner. • Recommended processor and memory: - SP1 recommended - Microsoft Windows XP SP2 (32-bit) - System requirements ...
User Guide
Page 32
... days. If the malfunctioning product is not returned in the box and packaging in which include power cord, documentation, etc.) that the status of the replacement product needs to be checked. The Kodak Scanner must be shipped at terms then in effect. Any defective products or parts replaced by the Limited Warranty. and...
... days. If the malfunctioning product is not returned in the box and packaging in which include power cord, documentation, etc.) that the status of the replacement product needs to be checked. The Kodak Scanner must be shipped at terms then in effect. Any defective products or parts replaced by the Limited Warranty. and...

User Guide
Page 33
Contacting Kodak • For Information on Kodak Scanners: www.Kodak.com/go /disupport B-4 A-61602 February 2009 Service, Repair and Technical Assistance by Telephone: 5 a.m. Monday-Friday; (800) 822-1414 (excluding Kodak holidays) • For Technical Documentation and FAQ's available 24 hours a day: www.Kodak.com/go /docimaging • For U.S. to 5 p.m.
Contacting Kodak • For Information on Kodak Scanners: www.Kodak.com/go /disupport B-4 A-61602 February 2009 Service, Repair and Technical Assistance by Telephone: 5 a.m. Monday-Friday; (800) 822-1414 (excluding Kodak holidays) • For Technical Documentation and FAQ's available 24 hours a day: www.Kodak.com/go /docimaging • For U.S. to 5 p.m.


