
User Manual
Page 3
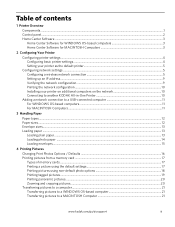
... a wireless network connection ...5 Setting up an IP address...9 Verifying the network configuration...9 Printing the network configuration ...10 Installing your printer on additional computers on the network 10 Connecting to another KODAK All-in-One Printer 10 Adding a network connection to a USB-connected computer 11 For WINDOWS OS-based computers...11 For MACINTOSH Computers ......cropping pictures...20 Transferring pictures to a computer...21 Transferring pictures to a WINDOWS OS-based computer 21 Transferring pictures to a MACINTOSH Computer 21 www.kodak.com/go/aiosupport iii
... a wireless network connection ...5 Setting up an IP address...9 Verifying the network configuration...9 Printing the network configuration ...10 Installing your printer on additional computers on the network 10 Connecting to another KODAK All-in-One Printer 10 Adding a network connection to a USB-connected computer 11 For WINDOWS OS-based computers...11 For MACINTOSH Computers ......cropping pictures...20 Transferring pictures to a computer...21 Transferring pictures to a WINDOWS OS-based computer 21 Transferring pictures to a MACINTOSH Computer 21 www.kodak.com/go/aiosupport iii

User Manual
Page 6
In addition, this printer supports networking, letting you print, copy, and scan pictures and documents. Components 1 2 34 56 7 Rotate Back Home MS SD/HC MMC 15 14 13 Rotate ... 11 10 9 1 Wi-Fi connectivity LED 2 Memory card slot 3 Control panel 4 LCD 5 USB port 6 Power cord connection port 7 Rear-access cleanout area 8 Printer access door 9 Printhead with ink cartridges installed 10 Right paper-edge guide 11 Paper tray 12 Paper tray extender / paper stop 13 Left paper-edge guide 14 Scanner glass...
In addition, this printer supports networking, letting you print, copy, and scan pictures and documents. Components 1 2 34 56 7 Rotate Back Home MS SD/HC MMC 15 14 13 Rotate ... 11 10 9 1 Wi-Fi connectivity LED 2 Memory card slot 3 Control panel 4 LCD 5 USB port 6 Power cord connection port 7 Rear-access cleanout area 8 Printer access door 9 Printhead with ink cartridges installed 10 Right paper-edge guide 11 Paper tray 12 Paper tray extender / paper stop 13 Left paper-edge guide 14 Scanner glass...
User Manual
Page 8
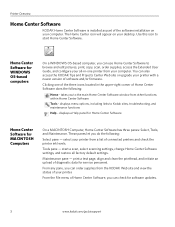
... icon will appear on your desktop. Clicking one of the three icons located in -one printer from the KODAK Web site and view the status of your printer. Printer Overview Home Center Software KODAK Home Center Software is installed as part of the software installation on your computer. Use this icon to Kodak sites, troubleshooting, and maintenance functions Help - From...
... icon will appear on your desktop. Clicking one of the three icons located in -one printer from the KODAK Web site and view the status of your printer. Printer Overview Home Center Software KODAK Home Center Software is installed as part of the software installation on your computer. Use this icon to Kodak sites, troubleshooting, and maintenance functions Help - From...
User Manual
Page 9
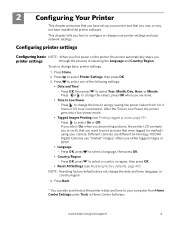
... one of selecting the Language and Country/Region. If you select On, when you are done. • Time to Low Power - www.kodak.com/go/aiosupport 4 Press to select a language, then press OK. • Country/Region - press OK when you printer ...printer's date and time to your network settings. Press to change the date and time, language, or country/region. 4. Press OK, press to select a country or region, then press OK. • Reset All Settings (see Printing tagged pictures, page 19) - 2 Configuring Your Printer This chapter presumes that you have installed the printer...
... one of selecting the Language and Country/Region. If you select On, when you are done. • Time to Low Power - www.kodak.com/go/aiosupport 4 Press to select a language, then press OK. • Country/Region - press OK when you printer ...printer's date and time to your network settings. Press to change the date and time, language, or country/region. 4. Press OK, press to select a country or region, then press OK. • Reset All Settings (see Printing tagged pictures, page 19) - 2 Configuring Your Printer This chapter presumes that you have installed the printer...
User Manual
Page 10
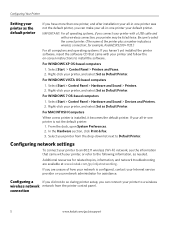
... than one printer, and after installation your all-in-one printer was not the default printer, you can connect your printer to Default Printer. For WINDOWS XP OS-based computers 1. Right-click your printer, and select Set as Default Printer. For WINDOWS 7 OS-based computers 1. If your network administrator for related topics, information, and network troubleshooting are available at www.kodak...
... than one printer, and after installation your all-in-one printer was not the default printer, you can connect your printer to Default Printer. For WINDOWS XP OS-based computers 1. Right-click your printer, and select Set as Default Printer. For WINDOWS 7 OS-based computers 1. If your network administrator for related topics, information, and network troubleshooting are available at www.kodak...

User Manual
Page 11
...One Printer Before you use the WiFi Setup Wizard on automatically when you connect to determine what is needed to connect your printer...Fi radio is successfully installed and communicating. Kodak recommends that uses Dynamic...printer searches for your network setup. For assistance, contact your Internet service provider or your network administrator. You can use a wireless access point/router that you connect You need: • A laptop or desktop computer equipped with a network interface card or wireless networking support. • A working 802.11 wireless network. KODAK ESP...
...One Printer Before you use the WiFi Setup Wizard on automatically when you connect to determine what is needed to connect your printer...Fi radio is successfully installed and communicating. Kodak recommends that uses Dynamic...printer searches for your network setup. For assistance, contact your Internet service provider or your network administrator. You can use a wireless access point/router that you connect You need: • A laptop or desktop computer equipped with a network interface card or wireless networking support. • A working 802.11 wireless network. KODAK ESP...
User Manual
Page 12
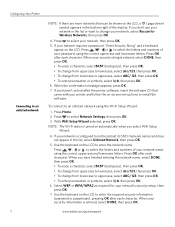
..., then press OK. 4. When your security information is turned on automatically when you haven't yet installed the printer software, insert the software CD that came with your printer and follow the on the LCD to select your security string is configured to uppercase, select ABC/... symbols, select !@#, then press OK. 6. Press Home. 2. Press , , or to select Network Settings, then press OK. 3. www.kodak.com/go/aiosupport Configuring Your Printer Connecting to uppercase, select ABC/123, then press OK. • To enter punctuation or symbols, select !@#, then press OK. 6. Press OK...
..., then press OK. 4. When your security information is turned on automatically when you haven't yet installed the printer software, insert the software CD that came with your printer and follow the on the LCD to select your security string is configured to uppercase, select ABC/... symbols, select !@#, then press OK. 6. Press Home. 2. Press , , or to select Network Settings, then press OK. 3. www.kodak.com/go/aiosupport Configuring Your Printer Connecting to uppercase, select ABC/123, then press OK. • To enter punctuation or symbols, select !@#, then press OK. 6. Press OK...
User Manual
Page 13
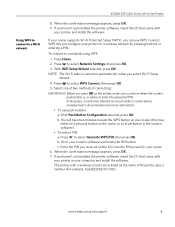
...button in the router's software). • To enter a PIN: a. If your router supports Wi-Fi Protected Setup (WPS), you haven't yet installed the printer software, insert the CD that came with a wireless connection is turned on the LCD into the PIN screen for example, KodakESP5200+1133). Press to a... then press OK. If necessary, consult your router's software and locate the PIN button. b. c. If you can use push buttons: a. KODAK ESP 5200 Series All-in-One Printer Using WPS to connect to enter the generated PIN. With Push Button Configuration selected, press OK.
...button in the router's software). • To enter a PIN: a. If your router supports Wi-Fi Protected Setup (WPS), you haven't yet installed the printer software, insert the CD that came with a wireless connection is turned on the LCD into the PIN screen for example, KodakESP5200+1133). Press to a... then press OK. If necessary, consult your router's software and locate the PIN button. b. c. If you can use push buttons: a. KODAK ESP 5200 Series All-in-One Printer Using WPS to connect to enter the generated PIN. With Push Button Configuration selected, press OK.
User Manual
Page 15
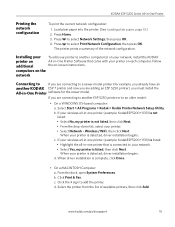
..., then click Next. d. b. d. Installing your To add your printer to another ESP 5250 printer or to a newer model printer (for the newer model. The printer prints a summary of available printers, then click Add. When your printer is complete, click Done. • On a MACINTOSH Computer: a. Press to another computer(s) on your network, install the KODAK printer on additional All-in -One Printer Printing the network...
..., then click Next. d. b. d. Installing your To add your printer to another ESP 5250 printer or to a newer model printer (for the newer model. The printer prints a summary of available printers, then click Add. When your printer is complete, click Done. • On a MACINTOSH Computer: a. Press to another computer(s) on your network, install the KODAK printer on additional All-in -One Printer Printing the network...
User Manual
Page 16
... to add the printer. 8. Highlight the all-in -one printer that is not listed: a. The printer with a wireless connection is listed: a. Disconnect the printer from USB to a wireless (Wi-Fi) network: 1. Press to select Network Settings, then press OK. 4. c. Select Start > All Programs > Kodak > Kodak Printer Network Setup Utility. 7. b. The printer with a wireless connection is detected, driver installation begins. 9. For...
... to add the printer. 8. Highlight the all-in -one printer that is not listed: a. The printer with a wireless connection is listed: a. Disconnect the printer from USB to a wireless (Wi-Fi) network: 1. Press to select Network Settings, then press OK. 4. c. Select Start > All Programs > Kodak > Kodak Printer Network Setup Utility. 7. b. The printer with a wireless connection is detected, driver installation begins. 9. For...
User Manual
Page 46
... such as paper jams and image quality. • www.kodak.com/go /itg to use our Step-by power cycling the printer: Turn off your access point is plugged in and turned on. • If you are installed correctly when you hear them click into an outlet or power... strip. • If the USB 2.0 cable was disconnected from the printer, then reconnected, or if power to www.kodak.com/go /inkjetnetworking. that the printhead and ink cartridges are installed correctly. (The printhead and ink cartridges are using the power cord that came with wireless networking...
... such as paper jams and image quality. • www.kodak.com/go /itg to use our Step-by power cycling the printer: Turn off your access point is plugged in and turned on. • If you are installed correctly when you hear them click into an outlet or power... strip. • If the USB 2.0 cable was disconnected from the printer, then reconnected, or if power to www.kodak.com/go /inkjetnetworking. that the printhead and ink cartridges are installed correctly. (The printhead and ink cartridges are using the power cord that came with wireless networking...
User Manual
Page 47
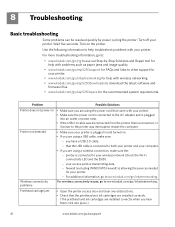
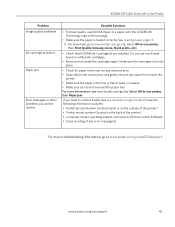
.... • Make sure you do not overload the paper tray. KODAK ESP 5200 Series All-in-One Printer Problem Image quality problems Ink cartridge problems Paper jam Error messages or other problems you cannot resolve Possible Solutions • For best results, use non-Kodak brand or refilled ink cartridges. • Remove, then install the cartridges again.
.... • Make sure you do not overload the paper tray. KODAK ESP 5200 Series All-in-One Printer Problem Image quality problems Ink cartridge problems Paper jam Error messages or other problems you cannot resolve Possible Solutions • For best results, use non-Kodak brand or refilled ink cartridges. • Remove, then install the cartridges again.
User Manual
Page 56
...operation. If this product. The radiated energy from that interference will not occur in a particular installation. In order to avoid the possibility of the FCC Rules. Operation is subject to the ...and (2) this device must accept any changes or modifications to this product not expressly approved by one or more of the following measures: • Reorient or relocate the receiving antenna. •...technical specifications. This Class B digital apparatus complies with Canadian ICES-003. 51 www.kodak.com/go/aiosupport CAUTION: Pursuant to Part 15.21 of the device. Product and...
...operation. If this product. The radiated energy from that interference will not occur in a particular installation. In order to avoid the possibility of the FCC Rules. Operation is subject to the ...and (2) this device must accept any changes or modifications to this product not expressly approved by one or more of the following measures: • Reorient or relocate the receiving antenna. •...technical specifications. This Class B digital apparatus complies with Canadian ICES-003. 51 www.kodak.com/go/aiosupport CAUTION: Pursuant to Part 15.21 of the device. Product and...

User Manual
Page 57
...One Printer Industry Canada (IC) Radiation Exposure Statement This equipment complies with IC radiation exposure limits set forth for information about the presence of Regulation (EC) No. 1907/2006 (REACH). "Das Gerät ist nicht für die Benutzung am Bildschirmarbeitsplatz gemäß BildscharbV vorgesehen." Contact your person. www.kodak....com/go /REACH for an uncontrolled environment. This equipment should be installed and operated...kodak.com/go to article 59(1) of substances included on the ENERGY STAR program, see www.energystar.gov. KODAK ESP...
...One Printer Industry Canada (IC) Radiation Exposure Statement This equipment complies with IC radiation exposure limits set forth for information about the presence of Regulation (EC) No. 1907/2006 (REACH). "Das Gerät ist nicht für die Benutzung am Bildschirmarbeitsplatz gemäß BildscharbV vorgesehen." Contact your person. www.kodak....com/go /REACH for an uncontrolled environment. This equipment should be installed and operated...kodak.com/go to article 59(1) of substances included on the ENERGY STAR program, see www.energystar.gov. KODAK ESP...
User Manual
Page 60
See Zooming and cropping pictures D Darkening copies, 26 Date and time setting, 4 synchronizing to another KODAK All-in-One Printer, 10 Control panel, 1, 2 Copies adjusting settings, 25 changing document options, 22 changing photo options, 24... on network, installing printer on LCD, using, 7 KODAK Home Center Software. See Home Center Software L Label sizes, 49 Language, setting, 4 55 www.kodak.com/go/aiosupport See Replacing ink cartridges Cleaning the printer, 29 Components, printer, 1 Configuring your printer, 4 basic printer settings, 4 setting printer as the default printer, 5 wireless ...
See Zooming and cropping pictures D Darkening copies, 26 Date and time setting, 4 synchronizing to another KODAK All-in-One Printer, 10 Control panel, 1, 2 Copies adjusting settings, 25 changing document options, 22 changing photo options, 24... on network, installing printer on LCD, using, 7 KODAK Home Center Software. See Home Center Software L Label sizes, 49 Language, setting, 4 55 www.kodak.com/go/aiosupport See Replacing ink cartridges Cleaning the printer, 29 Components, printer, 1 Configuring your printer, 4 basic printer settings, 4 setting printer as the default printer, 5 wireless ...
User Manual
Page 61
KODAK ESP 5200 Series All-in Home Center Software, 27 multiple pictures simultaneously, 28 Service agreements, 29 Settings basic printer, 4 wireless network, 5 www.kodak.com/go/aiosupport 56 See Tagged images Media supported, 48 Memory card slot, 1 Memory cards printing pictures from, 17 types compatible with printer, 17 Monitoring printer...installed, 1 Printing panoramic photos, 20 tagged image photos, 19 Protecting the printer, 29 R Rear-access cleanout area, 1 Recycling printer... glass, 1 lid, 1 Scanning, 27 changing settings in -One printer LCD, 1, 2 LED, Wi-Fi connectivity, 1 Left paper...
KODAK ESP 5200 Series All-in Home Center Software, 27 multiple pictures simultaneously, 28 Service agreements, 29 Settings basic printer, 4 wireless network, 5 www.kodak.com/go/aiosupport 56 See Tagged images Media supported, 48 Memory card slot, 1 Memory cards printing pictures from, 17 types compatible with printer, 17 Monitoring printer...installed, 1 Printing panoramic photos, 20 tagged image photos, 19 Protecting the printer, 29 R Rear-access cleanout area, 1 Recycling printer... glass, 1 lid, 1 Scanning, 27 changing settings in -One printer LCD, 1, 2 LED, Wi-Fi connectivity, 1 Left paper...
User Manual
Page 3
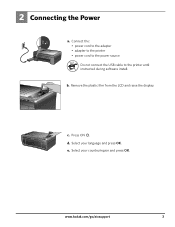
Rotate Back Home MS SD/HC MMC c. Select your country/region and press OK. Select your language and press OK. www.kodak.com/go/aiosupport 3 d. 2 Connecting the Power Rotate Back Home MS SD/HC MMC a. e. Remove the plastic film from the LCD and raise the display. b. Press ON . Connect the: • power cord to the adapter • adapter to the printer • power cord to the power source USB Do not connect the USB cable to the printer until instructed during software install.
Rotate Back Home MS SD/HC MMC c. Select your country/region and press OK. Select your language and press OK. www.kodak.com/go/aiosupport 3 d. 2 Connecting the Power Rotate Back Home MS SD/HC MMC a. e. Remove the plastic film from the LCD and raise the display. b. Press ON . Connect the: • power cord to the adapter • adapter to the printer • power cord to the power source USB Do not connect the USB cable to the printer until instructed during software install.
User Manual
Page 7
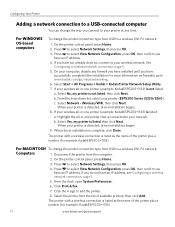
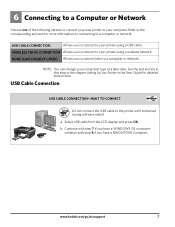
... 7 if you have a MACINTOSH Computer. USB CABLE CONNECTION Allows you to connect to your printer using a wireless network. NOTE: You can change your computer. a. Select USB cable from ...to a computer or network. Back Home b. www.kodak.com/go/aiosupport 7 WIRELESS (Wi-Fi) CONNECTION Allows you to connect to your printer using a USB cable. Refer to the corresponding sections...a computer or network. 6 Connecting to a Computer or Network Choose one of the following options to connect your new printer to your connection type at a later date. See the last section...
... 7 if you have a MACINTOSH Computer. USB CABLE CONNECTION Allows you to connect to your printer using a wireless network. NOTE: You can change your computer. a. Select USB cable from ...to a computer or network. Back Home b. www.kodak.com/go/aiosupport 7 WIRELESS (Wi-Fi) CONNECTION Allows you to connect to your printer using a USB cable. Refer to the corresponding sections...a computer or network. 6 Connecting to a Computer or Network Choose one of the following options to connect your new printer to your connection type at a later date. See the last section...
User Manual
Page 10
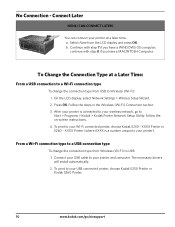
... Continue with step 8 if you have a MACINTOSH Computer. Follow the on-screen instructions. 4. To print to your Wi-Fi connected printer, choose Kodak 5250 - continue with step 7 if you have a WINDOWS OS computer; Follow the steps in the Wireless (Wi-Fi) Connection section. ... USB connected printer, choose Kodak 5250 Printer or Kodak 5260 Printer. 10 www.kodak.com/go to USB: 1. a. No Connection - Select None from the LCD display and press OK. Press OK. XXXX Printer (where XXXX is connected to Wireless (Wi-Fi): 1. The necessary drivers will install automatically. 2....
... Continue with step 8 if you have a MACINTOSH Computer. Follow the on-screen instructions. 4. To print to your Wi-Fi connected printer, choose Kodak 5250 - continue with step 7 if you have a WINDOWS OS computer; Follow the steps in the Wireless (Wi-Fi) Connection section. ... USB connected printer, choose Kodak 5250 Printer or Kodak 5260 Printer. 10 www.kodak.com/go to USB: 1. a. No Connection - Select None from the LCD display and press OK. Press OK. XXXX Printer (where XXXX is connected to Wireless (Wi-Fi): 1. The necessary drivers will install automatically. 2....

User Manual
Page 11
... have a CD drive, go to www.kodak.com/go /inkjetnetworking. Load the KODAK All-in -One Printer Software on the printer and to your KODAK All-in -One Printer from your firewall during software installation, be sure to download the software. www.kodak.com/go to follow the on your network, install the KODAK All-in -One Printer Software CD into the CD drive...
... have a CD drive, go to www.kodak.com/go /inkjetnetworking. Load the KODAK All-in -One Printer Software on the printer and to your KODAK All-in -One Printer from your firewall during software installation, be sure to download the software. www.kodak.com/go to follow the on your network, install the KODAK All-in -One Printer Software CD into the CD drive...


