Setup Booklet
Page 2
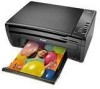
... tape and any foam pieces from the outside of the printer. 2 www.kodak.com/go/aiosupport Printer access door. b) Lift the printer access door. Carriage. Scanner lid. 1 Unpacking the Printer Power Cord and Adapter Printhead 10 Color Ink Cartridge Ink Cartridges Inkjet Printer Software FOR WINDOWS & MACINTOSH Software and User Guide CD USB Do...
... tape and any foam pieces from the outside of the printer. 2 www.kodak.com/go/aiosupport Printer access door. b) Lift the printer access door. Carriage. Scanner lid. 1 Unpacking the Printer Power Cord and Adapter Printhead 10 Color Ink Cartridge Ink Cartridges Inkjet Printer Software FOR WINDOWS & MACINTOSH Software and User Guide CD USB Do...

Setup Booklet
Page 3
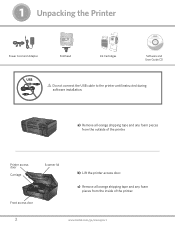
The printhead is fragile, handle carefully. c) Pull on the orange tab to remove the protective retainer. Insert the printhead immediately upon opening sealed bag. 2 Inserting the Printhead a) Lift the printer access door. 10 10 Color Ink Cartridge 10 Black Ink Cartridge Black Ink Cartridge b) Remove the printhead from its bag. www.kodak.com/go/aiosupport 3
The printhead is fragile, handle carefully. c) Pull on the orange tab to remove the protective retainer. Insert the printhead immediately upon opening sealed bag. 2 Inserting the Printhead a) Lift the printer access door. 10 10 Color Ink Cartridge 10 Black Ink Cartridge Black Ink Cartridge b) Remove the printhead from its bag. www.kodak.com/go/aiosupport 3
Setup Booklet
Page 4
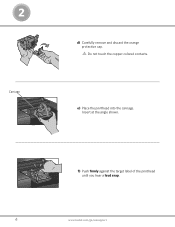
e) Place the printhead into the carriage. f) Push firmly against the target label of the printhead until you hear a loud snap. 4 www.kodak.com/go/aiosupport Insert at the angle shown. d) Carefully remove and discard the orange protective cap. 2 Carriage. Do not touch the copper-colored contacts.
e) Place the printhead into the carriage. f) Push firmly against the target label of the printhead until you hear a loud snap. 4 www.kodak.com/go/aiosupport Insert at the angle shown. d) Carefully remove and discard the orange protective cap. 2 Carriage. Do not touch the copper-colored contacts.
Setup Booklet
Page 5
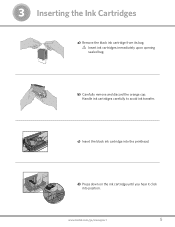
3 Inserting the Ink Cartridges a) Remove the black ink cartridge from its bag. Insert ink cartridges immediately upon opening sealed bag. 10 Black Ink Cartridge 10 b) Carefully remove and discard the orange cap. www.kodak.com/go/aiosupport 5 Handle ink cartridges carefully to avoid ink transfer. 10 Black Ink Cartridge c) Insert the black ink cartridge into position. Cartouche d'encre noire 10 10 d) Press down on the ink cartridge until you hear it click into the printhead.
3 Inserting the Ink Cartridges a) Remove the black ink cartridge from its bag. Insert ink cartridges immediately upon opening sealed bag. 10 Black Ink Cartridge 10 b) Carefully remove and discard the orange cap. www.kodak.com/go/aiosupport 5 Handle ink cartridges carefully to avoid ink transfer. 10 Black Ink Cartridge c) Insert the black ink cartridge into position. Cartouche d'encre noire 10 10 d) Press down on the ink cartridge until you hear it click into the printhead.

Setup Booklet
Page 6
g) Close the printer access door. 10 10 Color Ink Cartridge 10 Color Ink Cartridge 10 Black Ink Cartridge Black Ink Cartridge 6 www.kodak.com/go/aiosupport Insert it click into the printhead. Cartouche d'encre noire 10 10 Cartouche d'encre couleur f) Press down firmly on the ink cartridge until you hear it into position. 3 Cartouche d'encre noire Cartouche d'encre couleur 10 10 e) Open and uncap the color ink cartridge.
g) Close the printer access door. 10 10 Color Ink Cartridge 10 Color Ink Cartridge 10 Black Ink Cartridge Black Ink Cartridge 6 www.kodak.com/go/aiosupport Insert it click into the printhead. Cartouche d'encre noire 10 10 Cartouche d'encre couleur f) Press down firmly on the ink cartridge until you hear it into position. 3 Cartouche d'encre noire Cartouche d'encre couleur 10 10 e) Open and uncap the color ink cartridge.
Setup Booklet
Page 7
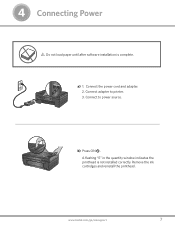
Connect to printer. 3. Connect adapter to power source. Remove the ink cartridges and reinstall the printhead. 4 Connecting Power Do not load paper until after software installation is not installed correctly. A flashing "E" in the quantity window indicates the printhead is complete. www.kodak.com/go/aiosupport 7 Connect the power cord and adapter. 2. b) Press ON . a) 1.
Connect to printer. 3. Connect adapter to power source. Remove the ink cartridges and reinstall the printhead. 4 Connecting Power Do not load paper until after software installation is not installed correctly. A flashing "E" in the quantity window indicates the printhead is complete. www.kodak.com/go/aiosupport 7 Connect the power cord and adapter. 2. b) Press ON . a) 1.
User guide
Page 4
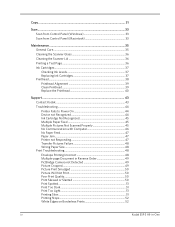
... the Scanner Lid 36 Printing a Test Page 36 Ink Cartridges ...37 Checking Ink Levels 37 Replacing Ink Cartridges 37 Printhead...38 Printhead Alignment 39 Clean Printhead 39 Replace the Printhead 40 Support ...43 Contact Kodak...43 Troubleshooting 44 Printer Fails to Power On 44 Device not Recognized 44 Ink Cartridge Not Recognized 45 Multiple Paper... 50 Print Spotted 51 Print Too Dark 51 Print Too Light 51 Printing Slow 51 Printing Stops 52 White Edges on Borderless Prints 52 iv Kodak ESP·3 All-in-One
... the Scanner Lid 36 Printing a Test Page 36 Ink Cartridges ...37 Checking Ink Levels 37 Replacing Ink Cartridges 37 Printhead...38 Printhead Alignment 39 Clean Printhead 39 Replace the Printhead 40 Support ...43 Contact Kodak...43 Troubleshooting 44 Printer Fails to Power On 44 Device not Recognized 44 Ink Cartridge Not Recognized 45 Multiple Paper... 50 Print Spotted 51 Print Too Dark 51 Print Too Light 51 Printing Slow 51 Printing Stops 52 White Edges on Borderless Prints 52 iv Kodak ESP·3 All-in-One
User guide
Page 10
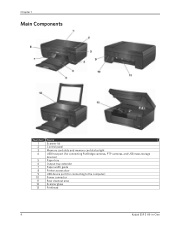
Chapter 1 Main Components Number 1 2 3 4 5 6 7 8 9 10 11 12 13 Name Scanner lid Control panel Memory card slots and memory card status light USB host port (for connecting PictBridge cameras, PTP cameras, and USB mass storage devices) Paper tray Output tray extender Paper width guide Printer access door USB device port (for connecting to the computer) Power connector Rear cleanout area Scanner glass Printhead 4 Kodak ESP 3 All-in-One
Chapter 1 Main Components Number 1 2 3 4 5 6 7 8 9 10 11 12 13 Name Scanner lid Control panel Memory card slots and memory card status light USB host port (for connecting PictBridge cameras, PTP cameras, and USB mass storage devices) Paper tray Output tray extender Paper width guide Printer access door USB device port (for connecting to the computer) Power connector Rear cleanout area Scanner glass Printhead 4 Kodak ESP 3 All-in-One
User guide
Page 14
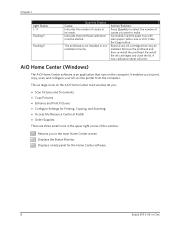
... for the Home Center software 8 Kodak ESP 3 All-in -One printer from the computer. AiO Home Center (Windows) The AiO Home Center software is not installed or not installed correctly. The six large icons on the computer. Remove any ink cartridges that printhead calibration must be started. Action/Solution... of copies you to print, copy, scan, and configure your All-in -One As needed, load the paper tray with plain paper (Letter-size or A4). Remove the printhead and then re-install the printhead. A new calibration sheet will print. Press the Copy button. It enables you...
... for the Home Center software 8 Kodak ESP 3 All-in -One printer from the computer. AiO Home Center (Windows) The AiO Home Center software is not installed or not installed correctly. The six large icons on the computer. Remove any ink cartridges that printhead calibration must be started. Action/Solution... of copies you to print, copy, scan, and configure your All-in -One As needed, load the paper tray with plain paper (Letter-size or A4). Remove the printhead and then re-install the printhead. A new calibration sheet will print. Press the Copy button. It enables you...

User guide
Page 15
...connected printers where you can select another printer. After installation, you to configure your All-in-One printer from the System Preference's Print & Fax pane by selecting your Kodak All-in the Printer List, clicking the Print Queue button, and then clicking the Utility icon.... online. It enables you to a Kodak web site where you : • Configure Settings • Print a Test Page • Align the Printhead • Run a Nozzle Health Check • Clean the Printhead Select: Provides a list of your Kodak All-in-One printer in -One printer. The Setup and Maintenance tabs ...
...connected printers where you can select another printer. After installation, you to configure your All-in-One printer from the System Preference's Print & Fax pane by selecting your Kodak All-in the Printer List, clicking the Print Queue button, and then clicking the Utility icon.... online. It enables you to a Kodak web site where you : • Configure Settings • Print a Test Page • Align the Printhead • Run a Nozzle Health Check • Clean the Printhead Select: Provides a list of your Kodak All-in-One printer in -One printer. The Setup and Maintenance tabs ...
User guide
Page 43
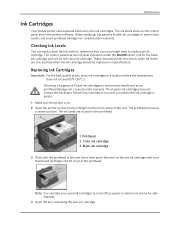
... from the front center of the printhead. Checking Ink Levels You can take your thumb and forefinger and lift it out of the unit. The control panel has two ink level indicators under the On/Off button, one for the black ink cartridge and one for safe disposal. 4 Open the...old ink cartridge with your used ink cartridges to ensure best results and avoid printhead damage not covered under warranty. When replacing, use genuine Kodak ink cartridges to most office supply or electronics stores for the color ink cartridge. Third-party ink cartridges may not contain the necessary Smart Chip ...
... from the front center of the printhead. Checking Ink Levels You can take your thumb and forefinger and lift it out of the unit. The control panel has two ink level indicators under the On/Off button, one for the black ink cartridge and one for safe disposal. 4 Open the...old ink cartridge with your used ink cartridges to ensure best results and avoid printhead damage not covered under warranty. When replacing, use genuine Kodak ink cartridges to most office supply or electronics stores for the color ink cartridge. Third-party ink cartridges may not contain the necessary Smart Chip ...
User guide
Page 44
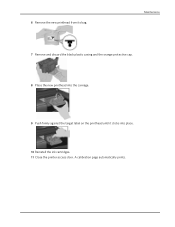
...the ink cartridge. Important Insert the ink cartridge immediately to its ready position. Discard the orange cap. 7 Insert the ink cartridge into the printhead. 8 Press down on the tab until you hear a click and feel the latch snap into position. 9 Close the printer access door. The... printhead moves to prevent any drying of the ink. 6 Remove the orange cap from the cartridge by grasping the top edge and pulling/rotating it off the ink cartridge. Chapter 7 5 Remove the bagged ink cartridge from the ink cartridges onto the paper. 38 Kodak ESP 3 All-in-One
...the ink cartridge. Important Insert the ink cartridge immediately to its ready position. Discard the orange cap. 7 Insert the ink cartridge into the printhead. 8 Press down on the tab until you hear a click and feel the latch snap into position. 9 Close the printer access door. The... printhead moves to prevent any drying of the ink. 6 Remove the orange cap from the cartridge by grasping the top edge and pulling/rotating it off the ink cartridge. Chapter 7 5 Remove the bagged ink cartridge from the ink cartridges onto the paper. 38 Kodak ESP 3 All-in-One
User guide
Page 45
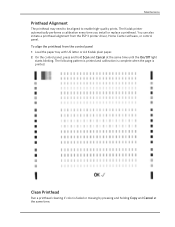
Clean Printhead Run a printhead cleaning if color is printed. The Kodak printer automatically performs a calibration every time you install or replace a printhead. You can also initiate a printhead alignment from the control panel 1 Load the paper tray with US letter or A4 Kodak plain paper. 2 On the control panel, press ... and Cancel at the same time until the On/Off light starts blinking. To align the printhead from the ESP 3 printer driver, Home Center software, or control panel. Maintenance Printhead Alignment The printhead may need to be aligned to enable high-quality prints.
Clean Printhead Run a printhead cleaning if color is printed. The Kodak printer automatically performs a calibration every time you install or replace a printhead. You can also initiate a printhead alignment from the control panel 1 Load the paper tray with US letter or A4 Kodak plain paper. 2 On the control panel, press ... and Cancel at the same time until the On/Off light starts blinking. To align the printhead from the ESP 3 printer driver, Home Center software, or control panel. Maintenance Printhead Alignment The printhead may need to be aligned to enable high-quality prints.
User guide
Page 46
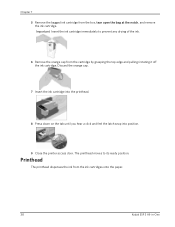
Remove both ink cartridges. 4 Unlatch the printhead by pressing by pressing the release button on the ink cartridge with your printhead is damaged or broken it out of the carriage. 5 Remove the old printhead from the carriage. 40 Kodak ESP 3 All-in -One printer is on. 2 Open the printer access door. 3 Pinch the latch on the top center of the print head. Chapter 7 Replace the Printhead If your thumb and forefinger and lift it is easy to replace yourself. 1 Make sure the Kodak ESP 3 All-in -One
Remove both ink cartridges. 4 Unlatch the printhead by pressing by pressing the release button on the ink cartridge with your printhead is damaged or broken it out of the carriage. 5 Remove the old printhead from the carriage. 40 Kodak ESP 3 All-in -One printer is on. 2 Open the printer access door. 3 Pinch the latch on the top center of the print head. Chapter 7 Replace the Printhead If your thumb and forefinger and lift it is easy to replace yourself. 1 Make sure the Kodak ESP 3 All-in -One
User guide
Page 47
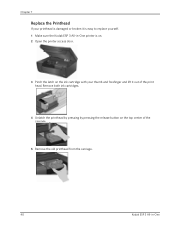
A calibration page automatically prints. 6 Remove the new printhead from its bag. Maintenance 7 Remove and discard the black plastic casing and the orange protective cap. 8 Place the new printhead into the carriage. 9 Push firmly against the target label on the printhead until it clicks into place. 10 Reinstall the ink cartridges. 11 Close the printer access door.
A calibration page automatically prints. 6 Remove the new printhead from its bag. Maintenance 7 Remove and discard the black plastic casing and the orange protective cap. 8 Place the new printhead into the carriage. 9 Push firmly against the target label on the printhead until it clicks into place. 10 Reinstall the ink cartridges. 11 Close the printer access door.
User guide
Page 56
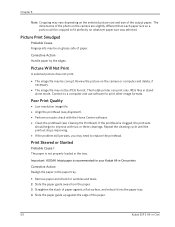
...Center software. • Clean the printhead (see Alignment). • Perform a nozzle check with two or three cleanings. The Kodak printer can print only JPEG files in -One printer. Important KODAK Inkjet paper is clogged, the printouts should begin to replace the printhead. Picture Print Smudged Probable Cause ... the printhead is recommended for wrinkles and tears. 2 Slide the paper guide away from the paper. 3 Straighten the stack of paper against a flat surface, and reload it into the paper tray. 4 Slide the paper guide up against the edge of the paper. 50 Kodak ESP 3 ...
...Center software. • Clean the printhead (see Alignment). • Perform a nozzle check with two or three cleanings. The Kodak printer can print only JPEG files in -One printer. Important KODAK Inkjet paper is clogged, the printouts should begin to replace the printhead. Picture Print Smudged Probable Cause ... the printhead is recommended for wrinkles and tears. 2 Slide the paper guide away from the paper. 3 Straighten the stack of paper against a flat surface, and reload it into the paper tray. 4 Slide the paper guide up against the edge of the paper. 50 Kodak ESP 3 ...
User guide
Page 57
... large number of the camera. For excessive dirt or debris, thoroughly clean the paper tray, and load new paper. Refer to prevent the printhead from collecting on your computer. Reload if necessary. • Try taking the picture again. Print Too Dark • Try retaking the picture...• Edit the picture using Kodak Home Center or Kodak EasyShare software on , or move within the flash range of prints, printing may be dirty. Refer to your camera user's guide for your camera user's guide for details. Corrective Action Load only one type of paper. Support Probable Cause...
... large number of the camera. For excessive dirt or debris, thoroughly clean the paper tray, and load new paper. Refer to prevent the printhead from collecting on your computer. Reload if necessary. • Try taking the picture again. Print Too Dark • Try retaking the picture...• Edit the picture using Kodak Home Center or Kodak EasyShare software on , or move within the flash range of prints, printing may be dirty. Refer to your camera user's guide for your camera user's guide for details. Corrective Action Load only one type of paper. Support Probable Cause...
User guide
Page 63
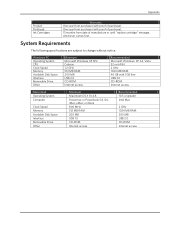
One year from purchase (with proof of purchase). 13 months from purchase (with 1 GB free USB 2.0 CD-ROM Internet access Macintosh Operating System Computer Clock Speed ... or until "replace cartridge" message, whichever comes first. eMac; iMac; System Requirements The following specifications are subject to change without notice. Appendix Product Printhead Ink Cartridges Warranty One year from date of purchase). or iBook 800 MHz 512 MB RAM 200 MB USB 1.0 CD-ROM Internet access Recommended 10.5 or greater Intel...
One year from purchase (with proof of purchase). 13 months from purchase (with 1 GB free USB 2.0 CD-ROM Internet access Macintosh Operating System Computer Clock Speed ... or until "replace cartridge" message, whichever comes first. eMac; iMac; System Requirements The following specifications are subject to change without notice. Appendix Product Printhead Ink Cartridges Warranty One year from date of purchase). or iBook 800 MHz 512 MB RAM 200 MB USB 1.0 CD-ROM Internet access Recommended 10.5 or greater Intel...


