
Reference Manual
Page 1
Reference Manual KODAK DP900 / DP1100 Digital Projectors with KODAK Image Manager PN 010-0210-00 8/99
Reference Manual KODAK DP900 / DP1100 Digital Projectors with KODAK Image Manager PN 010-0210-00 8/99

Reference Manual
Page 2
...may be required to correct the interference at his own expense. Operation of the FCC Rules. Canada This Class A digital apparatus complies with the instruction manual, may cause radio interference, in which case the user will be required to ...environment. These limits are designed to take adequate measures. Declaration of Conformity Manufacturer: Eastman Kodak Company Rochester, New York 14650 USA We declare under our sole responsibility that the KODAK DP900/1100 Digital Projector conforms to radio communications. Safety Certifications UL, CUL, TÜV, NOM EN 55022 ...
...may be required to correct the interference at his own expense. Operation of the FCC Rules. Canada This Class A digital apparatus complies with the instruction manual, may cause radio interference, in which case the user will be required to ...environment. These limits are designed to take adequate measures. Declaration of Conformity Manufacturer: Eastman Kodak Company Rochester, New York 14650 USA We declare under our sole responsibility that the KODAK DP900/1100 Digital Projector conforms to radio communications. Safety Certifications UL, CUL, TÜV, NOM EN 55022 ...

Reference Manual
Page 4
Reference Manual KODAK DP900 / DP1100 Basic Image Adjustment 25 Using the Remote Control 26 Adjusting the Projector 28 Using the Keypad and Remote Buttons 29 Using the On-Screen Menus 31 Kodak Menu 42 Maintenance & Troubleshooting 45 Cleaning the Lens 45 Replacing the Projection Lamp 46 Replacing the Batteries in the Remote Control 49 Using the...
Reference Manual KODAK DP900 / DP1100 Basic Image Adjustment 25 Using the Remote Control 26 Adjusting the Projector 28 Using the Keypad and Remote Buttons 29 Using the On-Screen Menus 31 Kodak Menu 42 Maintenance & Troubleshooting 45 Cleaning the Lens 45 Replacing the Projection Lamp 46 Replacing the Batteries in the Remote Control 49 Using the...

Reference Manual
Page 6
...8226; Warning: Refer all instructions provided with it. • Caution: The projector lamp bulb is turned on a hot surface or in direct sunlight. • Caution: Do not drop the projector. Reference Manual KODAK DP900 / DP1100 Safety Terms: • Warning: Don't look directly into the lens when... the projector is pressurized and may damage your own projector will void the warranty. Connect the power cord to ...
...8226; Warning: Refer all instructions provided with it. • Caution: The projector lamp bulb is turned on a hot surface or in direct sunlight. • Caution: Do not drop the projector. Reference Manual KODAK DP900 / DP1100 Safety Terms: • Warning: Don't look directly into the lens when... the projector is pressurized and may damage your own projector will void the warranty. Connect the power cord to ...
Reference Manual
Page 7
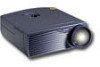
Introduction The KODAK DP900 /DP1100 Digital Projectors are easy to connect, easy to use, and easy to maintain. The soft carry case makes it to a lower resolution before you can display these images at 640x480 by turning off the Auto Resize feature. The DP900 has SVGA 800x600 graphics, the DP1100 has XGA 1024x768 graphics. The DP900 cannot compress screen...
Introduction The KODAK DP900 /DP1100 Digital Projectors are easy to connect, easy to use, and easy to maintain. The soft carry case makes it to a lower resolution before you can display these images at 640x480 by turning off the Auto Resize feature. The DP900 has SVGA 800x600 graphics, the DP1100 has XGA 1024x768 graphics. The DP900 cannot compress screen...

Reference Manual
Page 8
... a lower resolution before you connect the projector. If your computer's screen resolution is compatible with a wide variety of the DP1100's projected image is 1024x768. You can display these images at 75 Hz. • Most standard VCRs, DVD players, camcorders and laser disc players. 4 3/99 Reference Manual KODAK DP900 / DP1100 DP1100 The XGA resolution of computers and...
... a lower resolution before you connect the projector. If your computer's screen resolution is compatible with a wide variety of the DP1100's projected image is 1024x768. You can display these images at 75 Hz. • Most standard VCRs, DVD players, camcorders and laser disc players. 4 3/99 Reference Manual KODAK DP900 / DP1100 DP1100 The XGA resolution of computers and...

Reference Manual
Page 9
... control 4. Power cord 5. Audio cable 9. RCA audio/video cable 7. PS/2 mouse cable 10. Digital projector and lens cap 2. DP900 / DP1100 User's Guide, Reference Manual, and Online User Guide CD 6. MAC adapter 3/99 5 Contact your shipping box... may vary depending on the projector configuration you've ordered. 2 1 4 5 3 6 7 8 9 11 10 Figure 1 Shipping box contents 1. Cable connector hub 8. USB mouse cable 11. Note: The contents of your Kodak...
... control 4. Power cord 5. Audio cable 9. RCA audio/video cable 7. PS/2 mouse cable 10. Digital projector and lens cap 2. DP900 / DP1100 User's Guide, Reference Manual, and Online User Guide CD 6. MAC adapter 3/99 5 Contact your shipping box... may vary depending on the projector configuration you've ordered. 2 1 4 5 3 6 7 8 9 11 10 Figure 1 Shipping box contents 1. Cable connector hub 8. USB mouse cable 11. Note: The contents of your Kodak...

Reference Manual
Page 10
Reference Manual KODAK DP900 / DP1100 Projector Features Front of Projector focus ring zoom ring elevator button Rear and Side of Projector keypad front of projector connector panel elevator button power cord connector power switch Connector Panel speaker s-video composite connector computer L/R audio in (for video source) cable hub connector audio in 6 3/99
Reference Manual KODAK DP900 / DP1100 Projector Features Front of Projector focus ring zoom ring elevator button Rear and Side of Projector keypad front of projector connector panel elevator button power cord connector power switch Connector Panel speaker s-video composite connector computer L/R audio in (for video source) cable hub connector audio in 6 3/99
Reference Manual
Page 12
Reference Manual KODAK DP900 / DP1100 If You Need Assistance The first place to look for help is in "Troubleshooting" on Service and Support) (keyword) KODAK CompuServe GO KODAK Kodak Internet List Server photo-cd@info.kodak.com; or ftp.kodak.com Faxed Information Kodak offers automated support by fax: U.S. and Canada 1-800-508-1531 Europe 44-0-131-458-6962 U.K. 44-0-131-458-6962 8 3/99 Online Services Contact Kodak via: World Wide Web America Online http://www.kodak.com (click on page 50.
Reference Manual KODAK DP900 / DP1100 If You Need Assistance The first place to look for help is in "Troubleshooting" on Service and Support) (keyword) KODAK CompuServe GO KODAK Kodak Internet List Server photo-cd@info.kodak.com; or ftp.kodak.com Faxed Information Kodak offers automated support by fax: U.S. and Canada 1-800-508-1531 Europe 44-0-131-458-6962 U.K. 44-0-131-458-6962 8 3/99 Online Services Contact Kodak via: World Wide Web America Online http://www.kodak.com (click on page 50.

Reference Manual
Page 14
A longer term warranty can be purchased from your Kodak dealer. 10 3/99 The details of the warranty are printed at the back of this manual. Reference Manual KODAK DP900 / DP1100 Warranty This product is backed by a limited two-year warranty.
A longer term warranty can be purchased from your Kodak dealer. 10 3/99 The details of the warranty are printed at the back of this manual. Reference Manual KODAK DP900 / DP1100 Warranty This product is backed by a limited two-year warranty.

Reference Manual
Page 18
... connecting an older MACINTOSH computer that does not have a 15-pin connector, you must use the MAC adaptor between it and the projector is 10 feet or less. Equipment you want to connect Page Laptop computer with cable hub page 15 Desktop computer with cable hub... pages listed here.. Video players are turned off. If you're connecting a computer, make sure the projector and your equipment. Reference Manual KODAK DP900 / DP1100 Preparing to Connect Your Equipment to the Projector Note: Before you continue, make sure the distance between the computer and the cable hub. 14 3/99...
... connecting an older MACINTOSH computer that does not have a 15-pin connector, you must use the MAC adaptor between it and the projector is 10 feet or less. Equipment you want to connect Page Laptop computer with cable hub page 15 Desktop computer with cable hub... pages listed here.. Video players are turned off. If you're connecting a computer, make sure the projector and your equipment. Reference Manual KODAK DP900 / DP1100 Preparing to Connect Your Equipment to the Projector Note: Before you continue, make sure the distance between the computer and the cable hub. 14 3/99...

Reference Manual
Page 20
Windows 98 ships with Windows 98 only. 1. Skip to "Starting the Projector" on the cable hub. Reference Manual KODAK DP900 / DP1100 audio cable mouse cable Figure 6 Connecting audio and mouse cables to a laptop computer If your computer has a USB connector and is running Windows 98, use ... of the mouse cable into the connector on page 22. 16 3/99 A PS-2 mouse is hot-pluggable, meaning you 're ready to power up the projector and your computer to re-boot your computer. 2.
Windows 98 ships with Windows 98 only. 1. Skip to "Starting the Projector" on the cable hub. Reference Manual KODAK DP900 / DP1100 audio cable mouse cable Figure 6 Connecting audio and mouse cables to a laptop computer If your computer has a USB connector and is running Windows 98, use ... of the mouse cable into the connector on page 22. 16 3/99 A PS-2 mouse is hot-pluggable, meaning you 're ready to power up the projector and your computer to re-boot your computer. 2.

Reference Manual
Page 22
Note: A USB mouse is not hot-pluggable. 2. Reference Manual KODAK DP900 / DP1100 Do you do not need to re-boot your computer after connecting the mouse to use the PS/2 mouse cable. 1. Plug the end of the ... control your computer. 3. A PS-2 mouse is hot-pluggable, meaning you want to a desktop computer 18 3/99 If your computer. Unplug the mouse cable from the projector's remote or keypad?
Note: A USB mouse is not hot-pluggable. 2. Reference Manual KODAK DP900 / DP1100 Do you do not need to re-boot your computer after connecting the mouse to use the PS/2 mouse cable. 1. Plug the end of the ... control your computer. 3. A PS-2 mouse is hot-pluggable, meaning you want to a desktop computer 18 3/99 If your computer. Unplug the mouse cable from the projector's remote or keypad?

Reference Manual
Page 24
... on the video player (Figure 9). 3. Plug the other yellow connector into the composite connector on the back of the projector. • If you 're using S-video, plug the other end of the cable into the "video-out" port... four-prong S-video connector, you'll need an S-video cable in addition to the "s-video out" connector on the projector (Figure 9). If your video player uses a round, one-prong composite video connector, you'll need only the A/V ... connect it to the A/V cable. The S-video cable is sold separately. 2. Reference Manual KODAK DP900 / DP1100 Connecting a Video Player 1.
... on the video player (Figure 9). 3. Plug the other yellow connector into the composite connector on the back of the projector. • If you 're using S-video, plug the other end of the cable into the "video-out" port... four-prong S-video connector, you'll need an S-video cable in addition to the "s-video out" connector on the projector (Figure 9). If your video player uses a round, one-prong composite video connector, you'll need only the A/V ... connect it to the A/V cable. The S-video cable is sold separately. 2. Reference Manual KODAK DP900 / DP1100 Connecting a Video Player 1.
Reference Manual
Page 26
..., see "Default Source" on top of the power switch. • The Kodak startup screen appears and the Power LED on page 38. • Use the buttons to the image from the projector's on the keypad or remote, then select the Display or Image sub-menu.... is recommended. 3. Most computers should display on the projection screen. Refer to your electrical outlet. Reference Manual KODAK DP900 / DP1100 Starting the Projector Note: Always use the power cord that shipped with the projector. 1. A surge-protected power strip is active, press the button on the keypad (page 30) or the...
..., see "Default Source" on top of the power switch. • The Kodak startup screen appears and the Power LED on page 38. • Use the buttons to the image from the projector's on the keypad or remote, then select the Display or Image sub-menu.... is recommended. 3. Most computers should display on the projection screen. Refer to your electrical outlet. Reference Manual KODAK DP900 / DP1100 Starting the Projector Note: Always use the power cord that shipped with the projector. 1. A surge-protected power strip is active, press the button on the keypad (page 30) or the...
Reference Manual
Page 29
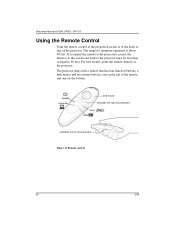
The projector ships with a remote that has four function buttons, a disk mouse and two mouse buttons, one on the bottom. standby computer disk mouse simulates the right ... best results, point the remote directly at the projection screen, the distance to the screen and back to the projector must be less than or equal to 40 feet. Reference Manual KODAK DP900 / DP1100 Using the Remote Control Point the remote control at the projection screen or at the front or rear of the...
The projector ships with a remote that has four function buttons, a disk mouse and two mouse buttons, one on the bottom. standby computer disk mouse simulates the right ... best results, point the remote directly at the projection screen, the distance to the screen and back to the projector must be less than or equal to 40 feet. Reference Manual KODAK DP900 / DP1100 Using the Remote Control Point the remote control at the projection screen or at the front or rear of the...
Reference Manual
Page 31
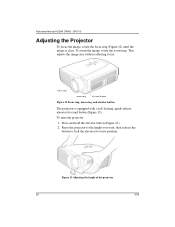
... the height you want, then release the button to lock the elevator foot into position. To raise the projector: 1. Figure 13 Adjusting the height of the projector 28 3/99 Reference Manual KODAK DP900 / DP1100 Adjusting the Projector To focus the image, rotate the focus ring (Figure 12) until the image is equipped with a self-locking, quick...
... the height you want, then release the button to lock the elevator foot into position. To raise the projector: 1. Figure 13 Adjusting the height of the projector 28 3/99 Reference Manual KODAK DP900 / DP1100 Adjusting the Projector To focus the image, rotate the focus ring (Figure 12) until the image is equipped with a self-locking, quick...
Reference Manual
Page 33
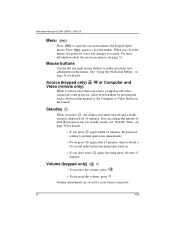
...KODAK DP900 / DP1100 Menu Press to make selections and adjustments in standby mode; Mouse buttons Use the left and right mouse buttons to open the on-screen menus (the keypad lights green). Source (keypad only) Video (remote only) or Computer and When you made. You can change the amount of time the projector...the volume, press • To decrease the volume, press Volume adjustments are saved for details. Press again to close the menus, the projector saves any changes you have more information about a 30 second delay before the lamp turns back on. • If you press , ...
...KODAK DP900 / DP1100 Menu Press to make selections and adjustments in standby mode; Mouse buttons Use the left and right mouse buttons to open the on-screen menus (the keypad lights green). Source (keypad only) Video (remote only) or Computer and When you made. You can change the amount of time the projector...the volume, press • To decrease the volume, press Volume adjustments are saved for details. Press again to close the menus, the projector saves any changes you have more information about a 30 second delay before the lamp turns back on. • If you press , ...

Reference Manual
Page 35
Changing the Tint setting has no effect on PAL or SECAM video sources. • Press the left mouse button to increase the amount of green in the image. • Press the right mouse button to increase the amount of the image. • Press the left mouse button to darken the image. • Press the right mouse button to lighten the image. Reference Manual KODAK DP900 / DP1100 Display Menu Figure 16 Display menu Brightness Adjusting the brightness changes the intensity of red in the image. 32 3/99 Tint The tint adjusts the red-green color balance in the projected image.
Changing the Tint setting has no effect on PAL or SECAM video sources. • Press the left mouse button to increase the amount of green in the image. • Press the right mouse button to increase the amount of the image. • Press the left mouse button to darken the image. • Press the right mouse button to lighten the image. Reference Manual KODAK DP900 / DP1100 Display Menu Figure 16 Display menu Brightness Adjusting the brightness changes the intensity of red in the image. 32 3/99 Tint The tint adjusts the red-green color balance in the projected image.
Reference Manual
Page 37
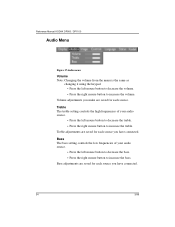
... adjustments you have connected. Bass adjustments are saved for each source you make are saved for each source you have connected. 34 3/99 Reference Manual KODAK DP900 / DP1100 Audio Menu Figure 17Audio menu Volume Note: Changing the volume from the menu is the same as changing it using the keypad. • Press the...
... adjustments you have connected. Bass adjustments are saved for each source you make are saved for each source you have connected. 34 3/99 Reference Manual KODAK DP900 / DP1100 Audio Menu Figure 17Audio menu Volume Note: Changing the volume from the menu is the same as changing it using the keypad. • Press the...
